- Create Azure Automation runbook: From the Azure portal, navigate to the already created Vaultmonitoring resource group by clicking on the Resource Groups icon in the left-hand menu:
- Click on the already provisioned Azure Automation account, MonitoringKeyVault, click on Runbooks in the left-hand menu, and click on +Add a Runbook from the top menu.
- Click on Create a new Runbook. Provide a name. Let's call this runbook CheckExpiredAssets, and set the Runbook type as PowerShell:

- Code the runbook: Declare a few variables to hold subscription ID, tenant ID, application ID, and certificate thumbprint information. These values are already stored in Azure Automation variables, and the certificate is stored within the RiteshSubscriptionCertificate certificate store. The values are retrieved from the store and assigned to the variables as follows:
$subscriptionID = get-AutomationVariable "azuresubscriptionid"
$tenantID = get-AutomationVariable "azuretenantid"
$applicationId = get-AutomationVariable "azureappid"
$cert = get-AutomationCertificate "RitestSubscriptionCertificate"
$certThumbprint = ($cert.Thumbprint).ToString()
Log in to Azure using the service principal with pre-filled variables and select an appropriate subscription:
Login-AzureRmAccount -ServicePrincipal -CertificateThumbprint $certThumbprint -ApplicationId $applicationId -Tenant $tenantID
Set-AzureRmContext -SubscriptionId $subscriptionID
Since Azure Event Grid was provisioned in the previous step, its endpoint and keys are retrieved using the Get-AzureRmEventGridTopic and Get-AzureRmEventGridTopicKey cmdlets.
Every Azure Event Grid generates two keys—primary and secondary—and so the first key reference is taken here.
$eventGridName = "ExpiredAssetsKeyVaultEvents"
$eventGridResourceGroup = "VaultMonitoring"
$topicEndpoint = (Get-AzureRmEventGridTopic -ResourceGroupName $eventGridResourceGroup -Name $eventGridName).Endpoint
$keys = (Get-AzureRmEventGridTopicKey -ResourceGroupName $eventGridResourceGroup -Name $eventGridName ).Key1
Next, all key vaults provisioned within the subscription are retrieved and looped over. While looping over the vault, all secrets are retrieved using the Get-AzureKeyVaultSecret cmdlet.
Even the secrets are looped, and within the loop, their expiry date is compared to today's date, and if it is less than a month away, then it generates an Event Grid event and publishes it using the invoke-webrequest command.
The same steps are executed for certificates stored within the key vault. The cmdlet used to retrieve all certificates is Get-AzureKeyVaultCertificate.
The event published to Event Grid should be in JSON format as an array, and so the message is converted to JSON using the ConvertTo-Json cmdlet and then converted into an array by adding [ and ] as a prefix and suffix.
To connect to Azure Event Grid and publish the event, the sender should supply the key in its header. The request will fail if this data is missing in the request payload:
$keyvaults = Get-AzureRmKeyVault
foreach($vault in $keyvaults) {
$secrets = Get-AzureKeyVaultSecret -VaultName $vault.VaultName
foreach($secret in $secrets) {
if( ![string]::IsNullOrEmpty($secret.Expires) ) {
if($secret.Expires.AddMonths(-1) -lt [datetime]::Now)
{
$secretDataMessage = @{
id = [System.guid]::NewGuid()
subject = "Secret Expiry happening soon !!"
eventType = "Secret Expiry"
eventTime = [System.DateTime]::UtcNow
data = @{
"ExpiryDate" = $secret.Expires
"SecretName" = $secret.Name.ToString()
"VaultName" = $secret.VaultName.ToString()
"SecretCreationDate" = $secret.Created.ToString()
"IsSecretEnabled" = $secret.Enabled.ToString()
"SecretId" = $secret.Id.ToString()
}
}
...
Invoke-WebRequest -Uri $topicEndpoint -Body $finalBody -Headers $header -Method Post -UseBasicParsing
}
}
Start-Sleep -Seconds 5
}
}
Publish the runbook by clicking on the Publish button, as shown in the following screenshot:

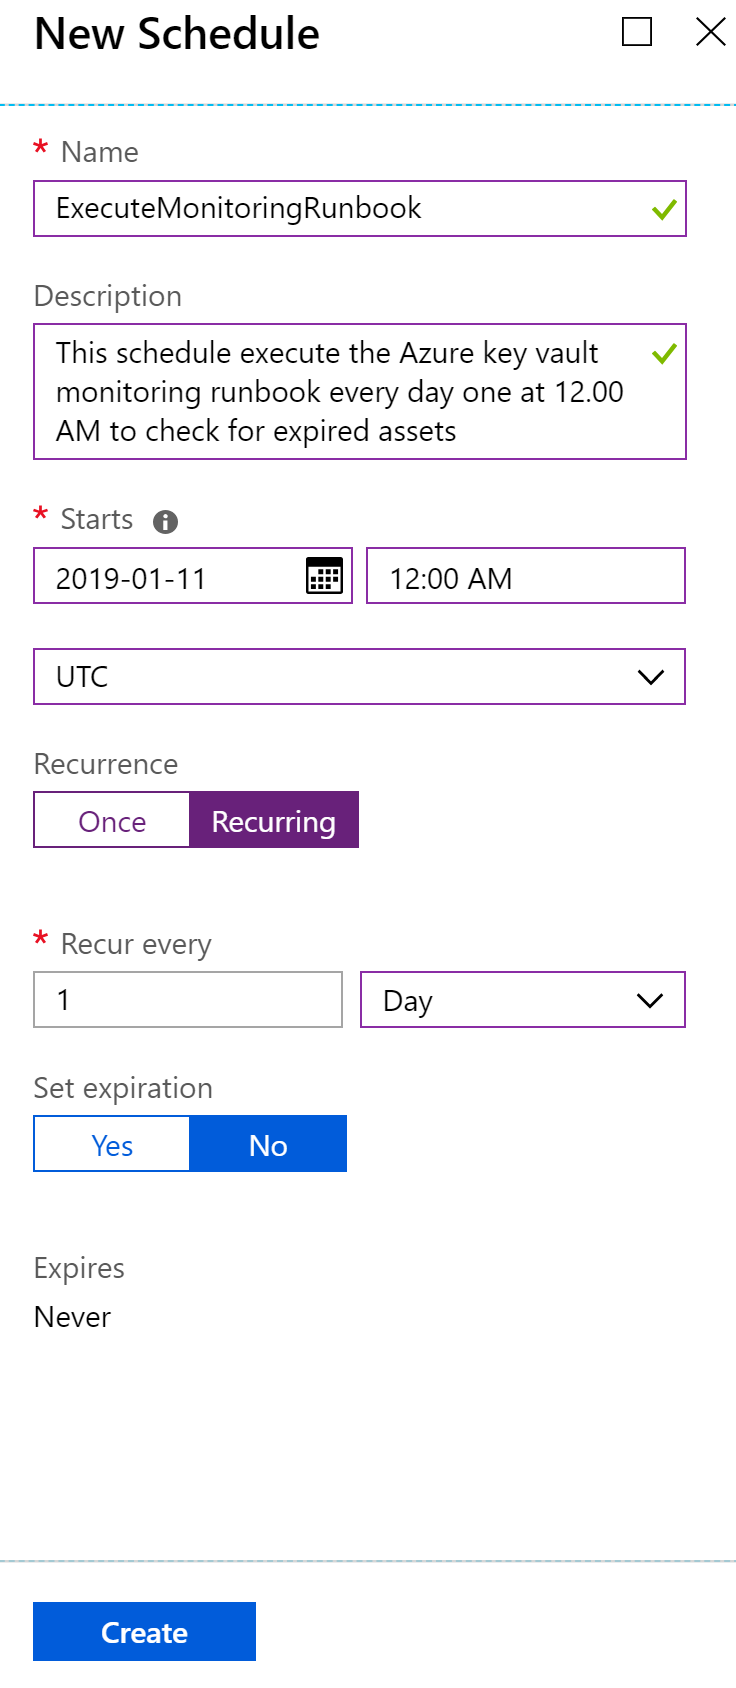
- Scheduler: Create an Azure Automation scheduler asset to execute this runbook once every day at 12.00 AM:
- Click on Schedules from the left-hand menu of Azure Automation and click on the +Add a schedule button in the top menu, as shown in the following screenshot:

-
- Provide scheduling information in the resulting form:

This should conclude the configuration of the Azure Automation account.