Chapter Five: Deflection Sacrifices
‘Look over here for a minute – Fooled you! I win over there!’
The deflection move is one of the most common and important power moves in the master repertoire. Deflection moves tell the other guy’s pieces, ‘get out of the way!’

What if the other guy doesn’t want to get out of the way?

Well, that’s the tricky thing about deflection moves; they force the opponent to budge, by making some other threat that can’t be ignored.
‘Simple Pokes’
This chapter is devoted to deflection sacrifices, a great surprise weapon requiring power move calculation. But you also need to look out for simple deflection moves that poke the defender away from a key piece or square. Often no sacrifice is needed to tell the key defender, ‘get out of my way!’
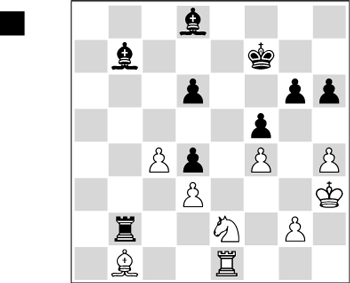
Hertan 2013

This simple check moves bang! deflection happens ‘every day of the week’:
1.Rb7+! and Black resigns because if 1…Kc8 2.Bxc6 is a ‘hook-up’ move rescuing the WR.
1…Ba5! is a simple deflection shot winning the Ne2.
Kasparov - Yermolinsky Yerevan 1996

Due to the sneaky-pinned Nf8 only Black’s queen guards the rook, but White can poke her away twice! 1.f3! Qf5 2.g4! Black has no safe checks and loses R or Q.
The ‘simple poke’ is a versatile weapon! Here Black cashed in on his powerful doubled seventh-rank rooks by poking away a defender:
Mons - Lupor Bad Wiessee 2008

1…Bd4! wins because on 2.Rd1 Bc5! (a decisive quiet move) the WK is in a mating net; B moves allow 3…Rxh2#.
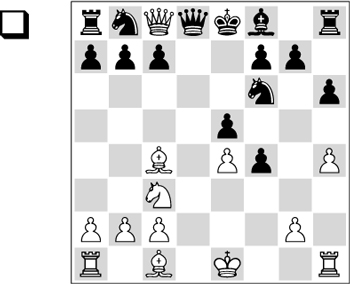
Deflection moves happen in the opening too! 1.f4! chases the BQ from defending a winning knight fork: 1…Qc5 2.Nxc7+ and White won easily.
Deflection Sacrifices
If you can’t just poke away a key defender, it’s time to look 1.5 power moves ahead for winning deflection sacrifices.
Back Rank Deflections
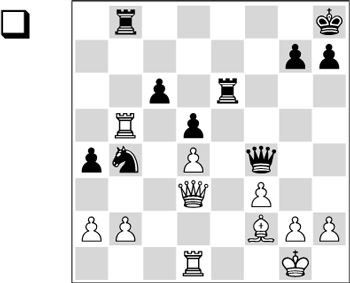
Reshevsky - Fischer Palma de Mallorca 1970

If the opponent has a weak back rank, look for ‘crazy moves’ diverting his defenders! Fischer does better than defending e8:
1…Qf2!! deflecting the WR; on 2.Rxf2 follows 2…Re1+ with mate next. Suddenly, White’s back rank is toast! If 2.Qxe8 Qxf1#, while on 2.Rg1 or 2.Qb5 Re1! is crushing, so Reshevsky resigned.
If 1.Rxb8+ Qxb8, but the deflection sac 1.Qf5! wins because 1…Qxf5 2.Rxb8+ is mate soon, while 1…Qc7 loses a R to 2.Rxb8+ Qxb8 3.Qxe6.
Miton - Charbonneau Montreal 2007

A deadly version of back rank mate involves Qf8 vs. a cornered K; she covers his airhole on g7. White deflects the black B: 1.Rd8+! Bxd8 2.Qf8#
Assisted Back Rank Mate Deflections
Alapin - Mieses Breslau 1889

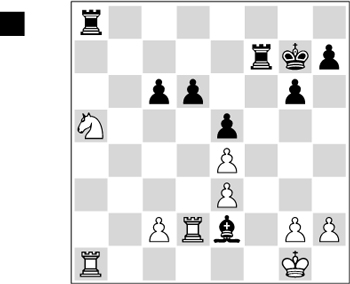
Black wins a free N with the deflection 1…Rxa5!; if 2.Rxa5 Rf1#.
In Chapter One we focused on B’s assisting a back rank mate, but any piece can cover a K’s airhole, even a pawn or king. Here young Magnus was the victim:
Carlsen - Nijboer Wijk aan Zee B 2005
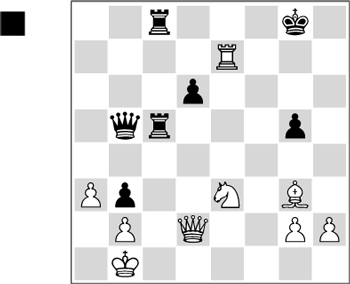
The Pawnb3 covers a2 and c2. Black wins by deflecting the Q: 1…Qd3+! 2.Qxd3 Rc1#
G. Kozlov - Chernobay Sochi tt-2 2009

A pawn on a3 or c3 for Black creates a key mating idea; worming the Q into b2 for checkmate. After the deflection sac 1…Qd4! White can’t cope with both threats of 2 …Qb2# and 2.Rxd4 Rf1+, mating.
Kasparov - Lutz Frankfurt simul 1986
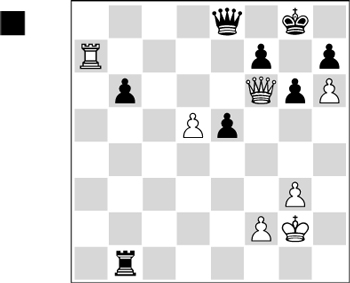
A mate threat on g7 looms, so the WR uses the back row for diversion. Lutz resigned due to 1…Qf8 2.Ra8! Qxa8 (otherwise the sneaky pin 3.Qg7# mates anyway) 3.Qg7#. An advanced pawn guarding the enemy K’s airhole is a potent weapon!
Here a N assists a back rank mate:
Schallopp - Burn Frankfurt 1887

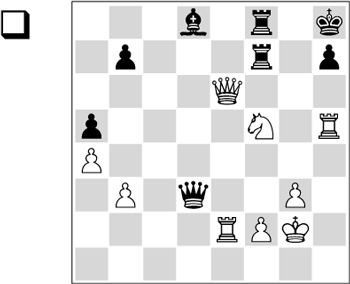
White rounds off the attack with the deflection shot 1.Qxf7!, winning a rook and more, since 1…Rxf7 2.Re8+ is mate next.
Even if back rank checks by a R or Q don’t mate, they may win decisive material. Below, a common back row deflection wins the queen.
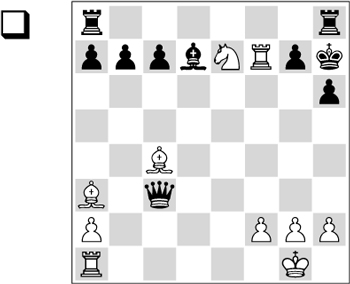
Mahescandra - Cochrane Calcutta 1854

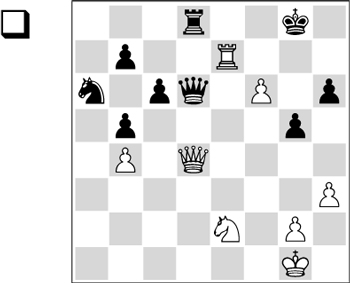
1.Re8+! wins by diverting the BR from defending the Q. On K moves 2.Rxd8! simply snatches a R. After 1…Rxe8 2.Qxd6 Rxe2 3.Qd3! Re1+ 4.Kf2! Black can resign; 5.Qg6+! and 5.Kxe1 are monster threats.
Back Rank Deflections: Exercises

Deflect the Q and break through.

Can White win the e4-pawn?
Back Rank Deflections: Solutions
Schulte - Tuncer Deizisau 2008
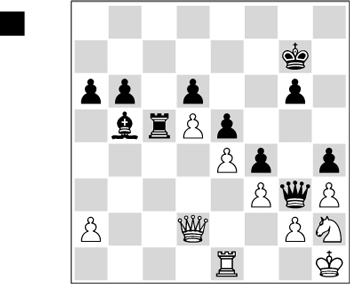
The deflection shot 1…Rc2! wins a knight after 2.Qxc2 (2.Qd1? Qxg2#) Qxe1+. White resigned.
Leko - Svidler Linares 2007
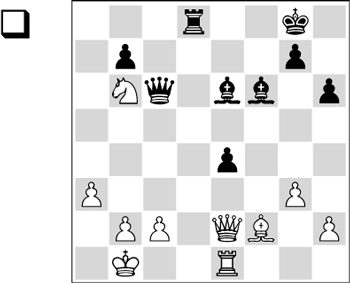
Did your board sight recognize the assisted back rank mate theme from Chapter 1?
The Be6 plugs the airhole, so 1.Qxe4?? is a losing blunder: 1…Qxe4 (1…Rd1+ would deflect the R and win the Q, but this is even better) 2.Rxe4 Rd1#
Leko played 31.a4 but lost anyway.
More Checkmating Deflection Sacs

While deflecting defenders of back rank mates is very common, the idea of forcing the opponent’s piece away from mating squares happens across the entire board. Here are some pretty deflection sacs on different squares.
Always look for these when only one enemy piece guards checkmate!
Three Great Mating Squares: h7, g7, and f7
These may be the most common squares for White to deliver checkmate. Why? Because Black usually castles kingside, and these squares are right in front of his K.
Deflection mates on h7
Fokin - Gleizerov Kursk 1987
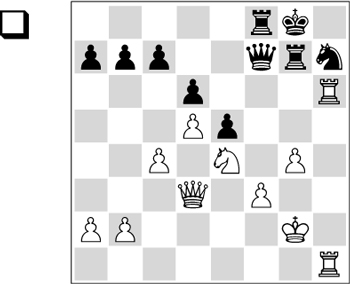
All White’s men point at h7. He exploits this with a super takes takes bang! combination: 1.Rxh7! and Black resigns due to 1…Rxh7 2.Nf6+! (a fork, discovery and deflection!) 2…Qxf6 (2…Kg7 3.Rxh7+ wins the Q) 3.Qxh7#
Stanley - Schulten New York 1844

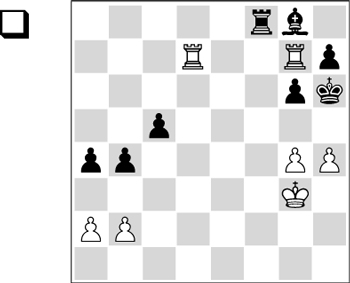
Two R’s on the seventh row are a mating machine! White sees mate on h7 by diverting the BK:
1.Rxh7+! (or 1.g5+ first) 1…Bxh7 2.g5+Kh5 3.Rxh7#
Schallopp - Anderssen Berlin 1866


You may have seen mates on h7 or f7 with a Ng5 and Qh5. Black’s h7 Pawn is alone on the edge, and his defenders often get cut off White sees mate if the Pawnf6 can be diverted: time to sac!
1.Rxe5! fxe5 2.Ng5 mates next on h7, but wait! The Q+N stock mate 2.Qf6# is quicker.

Q+N stock mate
Cochrane - Mahescandra Calcutta 1854

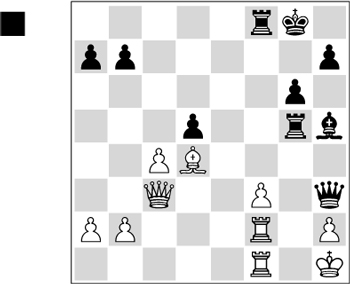
Our old dinosaur friends meet again. It looks even, but not really! All Black’s pieces attack the WK; White’s R’s are bunched up and passive. The Indian player finds a smashing blow to divert White from the defending g2:
1…Bxf3+! 2.Rxf3 Qg2#
Harrwitz - Szen London 1851


Black must keep the WQ out of two mating squares, g7 and f6. White’s R bursts in with a brilliant diversion:
1.Re8! Mate ensues on 1…Rxe8 2.Qg7# or 1…Qxe8 2.Qf6+ Rg7 3.Qxg7#.
Here’s a rare and pretty double deflection.
White’s R and two B’s are all forked by the BQ, but he forces mate with 1…Bb2!!. The Q is deflected, see 1…Qxb2 2.Bd3# or 1…Qxc4 2.Rxg7#. If 1…Be8 the other B says ‘Hey, look over here’ – 2.Bd3+! Qxd3 3.Rxg7#.
Deflection sacs on f7
The f7-square is a vulnerable target, defended only by the K in the starting position. Black has many defensive resources, but if he forgets to develop and castle early he may run into problems like this:
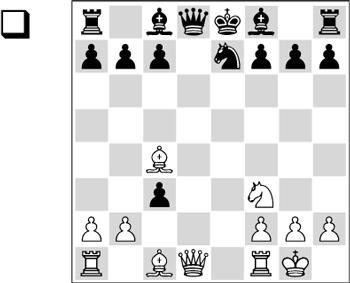
The deflection shot 1.Bxf7+! wins the Q by diverting her royal defender.
1.Bxf7+! wins the Q. or more after 1…Ke7 2.Qe6#.
Assisted Smothered Mate Deflections on f2/f7
Cochrane - Staunton London 1841

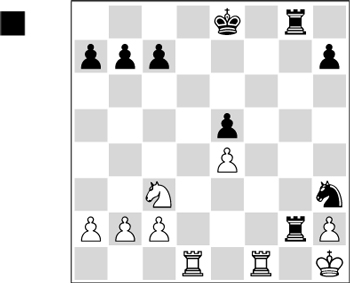
Last chapter we learned to entice defenders into Philidor’s Mate. Deflection is another key path to smothered mate by a knight. Another piece usually ‘assists’ deflection smothered mates on f7/f2 by cutting off the K’s escape.
1…Rg1+! Black wants more than 1…Nf2+. winning the exchange! 2.Rxg1Nf2#

Deflection/smothered mates are often shocking and beautiful.
French GM Christian Bauer subdued all-time great Victor Kortchnoi with 1.Rg1 + Kh8 2.Qd6!!. Black is defenseless against 3.Qxf6+, mating; or 2…Qxd6 3.Nf7# – assisted smothered mate!

Another beautiful Nf7 mate – helped by the Rg1
Mating Deflections on Other Squares
Neumann - Schulten Berlin 1865


Only the Qd8 stops a classic two B mate with Bxf6. White gives his Q to strip the defender! 1.Qe8+! Qxe8 Or 1…Nf8 2.Qf7 with mate threats on g8 and f6. 2.Bxf6#
Ipatov - Edouard Wijk aan Zee B 2013

Only the Q pin prevents 1…g5+ 2.Kh5 Rxh3#, so…
1…Re5! 2.Qd7! Maintaining the pin. 2…Ree3! A new mate threat on h3! 3.g5 Rf4+! 0-1 The pin is finally broken by another deflection sac: 4.Kh5 Rxh3+! 5.Qxh3 g6#
White deflects the g-pawn to land a critical stock mating pattern: N on f6, plus a major piece on g8 or h7:
1.Qxh6+ gxh6 2.Rg8# 1-0
Checkmating Deflection Sacs: Exercises
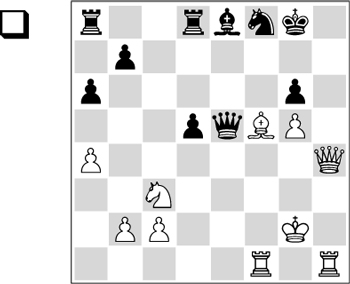
Say ‘Look, over there!’ to the BQ & N.
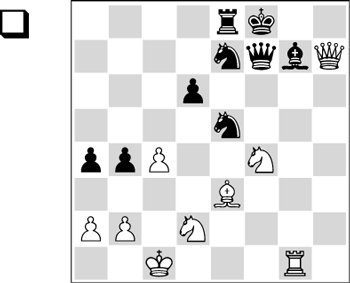
Deflect and mate on a key square.
Checkmating Deflection Sacs: Solutions
Pedersen - Simonen Odense 1963

1.Be6+! diverts the Q or N while clearing the f-file for the Rf1. On 1…Qxe6 (or 1…Kg7) 2.Qh8#, or 1…Nxe6 2.Qh7#.
Heinemann - Trisic Hamburg 1999

1.Ne6+! (even better than 1.Rxg7 Qxg7 2.Ne6+) diverts Black from the mating square: 1…Qxe6 2.Qxg7#
Checkmating Deflection Sacs: Exercises

Deflect and give mate on f7.

Chase White’s key defender.
Checkmating Deflection Sacs: Solutions
Kiefer - Luige (variation) Bühl 1983
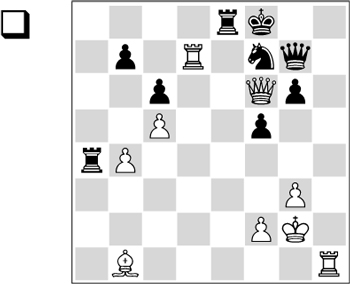
1.Rh8+! diverts the BQ and mates; the BN is caught in a sneaky pin. Or 1.Rxf7 +! Qxf7 2.Rh8# achieves the same result on a different square.
D’Andre - Loyd Paris 1867

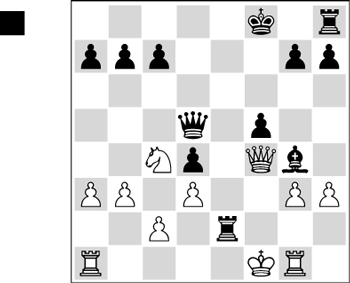
White’s h2-h3 push tried to chase the B from defending the Re2. Black counters with his own winning deflection:
1…g5! The WQ is glued to preventing …Qf3+ (2.Qxg5? Qf3#). 2.hxg4 gxf4 3.Kxe2 fxg4, winning easily with extra material plus attack.
Sacrifices chasing a key defender from guarding another piece are even more common than mating defections. Deflections are a great, sneaky way to win the enemy Q:
Berndt - Federau Germany Bundesliga B 1983/84
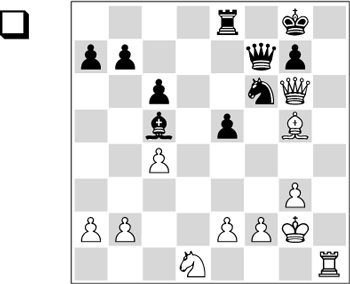
If only the enemy K defends his Q, try telling him ‘Hey, look over here!’
1.Rh8+! Kxh8 2.Qxf7 made Black resign.
Corti - Sosa Raddi Cordoba 1967
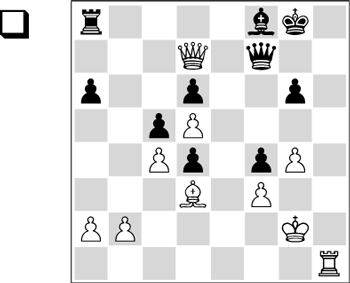
Take a good look at this idea, the most important power move deflection for winning the Q. Thousands of children and adults have lost their best piece this way!
1.Rh8+ Kg7 The BK doesn’t want to be parted from his lady, but now a diversion+skewer forces him to say ‘goodbye’: 2.Rh7+! wins the Q.
The R is the best, but not only piece, to deflect the K from protecting his Q.
1.Be7+! was an accurate deflection sac (1.Be5+? Kf7!), because if 1…Kf7? 2.Qf8#.
Zukertort - Steinitz (variation) USA 1886


The point of a beautiful piece sac in this World Championship match was a deflection move parting White’s K&Q: 1…Qxf2+ First the WQ is enticed onto a bad square. 2.Qg3 g5+! 3.Bxg5 hxg5+ and the Q goes.
Not every deflection wins the Q, but winning a lesser piece is great too!
Jugelt - Ehrke Bad Wiessee 2008
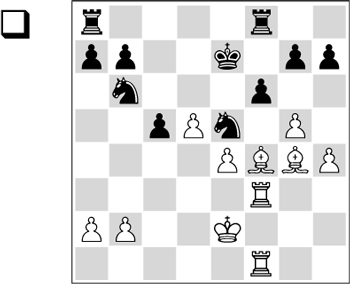
Black looks solid but a simple pawn push breaks his defense:
1.Bxe5 fxe5 2.d6+!, deflecting the king, wins a whole rook.
NN - Sarratt England 1810

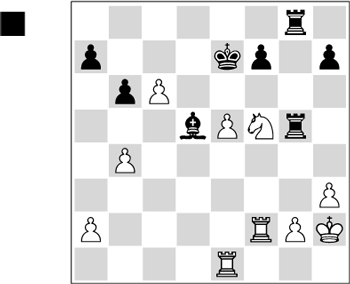
In the discovery chapter you learned how a trapped K in the corner is exposed to B discoveries on the long diagonal. Black deflects the WR from the key g2-square:
1…Rxf5! 2.Rxf5 Rxg2+ 3.Kh1 Re2+, winning a N.
Zuhao Luke Li - B. Kerr Ballarat 2013

In this recent game, a simple Pawn push caused Black’s position to collapse!
The pawn break 1.h4! deflects the g-pawn for a winning fork: 1…gxh4 2.g5! Qd6 3.f6+!. The threat 2.hxg5! wins because if 1…Kh6? 2.hxg5+ Qxg5 3.Rh3+! wins the BQ by deflection.
After 1.R1d6+ Ke5 Black counts on the zwischenzug (or ‘in-between move’) 2.Rxf6 Re1+! to rescue the R.
But the deflection shot 2.f4+! decides instead.
Kamsky - Carlsen Khanty-Mansiysk 2005
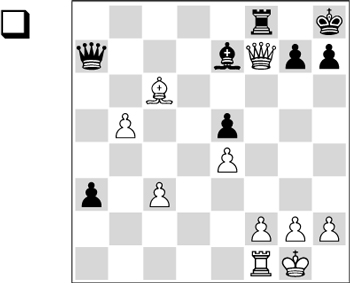
A close race with both sides trying to promote a Pawn! White looks for active play first, even with his Q attacked:
1.b6! 1-0. White queens on 1…Rxf7 2.bxa7; otherwise the BQ is deflected from e7 – 1…Qxb6 2.Qxe7 Qxc6?? 3.Qxf8#
Yi Liu - Stojic Ballarat 2013
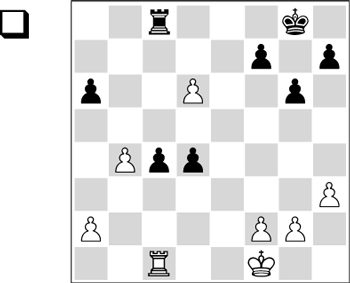
I think you know by now: watch for master tactics when a Pawn is close to queening!
1.Rxc4! wins both black Pawn’s and the game. On 1…Rxc4 2.d7! the R can’t get back to stop 3.d8Q (if 2…Rc1+ 3.Ke2 d3+ 4.Kd2!). If 1…Rd8 2.Rxd4 with two extra pawns. Black tried 1…Rb8 2.d7! 1-0 because 2…Rd8 3.Rc8! pins and wins the BR.
Deflections are crucial in R endings, to pry the defending R from guarding the queening square.
Elsness - Salem Istanbul 2012
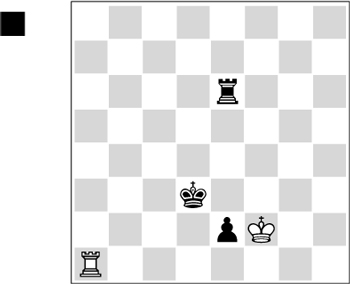
Black has a great passed pawn, but the WK and R defend e1. If 1…Kd2 2.Ra2 + Kd1 3.Ra1+ the R checks from a safe distance, forcing the BK away. The win requires ingenious play with a key deflection:
1…Rf6+! (chases the WK due to 2.Ke1 Rf1#) 2.Kg2 Ra6!!
The BR is doubly deflected! Either he allows promotion 3.Rxa6 e1=Q, when Q vs. R is a difficult, but forced win (as happened in the game); or he must leave the crucial a-file which gave the WR checking distance to harass the BK. After 2.Rb1 Kc2! 3.Re1 Kd2! 4.Kf2 Rf7+ the passed Pawn finally triumphs.
Material Winning Deflections: Exercises
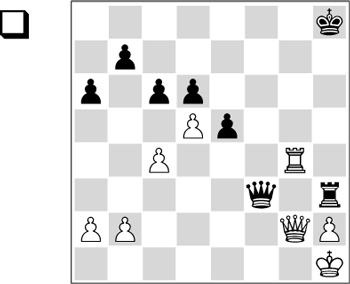
Win the BQ with a deflection.
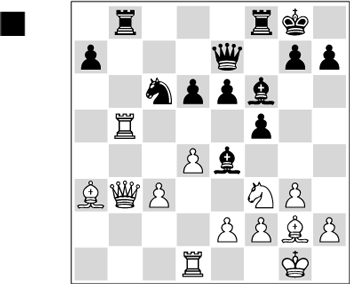
Find a winning fork+deflection.
Material Winning Deflections: Solutions
Eichborn - Anderssen Breslau 1853


1.Rh4+! deflects the BR from defending his lady. 1.Rg8+? Kh7 is much weaker because the WQ is pinned and can’t join the attack.
Rizvonov - Kasparov Vilnius 1975

1…Bc2! deflects the Q; if 2.Qxc2 Rxb5. Some twenty moves later White gave up against the strongest human player ever (Magnus Carlsen still needs to match Kasparov’s 20+ years as # 1!).
White should instead defend with 2.Rxb8! Bxb3 3.Rxb3 when the values show him just a point behind.
Material Winning Deflections: Exercises
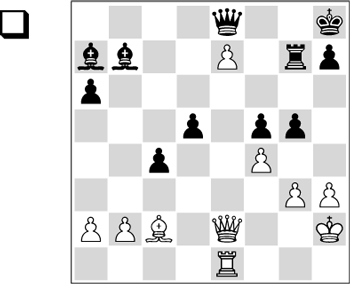
Tell the defender ‘Look, over here!’ to promote a pawn.

Entice the Q into a winning deflection.
Material Winning Deflections: Solutions
Blackburne - W. Paulsen Dresden 1892

1.Ba4! is a killer deflection. 1…Qxa4 2.e8Q+, 1…Bc6 2.Bxc6, or 1…Qxe7 2.Qxe7 Rxe7 3.Rxe7 skewering the bishops, isn’t Black’s idea of fun.
Jackova - Decka Moravia tt 1998/99
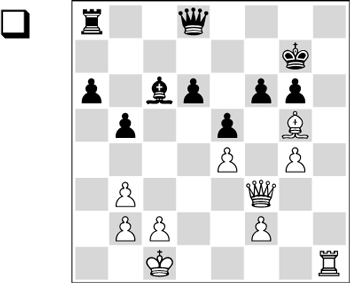
Black’s f6-square seems well-defended, but a takes takes bang! trick rips him apart:
1.Bxf6+! Qxf6 The royal fork entices the BQ into position for a deflection blow: 2.Rh7+! 1-0
