Chapter 7
Splitting Up Source Code Files
IN THIS CHAPTER
 Creating multiple source code files
Creating header files
Sharing variables among source files
Making use of the mysterious header wrappers
Just as you can divide your work into functions, so you can divide your work into multiple source code files. The main reason to do so is to help keep your project manageable. Also, with multiple source code files, you can have several people working on a single project, each working on a different source code file at the same time.
The key to multiple source files is knowing where to break the source code into pieces. As with anything else, if you break the source code in the wrong place, it will, well, break.
In this chapter, you discover how to divide your source code into multiple files (and in all the right places). The examples use Code::Blocks, but most modern IDEs work in about the same manner. You create multiple files and import them into a project (a description of what you want to do), which then manages the files for you and ensures that the right files are compiled at the right time.
 You don’t have to type the source code for this chapter manually. In fact, using the downloadable source is a lot easier. You can find the source for this chapter in the
 \CPP_AIO4\BookI\Chapter07 folder of the downloadable source. See the Introduction for details on how to find these source files.
Creating Multiple Source Files
In the sections that follow, you see how to create multiple source code files using one of two techniques: You can rely on the IDE to perform all the required setups for you, or you can manually add the file and perform the required setups by editing a build file.
When you create a second source code file, this code becomes part of your project. And when you compile, the compiler compiles all the source code files in your project, assuming that you have changed them since the last time you compiled. You can put your functions in separate source code files, and they can call each other. In this way, they all work together in the single application. The section “Sharing with Header Files,” later in this chapter shows how you can have a function call another function in a different source file.
You can’t break up a single function and put it into two source files. The compiler requires that your functions stay in one piece in a single source file.
Adding a new source code file
If you’re using Code::Blocks, cutting your application into multiple source code files is as easy as cutting a cake. The AddFiles example assumes that you have started with an existing project using the process found in Book 1, Chapter 2. The following steps show how to add another file to this existing project.
-
Choose File ⇒ New ⇒ File.
You see the New from Template dialog box, shown in Figure 7-1. Notice that you can choose from a header, a source code, or an empty file (among other non-C++ possibilities). Normally, you choose either the C/C++ Header or C/C++ Source option. The Empty File option is for non-source files, such as a text file used as a ReadMe.
-
Highlight the template you want to use and click Go.
You see a wizard associated with the particular file you’ve chosen. The example uses a new C++ Header File named
my_stuff.h. -
Click Next to get past the initial Welcome page.
If you chose the Empty File template, skip to Step 7. When using the C/C++ Header or C/C++ Source templates, you see a language selection page.
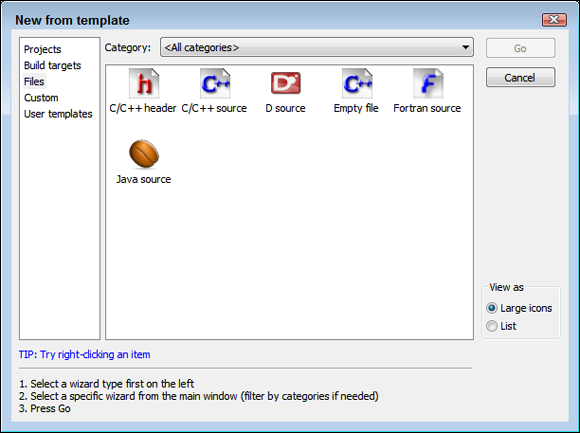
FIGURE 7-1: The New from Template dialog box lets you select a new file type.
-
Highlight the language you want to use — either C or C++ — and click Next.
The wizard asks what you want to call the file, where you want to store it, and which builds should use the file, as shown in Figure 7-2. (More on these choices in Steps 5–8.)
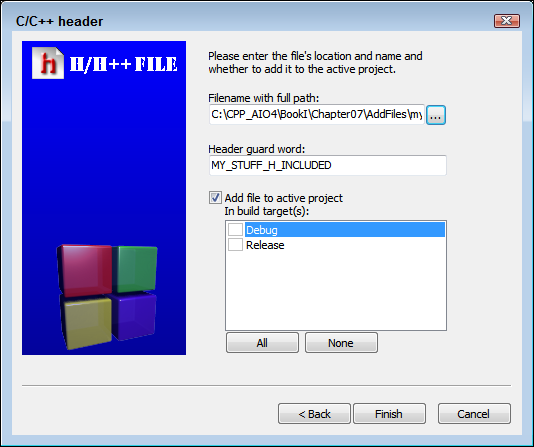
FIGURE 7-2: Provide the file information required by the wizard.
-
Type a path and filename for the file in the Filename with Full Path field.
You must provide the full path, even if you want the file in the current folder. Click the ellipsis to display the Select Filename dialog box, where you can choose the location of the file. The default path shown in the Select Filename dialog box is the current folder.
-
(Optional) Provide a header guard word when creating a header file.
You don’t need to worry about how to use headers now, but you use them to perform tasks such as making declarations like
#includestatements. Adding a header more than once into an application can cause all sorts of problems, and the application might not compile, even though it would normally do so without the multiple header copies. The header guard word keeps the number of copies of the header in your application to one. -
Check the individual builds that should use the file.
As an alternative, you can click All to add the file to all builds.
A debug version of your application will contain special information that you can use to find program errors. A release version of your application is smaller and executes faster. Each version has a purpose, so developers usually need to create both at some point. -
Click Finish.
The wizard adds the new file to your project. Code::Blocks automatically opens the file so that you can begin editing it. You also see the file you added in the Management window, as shown in Figure 7-3. In this case, you see both the source files and a header file. Notice that the source files appear in dark type and the header file appears in gray type. This shows that the source files are compiled to create the project and the header file isn’t. The “Sharing with Header Files” section, later in this chapter, discusses in more detail how the compiler works with header files.
 If Code::Blocks doesn’t automatically open the file you added, you can open it by double-clicking its name in the Management Window tree (see Figure 7-3). When you do, an additional tab appears at the top of your source code files. These tabs represent the different files that are open. You can click a tab to have that file’s code appear in the source code window. When you click another tab, the window shows the source for that file instead. And, thankfully, Code::Blocks remembers any changes you make if you switch to another tab. So you can bounce all around the screen and switch all you want, and the computer shouldn’t get confused.
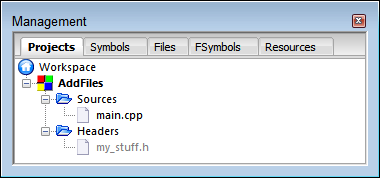
FIGURE 7-3: The Management window displays the files used to compile the project.
After you have multiple files in your project, you can put some of your source in one file and some in another. But before you do, you may want to read some of the other sections in this chapter because they explain how to properly divide your source code without having it end up like cake that got smooshed while you were trying to cut it.
Removing an existing source code file
If you add a file to Code::Blocks that you really don’t need, right-click the file in the Management window and choose Remove File from Project from the context menu. The file will disappear from the project but still appear in the directory in which you created it.
If you later decide that you really do want that file, right-click the project entry in the Management window, choose Add Files from the context menu, and select the file you want to add back into the project using the options in the Add Files to Project dialog box.
Creating a project with multiple existing files
Sometimes you have a number of existing files, but no project to hold them. For example, you might be moving from another IDE to Code::Blocks. That would mean that you’d have the source files from the other IDE, but no project file that Code::Blocks would recognize. Don’t worry: You can put existing files into a Code::Blocks project. The following steps tell you how to perform this process (you can see the result by opening the CopiedFiles project):
-
Choose Create a New Project on the Code::Blocks Start page.
You see the New from Template dialog box used to create all the examples so far in this book.
-
Choose the Empty Project template and click Go.
You see an Empty Project welcome dialog. You can skip this dialog box the next time by selecting Skip this Page Next Time. The Empty Project template lets you create a project shell without any files in it.
-
Click Next.
You see the Empty Project configuration dialog box, shown in Figure 7-4. This is where you supply the name of the project, not the files used in the project.
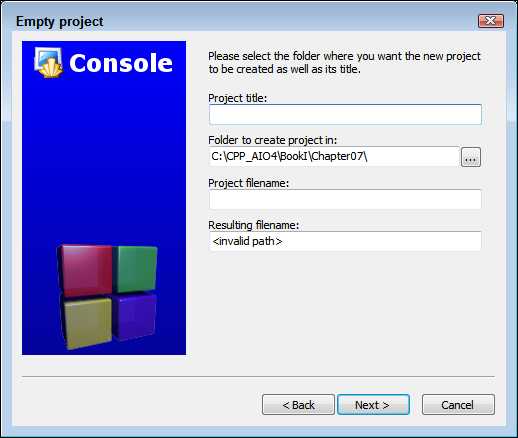
FIGURE 7-4: Supply a project name for your new application.
-
Type a name for the project in the Project Title field.
The example uses
CopiedFiles. Notice that the wizard automatically fills in the Project Filename field for you. -
Click Next.
The wizard asks you to supply the usual information for the compiler, debug configuration, and release configuration. The default settings will work fine in most cases.
-
Click Finish.
Code::Blocks creates an empty project for you where you can add files as needed.
-
Right-click the CopiedFiles project entry in the Management window and choose Add Files from the context menu.
You see the Add Files to Project window, shown in Figure 7-5. Only the project (
.cbp) file appears because this is an empty project.Of course, you need to add files to your project to make it useful. For the purposes of this example, you can use the files found in the
AddFilesexample created in the previous section of the chapter. For real-world use, you need to know the locations of the files you want to use to create your new project.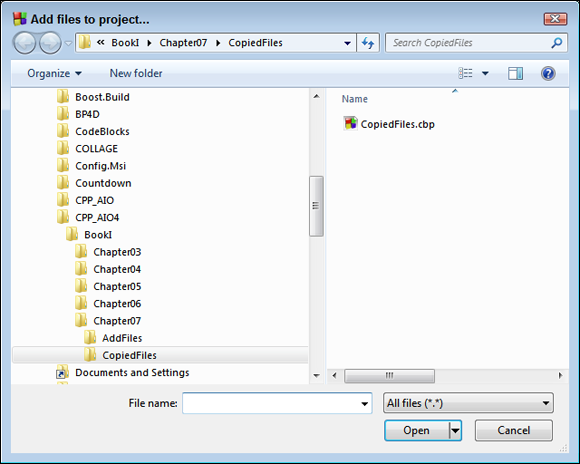
FIGURE 7-5: The current directory doesn’t contain any code files.
-
Navigate to the
AddFilesfolder, shown in Figure 7-5.Notice that you see a
main.cppandmy_stuff.hfile in the folder. (You may also see other files that you can safely ignore for now.) -
Locate and highlight the files you want to copy to the new project, which are
main.cppandmy_stuff.hin this case. Use the Ctrl+click method to select multiple files from the list. Code::Blocks makes it easy to select multiple files in a single pass so that you don’t have to open the Add Files to Project dialog box multiple times. -
Click Open.
Code::Blocks displays a dialog box asking which builds to add the files to, as shown in Figure 7-6. The exact appearance of the dialog box will vary by the number of files you select.
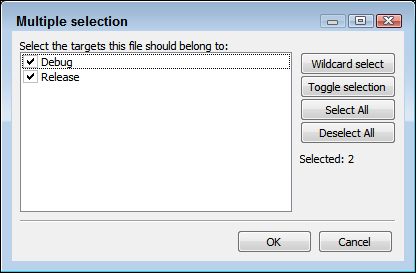
FIGURE 7-6: Select the builds where the files are used.
-
Select the builds you want to use and click OK.
Code::Blocks adds the required file references to the project, as shown in Figure 7-7.
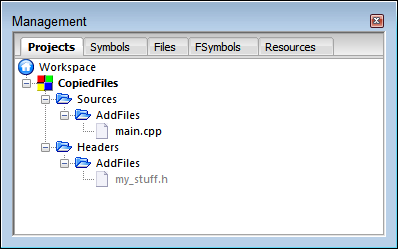
FIGURE 7-7: The new project now contains references to the selected files.
 Notice that the references in Figure 7-7 still show the original location of the files. In this case, these files come from the
 AddFiles project. If you change the file in the original project, it also changes in the new project.
You also notice that the File ⇒ Save command is disabled. That’s because you can’t save changes to file references in the project that references them; you must make changes in the original project. However, now that you have a reference to the file, you can make changes to it, and then use the File ⇒ Save As command to create local copies of the files with your changes in them. Don’t use the File ⇒ Save command; create a local copy using File ⇒ Save As instead.
Unfortunately, just creating the local copies doesn’t change your project. To remove the references from the original project, right-click the project entry in the Management window (which is CopiedFiles for the example) and choose Remove Files from the context menu. You see the Multiple Selection dialog box, shown in Figure 7-8, where you can choose which references to remove and which to keep.
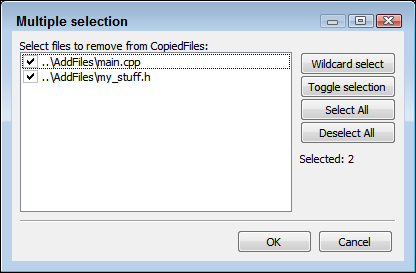
FIGURE 7-8: Remove the references you no longer need.
After you remove the references you no longer need, you can use Steps 7 through 11 in the preceding list to add the local copies of the files to the current project. The Management window will change to show that you’re using local copies of the files, rather than copies found in another project.
Getting multiple files to interact
Before two source files can work together, they must somehow find out about each other. Just because they’re both sitting on the computer doesn’t mean that they know about each other. Computers are kind of goofy about that sort of thing. To get two source files to finally open up and get to know each other, you need to tell each of them about what’s in the other file.
When you write a function, normally the function must appear before any calls to it appear within the same source file. That’s because of the way the compiler parses the code: If the compiler encounters a call to a function but has not yet heard of that function, it issues an error. But the way around this is to use a function prototype. A function prototype is simply the header line from a function, ending with a semicolon, as in the following:
void BigDog(int KibblesCount);
Later in the source file is the actual function, with this header line duplicated. But instead of a semicolon, the function would have an open brace, the function code, and a closing brace, as in the following:
void BigDog(int KibblesCount)
{
  cout << "I'm a lucky dog" << endl;
  cout << "I have " << KibblesCount << " pieces of food"
    << endl;
}
So, after the function prototype, you can call the function whether the function code itself is before or after the call.
For the compiler to understand a function call, all it needs at the point that the code makes the call is a function prototype. It’s up to the linker (the special application that takes the object file created by the compiler and creates an executable from it by linking everything together) to determine whether that function really exists.
Because the function call needs only a function prototype, you can put the function itself in another source code file. You could, therefore, have two separate source code files, as in the MultipleSourceFiles example, shown in Listings 7-1 and 7-2. (The first source code file — main.cpp — is shown in Listing 7-1, and the second source code file — mystuff.cpp — is shown in Listing 7-2.)
LISTING 7-1: Calling a Function with Only a Prototype
void BigDog(int KibblesCount);

int main() {
  BigDog(3);
  return 0;
}
LISTING 7-2: Using a Function from a Separate File
#include <iostream>

using namespace std;

void BigDog(int KibblesCount) {
  cout << "I'm a lucky dog" << endl;
  cout << "I have " << KibblesCount << " pieces of food"
    << endl;
}
Listings 7-1 and 7-2 break the function away from the prototype. When you compile these two files together as a single application (either by pressing F9 in Code::Blocks or by choosing Build ⇒ Build and Run), they all fit together nicely. You can then run the application, and you see this somewhat interesting output:
I'm a lucky dog
I have 3 pieces of food
Notice that main.cpp doesn’t contain either #include <iostream> or using namespace std; because it doesn’t have any calls to cout, just the call to BigDog(). You do have to put the #include <iostream> and using namespace std; lines at the start of the mystuff.cpp file because mystuff.cpp does use cout
Sharing with Header Files
Breaking apart source code into multiple files is easy, but soon you may run into a problem. If you have a function — say, SafeCracker() — and this function is extremely useful and is likely to be called many times from within several other source code files, you would need a prototype for SafeCracker() in every file that calls it. The prototype may look like this:
string SafeCracker(int SafeID);
But there is an easier way of adding the prototype instead of adding it to every file that uses the function. Simply put this line inside its own file, called a header file, and give the filename an .h or .hpp extension. (It’s your choice which extension you use, because it really doesn’t matter; most developers use .h.) For this example, you place the line string SafeCracker (int SafeID); in a file called safestuff.h.
Then, instead of typing the header line at the start of each file that needs the function, you type
#include "safestuff.h"
You would then have the three source code files used for the MultipleSourceFiles2 example, shown in Listings 7-3, 7-4, and 7-5:
main.cpp: Calls the functionsafestuff.h: Contains the function prototypesafestuff.cpp: Contains the actual code for the function whose prototype appears in the header file
Lots of files, but now the code is broken into manageable pieces. Also, make sure that you save all three of these files in the same directory.
LISTING 7-3: Including the Header File in the main File
#include <iostream>
#include "safestuff.h"

using namespace std;

int main()
{
  cout << "Surprise, surprise!" << endl;
  cout << "The combination for Safe 12 is: " << endl;
  cout << SafeCracker(12) << endl;
  cout << "Let's check on Safe 11 too: " << endl;
  cout << SafeCracker(11) << endl;
  return 0;
}
LISTING 7-4: Containing the Function Prototype in the Header File
#ifndef SAFESTUFF_H_INCLUDED
#define SAFESTUFF_H_INCLUDED

using namespace std;

string SafeCracker(int SafeID);

#endif // SAFESTUFF_H_INCLUDED
LISTING 7-5: Containing the Actual Function Code
#include <iostream>
using namespace std;

string SafeCracker(int SafeID)
{
  if (SafeID == 12)
    return "13-26-16";
  else
    return "Safe Combination Unknown";
}
Before you compile this application, you need to know a few things about how the compilation process works:
- When you compile a
.cppfile, the compiler outputs a.o(for object) file that is then linked by the linker with all the other.ofiles to create an.exe(executable) file. In addition to the.ofiles from your project, the linker also links in any library files or external code that your application accesses. - The compiler doesn’t compile the header file into a separate
.ofile. With the application in Listings 7-3 through 7-5, the compiler creates only two output files:main.oandsafestuff.o(you can see them in theCPP_AIO4\BookI\Chapter07\MultipleSourceFiles2\obj\Debugfolder). - When the compiler reads the
main.cppfile and reaches the#include "safestuff.h"line for the header file, it verifies that it hasn’t read thesafestuff.hfile before and included it within the.ofile. - If the
safestuff.hfile hasn’t been read before, the compiler temporarily switches over and reads the header file, pretending that it’s still reading the samemain.cppfile. As it continues, it compiles everything as if it’s all part of themain.cppfile.
If you include the safestuff.h header file in other source code files, the compiler adds the content to those source files as well. Compile and run the code in Listings 7-3 through 7-5. When you run the application, you see the following output:
Surprise, surprise!
The combination for Safe 12 is:
13-26-16
Let's check on Safe 11 too:
Safe Combination Unknown
If you have a source file containing some functions, creating a header file that contains the associated function prototypes is generally a good practice. Then you can name the header file the same as the source file, except with a different extension. In this example, you use the safestuff.h file to hold the prototype for the safestuff.cpp file.
Adding the header only once
Code::Blocks includes several lines in the header file by default. These lines create a symbol that tells the compiler whether a header file is already included in the source file so that the compiler doesn’t add it twice. Adding a header twice is an error because then you’d define the forward reference for a function twice. Here is what you see when you initially create a header file with Code::Blocks:
#ifndef SAFESTUFF_H_INCLUDED
#define SAFESTUFF_H_INCLUDED
#endif // SAFESTUFF_H_INCLUDED
When you type the header code into Code::Blocks, type it between the #define SAFESTUFF_H_INCLUDED and #endif // SAFESTUFF_H_INCLUDED lines. The section “Using the Mysterious Header Wrappers,” later in this chapter, describes these automatic entries in detail.
Using angle brackets or quotes
You may have noticed something about the code in Listing 7-3. When including the safestuff.h file, you don’t put it inside angle brackets, as with the #include <iostream> line. Instead, you put it inside quotes:
#include "safestuff.h"
That’s because programmers for years have been fighting over the rules of where exactly on the hard drive to put the header files. The question is whether to put them in the same directory or folder as your project or to place them in a directory all by themselves.
Regardless of where you put your header files, here is the rule for when to use quotes and when to use brackets: The compiler looks in several directories to find header files. And it can, possibly, look in the same directory as the source file. If you use angle brackets (that is, less-than and greater-than signs), as in #include <string>, the compiler doesn’t look in the same directory as the source file. But if you use double quotes, as in #include "safestuff.h", the compiler first looks in the same directory as the source file. And if the compiler doesn’t find the header file there, it looks in the remaining directories, as it would with angle brackets.
Some people always use double quotes. That way, whether the header file is in the same file as the source file or not, the compiler should find it. Most professional programmers today always use angle brackets. This forces programmers to put their header files in a common area. With really big projects, programmers like to have a directory dedicated to source files and another directory dedicated to header files. No header file is ever in the same directory as the source file.
For small projects, some people like to lump all the source and header files into a single directory. These people typically use angle brackets around system header files (such as #include <string>) and use double quotes around their own header files. The projects in this book generally follow this rule. The example header files are in the same directory as the source files and use double quotes for #include lines. System headers use angle brackets for the #include lines.
If you follow the same approach used here, you immediately know whether the #include line refers to one of your own header files or another header file. If it refers to your own, it has double quotes.
If you start working on a large C++ project, you will probably find that project managers use the rule of always using angle brackets. For large projects, this is typically the best policy.
If you try to compile and you get a No such file or directory error on the #include line, it’s probably because you put the header file in a source file directory but used angle brackets instead of double quotes. Try switching that line to double quotes.
Sharing Variables among Source Files
When you declare a variable inside a function, it remains local to the function. But you may want functions to share a single global variable: One function may store something, and another may read its contents and write it to the console. To do this, declare the global variable outside a function. Declaring the global variable inside a source file works until you try to share it among multiple source files. If you’re not careful, the source files end up with a separate copy of the global variable. Within a single source file, the global variable can be shared among functions but not among source files. That could be confusing.
There’s a trick to making this work. Declare the variable inside one and only one of the source files. Then you declare it again inside one (and only one) header file, but you precede it with the word extern, as in extern int DoubleCheeseburgers;.
The GlobalVariable example, shown in Listings 7-6, 7-7, and 7-8, demonstrates the use of a single global variable that is shared among multiple source files.
LISTING 7-6: Making Use of a Global Variable
#include <iostream>
#include "sharealike.h"

using namespace std;

int main()
{
  DoubleCheeseburgers = 20;
  EatAtJoes();
  return 0;
}
LISTING 7-7: Using the sharealike.h Header File to Declare a Global Variable
#ifndef SHAREALIKE_H_INCLUDED
#define SHAREALIKE_H_INCLUDED

extern int DoubleCheeseburgers;
void EatAtJoes();

#endif // SHAREALIKE_H_INCLUDED
LISTING 7-8: Declaring Global Variable Storage in the sharealike.cpp File
#include <iostream>
#include "sharealike.h"

using namespace std;

int DoubleCheeseburgers = 0;

void EatAtJoes() {
  cout << "How many cheeseburgers today?" << endl;
  cout << DoubleCheeseburgers << endl;
}
Be careful when you do this; getting it exactly right is very tricky. You declare the variable once inside the header file, but you must remember the word extern. That tells the various files, “This variable is declared elsewhere, but here’s its name and type so that you can use it.” (It’s okay that the file that defines the variable also includes the header file, which contains the extern declaration. In this case, extern says that the variable is declared somewhere, not that it’s declared externally outside this file.) Then you declare the variable in one of the source files, without the word extern; this creates the actual storage bin for the variable. Finally, you include the header file in each of your source files that uses the global variable.
It’s a bad idea to declare any variable without initializing it. If you don’t initialize the variable, you have no idea of what it contains. Not initializing the variable could lead to difficult-to-find errors. Global variables are even worse in this regard because now you don’t even have a good idea of precisely where to search. Fortunately, Code::Blocks does help you in this regard. You can right-click any occurrence of a global variable and choose Find Occurrences Of: <Variable Name> from the context menu.
Using the Mysterious Header Wrappers
When you include a header file, you usually want to include it only once per source file. But that can create a problem: Suppose that you have a huge software project, and several header files include another of your header files, called superheader.h. If you include all these other header files, how can you be sure to pick up the superheader.h file only once?
The answer looks strange but does the trick. You start each header file with these lines:
#ifndef SHAREALIKE_H_INCLUDED
#define SHAREALIKE_H_INCLUDED
#endif
Depending on which C++ IDE you use, your editor may add these lines automatically, just as Code::Blocks does. In this case, you type the header file content between the #define SHAREALIKE_H_INCLUDED and #endif lines. However, if your IDE doesn’t add the lines automatically, be sure to add them so that your code looks like the code in Listing 7-7. Otherwise, the compiler may spout errors that you may not recognize immediately.
These header wrappers, as they are often called, ensure that the code in the header gets processed only once per source code file each time you compile. The wrappers use special lines called preprocessor directives. Basically, the second line defines something that is sort of like a variable but is used only during compilation; this something is called a symbol. In this case, the symbol is called SHAREALIKE_H_INCLUDED.
The first line checks to see whether this symbol has been defined. If not, the compiler proceeds with the lines of code that follow. The next line defines the symbol, so now it’s actually defined for later. Then the compiler does all the rest of the lines in the file. Finally, the last line, #endif, simply finishes the very first line.
Now consider what could happen if you include this same file twice, as in
#include "sharealike.h"
#include "sharealike.h"
(That can happen indirectly if you include two different files that each include sharealike.h.) The second time the compiler goes through sharealike.h, it sees the first line, which checks to see whether the SHAREALIKE_H symbol is defined. But this time it is! So instead of going through all the lines again, the compiler skips to the #endif line that normally appears at the end of the file. Thus, your header file is processed only once per source code file. Use the following rule to make using headers easier:
When you create a header file, be sure to put the header wrappers around it. You can use any symbol name you like, as long as it uses only letters, numbers, and underscores and doesn’t start with a number and isn’t already a variable name in your source or a C++ word. But most people base their choice on some variation of the filename itself, such as MYFILE_H or MYFILE_H_ or even _MYFILE_H_. Code::Blocks, by convention, adds _INCLUDED to each symbol name, but it’s not necessary that you follow suit unless you want to.