
This dramatic modern cake is a real showstopper. The flowers soften the strong lines but the bold colours make for an impactful design that features the techniques of carving, creating texture and blending buttercream colours, as well as piping flowers. To create this sculpted masterpiece, you need a dense cake, such as Madeira, as a regular sponge will not carve well.
350g (12oz) unsalted butter
250g (12oz) caster (superfine) sugar
250g (12oz) self-raising (-rising) flour
125g (6oz) plain (all-purpose) flour
5 large eggs
1⁄8 tsp salt
2–3 tbsp milk
Greaseproof (wax) paper
20cm (8in) round cake tin
Mixer (hand-held or stand)
Mixing bowls
Measuring spoons
Skewer (optional)
1. Pre-heat the oven to 160°C/325°F/Gas Mark 3. Grease and line the base of your cake tin with greaseproof (wax) paper, and grease the paper.
2. Sift the flours together with the salt in a mixing bowl. Set aside.
3. In another large mixing bowl, use a mixer to cream the butter and sugar together until light, fluffy and pale. Beat in the eggs, one at a time. Beat the mixture well between each one and adding a tablespoon of the flour with the last egg to prevent the mixture curdling.
4. Combine the wet and dry ingredients by sifting in the flours and salt into a second mixing bowl.
5. Gently fold in, using enough milk to give a mixture that falls slowly from the spoon.
6. Transfer the mixture to the lined cake tin and bake for 60–90 minutes. Check your cake is ready by seeing if it is well risen, firm to the touch and if a skewer inserted into the centre will come out clean.
7. Turn the cake out onto a wire rack and leave to cool completely.
You will need to stack, fill and freeze your cake about 1–2 hours before carving it.
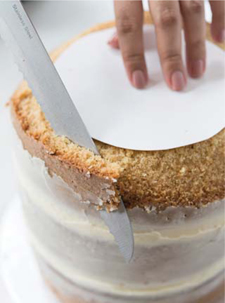
1. Stack and fill your cake beforehand and freeze it for about 1–2 hours. Trim a cake card to make a 13cm (5in) circle and place it as a guide centrally on top of your cake. Hold your knife at an angle and start cutting the corners of the cake at about 1cm (1⁄2in) all the way around.

2. Place a cake board on top of the cake and slide your hand under the bottom of the cake and quickly but carefully flip the cake over.
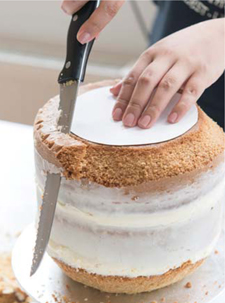
3. Trim another cake card to make a 10cm (4in) circle, place on top of the cake and repeat the same process. Carve the cake carefully to make it round, and make sure that the middle of the cake has a 20cm (8in) diameter. Crumb coat and chill for about thirty minutes to an hour.
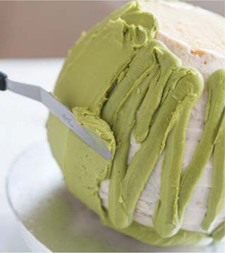
4. Apply a layer of light green buttercream, and use a palette knife to spread it evenly all over the cake (see Covering Cakes). Add texture by stroking upwards with your palette knife – all your final strokes should be made with an upward motion.

5. Insert a dowel to measure the height of the cake. Pull it out and cut it and a further two dowels to the same size. Insert these three dowels and leave a space for a central dowel in the middle of the cake.
As a general guide, the diameter of the top of the ball cake needs to be no more than 5cm (2in) smaller than the diameter of the middle tier, and the base diameter, 2.5cm (1in) smaller than the middle tier for good support. If you are worried that the ball cake bottom tier will be squashed, dowel it as shown or substitute it with a denser material such as rice crispie cake or a polysterene cake dummy.
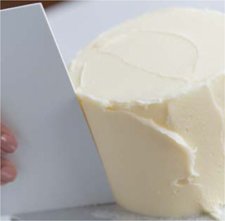
1. Remember to make a hole in the 15cm (6in) cake board for your central dowel. Place the middle tier cake on the board, cover with black buttercream and give it a smooth finish (see Covering Cakes). Cover your top tier cake with another layer of plain buttercream and even it out using your cake scraper.
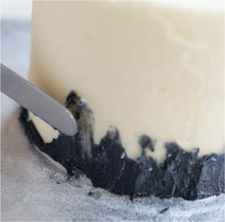
2. Use a piping bag to apply a thin layer of black buttercream in a narrow strip around the bottom of the top tier cake.
3. Using your palette knife, spread the black buttercream slightly using an upward motion. Do not overdo it as it could make your cake look very messy.
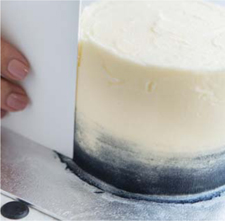
4. Run your scraper around the top tier cake continuously in one direction to smooth it.
5. Stack the middle and top tiers together, then place them on top of the base cake and insert the central dowel all the way through the bottom to keep the cakes in place.
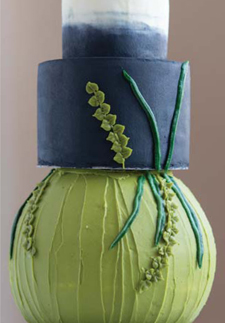
1. Decide where you want to position your foliage and pipe it directly on to the cake (see Leaves).
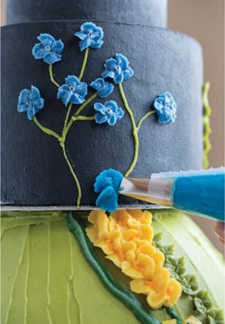
2. Next, pipe the long and tall types of flowers. We have chosen snapdragon and brunnera, the instructions for which can be found in the Flowers section.
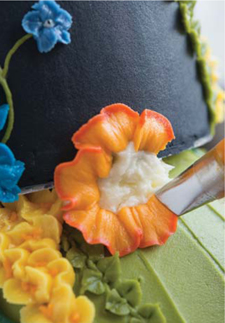
3. Next pipe the begonia, sunflower and clematis. You must pipe a blob of buttercream as a base for each of these blooms, in order to position them at the correct angle on the cake.