Turn an old incandescent light bulb into a little green grow house By Cyrus Ahmadi-Moghadam
The incandescent light bulb is the ultimate symbol of wasted energy. Since I don’t use them anymore, I wanted to transform them into something green rather than throwing them away. This project was inspired by an ad I saw in Popular Science (June 2008).
Warning: This Instructable requires working with glass and broken pieces of glass. Proper hand and eye protection should be worn.
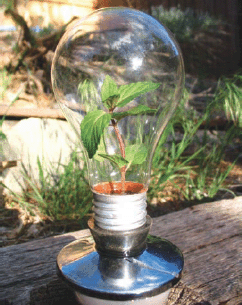
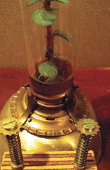
Figure A: Our finished light bulb greenhouse, planted with mint
1. Materials
You will need:
 An old light bulb. Best if burned out, but if it’s going to just sit and collect dust, a new one is fine, too.
A 7/16” wrench socket head. Holds the bulb on.
A shower flange (that thing that goes between the shower head and tiles)
A piece of rubber ring material big enough for the bulb to fit into. (I got my rubber part from my bike.)
A small plastic cup (for holding dirt and the plant roots)
Epoxy. Best glue ever.
Soil
Tools:
Pliers
File
Drill, drill bit
2. Prepare the light bulb
Start by using pliers to pull the bottom contact off of the light bulb. Next, use the file to break out the glass material between the two contacts. Break out the glass on the inside and use your file to smooth the edges. Clean the white powder from the inside of the bulb. You can do this with a rag and water. Careful.
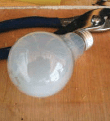
Figure B: Ready to prepare the bulb
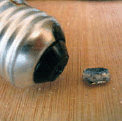
Figure C: Removing the contact
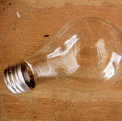
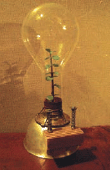
Figure D: The light bulb, filed, cleaned, and ready for planting

Figure E: The base with shower flange, socket head, and rubber ring, all epoxied together
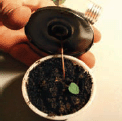
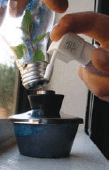
Figure F: The roots and stem of the plant threaded through the socket head
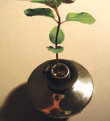
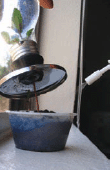
Figure G: Placing the flange over the grow cup once the plant has been rooted
3. Prepare the base
Using a drill press, widen the hole in the bottom of the socket. Use pliers to widen the hole in the bottom of the light bulb until the socket fits snugly. Epoxy the socket to the rubber piece. Let it dry for at least 20 minutes. Epoxy that to the shower flange. Let this dry for another 20 minutes.
4. Add a plant or plant seeds
This step is self-explanatory. Either add a plant or seeds.
5. Use it
Now all you have to do is fill the cup with soil and seeds (or small plants), put the base on it, then put the light bulb over it. Place it in a well lit window sill and water it occasionally.
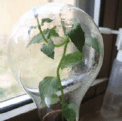
Here’s my mint plant after one month of being completely abandoned (I was 1,200 miles away)
Cyrus Ahmadi-Moghadam says “I’m a long-term maker, been helping in the garage as young as I possibly could. Got into Ibles about a year ago. Lived in Shoreview, MN, for 15.5 years, now in Santa Fe, NM. Current project is an electric car (1980 Fiat 124 Spider).”