 Atmel ATmega8L microcontroller, Digi-Key (www.digikey.com) part number ATMEGA8L-8AU-ND
Attach this fun persistence of vision toy to your shoe and write messages or patterns while you walk, run, or dance! By Dan Goldwater
The Dance Messenger is a fun persistence of vision toy. Attach it to your shoe and write messages or patterns while you walk, run, or dance!
1. The circuit board
I used a fairly generic circuit board I had lying around for this project. The circuit is really simple though; it’s just an Atmel AVR microcontroller, 10 LEDs, a programming header, and a few resistors and capacitors. You might want a button so you can turn it off. The board I used is mostly surfacemount components, but all the parts are available in through-hole form so you could easily build this on a proto-board. Figure C shows the assembled board.
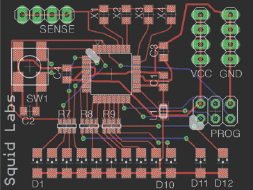
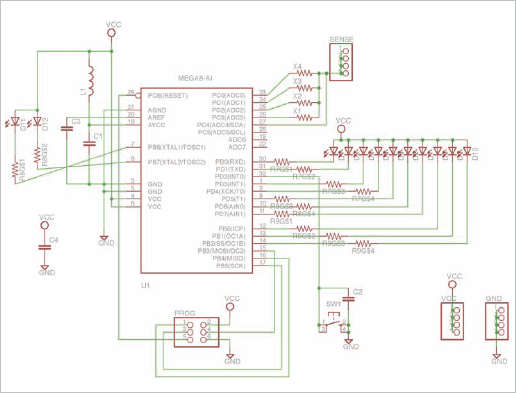
On the web page for this Instructable (www.instructables.com/id/Dance-Messenger), I’ve attached the EAGLE CAD (www.cadsoft.de) files for the circuit board, the C source code for the microcontroller, and the Gerber files of the circuit board in case you want to manufacture it. Figure D shows the board layout, and Figure E shows the schematic.
Note: EAGLE CAD is free for small-size boards like this one.
Parts used:
 Atmel ATmega8L microcontroller, Digi-Key (www.digikey.com) part number ATMEGA8L-8AU-ND
 6-pin .1" male header, Digi-Key WM26806-ND
 1206-size surface mount LEDs in color of your choice, Digi-Key 160-1406-1-ND, 160-1404-1-ND, 160-1402-1-ND
 150Ω resistor array/networks, Digi-Key EXB-V8V150JV (4)
 10μF 0805 size capacitor, Digi-Key 587-1299-1-ND
 Tactile switch, Digi-Key CKN1835CT-ND
 3.7 volt lithium-ion battery from Batteries America www.batteriesamerica.com/newpage8.htm
Note: A 3v coin cell is a convenient choice for the battery. Since it is flat, you can just tape or glue the circuit board to it, and then tape or glue the whole thing to your shoe.

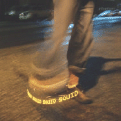
Figure A: Write a message in the air just by moving your foot!

Figure B: The Dance Messenger
Want an easy way to get all the parts? Buy a kit.
Adafruit Industries has an open source build-it-yourself kit of a similar persistence-of-vision toy, the MiniPOV. Their version uses only throughhole components, so it is easier to build, and you can program it directly from your computer’s serial port (Adafruit Industries sells a USB-to-Serial converter as well if you don’t have an RS232 serial port). They also have very detailed instructions for novice electronics hackers, instructions on how to use the GNU C compiler as well, and links to easy-to-use applications for programming your own messages.
The MiniPOV is available directly from Adafruit Industries (www.adafruit.com) and also MAKE magazine’s Maker Shed (www.makershed.com).
Figure C: 1. Not used 2. Power and ground connection to battery 3. Push-button switch and capacitor 4. 10μF capacitor 5. Atmel ATMega8 microcontroller 6. Don’t need L1, C1, or C3 for this project 7. Programming header 8. Optional connection 9. Rechargeable 3.7V lithium polymer battery 10. Resistor networks—four resistors per package 11. Ten yellow surface-mount LEDs 12. Red and green status LEDs (optional)

Figure D: EAGLE board layout

Figure E: EAGLE board schematic
Figure F: Connect it securely because you will want to shake that leg when you’re done!

Figure G: Dancing message

Figure H: A close-up
2. Programming the microcontroller
To program the microcontroller you will need a programmer such as the Atmel AVR ISP mkII programming kit (Digi-Key part ATAVRISP2-ND) or the USBtinyISP programmer kit (you assemble it) from Adafruit Industries (www.adafruit.com). The programmer connects your USB port to the programming header on the circuit board.
You will need the GNU AVR tool chain to compile and transfer the code to the microcontroller. You could also use Atmel’s free AVR Studio (www.atmel.com/avrstudio). The supplied code was written for the Imagecraft C compiler (www.imagecraft.com), but compiling it with the GNU tool chain is simple (the source code does not include a Makefile, but you should be able to use a Makefile from another AVR project such as the MiniPOV from Adafruit Industries).
Here is where you can obtain the GNU AVR tool chain for Windows, Linux, or Mac OS X:
 Windows: sourceforge.net/projects/winavr
 Linux: Install the AVR-GCC, Avr-Binutils, and avr-libc packages (these packages or something similar are available for many Linux distributions)
 Mac OS X: Install MacPorts (www.macports.org), then use MacPorts to install the packages listed above for Linux
For more information on the GNU AVR tool chain, see www.avrfreaks.net/wiki/index.php/Documentation:AVR_GCC.
The C code supplied does not include on/off button functionality, but this should not be hard to add.
Note: You should add a battery-voltage tester to sense when the battery is dead (this is important if you are using lithium-ion batteries, since they are permanently damaged by discharging too much). To make a battery-voltage tester, you may be able to use a 3.0V zener diode and 220k resistor across the battery, and then use the analog-to-digital converter on the ATmega8 to compare when the battery voltage falls below the zener reference voltage.
3. Attach to shoe
Just tape or glue the board & battery to your shoe (see Figure F).
4. Do some dancing!
In Figures G and H, my friend Corwin shows us some moves!
How well does this device work? It is a bit hard to notice it at walking speed (that’s because if you look straight at it the effect is reduced). If you avert your vision slightly, and look away at a fixed object, the effect is much clearer. At running speed or dancing it works nicely.
Dan Goldwater loves beams of light and the devices that make them. Dan is a co-founder of Instructables.com and SQUID Labs and now makes practical digital light art for bicycles at Monkeylectric.