
Atomic Zombie’s ChopWork Orange Chopper Bicycle
Re-make found bicycles into stylin’ road hogs By Brad Graham & Kathy McGowan
Kids’ bikes with 20" wheels are abundant at the dump and yard sales, especially the cheap steel frame units. These bikes not only take a beating, but they are outgrown in a year or two, so you will probably find a lot of them at your favorite scrap yard or city dump. These frames are easy to chop, and 20" bikes make great choppers, but unless you are only 4-1/2 feet tall, there won’t be much leg room on one of these bikes.
The problem of size is compounded even more if the head tube angle is taken back to add more rake, as this pushes the handlebars even closer to the seat. At this point, your only option is to move the seat higher or farther back, creating either a goofy looking chop, or a flying death trap that pulls uncontrollable wheelies on so much as a sneeze.
To get a little more leg room on a chopper made from a kid’s 20" frame, two frames will be joined together in order to move the bottom bracket further up. The head tube will also be pushed forward, allowing for a nice long set of forks to be installed without creating a super tall wheelie machine.
More about bike building, robotics, and electronics can be found at Atomic Zombie Extreme Machines! (www.atomiczombie.com) Check out the Support Forums, Builder’s Gallery, Blog, Downloads, Games, Videos, and more!
1. Find a donor bike
The sacrificial lamb is a typical steel girl’s frame 5-speed bike, fresh from the garbage heap at the local dump (Figure B). For this project, you will need two 20" frames, and the components to make one complete bicycle. Depending on how you join the frames, the condition of the front half of one frame and the rear half of the other may not be important, as you will soon see.

Figure A: The finished chopper
2. Find a second donor frame
The second frame is another small 20" steel kid’s bicycle, most likely another 5 speed or possibly a BMX wannabe. When joining two frames together to create a Frankenstein chopper, it really doesn’t matter too much how similar the frames are, just make sure the rear triangle to be used fits whatever rear wheel you end up using. Since I planned to use 20" wheels all around, the two donor frames are just perfect (Figure C).
3. Inventory all necessary parts
It’s always good to take everything apart in order to assess what will be usable and what will be tossed. Cracked bearing rings, rusty bearings, and bent pedals should all be replaced (Figure D).
4. Cut the frame tubes
There are many ways to join two frames together in order to create one longer frame, and depending on the condition and size of each frame, you will have to decide what goes where. I cut the top tube and head tube from the first frame, and the down tube, head tube, and bottom bracket from the other. I used the rear part of the first frame and the bottom bracket, down tube, and head tube section from the second frame (Figure E).
Figure B: The sacrificial lamb is a typical steel girl’s frame 5-speed bike
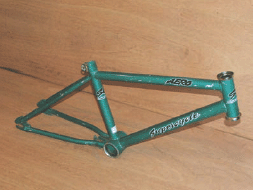
Figure C: The second frame is another small 20" steel kid’s bicycle
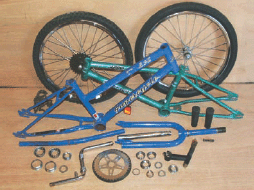
Figure D: Here are two donor frames and enough guts to assemble one complete bicycle

Figure E: Cut the top tube and head tube from the first frame, and the down tube, head tube, and bottom bracket from the other
5. Grind and clean the bottom bracket
As soon as any part is cut, it’s a good idea to grind away any leftover metal, as the part is easily handled on the workbench at this point. Once you start welding, it may be difficult (if not impossible) to get the grinder disk into the area to be ground (Figure F).
6. Tack weld the two frames
I admit there was no real plan here, just the idea of making a longer, taller frame for a chopper with extended forks. I decided to lay both bottom brackets on the ground and see where the head tube on the front frame would end up. The resulting layout was perfect! The bottom bracket was farther ahead, the head tube was nice and high, the rake was increased, and the distance between the head tube and seat was longer. I promptly tack welded the two frames together right where they sat, making sure vertical alignment was correct (Figure G).
Safety Warning: Welding fumes and coatings on some metals contain hazardous particles. Identify the metal and coatings prior to welding. Some coatings contain lead and other chemicals that can cause serious health problems. Always weld in a well-ventilated area, away from combustibles. Always wear safety equipment while welding.
7. Fill gaps and make seat stays
With the basic frame tack welded together, the next step was to fill in the gaps using whatever scrap was cut from the other frames. Since the frame we tack welded would not be anywhere near strong enough to hold up to a rider’s weight, some tubing was needed to create a solid shape. Cut a seat stay in half to separate the two small tubes. Let’s see where I can find room to weld these on the frame (Figure H).
Figure F: Bottom bracket, cleaned and ready for welding
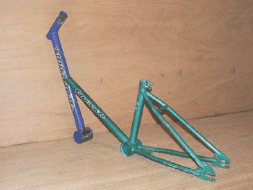
Figure G: Tack weld the two frames

Figure H: Cut a seat stay in half to separate the two small tubes
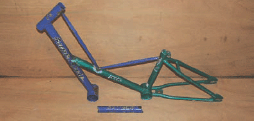
Figure I: Cut a small piece of tubing from the leftover frame to fit between the two bottom brackets
8. Make triangles for strength
Two lengths of tubing were just long enough to form two triangles from the head tube to the top of the seat tube. Since the triangle is the strongest shape you can form with tubing, this is a good thing. The two bottom brackets still needed to be joined, so another small section of tubing was cut from the leftover frame to fit between them (Figure I).
9. Frame is taking shape
The tube running between both bottom brackets almost completed the frame. In fact, I would imagine the frame would be strong enough right at this point, but something looked missing—just not enough going on in there yet. Besides, I had a lot of leftover scrap from the two frames. At this point, the welds were completed and ground clean (Figure J).
10. Add more tubes
I wanted a tube that would form another triangle in the frame, and since the tubing was becoming gradually smaller in diameter from the bottom to the top, I found an even smaller bit of steel rod (from an old fridge rack) to install. Now the frame was made of many triangles, and looked completed (Figure K). What else could I weld onto this thing?
11. Front fork construction
Before adding any more, I decided to work on the front forks. The front forks will be a typical set of round tube BMX forks, cut and extended to some length using 1" thin-walled electrical conduit. The first thing to do was cut the dropouts from the fork legs, sparing as much of the metal as you can since they will be put back on the new forks (Figure L).
12. Cut the fork legs
The fork legs were then cut so that only the vertical portion is removed. Imagine drawing a line from the inside of each leg and continuing it up past the head tube. This is the line that will be cut. This is done so that new fork legs can be installed later (Figure M).
Figure J: Welds are completed and ground clean
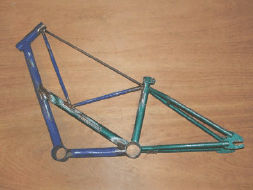
Figure K: Add another piece of rod to make another triangle to add strength
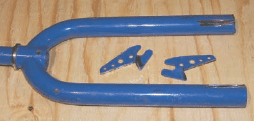
Figure L: Cut the dropouts from the fork legs
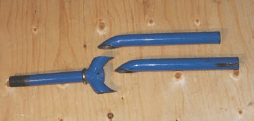
Figure M: Cut the fork legs so only the vertical portion is removed
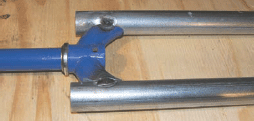
Figure N: Extend the forks by welding two lengths of 1" conduit where the original legs were cut

Figure O: This leftover chainring fit nicely in the frame
13. Extend the forks
The forks are extended by welding two lengths of 1" conduit where the original legs were cut. You will have to grind a little away from the original fork material in order to make a proper joint with the conduit for welding. When I welded the fork extensions to the original fork stem, the front dropouts were already welded to the other ends of the fork legs, and a wheel was installed to hold it all in place. The two extension legs are also laid on a flat board to help alignment (Figure N).
14. Use leftovers for pizzazz
This leftover chainring fit nicely in the frame. It was at this stage that the bike was given the name ChopWork Orange, because of all the gears, and yes, it would indeed be painted orange (Figure O).
15. Assemble the chopper
The chopper was assembled in order to make sure everything was going together correctly. A banana seat and some wide handlebars were installed to give the bike an old school cruiser look. A fork length was chosen that put the two bottom brackets in approximately the same position they were on the original bike, ensuring that the pedals had adequate ground clearance (Figure P).
Figure P: Assemble the chopper
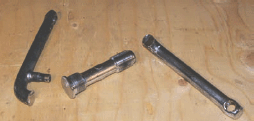
Figure Q: The arms are cut from the crank set; use the center axle to create a ghost ring
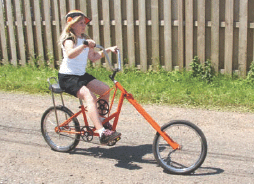
Figure R: Show off!
16. Make a ghost ring
Rather than just leaving the rear bottom bracket empty and unused, I decided to salvage the original crank set to create a ghost ring. This secondary chainring does nothing but spin with the front one, but it will add to the ChopWork theme of this bike. The arms are cut from the crank set, leaving only the center axle. It is ground smooth as well (Figure Q).
17. Paint the chopper
Once completed, the chopper was hand painted with a brush using some spare orange paint that was hanging around the garage. The chainrings were painted black to accent the bike, and the chrome was polished up with some steel wool. The completed chopper turned out quite well considering it only took a few hours and started life without any plan.
18. Start showing off
The bike looks cool with the dual chainrings. I tell people that this doubles your top speed, allowing the chopper to keep up with city traffic. It, of course, does nothing more than look cool!
19. ChopWork Orange Choppers are cool!
Once the hard work is done, it’s all about looking cool, you know! The chopper is very comfortable and easy to ride, even for the chopper newbie. Banana seats also let a variety of riders of different heights ride the same bike, just move to a comfortable spot on the seat. Christina takes the bike out for a cruise and it rides like a dream (Figure R).
20. Enjoy your ChopWork Orange Chopper!
We hope that you enjoyed this Instructable. Make sure that you submit your completed chops to the Atomic Zombie Extreme Machines Builder’s Gallery at www.atomiczombie.com.
You will also find:
 Builder’s Support Forums Videos
 Builder’s Gallery
 Blog
Blog
 Games
Games
 Links
Links
Hope to see you there!
Brad Graham and Kathy McGowan are busy building as many trikes, recumbents, choppers, and electric bikes as possible this summer before winter returns to Northern Ontario. These garage hackers have little “spare time,” but always make time to connect with other bike builders worldwide. “No fate but what we make.”