Amaze your friends with your blatant defiance of the law of gravity! By Troy Broadrick

Figure A: Books behaving strangely…
Cast levitation level 7 on your books!
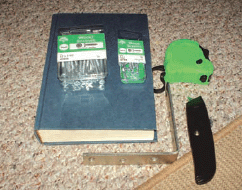
1. What you’ll need
 Book
Book
Good-sized “L” bracket
Carpet knife
Pen
Small wood screws (of the flat headed variety)
Large wood screws
Tape measure or ruler
Glue
A stack of books for weight
To make your shelf, use a book you don’t mind never reading again. A friend at work gave me a stack of old books that were collecting dust in his garage, and my previous two shelves were made out of free books that my local public library was trying to get rid of.
2. Measure twice, cut once
Measure the halfway point, make a mark, set down your bracket, draw an outline, measure again, cut out a hole deep enough that the bracket will set flush. You are doing this to the back or bottom of the book, the part that will be visible in the finished product.
3. Don’t put away the carpet knife yet!
Use your knife to make a notch for the “L” bracket so the book can sit flush against the wall.
4. Screw old books!
…or at least place your small wood screws to secure the “L” bracket in place, one on either side toward the edges of the book to secure the book’s pages together. Hanging the bracket over the edge of a desk, chair, or counter is helpful. The pages will try to rise up the screw as you insert it, so make sure you put some pressure on it to keep it in line. If this part is not done correctly the end result will show the pages as wavy and will tip off the viewer that something is amiss. The picture shows me using a cordless drill, but I found that doing it by hand was much more effective.
5. Glue and apply pressure
The glue will hold the bottom cover of the book in place, and the screws hold the pages together. Put the stack of books on top and wait overnight.
6. No, seriously—wait overnight
Did you think I was kidding?
7. Attach it to the wall
Sorry to switch books, but I wanted to finish the Instructable while the glue was drying. Use a large wood screw to attach the whole mess to the wall. Find a stud first.
8. Load it up!
Put some books on it to cover your handiwork. Make sure you put on enough books to cover the bracket.
9. Forget that it’s there…
…and wait for the crazy looks on peoples’ faces when they notice it and can’t figure it out.
Troy Broadrick is a single father and is raising his son Jace in Louisville, Kentucky. Troy is a musician and would like to be a worship leader some day.
Figure B: Materials

Figure C: Finding the halfway point
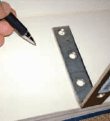
Figure D: Marking the bracket outline

Figure E: Cutting out pages for bracket placement

Figure F: Bracket sitting flush

Figure G: Book closed on bracket

Figure H: Notching cover

Figure I: Book will sit flush against the wall

Figure J: Drilling holes for screws

Figure K: Glue everything
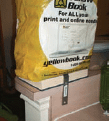
Figure L: Weighting while the glue dries…

Figure M: Attaching bracket to wall

Figure N: Add books