How to recycle paper into blank books

Figure A: The completed tome. Plenty of space for notes.
How to recycle paper into blank books
Figure A: The completed tome. Plenty of space for notes.

Figure B: All the materials we’ll need

Figure C: Tools—a square corner ruler, scissors, large binder clip, an awl, and a cutting surface (not shown—sewing/bookbinding needle)
In this Instructable, I will demonstrate a simple bookbinding technique using a Japanese stabbinding method for making blank books from paper that’s printed on one side. These books are useful for all kinds of notes, and tell an interesting story about the place they came from. I work in the computer lab at my school, where a lot of printer paper is wasted. I go through the recycle bin to find my paper.
This is a great little book for phone numbers and random notes. You can make it any size you like, and the paper never has to go to the processing plant! Using string binding instead of glue is easier on the environment, too!
Materials:
 Recycled paper (blank on one side)
Thicker recycled material (postcards, envelopes, cardboard, etc.) for covers
Twine, yarn, or other string
Tools:
Awl, drill, or drill press
Large sewing needle or bookbinding needle
Paper cutter, scissors, or utility knife
Cutting mat
Ruler
1. Cut and fold your paper
Using a paper cutter, scissors, or a utility knife, cut your paper down to twice the desired size. Fold each sheet in half, and cut your cover material (one for front, one for back) down to the size of a folded sheet (Figures D-E).
Figure D: Cutting the inside page to twice the desired size

Figure E: Each inside page folded in half

Figure F: Lining up the edges of the inside pages and cover. Secure with clip.

Figure G: Marking 3/8” from the corners of the bound edge
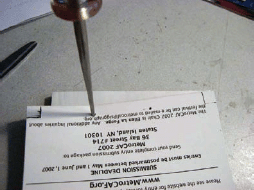
Figure H: Drill holes along the binding edge
2. Line up, clip, and make holes
Stack your cover material and pages together and line up all edges. Clip with the large binder clip to secure (Figure F).
Mark 3/8” from both to-be-bound corners (the folded side of the sheets). Divide the space along the binding between these marks into thirds, and mark those locations. These are where we make the holes for the twine binding (Figure G).
User Notes
Eric Cushing says: Here’s a fancy version I did a while back.
A couple tips: A nice bead of Tacky Glue on the spine works really well. Hot glue is a little stiff in my experience and yields a book that is tough to open and keep open. If you go to a paper/printing store, you can find something called Padding Compound. It’s a glue specifically designed for binding the spine of notebooks.
Other cool items to consider including as pages are:
 Envelopes
Acetate (clear sheets, very cool. You can even make a whole clear book, use a lighter to melt the spine together.)
Large leaves
Etc., etc….old clothing?

Figures I-L: Sew through the binding holes as shown in these four steps

Figure J: Keep sewing!

Figure K: Almost there

Figure L: Tie it off

Figure M: What the binding should look like when you’re finished
Make holes all the way through the book with an awl, drill, or drill press. If using a drill or drill press, clamp your papers down tightly to avoid any paper ruffling. Placing a piece of wood under the book helps make a clean cut in the back (Figure H).
3. Bind the book
I used this tutorial (www.sff.net/people/Brook.West/bind/bindit.html) to learn to bind books this way. It’s very thorough, so I won’t repeat its instructions, but basically you sew the binding in a particular way with the twine and needle. Make sure it’s very tight and secure (Figures I-L). That’s it!
Becky Stern (sternlab.org) is an artist and a blogger for MAKE and CRAFT. She’s currently a grad student at Arizona State University, where she studies sculpture.

