5E | CONDITION REPORTING
A GOOD CONDITION REPORT is an accurate and informative assessment of an object’s state of preservation at a particular moment in time. It provides a written and often a visual description of the nature, location, and extent of each defect in a clear, consistent manner. A condition report written by a registrar, curator, or collections manager (as discussed in this chapter) may be used for general collections management and to document incoming and outgoing loans. It is not the same as a condition report written by a conservator, which is intended for planning and performing object treatment.
A condition report can:
- Establish the exact condition of an object at a point in time.
- Benchmark the type and rate of deterioration.
- Differentiate otherwise identical objects from one another.
- Document an object’s condition history, providing past evidence for the origin of future problems.
- Set priorities for conservation care and treatment.
- Make future handlers aware of seen and unseen vulnerabilities.
- Suggest an object’s default monetary value in lieu of an actual value for insurance purposes.
- Provide identifying documentation for lost or stolen objects.
EXAMINATION
Prior to examination, review any previous condition reports. Examine the object in a clean, secure, well-lit work area where eating, drinking, and smoking are prohibited. For small- and medium-sized objects, pad a sturdy table or desk with polyethylene foam and cover it with clean, white, cotton sheeting or acid-free paper to help detect signs of flaking, infestation, etc. A padded flatbed dolly may be useful for larger objects. Heavy and oversized objects may need to be examined in place.
Before handling an object examine it for any inherent dangers (e.g., radioactive rocks, live ammunition, sharp-edged weapons, lead toy soldiers) and take appropriate precautions. Consult with experts and review relevant Safety Data Sheets (SDS) to determine necessary safety equipment and measures.
Wear gloves when handling objects. Nitrile gloves are smooth and less likely than cotton gloves to disrupt fragile surfaces. Nitrile gloves are especially important when working with ethnographic and natural history collections because in the past many objects were treated with pesticides and other chemicals. Follow all appropriate handling guidelines, making sure each part is properly supported. Large, awkward, or fragile objects may require several handlers. Check carefully for an object’s visible faults, such as cracks, tears, and potential weaknesses, such as repaired handles or brittle veneer (see chapter 5b, “Object Handling”).
Make sure that lighting is adequate for the task. General lighting illuminates the object overall; raking light illuminates at an angle; transmitted light illuminates from the reverse. Good lighting can reveal a variety of surface and subsurface irregularities. Use ultraviolet (UV) light judiciously to detect adhesive residues, paints, resins, etc. An X-ray uses electronic radiation to detect subsurface cracks and losses. Avoid light damage by reducing long-term exposure, filtering UV from general lighting, minimizing intense exposure, and reducing heat buildup (see chapter 5i, “Preventive Care”).
To understand and identify an object’s defects and weaknesses, it is important to determine its composition. Objects may be made of organic materials (e.g., bone, cotton, hair), inorganic materials (e.g., gold, clay, flint), or a combination of both. These materials may be in their original form, such as marble, or may have been modified, such as brass (an alloy of copper and zinc). Objects made from a combination of materials may suffer from a variety of problems including weak joints, dissimilar rates of expansion and contraction, or chemical incompatibility.
Damage affects an object’s condition. An inherent fault (also known as inherent vice) is a weakness in the construction of an object or the incompatibility of materials of which it is composed, such as a thin handle on a heavy teapot or metallic salts added to nineteenth-century silks. Pests and mold, which feed on organic materials or deposits, cause biological damage as they weaken an object’s structure or create problems such as riddled wood or discoloration. Physical damage is caused by mechanical stress and includes abrasion, losses, tearing, etc. Chemical damage is the result of a reaction between a material and an energy source (heat, light) or a chemical (e.g., water). It is evidenced by corrosion, tarnish, fading, etc. Other condition-related factors to keep in mind:
- Distinguish between historic and modern damage or repairs.
- Note any extraneous materials (e.g., surface dust, insect frass, and accretions such as paint splatters and adhesive residues).
- Burial may affect an object’s condition (e.g., salts efflorescing on pottery) and materials that are excavated as already broken may still be considered in good condition.
- Consider that one type of damage may contribute to another (e.g., embrittlement can lead to tearing).
- Understand that some objects have important evidence of a past function (e.g., stains on a ritual blade, dried residue in a medicine bottle).
When possible, examine objects by category (e.g., hats, bird mounts, paintings) or by types of materials (e.g., stone, paper, wool). Grouping will promote consistency, thoughtful observations, and accuracy. Determine an appropriate examination pattern and follow it each time (e.g., top to bottom, proper left to proper right, front to back, exterior to interior). Some objects are made of multiple components such as a painting and its frame, a taxidermy specimen and its mount, or a tea set and its storage case. Consider reporting on each component separately.
The following equipment, tools, and supplies can be helpful when examining and documenting an object’s condition.
Documentation
- Soft lead pencil (a pen can leave a permanent mark);
- White or kneaded eraser;
- Examination form and note paper (acid-free, if it will be part of the permanent record);
- Computer or tablet;
- Digital camera and SD (secure digital) cards (for still shots or video), or film camera and film; and
- Three-dimensional imaging camera or scanner (captures both visual images and measurements).
Measurement
- Cloth tape measure, without metal caps (caution: some tapes can stretch);
- Clear plastic flexible ruler; and
- Calipers.
Handling and Support
- Nitrile gloves (powder-free);
- Personal protective gear (e.g., lab coat, face mask, respirator);
- Buffered and unbuffered acid-free, lignin-free, tissue paper and board;
- Sheeting (e.g., white cotton, polyethylene closed-cell foam, nonwoven polyethylene fabric);
- Supports (e.g., padded muslin rolls and blocks, lightweight weights, book holders); and
- Flatbed dolly.
Illumination
- Flashlight;
- Pen or crevice light;
- Portable incandescent light (e.g., a mechanic’s drop light);
- Headlamp; and
- UV light.
Magnification
- 10 × hand lens;
- Jeweler’s loupe;
- 55 × microscope; and
- Head-mounted magnifier.
Miscellaneous
- Hand mirror;
- Dental mirror;
- Magnet (to identify ferrous metals);
- Natural-hair brushes in a variety of shapes and stiffness;
- Probes (dentals tools);
- Forceps (tweezers);
- Palette knife; and
- Air blower.
DOCUMENTATION
Determine what types of condition reports are required based on need, level of specificity, budget, staff availability, and collections management priorities. Condition reporting fields found within basic digital collection management systems may be adequate for a general assessment of most objects in a collection. Custom reports may be required for sizable collections of specialty items, such as glassware or archaeological materials, and for objects which are fragile, valuable, subject to loan, or are otherwise significant.
Staff-created handwritten or computer-based report forms that are customizable, budget friendly, and easy to use can be created on demand (FIGURE 5E.1; see also the “Condition Report for Paintings, Drawings, Prints, and Other Works on Paper” in the Collection Forms section). However uploading and annotating images, and printing and scanning completed reports, can be time-consuming. Proprietary digital reporting applications offer the convenience of quickly and seamlessly merging images and data, provide editing and annotating functions, and allow multiple users to collaborate and share. When purchasing software, consider initial costs and annual fees, the ability to customize templates, the company’s reliability, the helpfulness of support staff, and the software’s ability to integrate with other collection-management systems, particularly hardware compatibility.
An object’s condition can be documented by text (physical description), sketch (rough representation), and photographic image (exact representation). A combination of these methods provides a complete account of an object’s condition at a particular moment in time (FIGURE 5E.2). Note any issues which may impede accurate or complete condition reporting, such as an object framed behind glass or an oversize object that cannot be viewed on all sides.
Written documentation can take the form of a narrative or a checklist. Although some technical terminology will be needed for clarity, in general a report’s language must be simple, straightforward, and understandable. A condition report should include:
- Identifying numbers (accession, loan, field, catalog);
- Type of object;
- Name of artist or maker (if known);
- Title of object (if any);
- Date and place of manufacture or site collection (if known);
- Dimensions (height × width × depth, diameter, circumference);
- Number of parts;
- Object composition or construction;
- Overall condition assessment;
- Types of damage and any extraneous materials;
- Extent of damage;
- Location of damage;
- Dates and cause of damage (if known);
- Previous repairs (historic, modern);
- Recommendations for exhibition or storage (based on object’s condition);
- Examiner’s name; and
- Date of examination.
Digital images capture the nature, extent, and location of damage, and high-resolution images can provide passive documentation of unnoticed problems for future confirmation. Notes or marks highlighting problem areas may be made within a digital file (via a word-processing or graphics-editing program) or directly on prints. If using film, consider
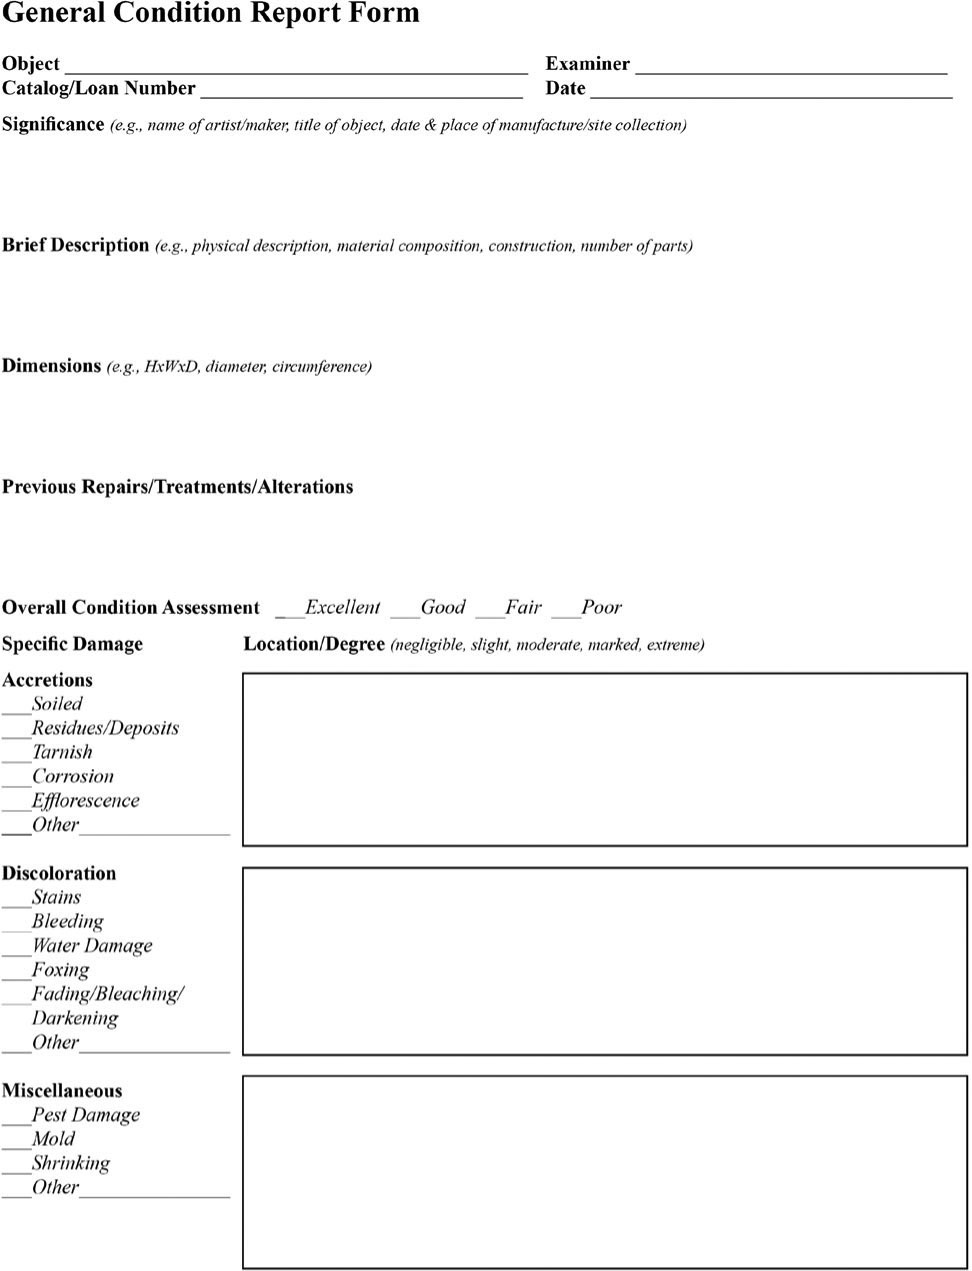
FIGURE 5E.1A GENERAL CONDITION REPORT FORM, PAGE 1. CREATED BY AUTHOR.
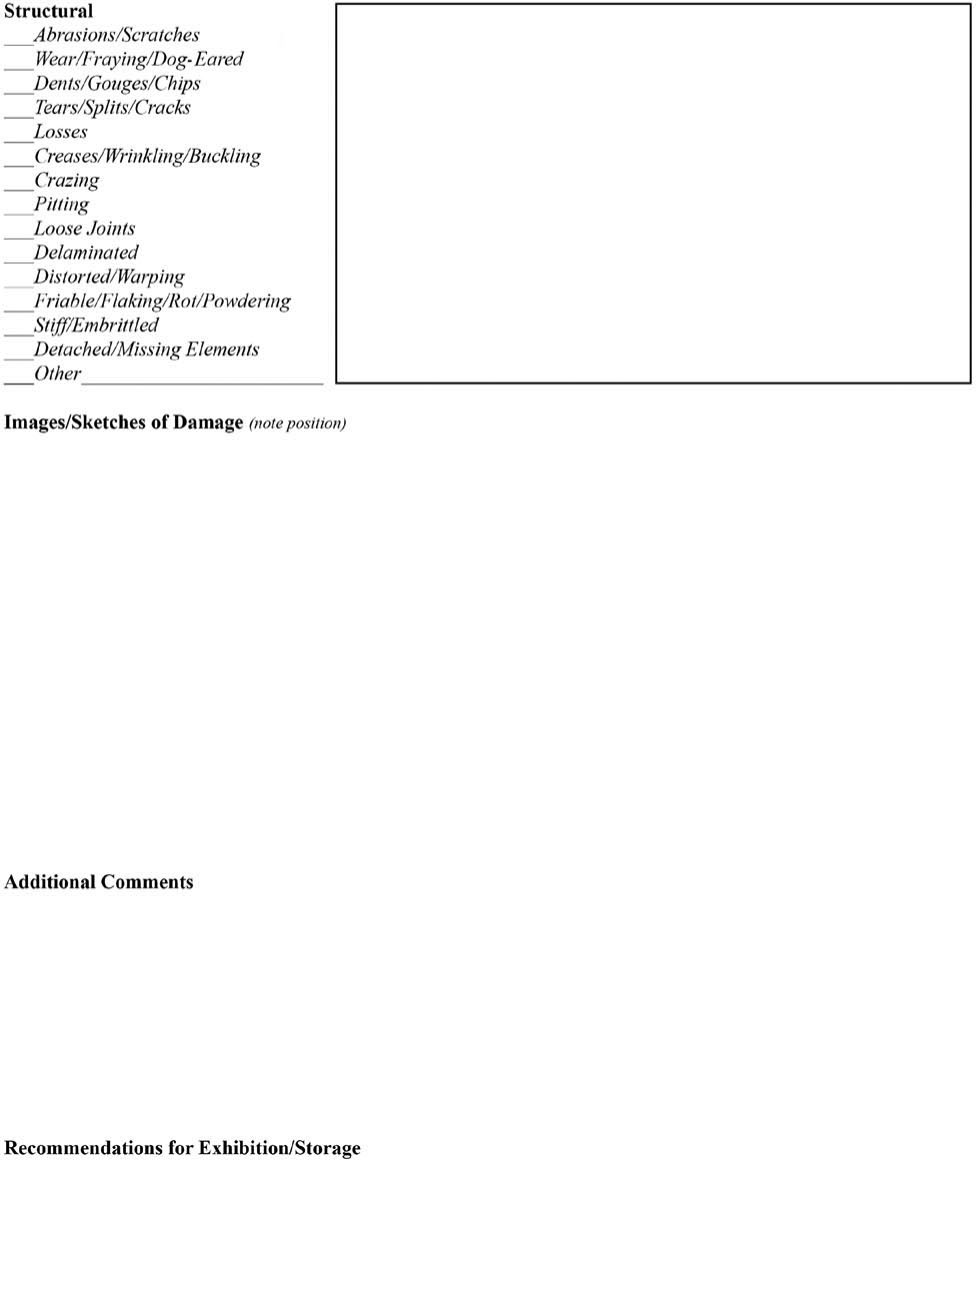
FIGURE 5E.1B GENERAL CONDITION REPORT FORM, PAGE 2. CREATED BY AUTHOR.
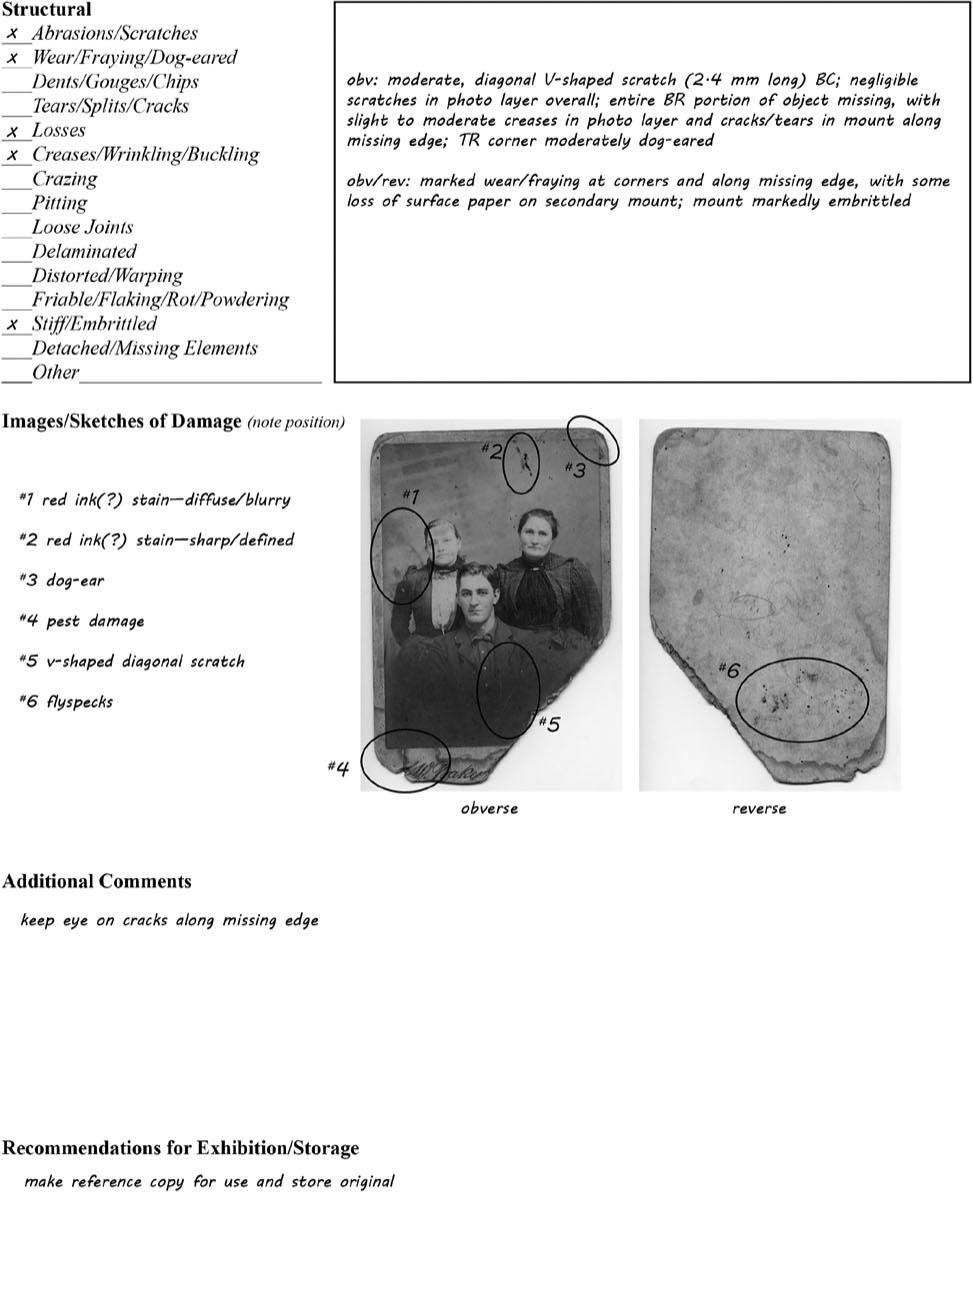
FIGURE 5E.2 METHODS OF DOCUMENTING AN OBJECT’S CONDITION. CREATED BY AUTHOR.
black-and-white film as the contrast in tones can better highlight cracks and flaws than color film. A photographic image should include:
- Identifying numbers;
- Scale;
- Color chart; and
- Date of image.
Whether an object’s condition is recorded electronically or on paper or film, make sure that the materials and methods used are archivally sound and selected for long-term preservation. Digital images should be captured at a high resolution and saved using widely available, nonproprietary lossless data compression (see CHAPTER 5H, “Photography”). View or modify a surrogate file rather than the original. If using film, keep in mind that black-and-white film is more stable than color (although modern color film is more stable than its predecessors). Process film or print digital images according to American National Standards Guidelines for longevity.
Store original and annotated images with their respective reports. Paper-based documentation should be stored in a secure and environmentally stable area. At least one set of duplicates should be housed separately, outside of the community in which the institution is located, in case of area-wide disaster. Electronic documentation should be backed-up as changes are made and maintained on external hard drives, in a networked system, or in cloud storage, depending on need and budget. Maintain more than one back-up in case problems arise with a particular hosting company. Files should be refreshed every few years to prevent degradation of media, and they should be migrated as technology changes.
When writing a condition report, consider the nature, location, and extent of damage. Completely discuss one type of damage on one portion of the object before moving on, to ensure accuracy and minimize handling. Observational skills will be honed after creating condition reports for several similar objects, so review the earlier reports and improve them as necessary. Keep all reference materials (e.g., glossaries, location nomenclature) on file for future reference. Use terms consistently. Be objective and specific.
TYPE OF DAMAGE
What is the nature of the damage? If the examiner is trained in conservation, it may be possible to determine whether damage is biological, physical, or chemical in nature or the result of an inherent fault. If the cause of damage is not apparent, leave etiological statements to the conservator. Describe damage in terms of texture, color, shape, odor, and other physical properties, as appropriate. A glossary, whether established or constructed, can be used to assign a descriptive term to a specific condition. Speculative assessments should be indicated with a question mark.
Location
Where is the damage located? When possible, use a recognized nomenclature to indicate the exact position of damage (e.g., proper left, viewer’s right) or describe the damaged part of the object (e.g., for a hammer—face, neck, handle, grip, cheek). Sources for standards include museum nomenclatures, collector organizations and publications, product manufacturers, and reference texts. The object itself may provide location names (e.g., the shirt or face area on a figure in a painting, or “to the right of the handle, at the base”).
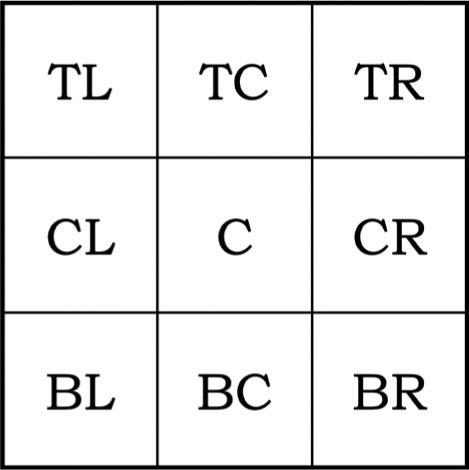
FIGURE 5E.3 ZONE SYSTEM. CREATED BY AUTHOR.
A zone system (FIGURE 5E.3) provides a generalized method for locating damage on two-dimensional objects. Each zone or square is labeled, such as TR (top right) or C (center), and the damage is placed within a zone. The matrix system (FIGURE 5E.4), also for two-dimensional objects, is more precise, as the damage is plotted in millimeters using the x- and y- coordinate positions. The x-coordinate represents the horizontal (bottom edge) of the object (the x-axis); the y-coordinate represents the vertical (left edge) of the object (the y-axis). A stain near the top right corner of a document might be plotted as 400 mm along the x-axis (horizontal) and 450 mm along the y-axis (vertical), and expressed as “400, 450 mm.” Sketches, photographs, or digital images offer location guidance for three-dimensional objects. Measurements in the United States have been taken either metrically or in the English system, depending on the museum’s discipline and traditions. However, if the English system is used, metric equivalents should be indicated as well. When possible, lay the measuring device alongside the object to avoid touching the object. Other ways to describe location include:
- Direction (horizontal, vertical, diagonal);
- Object side (obverse or reverse, interior or exterior, proper left or proper right); and
- Range (scattered, overall).
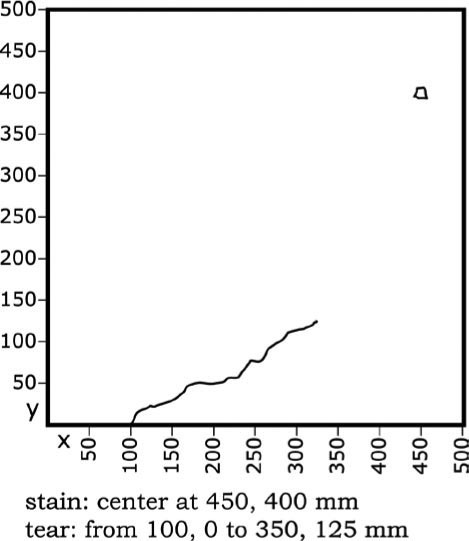
FIGURE 5E.4 MATRIX SYSTEM. CREATED BY AUTHOR.
Extent
What is the extent of the damage? Proceed from the general to the specific (e.g., “object yellowed overall, especially in BR corner”). Some damage such as a tear or a loss can be readily measured. Damage, which cannot be conventionally measured, such as foxing or yellowing, can be described in standardized degrees of severity (e.g., negligible, slight, or moderate, marked, or extreme). Recognized condition standards have been established for a variety of objects (e.g., coins, stamps).
Updating Reports
When updating reports, add new condition information (including the examiner’s name and date) next to the old, so past and present comments appear together. Unless there has been a change in condition, there is no need to repeat the same information for an object that is part of a long-term traveling exhibition. Rather, indicate that the comments provided in the initial report or by previous examiners are still applicable. Treat the condition report as a legal document; it may be used in title or insurance disputes.
Carefully review an incoming condition report immediately following the receipt of an object. If there is a discrepancy, a digital photo of the problem area can be made and promptly sent to the lender. When dealing with a large incoming collection, it is best to have two examiners: one person to read the report aloud (and make notes) and another to visually confirm the description against the objects.
CONDITION REPORTING GLOSSARY
The following are some common terms used to describe condition. Many are general and can be applied to a number of materials; some are material specific and are to be used in conjunction with the general terms. See FIGURES 5E.5–7 for examples of damage and the terminology used to describe it.
General Terms
- abrasion—A generally superficial mechanical wearing away of the surface, often from scraping, rubbing, grinding, or friction.
- accretion—External material deposited on a surface, often as a result of burial conditions or accidental deposits such as splashes, drips, flyspecks, etc. (cf. inclusion).
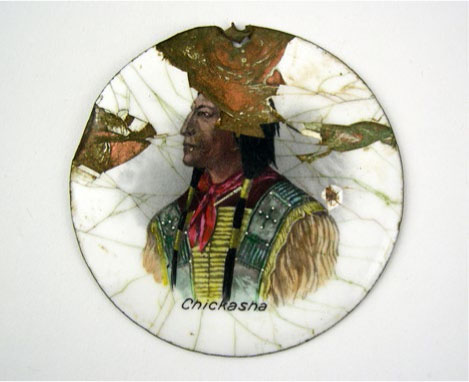
FIGURE 5E.5 LATE NINETEENTH-CENTURY MEDALLION WITH CRAZED AND STAINED ENAMEL, CONCAVITIES, AND CORROSION IN THE COPPER SUPPORT AND SURFACE LOSSES IN THE ENAMEL AS A RESULT OF EXTREME DENTS. COURTESY SHILOH MUSEUM OF OZARK HISTORY (S-66-2-892). CREATED BY AUTHOR.
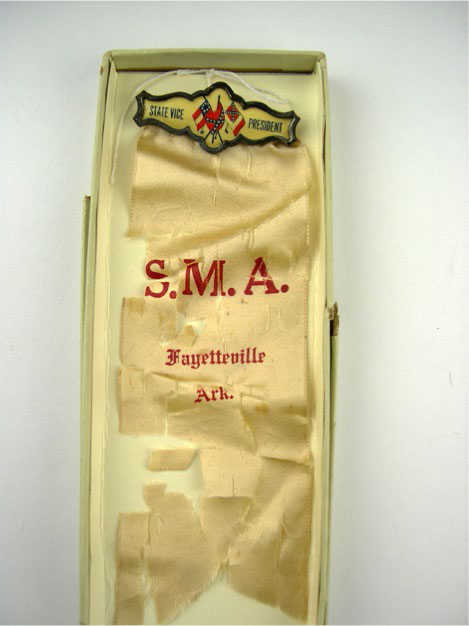
FIGURE 5E.6 DETAIL OF AN ORGANIZATION BADGE WITH SHATTERED SILK RIBBON AND A TARNISHED BAR-STYLE PINBACK WITH SOILED AND YELLOWED CELLULOID INSERT DATING FROM 1900. COURTESY SHILOH MUSEUM OF OZARK HISTORY (S-89-167-36). CREATED BY AUTHOR.
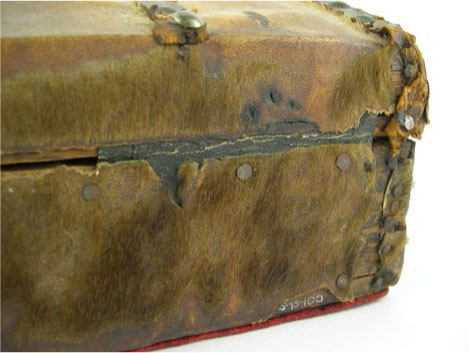
FIGURE 5E.7 DETAIL OF A DOLL TRUNK WITH RUSTY NAIL HEADS, SPLITTING WOOD, AND EMBRITTLED ANIMAL-SKIN HIDE WITH MISSING FUR, TEARS, FRAYED EDGES, AND LOSSES, CIRCA 1860. COURTESY SHILOH MUSEUM OF OZARK HISTORY (S-95-100). CREATED BY AUTHOR.
- adhesive residue—The sticky or crusty remains of glue, paste, or pressure-sensitive tape.
- bleeding—The suffusion of a color into adjacent materials, often caused by water or other solvents.
- break—A fracture or split resulting in the separation of parts.
- chip—A defect in a surface characterized by the breaking away of material.
- crack—A surface fracture or fissure across or through a material, either straight-line or branching in form; no loss is implied. A crack may be described as blind when it stops part way, as hairline when it is a tiny fissure, or as open when it is a large fissure.
- crazing—An unintentional fine network of surface cracks in a ceramic glaze, a painting’s varnish layer, or a metal’s coating (cf. crizzling).
- crease—A line of crushed or broken fibers, generally made by folding.
- delamination—A separation of layers; splitting.
- dent—A shallow concavity in the surface, caused by a blow (cf. gouge).
- discoloration: A partial or overall change in color caused by aging, light, or chemical agents. Yellowing and darkening can occur, along with bleaching (the lightening of color), and fading (a loss of color or a change in hue).
- disjoin—A partial or complete separation of a joint between two members of an object, as distinguished from a crack, tear, check, or split.
- distortion—A misshaping of the original shape; shrinkage may occur (cf. creep).
- draw—A local distortion at the corner of a painting or a piece of paper, marked by diagonal cockling from the corner toward the center of the mount (cf. dishing).
- embrittlement—A loss of flexibility causing the material (e.g., paper, parchment, leather) to break or disintegrate when bent or curled (cf. stiffness).
- friable—Able to be easily crumbled or pulverized into a powder.
- gouge—A concavity in the surface where material has been scooped out (cf. dent).
- inclusion—A particle accidentally bonded to the surface of an object during manufacture.
- loss—Missing area or hole.
- mildew—See mold.
- missing element—The loss of an integral component of, or an addition or appendage to, an object (e.g., handle, tassel).
- mold—Biological in nature, mold or mildew can be evidenced by a musty odor or colored, furry, or web-like surface excrescences. Some foxing (see below) can be caused by mold.
- patina—A colored surface layer, either applied or naturally occurring.
- pest damage—Surface loss, tunneling, holes, fly specks, and so on caused by insects, rodents, or other pests.
- repair—The evidence of past repair such as a filled loss, a staple or rivet, or inpainting.
- scratch—A linear surface loss due to abrasion with a sharp point.
- sheen—A polish produced by handling. Often occurs on frequently touched locations.
- soil—A general term denoting any material that dirties an object. Dust is loose soil while a smear and a fingerprint are types of localized grime.
- stain—A color change as a result of soiling, adhesives, pest residue, food, oils, etc. A diffuse stain is without a distinct boundary; a discrete stain has a distinct boundary or tide line, which is darker than the general area of the stain; and a centered stain has a darker or more intensely colored center within its general area. In metallic staining, adjacent materials are discolored as a result of metal corrosion.
- stiffness—The loss of flexibility and suppleness (cf. embrittlement).
- tear—A break in fabric, paper, or other sheet material as a result of tension or torsion.
- wear—Surface erosion, usually at the edges, due to repeated handling.
Ceramic, Glass, and Stone Terms
- crizzling—A fine network of cracks on glass caused by the hydration of the salts in the glass as a result of the leaching of excess alkali (cf. crazing, devitrification).
- devitrification—The loss of transparency in glass caused by the crystallization of the original ingredients (cf. crazing, crizzling).
- efflorescence—A powdery or crystalline crust on the surface of stone, plaster, ceramics, etc. Formed when transmigrating water reacts with an object’s chemical makeup or extraneous deposits from a burial.
- flaking—A lifting of the surface layer (e.g., glaze, enamel); often resulting in a loss (cf. powdering). iridescence—A color effect in glass or pottery that is due to the partial decomposition of the surface and the formation of innumerable thin scales, resulting in an uneven, flaky surface.
- powdering—Shallow losses or flaking from the surface of stone or ceramic (cf. flaking).
- spalling—A general weakness resulting in the exfoliation of the body or chipping off of layers parallel to the surface.
- sugaring—The erosion of a marble surface creating a granulated or sugary surface appearance.
- weeping—A wet, dripping surface on glass. Caused by a reaction between water and formic acid.
Leather and Skin Terms
- fatty spews—A milky film found on leather as a result from previous dressing applications or the migration of natural fat in the leather.
- hair loss—An area of loose or missing fur in objects and garments made of pelts. Often due to pest activity or the improper processing of the hide.
- red rot—A powdery red substance found on vegetable-tanned leather objects as a result of a chemical reaction with pollutants in the air.
Metal Terms
- corrosion—The chemical alteration of a metal surface caused by agents in the environment or by reagents applied purposely. Corrosion may only affect an object’s color and texture without altering the form, or it may add to the form, producing hard nodules or crusts. Bimetallic (or galvanic) corrosion results from incompatible metal contact. Bronze disease (often found in unearthed archaeological objects) is a type of copper corrosion evidenced by powdery green spots. Rust is a reddish-brown corrosion that can be soft and powdery, flaking, or compact and hard. Copper stea-rate corrosion is a waxy green compound formed as a reaction between a copper-based metal and the oils found in leather.
- pitting—Small, irregular, shallow, pinhole-sized losses scattered over the surface of metal, caused by acidic conditions or resulting from the casting process.
- tarnish—A dullness or blackening of a bright metal surface.
Painting Terms
- blanching—Irregular, obtrusive, pale, or milky areas in paint or varnish. Not a superficial defect like bloom but a scattering of light from microporosi-ties or granulation in aged films.
- blister—A separation between layers, appearing as an enclosed, bubbled area.
- bloom—A whitish, cloudy appearance in the varnish layer, caused by exposure to moisture or resulting from a wax-based media.
- buckling—Waves or large bulges in a canvas from a nonuniform tension around the stretcher or strainer.
- chalking—A loss of a paint or emulsion layer by pow dering off.
- cleavage—A separation between the paint layers and the support producing tenting (gable-like ridges) or cupping (concave flakes). Caused by the contraction of the support, which forces the paint layer up and off the surface.
- crackle, craquelure—A network of fine cracks that develop in the ground, paint layer, or surface coating of a painting as the materials age or dry, or as the result of a blow. Age cracks usually penetrate both paint layer and ground. Drying cracks are caused by the failure of the film to withstand its own contraction during drying. Such cracks usually do not penetrate the whole structure from support to surface. Mechanical cracks, although similar in appearance and character to age cracks, are often caused by external local pressure and frequently appear as a bullseye pattern of concentric circles.
- cupping—See cleavage.
- dishing—A defect in the stretcher caused by the torque of a drawing fabric. If the stretcher members are twisted out of a common plane, a shallow dihedral angle is formed at the corners. Dishing is a common cause of corner wrinkles in stretched canvases (cf. draw).
- fill—The material used to replace areas of loss.
- flaking—The lifting and sometimes loss of flat areas of the surface layer.
- inpainting—New areas of paint added over fill to restore design or color continuity; restricted to areas of loss.
- overpainting—Areas of repainting over an existing original surface.
- stretcher crease—A crease or line of cracks in the ground and paint layers of a painting on fabric, following the inside edges of the stretcher members or the edges of cross-members.
- tenting—See cleavage.
- wrinkling—Small ridges and furrows of crawling paint or varnish caused by the use of improper methods or materials. Usually related to a non-drying medium and the loss of volume in the film through evaporation.
Paper Terms
- cockling—A soft, concave or convex random distortion characterized by parallel, repeated ripples, usually horizontal or vertical.
- dimpling—A local distortion, usually in a corner, marked by a distinctly concave area. Usually caused by local adhesion of the support to the secondary support.
- dog-ear—A diagonal crease across the corner of paper-based materials (e.g., book page, pasteboard secondary mount).
- foxing—Small yellow, brown, or reddish-brown spots on paper caused by mold or the oxidation of iron particles within the paper.
- wrinkling—An angular, crushed distortion.
Photography Terms
- ferrotyping—Glossy patches found on the surface of a photograph resulting from lengthy contact with a smooth-surfaced storage enclosure, such as polyester or glass.
- frilling—The separation and lifting of the photographic emulsion from the edges of the support.
- silvering—Shiny or mirror-like discoloration in the shadow areas of a photographic image, caused by the aging of excessive residual silver compounds.
Plastic Terms
- bubbly area—A bubbly or blistered area in cellulose nitrate and acetate film.
- creep, deformation—A change in the original shape due to chemical instability or exposure to high temperature (cf. distortion).
- odor—The smell of sulfur, camphor, vinegar, and so on produced by the degradation of cellulose nitrate or acetate products. Strong odor indicates severe degradation.
- oozing—See sweating.
- sweating, liquid exudate—A clear or yellow oily liquid found on the surface of a deteriorated cellulose nitrate or acetate object.
Textile Terms
- crocking—The rubbing off of color, resulting in the loss of dyestuff but not of fiber.
- fraying—A raveled or worn spot indicated by the separation of threads, especially on the edge of a fabric.
- shattering, tendering—A deterioration of threads, most common in silk. Usually caused by light, heat, use of salt mordants, exposure to perspiration, or a combination thereof. Lateral splits occur parallel to the grain of the cloth’s fiber when the textile is stretched and damaged by sunlight.
- weak seam—A looseness in the attachment of two adjoining pieces of fabric.
Wood Terms
- alligatoring—A series of hairline cracks in old varnish, creating the appearance of alligator hide.
- checking—A slight splitting along the wood grain creating a checkerboard-like pattern. Checking is usually in response to repeated dimensional change brought on by fluctuations of temperature and humidity (cf. split).
- cupping, dishing—The warping across the width of a board, usually with the upper surface developing a concave curve.
- dry rot—The decay of seasoned timber caused by fungi that consume the cellulose of wood, leaving a soft skeleton that is readily reduced to powder.
- shrinkage—A loss of mass or size in response to low relative humidity conditions.
- split—A crack that runs through an entire surface, such as veneer.
- warping—An irregularity in wood as a result of shrinkage (e.g., furniture, a painting’s wood support). Often caused by relative humidity. •
BIBLIOGRAPHY
Van Horn, D. R., H. Culligan, and C. Midgett, Basic Condition Reporting. A Handbook, 4th ed. (Lanham, MD: Rowman & Littlefield, 2015).
With sincere thanks to Martha Battle Jackson (North Carolina Historic Sites), Ellen E. Endslow (Chester County Historical Society, Pennsylvania), Anne Ennes (National Park Service-Harpers Ferry Center, Museum Conservation Services), Jennifer Gallatin Rigsby (Indianapolis Museum of Art at Newfields), Lena Hernandez (Museum of Science & History), Kathryn Lang (Steam-town National Historic Site), Cara Seitchek (Montgomery County Historical Society), Rachel Shabica (National Museum of the American Indian), Elizabeth Varner (US Department of the Interior, Interior Museum Program), and the authors of Basic Condition Reporting: A Handbook (3rd edition, 1998).