Scenario Manager
Another tool provided by Excel that you can use to create a What-If Analysis is the Scenario Manager. The Scenario Manager enables you to create different scenarios where certain input values are changed to produce different results.
You can assign names the different scenarios in the scenario manager, for example, Most Likely
, Best Case
, and Worst Case
. Once you’ve created the scenarios in the Scenario Manager, you can view the different scenario in your worksheet or generate a summary report with all the scenarios so that you can compare them side-by-side.
In the following example, we will create several projections for the next year based on figures from the current year. The scenarios will apply different growth rates to the current figures so that we can compare the scenarios together in a summary report.
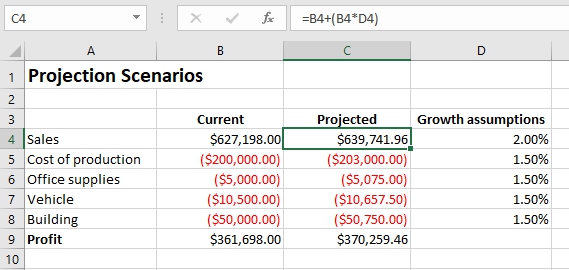
Figures – Current Year
- Sales: $627,198.00
- Cost of production: $200,000
- Office supplies: $5,000
- Vehicle: $10,500.00
- Building: $50,000.00
The projected value in C4 is calculated with the following formula:
=B4+(B4*D4)
The formula in Projected
simply increments the Current
value by the percentage rate in Growth assumption
. The same formula is used to derive the values in cells C5:C8.
We want to create more scenarios using different growth assumptions without overwriting the original data as we want to be able to compare multiple scenarios together. This is where the Scenario Manager comes in.
Tip
: When using the Scenario Manager, it is a good idea to name each cell you intend to change. It makes it easier to know what each cell represents when you enter the new values in a subsequent dialog box. It also makes any subsequent reports you create of the scenarios easier to understand. Named Ranges are covered in my
Excel 2019 Basics
book.
Follow the steps below to create different scenarios with the Scenario Manager:
- Select the changing cells in the worksheet. In this case, the changing cells are D4:D8.
- On the Data
tab, in the Forecast
group, click What-If Analysis
command button and select Scenario Manager
from the drop-down menu.
The Scenario Manager
dialog box will be opened.
- Click on the Add
button to add a new scenario.
- Enter a name for the scenario in the Scenario name
field. These can be names like Most likely
, Best case
, Worst case
etc.
- The Changing cells
field should already have the reference to the cells you selected before opening the Scenario Manager dialog box. However, if the right cells have not been selected, click on the Expand Dialog box button on the field (up arrow) and select the cells in the worksheet.
- The Comment
box is optional. You can enter a short description for the scenario or leave the default text which is a log of when it was last updated.
- In the Protection
portion of the screen, leave the Prevent changes
checkbox selected if you want Excel to protect the scenario from changes when worksheet protection is turned on. If you don’t want to protect the scenario when the worksheet is protected, uncheck Prevent changes.
- If you don’t want the scenario hidden when worksheet protection is on, leave the Hide
check box unselected. Alternatively, if you want Excel to hide the scenario when the worksheet is protected, select the Hide check box.
Note
: Worksheet protection is a separate topic that’s not related to What-If Analysis and covered elsewhere in this book.
- Click OK
to open the Scenario Values
dialog box.
- The Scenario Values dialog box contains a number of fields for the changing cells. As you can see from the image above, naming the changing cells becomes useful here as each field is labelled with a name rather than a cell reference.
For the first scenario, you may want to accept the values already in the fields (if you had values in the cells prior to starting the Scenario Manager). If you want a different set of values for your first scenario, you can change them here.
- When done, click the Add
button to save the scenario and go back to the Add Scenario
dialog box.
- Repeat steps 4
to 11
above to add the other scenarios you want to create.
After you finish creating the different scenarios you want to add, you can close the Scenario Values dialog box and then return to the Scenario Manager dialog box. Now, in the Scenario Manager dialog box, you’ll see the names of all the scenarios you’ve added in the Scenarios
list box.
To show the scenario that you have entered, select the scenario in the Scenarios
list box and click on the Show
command button. You can also just double-click on the name of the scenario in the list box to show the scenario in the worksheet. For example, to display the Best Case
scenario, double-click on Best Case
. This will close the Scenario Manager dialog box and insert the rates we entered for the Best Case
scenario in our table.
To delete a scenario, select it in the list box and click on the Delete
button. This will remove that scenario from the scenario manager.
To edit a scenario, select the scenario in the Scenarios
list box and click on the Edit
button. This will take you through the editing process where you can change the name of the scenario, the changing cells, and the values for the cells. If you only want to change just the values, then click through until you get to the Scenario Values
dialog box and change the values there.
The Scenario Manager dialog box also enables you to merge scenarios from other Excel workbooks that are open. Note that the workbooks must share the same data layout and changing cells for you to be able to merge their scenarios.
To merge scenarios from another workbook, do the following:
- Click the Merge
button in the Scenario Manager dialog box. This will display the Merge Scenarios
dialog box.
- Select the workbook name from the Book
drop-down list box.
- In the Sheet
list box, select the worksheet and then click OK
.
All the scenarios in that worksheet are then copied and merged with the current worksheet.
Summary Reports
After creating the different scenarios, you can compare them side-by-side in a summary report.
To generate a summary report for the scenarios you have entered:
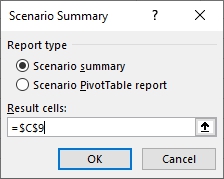
- In the Scenario Manager dialog box, click on the Summary
button. This will open the Scenario Summary
dialog box.
- Select Report type
if it is not already selected.
- Click the Results cells
text box and select the result cells in your worksheet. These would be the cells with the totals for your projection. For our example, our Profit
cell is C9.
- Click on OK
to generate the report.
Excel will generate a report in a separate worksheet showing you all the scenarios you have created.
As you can see from the image above, assigning names to the changing cells and result cells in your worksheet comes in handy when producing a scenario summary.
Now, you may wonder why we need to use the scenario manager when we could have just entered the different scenarios directly in the Excel worksheet area. The example used here with the scenario manager is simple for demonstration purposes only. However, the scenario manager comes in handy when the complexity of the data model would make it difficult to enter the different scenarios side-by-side in Excel in a meaningful way.