Set Different Access Levels
The password protection method described above enables you to quickly protect your Excel workbook from unauthorised access with a password. However, it does not provide a way to set different access levels, for example, read-only
access and read-write
access. To set different access levels with passwords, you need to use the older method where you save the file with a different name and insert the passwords during the process. This method allows you to set separate passwords for opening and modifying the file.
Note
: Only use this method (over the encryption method described above) if you want to create different access levels for different groups of users.
To set different passwords for opening and modifying an Excel file, do the following:
- Click on File
> Save As
(or Save a Copy
, if your file is on OneDrive and AutoSave is set to On
).
- Click on the More options
link (which is directly under the file type field). This will open the Save As
dialog box.
- On the Save As
dialog box, click on the Tools
button and select General Options
from the menu.
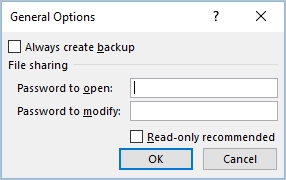
This will display the General Options
dialog box which enables you to set one password for opening the workbook and another for modifying the workbook.
- Enter different passwords in the Password to modify
and Password to open
boxes, and then click OK
.
- Two Confirm Password
prompts will be displayed. Re-enter the Password to open
and Password to modify -
to confirm them.
- In the Save As
dialog box, in the File nam
e field, enter a new name for the workbook and click Save.
Note that you must save the file with a new name as Excel will not allow you to save it with the current name.
- Close and reopen the workbook. This time Excel will challenge you with a prompt for a password to open the workbook. Enter the password and click OK
.
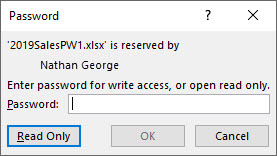
- Excel will display another password prompt for write-access to the workbook. Enter the write-access password in the Password
field and click on OK
(this is the password set in the Password to modify field).
Anyone with the password to open the workbook but not the password to modify it can open the file in read-only mode by clicking on the Read Only
button.
Removing the Passwords Set in General Options
There may be occasions when you want to remove file protection and make the file accessible to all users. To remove the passwords set in General Options we need to delete them from General Options and save the file again.
Do the following to remove the passwords:
- Open the Excel file with the current passwords.
- Click on File
to go to the backstage view and click on Save As
(or Save a Copy
if your file is saved on OneDrive).
- Click on the More options
link (which is directly under the file type text box). This will open the Save As
window.
- In the Save As
dialog box, click on the Tools
button and select General Options
from the menu. This will display the General Options
dialog box where you entered the passwords.
- Delete the passwords from the Password to modify
and Password to open
fields and click on OK
to dismiss the dialog box.
- In the Save As
dialog box, click on Save
to save the file.
- Close the workbook and reopen it. It will no longer prompt you for a password.


