Protect Worksheets
Instead of protecting the whole workbook with a password you can protect individual worksheets and even narrow it down to restricting certain actions within the sheet. For example, you can lock certain cells in the worksheet with formulas from being editable so that other users cannot accidentally delete formulas.
In a shared workbook, users could inadvertently delete formulas as they may not be aware that some cells are calculated values rather than ordinary values. To prevent this from happening, cells with formulas are often protected in shared worksheets.
Another reason to protect parts of your worksheet is that you may have some core data that you don’t want users to change. You can protect those ranges only on the worksheet.
Worksheet protection involves two steps:
- First, unlock the cells that you want to keep editable. If you don’t take this step all cells in the worksheet will be locked when you protect it.
- Protect the worksheet with or without a password.
Step 1 - Unlock any cells/ranges that need to be editable:
- Click on the worksheet name tab that you want to protect to select it. In the worksheet area, select the range(s) that you don’t want protected.
Tip
: You can select multiple ranges by holding down the Ctrl
key while selecting additional ranges.
- On the Home
tab, in the Cells
group, click on Format
> Format Cells
.
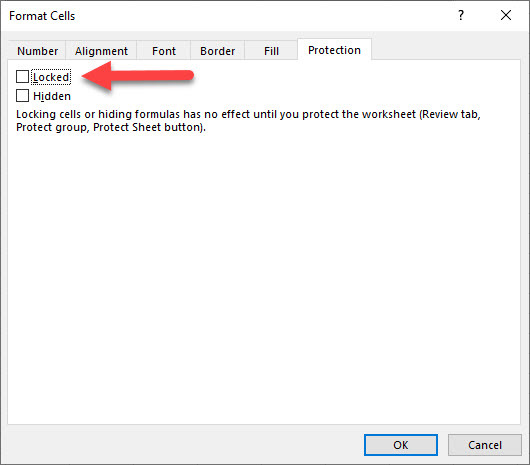
- Click on the Protection
tab and clear the Locked
checkbox.
Step 2 - Protect the worksheet:
Next, you can choose specific actions that users are allowed to carry out in the worksheet.
- On the Review
tab, in the Protect
group, click Protect Sheet
.
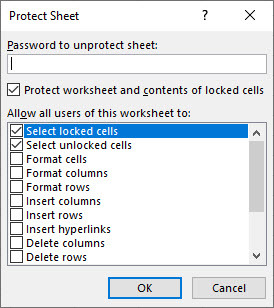
- Ensure Protect worksheet and contents of locked cells
is selected. This should be selected by default.
- In the section named Allow all users of this worksheet to
, check the actions you want users to be able to carry out on the worksheet. For example, you could allow users to insert rows and columns, sort data, format cells, use AutoFilter etc. among the many options on the list.
- Optional: You can specify a password to lock your worksheet, but this is optional. You can protect the sheet without a password, but a user can click the Unprotect Sheet
button to deactivate the sheet protection. If you want to prevent people from doing this, you can enter a password in the Password to unprotect sheet
field and click OK
. Re-enter the password at the Confirm Password
prompt and click OK
to complete the action.
Important!
If you set a password to protect your worksheet, you’ll need the password whenever you want to unprotect it. Hence, it is critical that you remember your password. Ideally, you want to have it written down somewhere under lock and key for retrieval if needed. If you forget the password there are no tools provided by Microsoft to retrieve it.
Unprotect a Worksheet
In a protected worksheet, in place of the Protect Sheet
command button on the Review
tab, you’ll see an Unprotect Sheet
command button.
To unprotect the sheet, click the Unprotect Sheet
command button. If it was protected with a password, you’ll get a password prompt. Enter the password, and then click OK
to unprotect the worksheet.


