During a play, you see only the actors, but many important things happen behind the scenes.
One important job is making the sound effects for a play. For example, if the play is outside, you might use birds, wind, or car sound effects. Indoor sound effects might be needed, too, such as doorbells or telephones. You can practice these in Sound-Effects Story.
The audience can tell a lot about a character from his costume and makeup. Create new characters based on costumes in Creative Costume Play. If you’re playing an animal character in a play, you can make the ears and tails with Animal Costumes.
In Japanese Kabuki theater, the color of a character’s makeup shows the audience what kind of character he is.
Face painting is fun to do at home, at costume parties, or for plays. Use the same tools and techniques as a professional makeup artist in Stage Makeup and Makeup Morgue.
Next, try your hand at designing a set with Sketch a Set and Set Diorama. Both activities involve attending a production meeting where designers and directors meet to discuss the backstage elements of a play.
Many plays call for props or objects to be carried onstage by actors. Prop Characters and Prop Scenes will help you be creative with objects.
Once you combine the previous acting games with these backstage activities, you’ll know just about everything necessary to mount a full production.
Though many sound effects are made with machines and instruments in movies, you can make most of these sounds by using just your voice, your hands, or your body. If you have a computer or cell phone with recording capabilities, tape this activity so you can hear what the sound effects sound like.
Choose one player to be the leader. The leader sits facing all the other players. He calls out a series of sound effects. After each one, the other players make this sound by using their voices, hands, or bodies.
The leader reads the following story that uses these sound effects. The leader should pause after each bolded word so that the other players can make this sound.
This is the story of my scary day. I woke up to the sound of my alarm clock. I yawned and got out of bed. I took a shower. When I was done, I opened up my closet door and took out some of my clothes for the day. Then I opened my dresser drawer and took out the rest of my clothes and got dressed. I went downstairs and opened the front door. It was a beautiful day. There was a light breeze and birds were singing.
Off in the distance, I heard a train coming. The sound grew louder and louder. I ran to the train and hopped on. I rode for a while until it suddenly stopped. I got off the train. The wind was blowing. It started to rain a little, then harder and harder. It turned into a thunderstorm.
Off in the distance, I heard a horse galloping. The sound got louder and louder. I followed the horse to a spooky-looking house.
I walked up the creaky stairs and rang the doorbell. The door opened by itself. I walked inside, and the door slammed behind me. I walked upstairs very slowly. Suddenly, something jumped out at me, but it was only a cat. I opened the door of the first room. I thought I heard a witch laughing. The sound grew louder and louder. I closed the door. I opened the door to the next room. I thought I heard a ghost. The sound grew louder and louder. I closed the door. I opened the door to the next room. I thought I heard a monster. The sound grew louder and louder. I closed the door and ran down the stairs and outside.
A drum is often used to make the sound of thunder for a play.
I heard a motorcycle coming. It screeched to a stop. My mom was on it. She had been looking for me. I told her about the spooky house. She said I needed to hop on the back of the bike so she could take me to the park. She drove to a babbling brook. There were frogs and crickets along the banks of the brook. While I was peering down at them, I lost my balance and fell off the bike and into the brook with a splash.
My mom took me home and dried me off with a blow-dryer. We popped popcorn and sat by the crackling fireplace until I fell asleep.
The end.
A human being makes the sound effects between scenes and before commercial breaks on the television show Home Improvement. One person creates the sounds of tools, animals, slamming doors, and more.
Fill a box with various clothing items. They can be unusual and shouldn’t fit just one character. For example, a cape is a good item— but it cannot be Batman’s cape, because then it can only be used for a scene with Batman.
Once all the costume items are in the box, players should take a few minutes to explore its contents. Players can try items of clothing on until each player has created a costume that he likes. Now players walk around in their costumes while thinking about and eventually creating a walk that fits their costumed characters. Once every player has decided on her costume and walk, she walks around and introduces herself to each player as her new character.
After this mini rehearsal, divide into groups and make up a story that includes all of the costume characters in the group. Turn the story into a scene and rehearse it until you are ready to perform. When everyone is ready, perform your scenes for each other.
If you would like to further develop your costume characters see Visualization and Hot Seat in chapter 6.
In Shakespeare’s time, the fashions changed so quickly that royalty would often give their clothes to theaters to use for costumes after wearing them only a couple of times.
To create an animal costume, start by wearing clothing that has the basic colors of your animal. For example, if you are a cat, you may choose to wear all black, brown, gray, white, or orange. The only other things you need are ears and a tail.
Here’s a simple way to make your own ears and tail.
To make your ears, draw your ear shapes on construction paper. Cut them out, leaving a little extra paper at the bottom of each ear. Wrap the extra paper around a plastic headband, and tape or glue it on. (If you use tape, it will be easy to reuse the headband after you are done.)
To make your tail, find a sock that is the same color as your animal. Stuff it with newspapers and safety pin it to your clothes.
See the next activity, Stage Makeup, to complete your character’s look with face painting.

You can create many different characters with makeup.
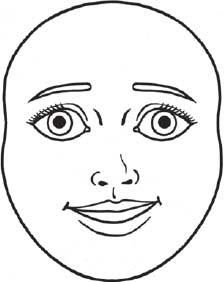
Once you’ve chosen a character, create a makeup plan for her. You can create a makeup plan by tracing the face pattern on the following page and using makeup on the paper to design your stage face. For most of your theatrical makeup needs, you can use women’s cosmetics. For special colors (such as bases for animal characters), a local costume shop or theatrical supply store are your best bets.
Choose your stage makeup colors carefully. Stage lights make everyone look pale, and in a theater, you need to be seen easily from a distance, so make them darker than normal. Design your stage face, and try out your makeup techniques at home before your performance. Standing in a room with very bright light, with full makeup on, will help you judge if you’ve applied enough makeup.
In The Wizard of Oz, the actor who was first cast to play the Tin Man, Buddy Ebsen, had to quit because he was allergic to the silver makeup. Jack Haley is the actor who replaced him.
Here are some makeup design tips:
A “makeup morgue” is a book that makeup designers use to help them create makeup plans for characters.
Laurence Olivier liked to use stage makeup to make his nose look larger for many of his dramatic characters.

Begin by labeling seven different pieces of paper with the following headings: “Old Age,” “Youth,” “Glamorous,” “Animals,” “Hair,” “Facial Hair,” and “Unusual Characters.”
Look through magazines and cut out pictures of people who depict your seven different categories. For your “Old Age” page, find pictures of older people; for “Youth,” find pictures of babies, kids, or young adults; for “Glamorous,” look for models and pictures of wealthy or elegantly dressed people. “Animals” can include real animals or cartoons. Look for pictures that show unusual hairstyles for the “Hair” category. For “Facial Hair,” find pictures of men with beards or mustaches. For your “Unusual Characters” page, look for people who are out of the ordinary, such as superheroes, cartoon humans, elves, or space aliens. Glue the pictures onto the appropriate page. See if you can fill up an entire page for each category.
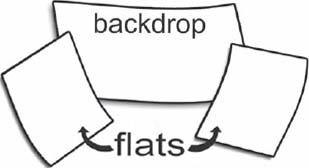
The “set” is the scenery or background for a play. Before a set designer builds a set, he draws sketches of it to see how it will look. While every stage is different, many have a “backdrop”—a long back wall or a large piece of cloth painted with scenery. A backdrop may also have two “flats,” which are two smaller, flat pieces of scenery placed on the stage. A stage where the audience is on only one side is called a “proscenium stage.” Sketch a set design for a proscenium stage.
Divide into teams of two or more actors. Choose a play or story and discuss the surroundings that are depicted in this play. Think about colors that would help create the mood of this play. For example, if the play is a comedy, you might choose bright, happy colors. If the play is a drama, you might choose darker colors.
Using your colored pencils, sketch your backdrop on the long piece of paper and the two flats on the shorter pieces, using one piece for each flat.
When all the groups have finished, hold a production meeting. A production meeting is a meeting where the designers explain their designs to the director and other designers. In turn, every group presents its design and explains what everything means and why they chose their colors.
To continue your set design, use your sketch to create a set diorama (see the following activity for how to do this).
The movie Oklahoma was actually filmed in Arizona.
After the director and designer have agreed on the set sketch, the set designer then makes a model of the entire set.
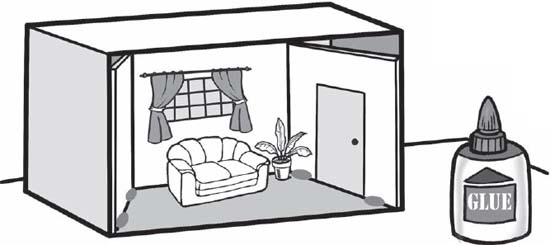
Set your shoe box lengthwise on a table, with the open part facing you. Glue your backdrop to the back of your box. Glue your “flats” onto cardboard so they are sturdy. You can get your cardboard flats to stand by sticking a ball of clay to the bottom edge of each cardboard piece, then flattening it on a tabletop. Place one flat on either side of your shoebox backdrop, angled out so the audience can see them once the entire set is built. Now add the furniture or other set pieces to your diorama. (What pieces you need are determined by the play script you’ve selected. If, for example, the entire play takes place outside, you won’t need any furniture, but you might want to make trees out of small sticks or snow out of cotton balls. But if all the action occurs in a living room, then you’ll need a couch and some chairs. Read through the script to pick out the furniture you’ll need. This is also a great way to create a props list.) If a number of people have created dioramas, hold a joint production meeting. Here you can show them your work and explain the choices you made; they can do the same for you.
A “prop” is anything an actor carries onstage. You can tell a lot about a character by the things she carries around.
Place all the props you’ve collected into the box. All the players should examine the objects in the box; then each player picks out one that he’d like to use for this game. Next, each player needs to think about the kind of person who would carry or use this object for a prop and create a character based on this prop. Each should come up with a name, a walk, and a voice for his character. Once everyone has created a character, all players walk around, in character, and introduce themselves to the other players.
In early rehearsals, the shape of the set may be marked on the floor with masking tape so the actors can rehearse moving around the scenery once it is built and placed onstage.
Divide into groups and make up a story that includes all of the characters and props in the group. Turn the story into a scene, and rehearse the scene until you are ready to perform. When everyone is ready, perform your scenes for each other.
Charlie Chaplin’s cane is a famous prop that helped him get into character.
Props can be very important, not only to characters but to the entire scene. Create scenes based on props.
Divide into groups. Each group selects three objects that have nothing to do with each other—such as a hanger, a basketball, and a cookie cutter—and creates a scene about the three objects by coming up with a “who,” “what,” and “where.” Rehearse the scene until you’re ready to perform. When each group is ready, perform your scenes for each other.
Have one person select three objects from the box that no one chose the first time around. In turn, each group can create a scene using these three props. See how different each of the scenes turns out. After every group has gone, discuss the different ways the props were used in each scene.