Chapter 5: Using System Tools
In This Chapter
![]() Unveiling the super Task Manager
Unveiling the super Task Manager
![]() Installing a new hard drive
Installing a new hard drive
![]() Running Hyper-V
Running Hyper-V
Windows abounds with tools that can help you do everything from taking out the dog to making the perfect espresso — at least, if your computer runs hot. In this chapter, I step you through three specific tools that can come in very handy:

 The new-in-Windows-8, greatly improved and expanded Task Manager has turned into the Swiss Army knife of Windows applications. In Windows 7, you had to bring up, navigate to, download and/or install a half-dozen different tools to even come close to what the Win8.1 Task Manager does right out of the box. In earlier versions of Windows, many of the tools existed only in vestigial form.
Windows includes all the tools you need to install a new hard drive, and the steps are easier than you think. All it takes is a trip to the Disk Management application. In this chapter, I show you how.
 Finally, I have a bonus section on the virtual machine generator that ships with Windows 8.1 Pro only. (Sorry, if you have standard Windows 8.1, you don’t get it.) A virtual machine is a make-believe, fully contained PC that runs inside your regular PC. You can use it to run Windows XP programs, for example, without setting up a dual boot on your Windows 8.1 system. You can also use a VM to check out new tricks or try some different Windows settings, without gumming up your working machine. Hyper-V works a treat, if you know how to treat it.
Tasking Task Manager
Windows has a secret command post that you can get to if you know the right handshake, uh, key combination. Whatever. The key combination (or tap sequence) works all the time, unless Windows is seriously out to lunch.
Task Manager can handle any of these jobs:
Kill a program. That comes in very handy if, say, Internet Explorer freezes and you can’t get it to do anything. Doesn’t matter if the tiled, full-screen version of IE freezes, or the desktop version. Either way, one trip to Task Manager and zap!
Windows tries to shut down the application without destroying any data. If it’s successful, the application disappears from the list. If it isn’t successful, it presents you with the option of summarily zapping the application (called End Now to the less imaginative) or simply ignoring it and allowing it to go its merry way.
Switch to any program. This is convenient if you find yourself stuck somewhere — in a game, say, that doesn’t “let go” — and you want to jump over to a different application. You can easily go to a tiled- or desktop-style program.
See which processes are hogging your CPU. There’s a bouncing list of program pieces — called processes — and an up-to-the-second ranking of how much computer time each one’s taking. That list is invaluable if your PC is working like a slug, and you can’t figure out which program(s) are hogging the processor.
See which processes take up most of your memory, use your disk, or gab over the network. Sometimes it’s hard to figure out which program’s at fault. Task Manager knows all, sees all, and tells all.
Get running graphs of CPU, memory, disk, or network usage. They’re cool and informative, and may even help you decide whether you need to buy more memory.
See which tiled Windows Store apps use the most resources over a specified period of time. Did the Camera take up the most time on your PC in the past month? Pinball?
Turn off auto-starting programs. This used to be a huge headache, but now it’s surprisingly easy. The simple fact is that almost everybody has automatically starting programs that take up boot time, add to your system overhead, cause aggravation, and may even be dangerous. Task Manager shows you major programs that start automatically and gives you the option to disable the programs.
Send a message to the other users on your PC. The message shows up on the lock screen when you log off.
Force Task Manager to stay on top of all other windows. This includes “immersive” full-screen windows.
Who da man?
Here’s how to bring out the full glory of the Swiss Army knife version of Windows Task Manager:
1a. If you have a keyboard, press Ctrl+Alt+Delete; tap or click the Task Manager link in the screen that appears. Equivalently, right-click in the lower-left corner of the screen and choose Task Manager.
1b. If you don’t have a keyboard, go to the Start screen, type Task, and on the left, tap or click Task Manager.
In either case, the Task Manager appears with a list of all running applications (see Figure 5-1). Notably, the list includes all the running tiled apps, as well as all the running desktop programs.

Figure 5-1: Windows Task Manager lets you control running programs.
2. To kill one of your running programs, tap or click it and then tap or click End Task.
The program may continue for a minute or two — some programs hold on tenaciously — but in the end, almost every program succumbs to the preemptive force.
3. To see the other options, tap or click More Details.
The Processes tab of the full-fledged Task Manager appears. See Figure 5-2.

Figure 5-2: Task Manager ranks processes in real time.
Task Manager Processes
On the Processes tab, Task Manager groups running programs depending on the type of program:
Apps are just regular, everyday programs. They’re ones you started, or ones that are set up to start automatically. (You may think that “apps” means “Windows Store apps” or “Metro apps” — but no. These are just programs, or Metro apps, or whatever happens to be running.)
Background processes keep the pieces of your programs and drivers working.
Windows processes are similar to background processes, except they’re parts of Windows itself.
 You can tap or click a column heading (such as CPU, Memory, Disk, or Network), and Task Manager sorts on that particular value. To update the report, choose View⇒Refresh Now.
As you start new programs, they appear on the Apps list, and any background programs that they bring along appear on the Background processes list. Tiled, full-screen apps, in particular, go to sleep when they aren’t being used, so they drop off the Task Manager list. One glance at the Processes tab should give you a good idea if any programs are hogging your machine — for CPU processor cycles, memory, disk access, or tying up the network.
Task Manager Performance
The Performance tab (see Figure 5-3) gives you running graphs of CPU usage, allocated memory, disk activity, and the volume of data running into and out of your machine.
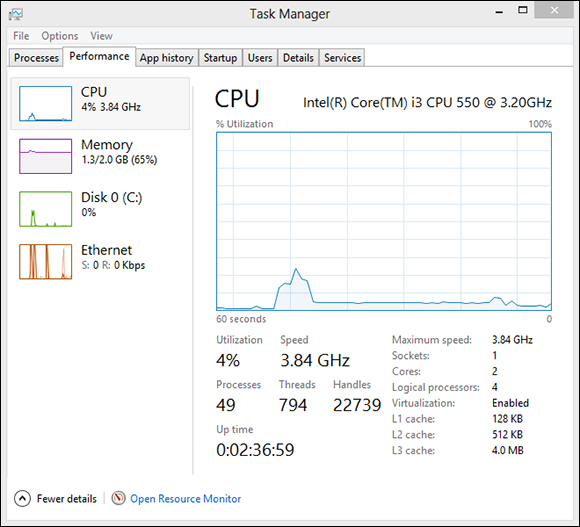
Figure 5-3: Keep tabs on the four key components of your PC’s performance.
 If you want to see much more detailed information — including utilization of each of the cores of a multi-core CPU — tap or click the Open Resource Monitor link at the bottom.
Task Manager App History
The App History tab (see Figure 5-4) keeps a cumulative count of all the time you’ve spent on each of the various tiled Metro apps from the Windows Store. Tap or click a column header to sort.
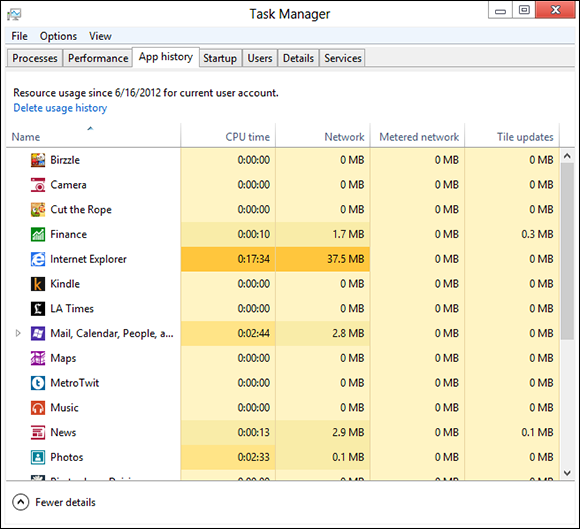
Figure 5-4: A comprehen-sive list of all the time you’ve spent playing, er, using each of the tiled Windows Store Metro apps.
Task Manager Startup and autoruns
No doubt you know that Windows automatically runs certain programs every time you start it, and that those programs can prove, uh, cantankerous at times. The Startup tab, as shown in Figure 5-5, represents a giant step forward for Windows usability. It shows you all the programs that are started automatically each time you log on to Windows.
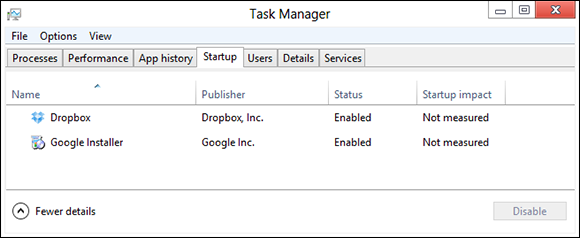
Figure 5-5: A subset of those cycle-stealing auto-startup programs.
If you want to disable an autorunning program, tap or click the program, choose Disable, and then reboot Windows.
The Task Manager Startup tab shows you the application programs, their helper programs, and sometimes problematic programs that use well-known tricks to run every time Windows starts. Unfortunately, really bad programs frequently find ways to squirrel themselves away, so they don’t appear on this list.
Microsoft distributes an Autoruns program that digs in to every nook and cranny of Windows, ferreting out autorunning programs — even Windows programs.
Autoruns started as a free product from the small Sysinternals company, and owes its existence to Mark Russinovich (now a celebrated novelist) and Bryce Cogswell, two of the most knowledgeable Windows folks on the planet. In July 2006, Microsoft bought Sysinternals. Mark became a Microsoft Demigod, er, Fellow. Microsoft promised that all the free Sysinternals products would remain free. And wonder of wonders, that’s exactly what happened.
To get Autoruns working, download it as a Zip file from http://technet.microsoft.com/en-us/sysinternals/bb963902.aspx and extract the Zip. Autoruns.exe is the program you want. Tap or double-click to run it; no installation required.
After Autoruns is working on your computer, the following tips can help you start using the program:
Autoruns lists an enormous number of auto-starting programs, some of which appear in the most obscure corners of Windows. The Everything list shown in Figure 5-6 lists every auto-starting program in the order they’re run.
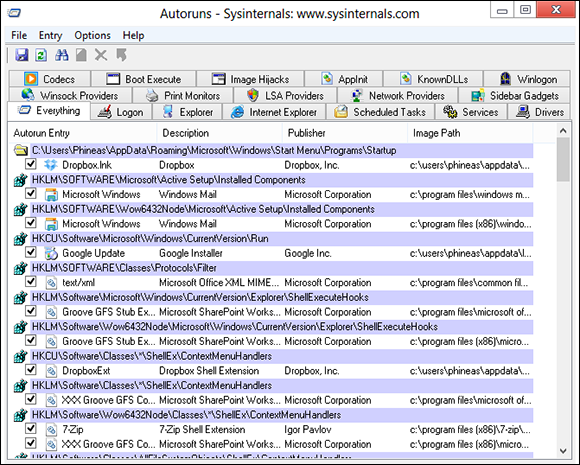
Figure 5-6: Autoruns shows you every program that starts automatic-ally.
Autoruns has many options — you can get a good overview on the Microsoft Ask the Performance Team blog, http://blogs.technet.com/b/askperf/archive/2009/02/10/who-s-that-hiding-in-my-windows.aspx. The one I use most is the ability to hide all the auto-starting Microsoft programs. It's easy. Choose Options⇒Filter Options and then select the Hide Microsoft Entries box. The result is a clean list of all the foreign stuff being launched automatically by Windows.
Autoruns can suspend an auto-starting program. To do so, deselect the box to the left of the program and reboot Windows. If you zap an auto-starting program and your computer doesn’t work right, run Autoruns again and select the box. Easy.
 Of course, you shouldn’t disable an auto-starting program just because it looks superfluous, or even because you figure it contributes to global warming or slow startups, whichever comes first. As a general rule, if you don’t know exactly what an auto-starting program does, don’t touch it. It’s not nice to fool with the support for those tiled apps, in particular.
On the other hand, if you concentrate on auto-starting programs that don’t come from Microsoft, you may find a few things that you don’t want or need — items that deserve to get consigned to the bit bucket.
Task Manager Users
If you’re using an administrator account, the Users tab lets you look at what’s happening with every person who’s currently logged on to your computer, as shown in Figure 5-7.
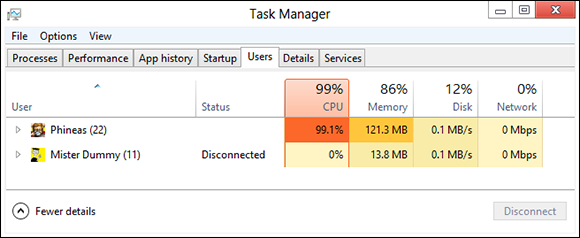
Figure 5-7: See what other users are doing right now.
The number that appears to the right of the User’s name is the number of processes the user has going at that point. Tap or click the wedge to the left of the user’s name, and you see a full list of processes.
Task Manager Details and Services
If you used Task Manager in Windows 7 or earlier, you’ve seen this version, shown in Figure 5-8. The Details tab shows all the running processes, regardless of which user is attached to the process.
The Services tab, similarly, shows all the Windows services that have been started. Once in a very blue moon, you may find a Windows error message that some Windows service or another (say, the printer service, or some sort of networking service) isn’t running. This tab is where you can tell whether the service is really running.
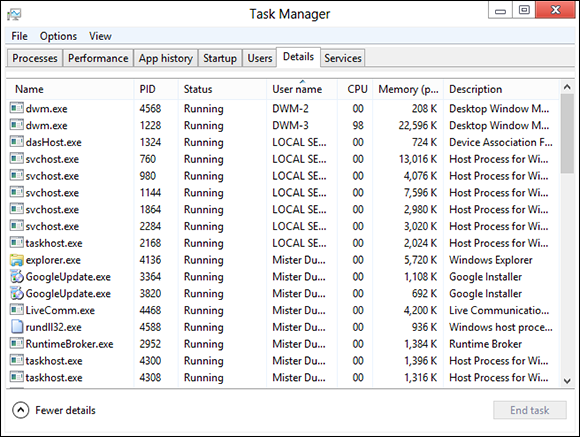
Figure 5-8: All the details about every process appear here.
Installing a Second Hard Drive
You probably know how hard it is to install an external hard drive in a Windows 8.1 PC. Basically, you turn off the computer, plug the USB or eSATA cable into your computer, turn it on . . . and you’re done.
Yes, external hard drive manufacturers have fancy software. No, you don’t want it. Windows knows all the tricks. If you install one additional hard drive, internal or external, you can set up File History (see Book VIII, Chapter 1). Install two additional drives, internal or external, and you can turn on Storage Spaces (see Book VII, Chapter 4). None of the Windows programs need or want whatever programs the hard drive manufacturer offers.
Installing a second internal hard drive into a PC that’s made to take two or more hard drives is only a little bit more complex than plugging an external drive into your USB port. Almost all desktop PCs can handle more than one internal hard drive. Some laptops can, too.
Here’s how to do it:
1. Turn off your PC. Crack open the case, put in the new hard drive, attach the cables and secure the drive, probably with screws. Close the case. Turn on the power and log in to Windows.
If you need help, the manufacturer’s website has instructions. Adding the physical drive inside the computer case is really very simple — even if you’ve never seen the inside of your computer.
2. Right-click in the lower-left corner of the screen and choose Disk Management.
The Disk Management dialog box appears, as shown in Figure 5-9.
3. Scroll down the list at the bottom and find your new drive, probably marked Unallocated.
In Figure 5-9, the new drive is identified as Disk 7.
4. On the right, in the Unallocated area, tap and hold or right-click, and then choose New Simple Volume.
The New Simple Volume wizard appears, as shown in Figure 5-10.
5. Tap or click Next.
You’re asked to specify a volume size.
6. Leave the numbers just as they are — you want to use the whole drive — and tap or click Next.
The wizard asks you to specify a drive letter. D: is most common.
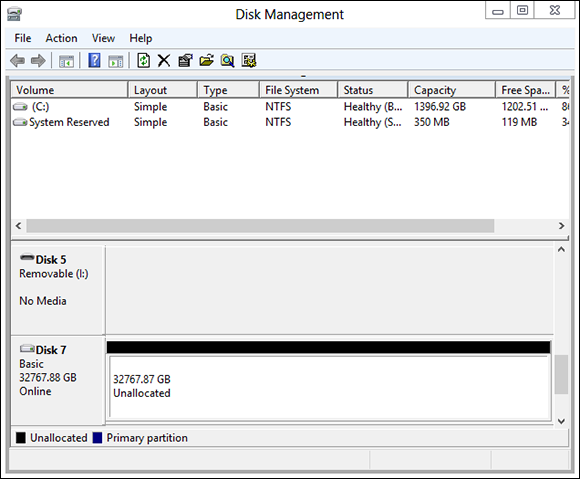
Figure 5-9: Add the new drive here.
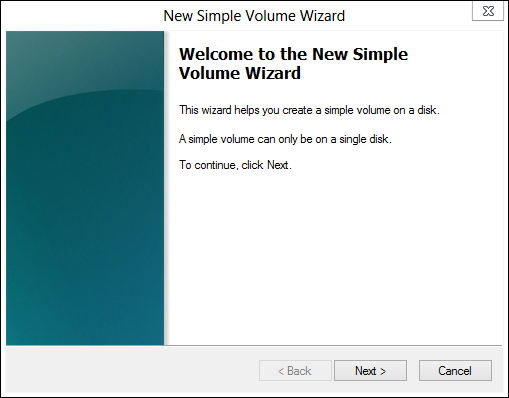
Figure 5-10: The wizard takes you through all the steps.
7. If you really, really want to give the drive a different letter, go ahead and do so (most people should leave it at D:). Tap or click Next.
The wizard wants to know whether you want to use something other than the NTFS file system, or to set a different allocation unit. You don’t.
8. Tap or click Next; then tap or click Finish.
Windows whirs and chunks, and when it’s done, you have a spanking new drive, ready to be used.
If you have three or more drives in, or attached to, your PC, consider setting up Storage Spaces. It’s a remarkable piece of technology that’ll keep redundant copies of all your data and protect you from catastrophic failure of any of your data drives. See Book VII, Chapter 4 for details.
Running a Virtual Machine
At its heart, a virtual machine (or VM) is a sleight of hand. A parlor trick. You set up a “machine” inside Windows that isn’t really a machine; it’s a program. Then you stick other programs inside the virtual machine. The programs think they’re working inside a real machine, when they aren’t — they’re working inside another program.
Windows 8.1 Pro (and Enterprise) includes Hyper-V and all the ancillary software (drivers and such) you need to run a virtual machine inside of Windows. If you only have the “regular” version of Windows 8.1, you need to look elsewhere. (Hint: Use Google and find a copy of VirtualBox.)
In addition, to get the Hyper-V program going, you must be running the 64-bit version of Windows 8.1 Pro, with at least 2GB of memory. The hardware itself has to be fairly up to date because it has to support the Second Level Address Translation (SLAT) capability. You can find a good overview of testing for SLAT on the How-To Geek site, www.howtogeek.com/73318/how-to-check-if-your-cpu-supports-second-level-address-translation-slat.
Why would you want to use a VM? Many reasons:
Say you have an old program that runs only under Windows XP or Windows 95 (or even DOS, for that matter). You set up a VM, install XP or 95 (or DOS) and then stick the old program inside the VM. The old program doesn’t know any better — it’s fat, dumb, and happy working inside of XP. But you’re watching from the outside. You can interact with the old program, type inside it, click inside it, give it disk space to play with, or attach it to a network interface card. A fake (“virtual”) one, of course, that works just like the real thing.
You want to try a different operating system. Maybe you want to play with Linux for a while or take Windows Server 2012 for a ride. Or you get nostalgic for the days of Windows Me. Or Microsoft Bob. Set up a virtual machine for each of the operating systems and install the operating system in the VM. Then close each VM and save it. When you want to play with one of the OSs, just crank up the right VM, and you’re on your way.
You need to isolate your “real” system while you try something that’s tricky or experimental or potentially dangerous. If you have a VM that gets infected with a virus, the virus doesn’t necessarily spread to your main machine. If you try a weird program inside a VM and it crashes, restarting the VM is much easier than restarting your PC, and if there are any bizarre side effects — say, weird Registry changes — they won’t affect your main machine.
I use VMs when I’m experimenting with hooking computers together. It’s pretty easy to set up several VMs, one running XP, say, another with Win7, and one more with Win8.1. Each of them thinks that it’s connected to the other two. That way, I can test settings and figure out how to get them to communicate with each other.
Hyper-V is a big, complex product, worthy of a book unto itself. In this chapter, I just get you started and then point you to some sources of information that’ll help you take full advantage of the product.
Here’s how to turn on Hyper-V:
1. On the Start screen, type features.
2. Below the search box, tap or click the Turn Windows Features On or Off link.
The Windows Features dialog box appears, as shown in Figure 5-11.
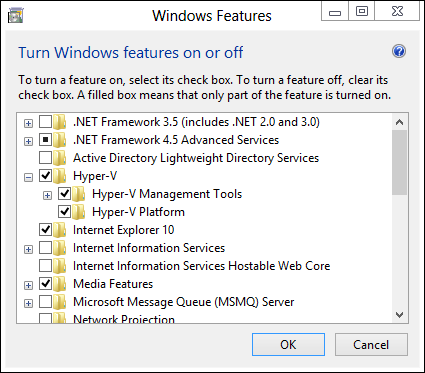
Figure 5-11: Hyper-V has to be turned on before you can use it.
3. Select the Hyper-V box and then tap or click OK.
Windows installs two programs, the Hyper-V Manager and the Hyper-V Virtual Machine Connection. Both appear as tiles on the far-right side of the Start screen.
4. Reboot after the installation finishes.
When Windows comes back, you’re ready to set up your first virtual machine. Here’s how:
1. On the All Apps screen (if you start with the Metro Start screen, click or tap the down arrow at the bottom), and then tap or click the Hyper-V Manager tile.
Hyper-V brings up the rather intimidating screen shown in Figure 5-12.
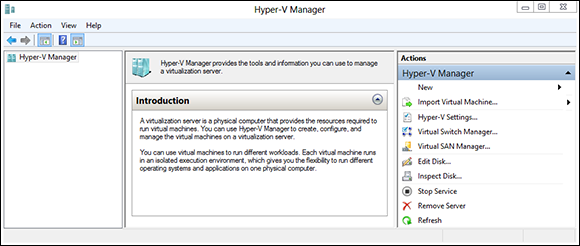
Figure 5-12: Create new virtual machines here.
2. On the right, tap or click Virtual Switch Manager.
The Virtual Switch Manager for your PC appears, as shown in Figure 5-13.

Figure 5-13: Set up a virtual switch now, while it’s easy.
I assume you want your new VM to be able to communicate with the outside world — for an Internet connection, if nothing else — and it’s easiest to set up that connection before you create the VM. The connection is done through a virtual switch, which ties a connection inside the virtual machine to a physical device on the outside, in the real world.
3. On the left, tap or click New Virtual Switch.
You’re asked to set up properties for the new virtual switch, as shown in Figure 5-14.
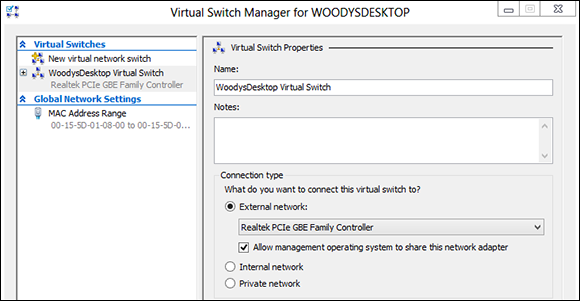
Figure 5-14: Flesh out the virtual switch here.
4. Give the new virtual switch a name and tap or click OK.
Chances are good you want your VM to connect to a physical network adapter in the outside world, so leave the default selections the way they are.
Hyper-V goes back to the Hyper-V Manager dialog box (refer to Figure 5-12).
5. On the right, choose New⇒Virtual Machine.
The New Virtual Machine Wizard starts.
6. Tap or click Next.
You’re asked to specify a name and location for the VM, as shown in Figure 5-15.
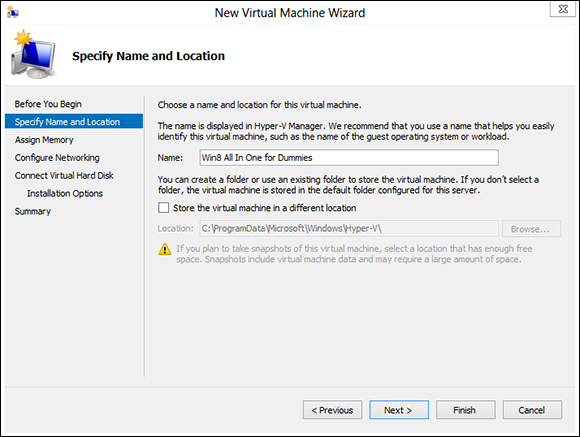
Figure 5-15: Start by giving the VM a name you will recognize.
7. Type a name that will immediately tell you what you’re running on this VM; and if you need to move the location of the VM (remember the VM is a program, and needs to store its files somewhere), change the location.
8. Tap or click Next.
VMs take up a lot of room, and each time you take a “snapshot,” you store away the entire status of the VM — including any data on the disks, copies of installed programs, and all settings.
The wizard asks how much memory you want to assign for startup.
9. If you’re going to run Windows 7 or Windows 8.1, set startup memory at 1024MB and select the Use Dynamic Memory for this Virtual Machine box.
Linux fans can get by with 512MB and no Dynamic Memory.
10. Tap or click Next.
You want enough memory so the VM doesn’t start thrashing, but you don’t want to specify too much in case you try to start many VMs at the same time.
Hyper-V wants to know whether you want to connect the VM to a network adapter. You set up the virtual connection already, so it’s easy.
11. In the Connection box, choose the name of the connection that you created in Steps 3 and 4. Tap or click Next.
Hyper-V wants you to set up the virtual hard disk.
In case you’re wondering, the virtual hard disks inside Hyper-V are quite different from the disk virtualization done in Windows Storage Spaces. Don’t be confused. They work in completely different worlds.
12. Type a new name if you like and then tap or click Next.
The defaults here are fine.
You see the final key step in the wizard, which asks you how you want to install the operating system on the VM, as shown in Figure 5-16.
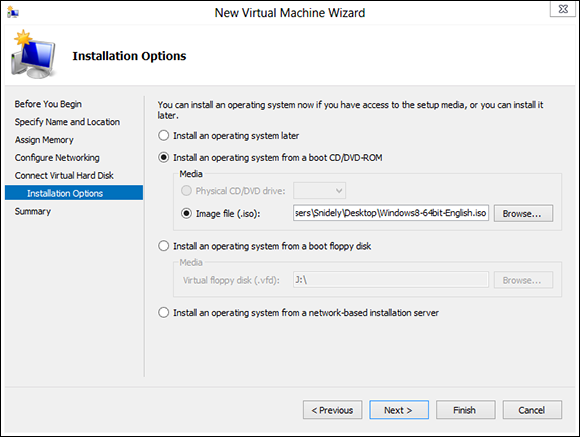
Figure 5-16: Every VM needs an operating system. Pick yours here.
13. If you have a Windows installation disk or file, select Install an Operating System from a Boot CD/DVD-ROM and tell Hyper-V where to find the Boot CD/DVD (or ISO file, if you have one).
14. Tap or click Next.
Hyper-V gives you a last look at your settings.
15. Tap or click Finish.
Your new VM appears in the list of virtual machines.
To start the VM, tap or double-click it, and then if necessary choose Action⇒Start. You see something like the VM in Figure 5-17, which runs Windows 8 in a VM inside Windows 8.1.
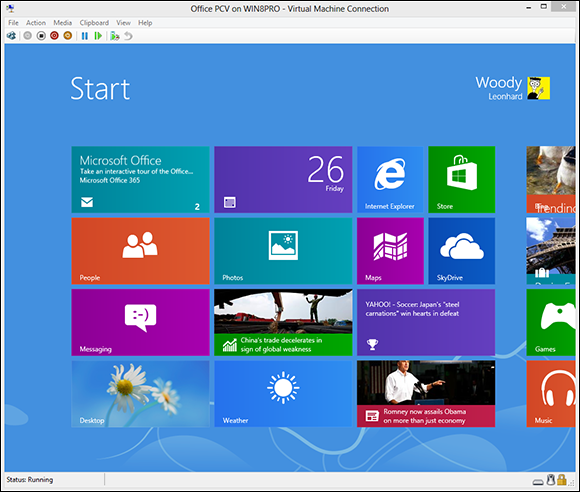
Figure 5-17: A Windows 8 virtual machine running inside Windows 8.1.
The first thing you want to do with your new VM is add an Integration Services Setup Disk, so you can control the VM more readily. To do so, choose Action⇒Insert Integration Services Setup Disk.
That just barely scratches the surface of Hyper-V. For more info, start at Microsoft's Hyper-V support center at http://technet.microsoft.com/en-us/windowsserver/dd448604.