Crafting with wine corks is a relatively simple endeavor, but you’ll need a little background information before you dive in. In this part, you’ll learn about the different types of corks you can find, and how to get more if you need a break from drinking wine! You’ll also get a quick rundown of the everyday tools and techniques you’ll be using for the crafts in this book.
What is cork, anyway? Cork is tree bark! Most cork that you see is bark from the “cork oak,” an evergreen oak tree that grows in southwest Europe and northwest Africa. The cork oak’s Latin name is quercus suber, and if you even make a half-hearted attempt at pronouncing that, you’ll notice that the first word sounds kind of cork-y. Quercus actually means “oak,” though; it’s the suber part that means “cork.”
Cork is a renewable resource, which means when you are crafting with corks, you are crafting green, baby! In fact, the cork oak is not harmed at all by harvesting, which is done by hand with an axe by trained extractors. The bark grows back after nine to twelve years, and can be harvested about twelve times in the life cycle of the tree.
Cork is elastic and nearly impermeable, which is why vintners have used it to seal wine bottles since the mid-1700s.
If you drink a lot of wine, you may have encountered several different kinds of corks. The type is chosen by the manufacturer for many different reasons, including quality, price, and how long the wine is aged. Luckily, there are ways to craft with each type! Here is a not-so-scientific guide to the different types of wine corks you may come across:
The projects in this book use all kinds of corks, even synthetic! Crafting with corks is very forgiving—if you have corks that are in great shape, you can feature them as-is—if not, you can dye, cut, or reshape them! Everyone has her own personal preference. (Personally, I like the irregular texture and variations in color that you find in natural corks.) All that matters is that you like the finished product.
If you have a large collection of corks, it can be kind of overwhelming to paw through them all to get the corks you want for each project. I suggest you separate them into categories ahead of time so you can easily grab what you need when you’re ready to craft.
These are the categories I separate my corks into, and how I like to use them:
These are just my preferences. The more you get to know your collection and the different ways to use corks, the more you’ll develop your own styles and preferences.
Most of the projects in this book require some simple crafting skills. No need to be intimidated—they are all easy to master. Read on for tips on each technique.
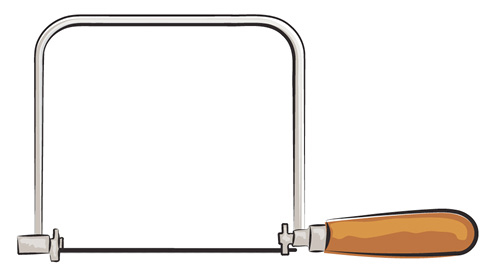
I had the best results using a small woodworker’s coping saw. A coping saw is a thin-bladed tool that is shaped like the letter P. You can find one at a hardware store, or online. Use a block of wood under the cork to give you some leverage and height, and go slow.
Another way to cut corks is with an X-ACTO knife—a very sharp, razor-like knife that’s great for detail work (such as the Simple Stamps project, see Part 5). They’re available at craft and office supply stores, hardware stores, and online.
Cutting a cork does leave the edges a bit rough, so I keep two kinds of sandpaper at the ready—rough and fine. The rough grit is useful when you have a very crumbly edge that you need to clean up, while the fine grit works best when you just need to get rid of a few slightly uneven spots. I find it easiest to put the sandpaper on a table and gently swipe the cork across it a few times. A little bit of sanding goes a long way.
I have read on the Internet that you should soak corks in hot water before cutting, to avoid crumbling. But I gotta tell you, I cut hundreds of corks for the projects in this book and I didn’t soak any of them. I’d try cutting your corks without soaking them first—unless your collection is extremely dry, you probably don’t need to bother.
You’ll need a drill to make holes for clasps, hooks, and the like. A handheld power drill will do the job. Use the power drill on top of a wood block, to give you some stability and leverage.
If you have and are comfortable using a drill press, you can also use that. Be especially careful when you don’t have a flat edge to drill into! The cork can roll around if you don’t hold it securely.
Since corks are so lightweight, they’re relatively easy to glue. When I first started working with corks, I didn’t believe that a hot glue gun would make a secure bond. I imagined the corks breaking apart from each other with clumps of dried glue on them. To my surprise, the hot glue worked just great most of the time! Any time the corks are being glued to something for a decoration, the hot glue gun is the way to go. You can find inexpensive glue guns at craft stores and online. Make sure to buy extra glue sticks ahead of time!
You do have a couple of other options, too:

Dyeing corks enhances them with a nice translucent color, so you can still see the printing and grain of the cork. Readily available dyes like Rit brand work great on corks too. Here are some tips for using Rit:
Painting corks is the way to go if you really want bright color for your project, or to cover writing or images you don’t like. And the brighter you want your color, the more you are going to want to prime your corks with a white base. I like to apply KILZ 2 latex primer (available at hardware stores) with a small paintbrush. You could also use a spray primer, artist’s gesso, or white acrylic paint as primers. I primed most of the painted projects in this book, but you can do whatever you like. There is no right or wrong, it comes down to preference and time!
For the actual painting, use water-based craft or acrylic paint. I refer to them (interchangeably) as both in the projects, and it really doesn’t matter which one you use. “Craft paint” tends to be less expensive, more translucent (requiring more coats), and more matte. Use what you have or what you can afford! Follow the paint manufacturer’s directions for application and dry times between coats. Let dry completely before crafting.
Now that you are ready to get crafting with wine corks, you’re wondering, “How can I get my crafty paws on some corks, stat?” Of course, the corks from wine that you drank personally will have more meaning (perfect for the Special Occasion Memento, see Part 6), but sometimes you need more corks than you can harvest after a boozy night with the girls. Here are some suggestions:
You’ll be using a few types of common crafting closures and tools for some of these projects. They’re all readily available at craft stores or online. In each case, I’ve given you guidance on size and type—but don’t feel tied to those suggestions! If I list a 1⁄2" eye pin and you have a 1⁄2" eye pin on hand, go ahead and use it. The parts and tools you need include:
Now start making some stuff with corks and drop me a line at melissa@yummygoods.com to show me what you made!
Wine Profile: Chardonnay
Chardonnay is undoubtedly the noblest white grape in the world. It can produce the greatest variety of wines in the greatest variety of areas. DNA profiling has concluded that Chardonnay is a cross between the notoriously unstable Pinot Noir and an ancient, and almost extinct, variety called Gouais Blanc. Burgundy claims the title of Chardonnay’s birthplace, and there is little to dispute that claim.
Chardonnay is fairly low in varietal character, meaning that it is not terribly impressive on its own, or vastly distinguishable from other white grape varieties. Much of what determines the personality of a Chardonnay is what the winemaker does to the grapes. Using oak to ferment and/or age the wine produces vanilla flavors, while adding richness. Leaving the wine on the spent yeast cells, or lees, adds complexity and a toasty note. Conducting malolactic fermentation reduces the overall acidity and produces a softer, creamier wine. None of this is derived from the grapes themselves.
Chardonnay is hardy and versatile and can grow successfully in all but the most extreme wine regions around the world. It can make great—though somewhat different—wines almost anywhere it’s reasonably comfortable. Cool climate Chardonnays tend toward a dry crispness and clean fruit flavors. Warmer climate Chardonnays lean toward richer honey and butterscotch flavors.
In Burgundy, Chardonnay goes into all the region’s white wines, such as Montrachet, Meursault, Pouilly-Fuissé, and Chablis. It’s one of the three grapes—along with Pinot Noir and Pinot Meunier—allowed in Champagne and the only grape in blanc de blancs. Recently, a series of unoaked Chardonnays have entered the arena and are gaining momentum. Traditionally, famed unoaked styles have come from northern Italy, Chablis, and Burgundy’s Mâconnais district.
Chardonnay’s versatility is the main reason why it has become one of the most recognized wines in the world. You can expect a tremendous variety of flavors, medium to high acidity, medium to full body, and minimal fruit to tropical fruit. And you can count on a wine that’s dry.