Appendix A
Testing Your App on a Device
The iOS Simulator is a handy tool for testing your application as you are developing it. However, it is no substitute for testing on an actual device. Certain features, such as the accelerometer and camera, cannot be tested on the simulator at all.
Testing your application on your device is slightly different from giving it to a small number of users for beta testing. When it is your own device, you can physically connect it to your Mac and use Xcode to test/debug your app while it executes on the device. Distributing your app to a few users for beta testing is achieved through TestFlight, a process covered in detail in Appendix B.
Before you can test your app on a device, you need to prepare the device for testing and configure a few options in Xcode. The process itself can seem quite complicated at first. This appendix goes through the various steps required to test your apps on a device with Xcode.
Obtaining and Registering UDIDs
Each iOS device has a unique 40-digit identifier, commonly referred to as the device UDID. Before you can test your app on a device with Xcode, you will need to register the UDID of that device with the iOS Provisioning Portal. You can obtain this UDID through the Xcode Device Manager.
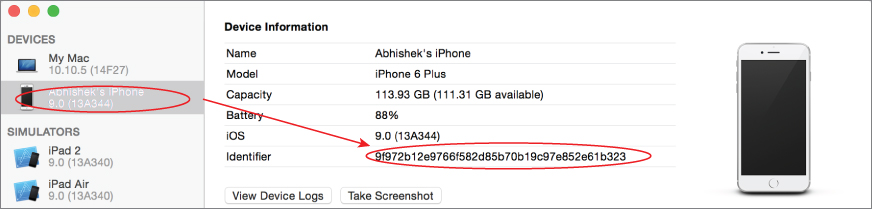
To obtain the UDID for a device, simply connect it to your Mac and access the Devices Manager by selecting Window ![]() Devices. Click the device in the list on the left-hand side and note the value of the Identifier field (see Figure A.1).
Devices. Click the device in the list on the left-hand side and note the value of the Identifier field (see Figure A.1).
To register a device for development, simply click the Use for Development button in the Devices Manager window. You will be asked to provide the Apple ID and password you used to register as an iOS developer. If the device has already been set up for development, then the Use for Development button will not be visible.
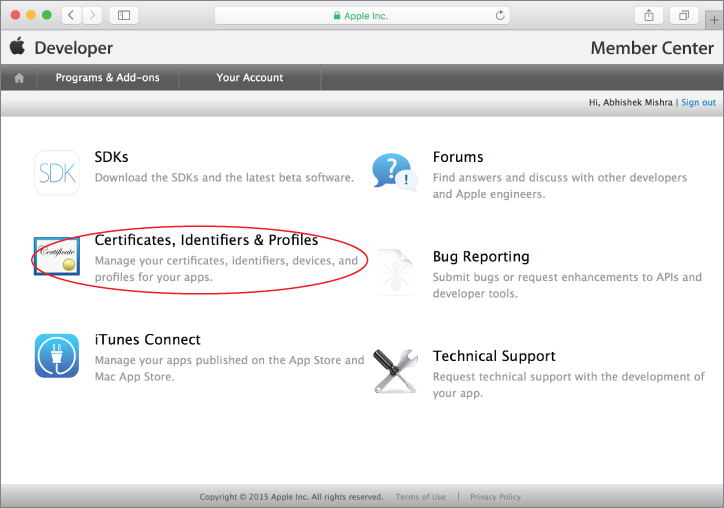
You can also register UDIDs manually. To do this, you must log in to your iOS developer account at https://developer.apple.com/ios. Click the Member Center link on the top-right corner of the page to navigate to the member center. Within the member center, click the Certificates, Identifiers & Profiles link (see Figure A.2).
Next, click the Devices link in the iOS Apps category on the left-hand side of the page (see Figure A.3).

The Devices screen shows you a list of devices registered to your account. You can register up to 100 devices of each type a year (note that deleting a device does not count toward this limit). There are five device types:
- iPhone
- iPad
- iPod Touch
- Apple Watch
- Apple TV
To add a device to your account, click the Add button located above the list of devices and fill in the UDID of the device along with a name with which you would like to refer to the device (see Figure A.4). Click Continue to add the UDID to the device list. This list can be reset once a year, when you renew your paid membership.

Creating an App ID (Bundle Identifier)
The next step involves creating and registering a unique identifier for your app; this is known as the App ID (or Bundle ID). In addition to uniquely identifying your application, an App ID allows your application to receive remote notifications, communicate with external accessories, or share keychain data with other applications in a suite, and use iCloud services.
An App ID consists of an organization identifier and an application identifier (see Figure A.5). When you create a new project in Xcode, you are asked to provide an organization identifier, and the App ID is generated for you by appending the name of the project to the organization identifier. To distribute the application through the App Store, the identifier used to create the Xcode project must be registered with your iOS developer account. You can always change the Bundle Identifier for an existing application by editing the Bundle Identifier key in the project's info.plist file.

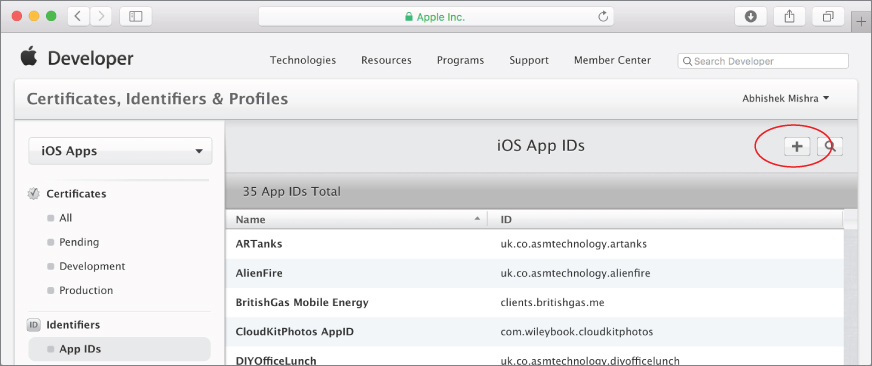
To create an appropriate App ID, log in to your iOS developer account at https://developer.apple.com/ios. Click the Member Center link in the top-right corner of the page to navigate to the member center. Within the member center, click the Certificates, Identifiers & Profiles link, and then in the Identifiers section under the iOS Apps category click on the link to App IDs.
To create a new App ID, click the New App ID button on the top-right side (see Figure A.6).
Provide a descriptive name for the new App ID in the Name field and select Team ID in the App ID prefix drop-down. Select the Explicit App ID radio button under the App ID suffix section and provide a unique identifier in the Bundle ID field that ends in the name of the Xcode project you are going to create (or have created).
Typically, you create this identifier by combining the reverse-domain name of your website and the name of your Xcode project. For example, if your company identifier is com.acmecorp and your Xcode project is called cloudkitphotos, then the bundle identifier specified should resemble com.acmecorp.cloudkitphotos. Your browser window should resemble Figure A.7.

If you do not mind your apps sharing data between them, you can use an asterisk instead of the application name, thus creating a string of the form com.domainname.*.
Such an App ID is called a wildcard App ID and can be used repeatedly across multiple applications. If you want to create a wildcard App ID, simply select the relevant radio button on the page (see Figure A.8).

The downside of wildcard App IDs is that certain features such as Remote Push Notifications and iCloud support are not available.
Click the Continue button to proceed. You will be presented with a summary of the App ID information. Click on Submit to finish creating the App ID.
Creating a Development Certificate
The next step is to create and install a development certificate. Creating a development certificate involves creating an appropriate certificate request and submitting this request to the iOS Provisioning Portal. Once the certificate is ready, you will be able to download and install it on your Mac.
To create a certificate request, launch the Keychain Access utility from the Applications folder on your Mac. When the Keychain Access utility is running, choose Keychain Access ![]() Certificate Assistant
Certificate Assistant ![]() Request a Certificate from a Certificate Authority.
Request a Certificate from a Certificate Authority.
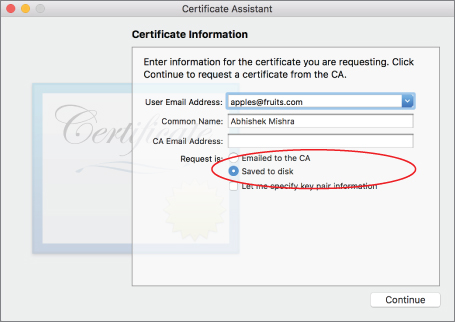
In the Certificate Assistant dialog box (see Figure A.9), specify the e-mail address and account name used to access the iOS Developer Program, and ensure the Saved to Disk radio button is selected. Click the Continue button to save the certificate request as a file on your Mac.
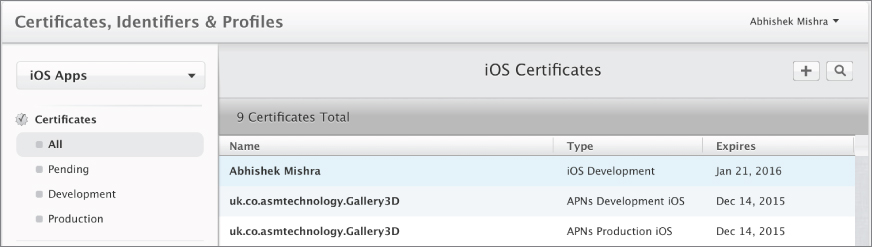
To create a development certificate from your certificate request file, log in to your iOS developer account at https://developer.apple.com/ios. Click the Member Center link on the top-right corner of the page to navigate to the member center. Within the member center, click the Certificates, Identifiers & Profiles link, and then under the iOS Apps category, look under the Certificates category and click on All.
To create a new development certificate, click the Add button (+) on the top-right side (see Figure A.10).
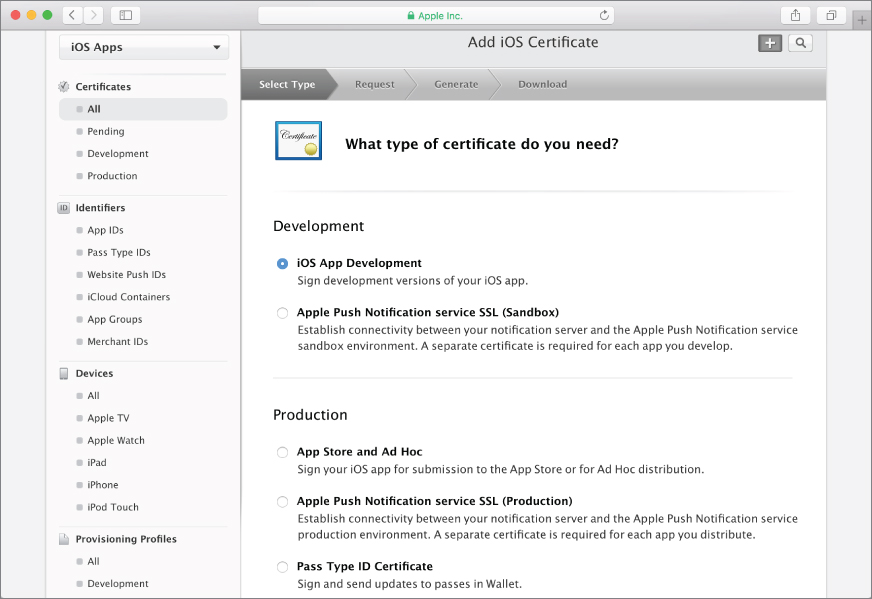
You will now be asked to choose the type of certificate you want to create. Select iOS App Development from the list of options (see Figure A.11), scroll down to the bottom of the page, and click Continue.
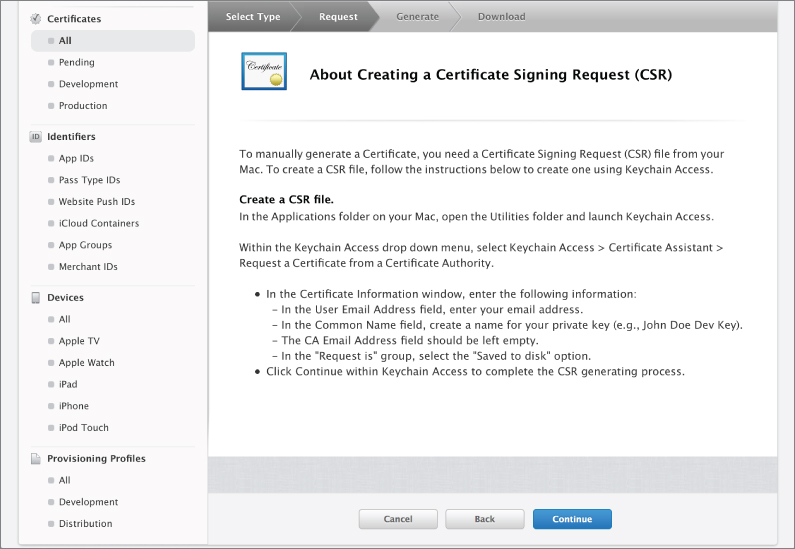
The next screen contains some general information on what a certificate request file is and how to create one (see Figure A.12). Because you have already created one, scroll to the bottom of the page and click Continue.
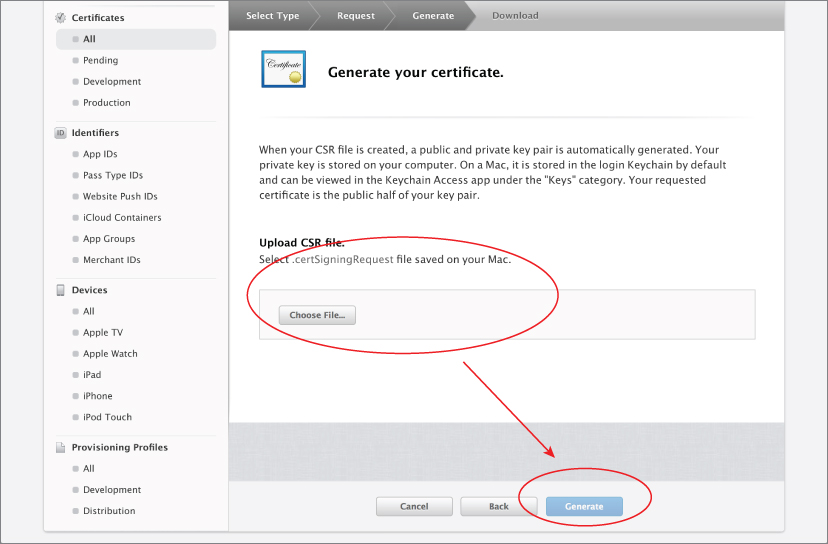
In the next screen, use the Choose File button to select the certificate request file that you saved on your Mac and then click the Generate button to create the development certificate (see Figure A.13).
If you are not part of a team, and are solely responsible for handling your iOS Developer account, your certificate is issued automatically and available to download in a few minutes. You may need to refresh your browser window. If you are part of a team, your team manager will need to first approve the certificate request. When your certificate is ready to download, you will see its status listed as Issued, and a Download link will be available.
Download the certificate and save it to your Mac; by default, the certificate should be saved to your Downloads folder.
If you haven't done so already, download the Worldwide Developer Relations Certificate from the Apple PKI authority page (see Figure A.14). This page is located at https://www.apple.com/certificateauthority/.
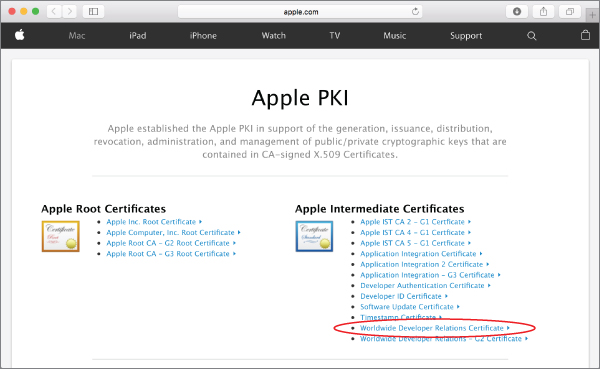
This certificate is also available to download at the bottom of the Create Certificate page, where you select the type of certificate to generate (Figure A.15).

Creating a Provisioning Profile
After having registered your device UDID, App ID, and creating a development certificate, you will need to create a development provisioning profile. A provisioning profile groups an App ID, a certificate, and device UDIDs into a single entity. The certificate in question would be the development certificate you just generated in the previous section, and the device-specific information would be a list of UDIDs on which you want to debug your application.
To create a development provisioning profile, log in to your iOS developer account at https://developer.apple.com/ios. Click the Member Center link on the top-right corner of the page to navigate to the member center. Within the member center, click the Certificates, Identifiers & Profiles link, and then under the iOS Apps category, find Provisioning Profiles and click All.
Click the New Profile button on the top-right side (see Figure A.16).

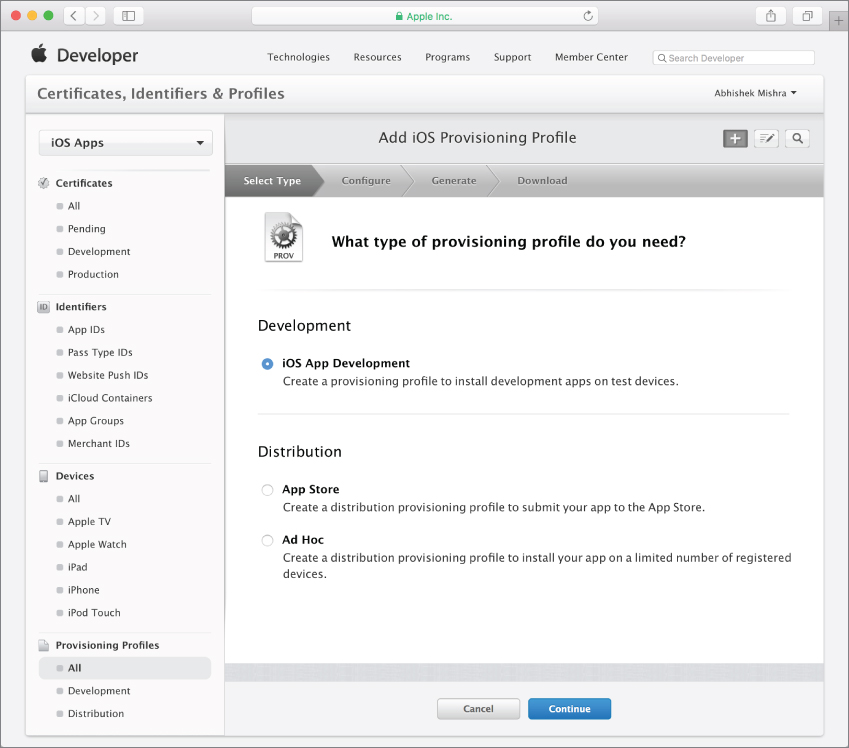
You will be asked to choose between a development or a distribution provisioning profile. A distribution provisioning profile is used to submit applications to iTunes Connect. For the moment, select the iOS App Development option and click Continue (see Figure A.17).
As mentioned earlier in this section, a development provisioning profile connects three pieces of information:
- A single App ID
- One or more public keys
- A list of test device IDs
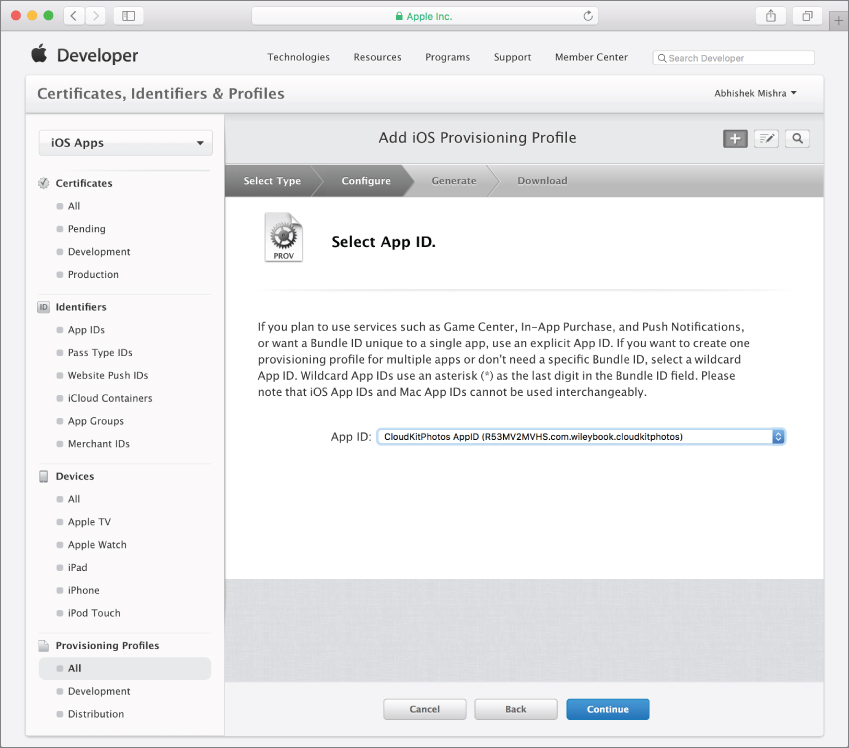
The next step requires you to select an App ID that will be associated with this provisioning profile. Select an App ID from the list of available identifiers (see Figure A.18) and click Continue.
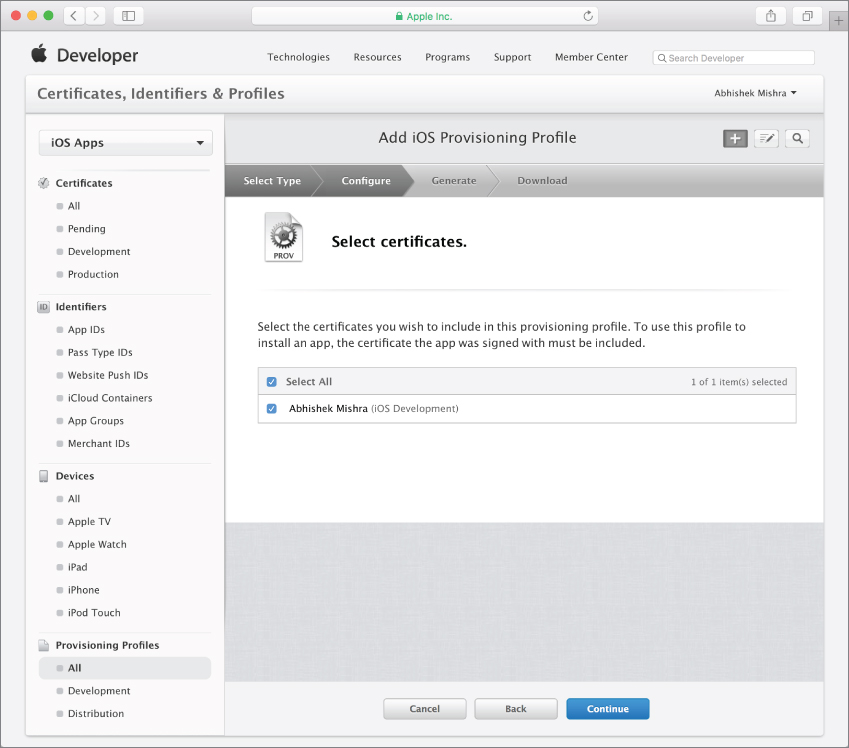
Select one or more development certificates that will be included in the profile. You must make sure to sign the app in Xcode using one of the certificates you select here. Select a suitable certificate and click Continue (see Figure A.19).
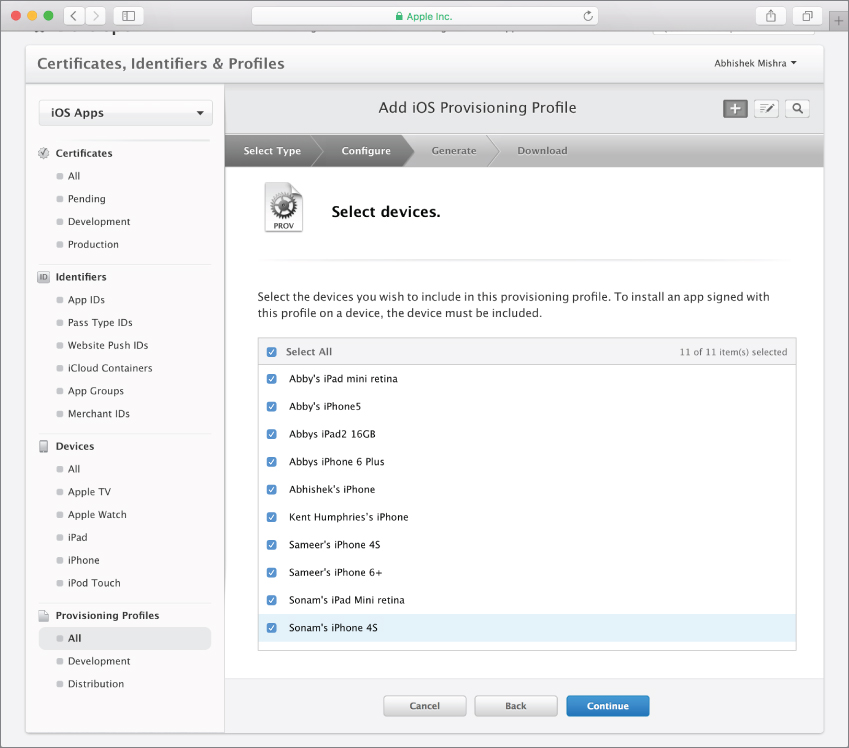
Next, you must select one or more devices that will be included in this provisioning profile. The corresponding identifiers for these devices must be registered with your development account. Your app will only be testable on these devices (see Figure A.20).
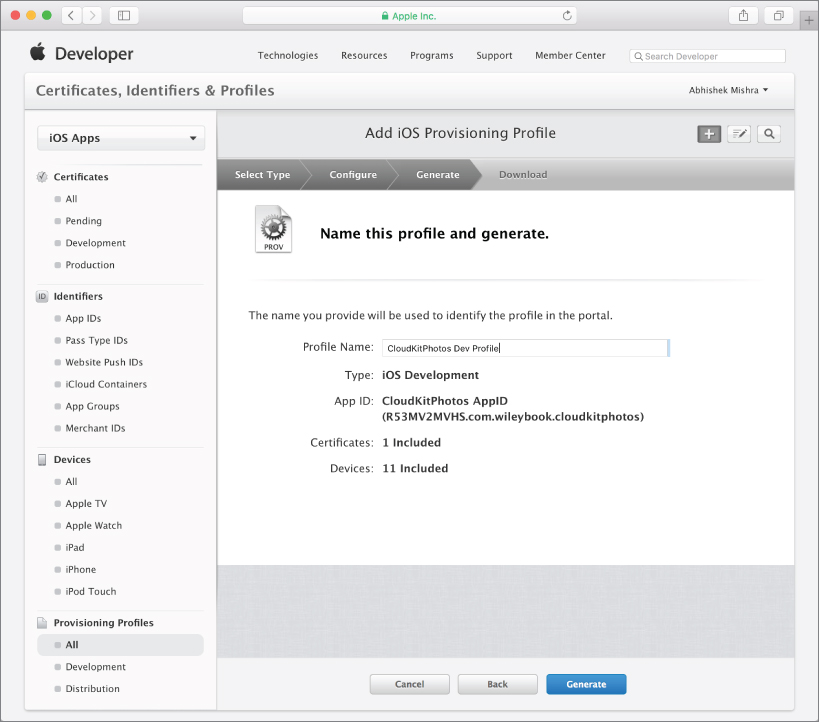
The final step involves providing a suitable name for the profile and clicking the Generate button. When the profile is created, you will be provided an option to download it onto your computer. (see Figure A.21).
If you were to now click the All link under the Provisioning section of the left-hand side menu, you should see an entry for the new profile in the list of available profiles. You can also download a provisioning profile from this list.
Once the profile has been downloaded, simply locate it in the Downloads folder on your Mac and double-click it to install it in Xcode.
Configuring Your Project
The final step in the process involves setting up your Xcode project and preparing an appropriate build. Before you begin, make sure you have installed both your development certificate and development provisioning profile.
Open the project that you want to test on a device. If the project's App ID is different from what has been registered with the iOS Provisioning Portal, edit the value of the Bundle identifier key in the project's info.plist file to match.
Save the info.plist file if you have edited it, and then connect one of the provisioned iOS devices to your Mac and ensure that the Scheme/Target selector in the Xcode toolbar is set to build for an iOS device (see Figure A.22).

Access the project's properties by selecting the root project node in the project navigator. Select the build target and then switch to the Build Settings tab.
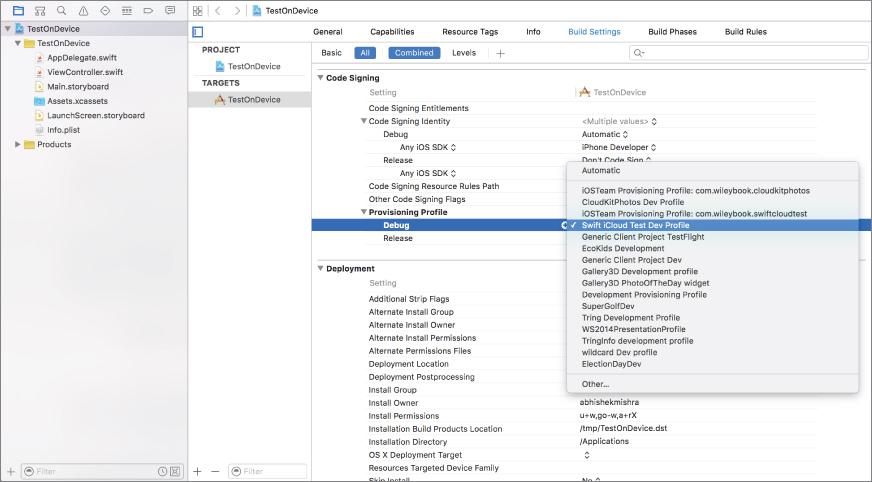
Scroll down to the Code Signing section and locate the node labeled Provisioning Profile. You may need to expand this node to see the values for individual build configurations (such as debug, release). Select the provisioning profile you created earlier from the list of profiles for the debug configuration (see Figure A.23).
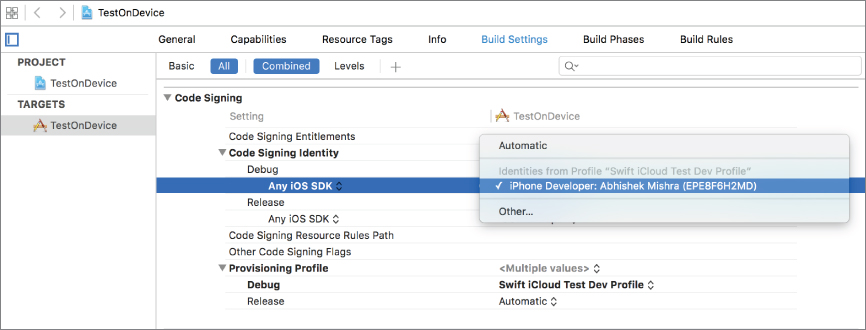
Now look for a node called Code Signing Identity. Expand this node to reveal a node called Debug, and then expand the Debug node to reveal a node called Any iOS SDK. Ensure the value of this node is set to be the development certificate you created and installed earlier (see Figure A.24).
Your Xcode project is now ready to be tested on an iOS device. Simply click the Run button on the Xcode toolbar to begin.