Appendix C
App Store Distribution
In most cases, after your app is ready and tested, you will want to list it in the App Store. Regardless of your pricing strategy (free or paid) every application that is submitted to Apple for distribution via the App Store is subject to an approval process. The approval process usually takes about a week. Updated versions of an existing application also need to go through an approval process.
To distribute your application via the App Store, you will need a standard, paid, iOS developer account. If you have an enterprise iOS developer account, you cannot distribute your applications through the App Store. Submitting an application to Apple for inclusion in the App Store is a two-stage process. First, you need to create an application profile on the iTunes Connect portal, and then you need to upload your application binary to iTunes Connect using Xcode.
Creating an Application Profile
To start the App Store submission process, log in to the iTunes Connect portal at https://itunesconnect.apple.com/ with your iOS developer account credentials. Once you have logged in to the portal, click the My Apps link (see Figure C.1).

On this screen you will see all your iOS and Mac OS applications. You can either add a new application or manage one of the existing ones. To create a new application profile, click the Add New App button in the top-left corner of the window (see Figure C.2).

Selecting the New App option will display a popup window where you need to enter some basic information on your new app, including the Name, Bundle ID, and version number (see Figure C.3).
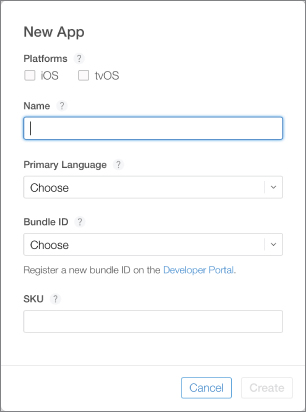
The Bundle ID (also known as an App ID) must be registered with your iOS developer account. If you haven't created an App ID, you will need to do so now, before you can proceed with the next steps. Creating an App ID has been discussed in Appendix A. To get started, log in to your iOS developer account at https://developer.apple.com/ios and navigate to the Identifiers section of the website.
Once you have filled in the fields in the popup window, click Create to go to the Application Information screen (see Figure C.4).

At the top of the page is a tabbed menu bar (see Figure C.5) with four tabs labeled App Store, Features, TestFlight, and Activity.

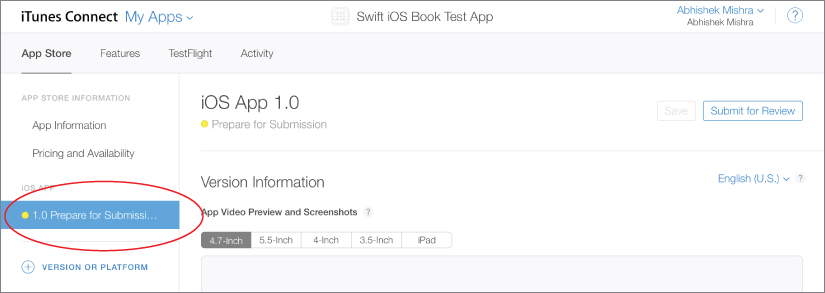
The App Store tab is selected by default, and the new application's status is displayed in the left-hand side of the screen. A new application profile starts out in the Prepare For Submission state. You then fill in all the relevant information to complete the application profile and click the Save button to save this information (see Figure C.6).

Once you have saved the application profile, you will need to upload a build from Xcode. The process of uploading a build is covered later in this appendix. First let's examine each of the tabs on the application profile screen.
App Store Tab
This screen has a menu on the left-hand side that provides the following options:
- App Information
- Pricing and Availability
- Versions
App Information
On this screen you need to specify basic information on the app, including an application name, a SKU code, and an application Bundle ID. The Bundle ID you specify on this screen must match the one have used in your Xcode project's info.plist
The SKU code is not used by Apple, but is used to identify the application on the monthly financial report provided by Apple.
Toward the bottom-right corner of the screen, you will find options to select a Primary and Secondary Category under which your app will be listed in the App Store (see Figure C.7).

Pricing and Availability
This screen contains options that let you specify the price of the app as well as the territories where your app will be available for purchase (see Figure C.8).
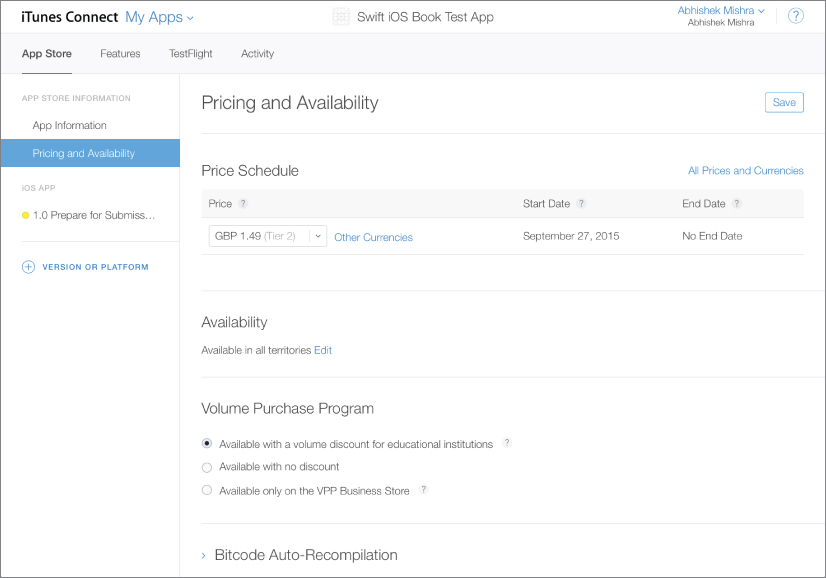
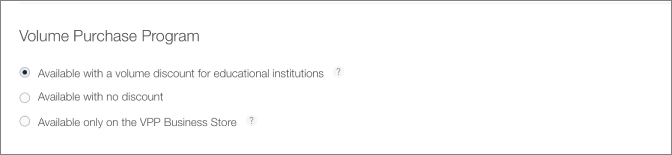
If you would like to provide a discount to business buyers, or educational institutions when they buy multiple copies of your app, you can select one of the options under the Volume Purchase Program section of the page (see Figure C.9).
Click the Save button to save the changes you have made to this page before moving on to the next section.
Versions
This section allows you to provide screenshots and videos, and to configure application metadata for each version of your app. A node in the menu on the left-hand side represents each version (see Figure C.10).
The options in this screen are grouped into several subsections:
- Version Information
- Apple Watch
- Build
- General App Information
- Game Center
- App Review Information
- Version Release
Version Information
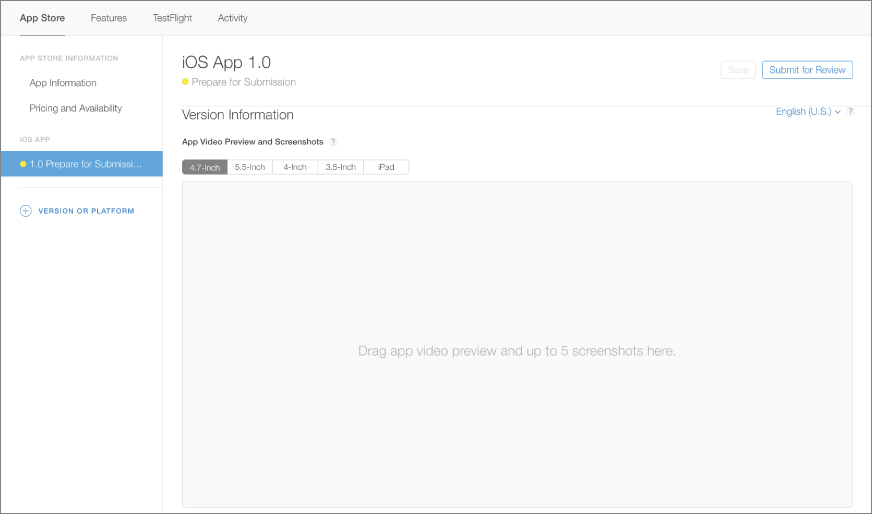
The version information section resembles Figure C.11. Here you need to specify the following information:
- Screenshots: You can provide up to five screenshots and a video preview for different devices. If you are submitting a universal application, you will need to provide both iPhone and iPad screenshots.
- Description: This is the description, as you want it to appear on the App Store. It can be no more than 4,000 characters.
- Keywords: One or more keywords that describe the app you are adding. When users search the App Store, the terms they enter are matched with these keywords.
- Support URL: A URL that links to the application's support site.
- Marketing URL: An optional URL that links to the application's website.
Apple Watch
The Apple Watch section contains options that allow you to upload screenshots and an icon for your Apple Watch app (see Figure C.12). Creating Apple Watch apps is a topic beyond the scope of this book; if you are interested, you should read the Apple Watch Programming Guide located at https://developer.apple.com/library/prerelease/ios/documentation/General/Conceptual/WatchKitProgrammingGuide/.

Build
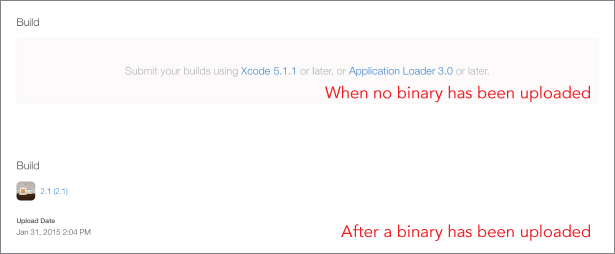
The Build section will contain the application binary that has been uploaded for the current application version. If no binary has been uploaded, this section will be empty (see Figure C.13). The process of uploading an application binary to iTunes Connect with Xcode is covered later in this appendix.
General App Information
The general app information section resembles Figure C.14. Here you need to specify the following information:
- App Icon: The icon that will be used on the App store. This icon must be 1024 x 1024 in the JPEG or PNG format and must not have rounded corners.
- Version: This must match the value set in the Xcode project.
- Copyright: The name of the person or entity that owns the copyright to the app.

Tapping on the Edit button next to the Rating link will bring up a popup window that consists of a series of questions, the answers to which determine a rating category for your application (see Figure C.15). The rating determines the parental controls that will apply to your application. As you change the answers to these questions, the age limit will change.

Game Center
The Game Center section is disabled by default, and should be enabled for applications that support Game Center. When enabled, you will have options to configure leader boards, achievements, and multiplayer compatibility. Game Center is a topic beyond the scope of this book, but if you are interested, you should read the Game Center Programming Guide located at https://developer.apple.com/library/ios/documentation/NetworkingInternet/Conceptual/GameKit_Guide/Introduction/Introduction.html.
App Review
The App Review section allows you to provide special testing instructions to Apple engineers when they review your app, as well as contact information for a person in your company who will be contacted if there are problems with your app.
Features Tab
The features tab provides options to configure In-App purchases and Game Center for an app. In-App Purchases and Game Center are not covered in this book. If your app does not utilize either of these technologies, you can ignore the contents of this tab.
TestFlight Tab
This tab provides options to distribute prerelease builds of your app to internal and external testers using TestFlight. This is covered in Appendix B.
Activity Tab
This tab provides options to examine beta test activity. This is covered in Appendix B.
Preparing and Uploading the Application Binary
Once you have created and saved the application profile, the next step involves using Xcode to upload the binary to iTunes Connect. Before you can do this, you may need to do certain housekeeping tasks; these are especially relevant when you are submitting your first application.
Creating a Distribution Certificate
The process of creating a distribution certificate is very similar to that of creating a development certificate. Creating a development certificate is covered in Appendix A.
To create a distribution certificate, create a Certificate Signing Request (.csr.csr
Log in to your iOS developer account at https://developer.apple.com/ios and navigate to the Certificates section of the developer portal. Click the New Certificate button on the top-right side of the screen and choose App Store and Ad Hoc under the Production category (see Figure C.16).

Scroll down to the bottom of the page and download the Worldwide Developer Relations Intermediate Certificate using the link provided if you haven't done so already. To proceed with creating the distribution certificate, click Continue.
On the next screen, upload the certificate request file that you saved on your Mac and then click the Generate button to create the distribution certificate.
If you are not part of a team, and are solely responsible for handling your iOS Developer account, your certificate is issued automatically and available to download in a few minutes. You may need to refresh your browser window. If you are part of a team, your team manager will need to first approve the certificate request. When your certificate is ready to download, you will see its status listed as Issued, and a Download link will be available.
Download the certificate and save it to your Mac. By default, the certificate should be saved to your Downloads
Creating a Distribution Provisioning Profile
The process of creating a distribution provisioning profile is similar to that of creating a development provisioning profile. Creating a development provisioning profile has been covered in Appendix A.
Before you create a distribution provisioning profile, you must ensure that you have created a distribution certificate and have registered an App ID with your developer account.
The main differences between a distribution provisioning profile and a development provisioning profile are that a distribution profile does not have a list of devices included in it and requires a distribution certificate.
To create a distribution provisioning profile, log in to your iOS developer account at https://developer.apple.com/ios. Navigate to the Provisioning Profiles section and click the New Profile button on the top-right side of the screen.
When you are asked to choose the profile type, choose App Store from the list of available options and click Continue (see Figure C.17).

In the next screen, select the App ID that corresponds to the app that you want to submit to iTunes Connect and click Continue. Finally, select the distribution certificate and generate the provisioning profile. Download the provisioning profile and double-click the downloaded file to install the distribution profile in Xcode.
Configuring the Xcode Project
The next step in the process involves setting up your Xcode project and submitting a build to iTunes Connect. Before you begin, make sure you have installed both your distribution certificate and distribution provisioning profile.
Open the project that you want to submit in Xcode. If the project's App ID is different from what has been registered with the iOS Provisioning Portal, edit the value of the Bundle identifier key in the project's info.plist
Save the info.plist

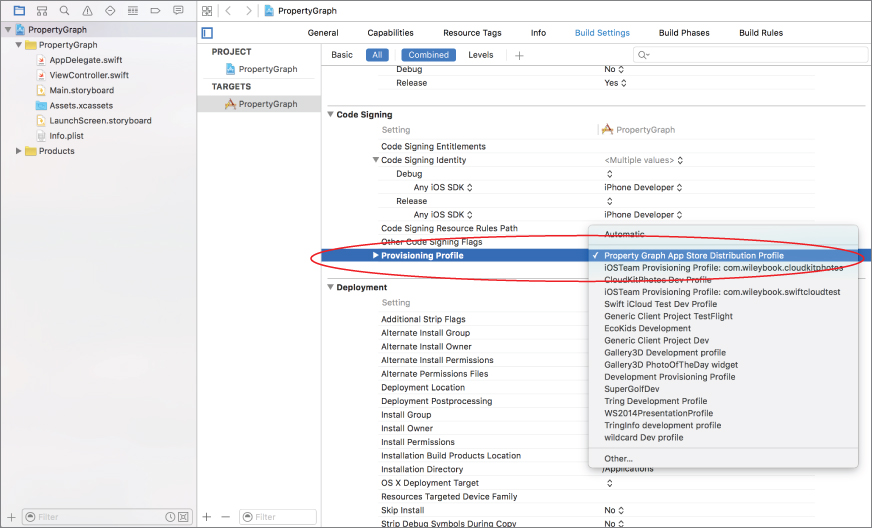
Access the project's properties by selecting the root project node in the project navigator. Select the build target and then switch to the Build Settings tab.
Scroll down to the Code Signing section and locate the node that's labeled Provisioning Profile. You may need to expand this node to see the values for individual build configurations (such as Debug or Release). Select the provisioning profile you created earlier from the list of profiles for the release configuration (see Figure C.19).
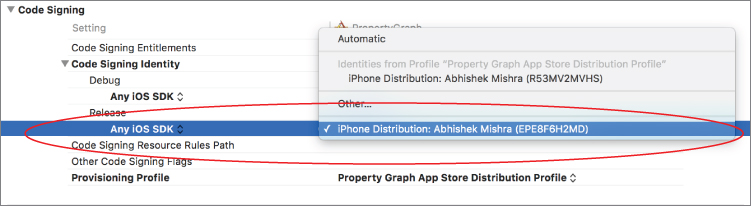
Now look for a node called Code Signing Identity. Expand this node to reveal a node called Release, and then expand the Release node to reveal a node called Any iOS SDK. Ensure the value of this node is set to be the distribution certificate you created and installed earlier (see Figure C.20).
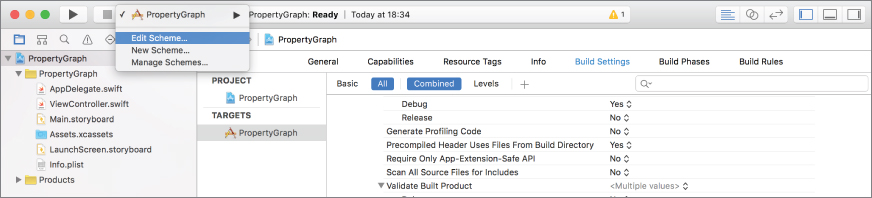
Select the Edit Scheme menu from the Scheme/Target multi-selector in the Xcode toolbar (see Figure C.21).
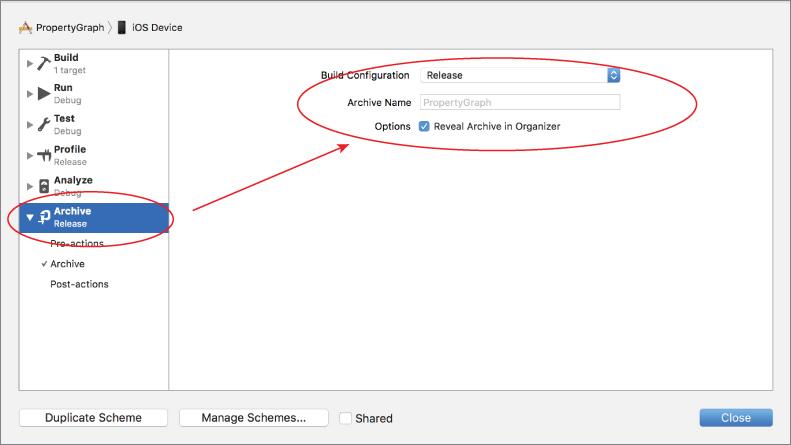
In the Edit Scheme dialog box, select Archive from the left menu to bring up archive-specific options. Ensure the Reveal Archive in Organizer option is selected and Build Configuration is set to Release (see Figure C.22). Click OK to dismiss this dialog box.
At this point you are ready to prepare an archive that can be distributed to your clients/beta-testers. To prepare an archive, simply select Product &cmdarr; Archive in Xcode. This builds your project for App Store distribution. During the build process, Xcode may ask you to allow access to your distribution certificate.
If it does, click the Allow button. When the archive is successfully built, the Organizer opens automatically, revealing the archive.
To submit the archive to the iTunes Connect portal, ensure the relevant archive is selected, and click the Upload to App Store button. The Organizer will ask you for your iTunes Connect login credentials, and upload the archive to iTunes Connect (see Figure C.23).

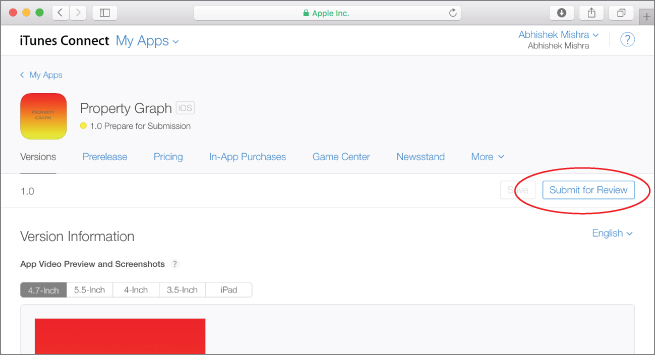
Submitting the App for Review
Once the application binary has been uploaded to iTunes Connect, you will need to log in to iTunes Connect once again, and click the Submit for Review button in your application record page to submit the app for review (see Figure C.24).