Before you start creating the food that’s fun for you and your kids, you need to know what you should have on hand. In this chapter you’ll find information on the kitchen tools—like a candy melting electric pot, disposable cake-decorating bags, and a cake-decorating paint set—that will help make creating these kids’ treats fun and easy. You’ll also find a variety of basic recipes that you’ll see used over and over again throughout the following chapters. These recipes will give you the knowledge you need to whip through the serious cooking part of the process and get right to the fun! Also, while these tools and recipes are recommended, if you want to mix it up and do your own thing, go for it! If you want to use a fork to dip your cookies in melted chocolate instead of buying a dipping scoop, that’s fine! If you want to use your grandma’s sugar cookie recipe instead of the one that you’ll find here, that’s great! Do whatever works for you and your family, but don’t forget to have fun, no matter what!
Creating and baking in the kitchen with your kids may be a bit messy at times but it doesn’t need to be stressful! In this section you will find some of my favorite go-to kitchen tools to have on hand while creating amazing snacks and desserts with my kids. These simple tools not only make creating treats easier and minimize messes, but many of them, such as the Silpat and cookie scoop, can also be used in everyday baking and cooking, which means that your money will be well spent. That said, you do not have to have these kitchen tools available, but they really do make the time in the kitchen a bit easier. And since easy is so important when you’re a parent, you can find all of these kitchen tools in your local craft store, online, and even in your local grocery store.
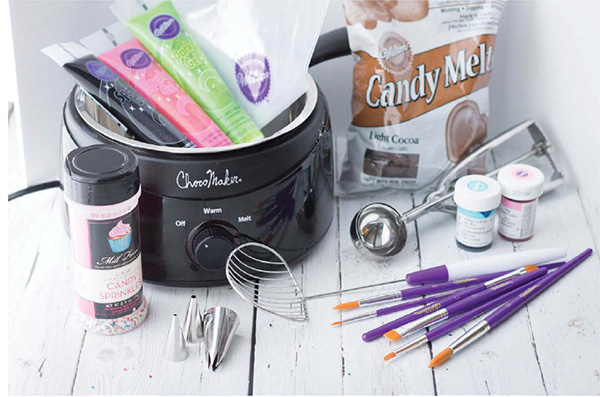
So what should you have close by whenever you sit down to make delicious treats with your family? Read on!
Candy melts—small, medallion-shaped chocolate pieces that you can melt to cover cookies, cupcakes, and more in fun, delicious colors—are such a fun way to add something extra sweet and special to your treats. They come in many different colors and flavors and are simple to find online, in your local craft store, or even in some grocery stores. They easily melt in a candy melting electric pot or in the microwave, which makes treat making a breeze! I love to use the Wilton brand medallions because I think they melt the best. If you are having a bit of trouble with the chocolate melting, however, just add a tablespoon of canola or vegetable oil and stir. It should help smooth out the consistency of your chocolate medallions.
A candy melting electric pot is my favorite kids’ treat decorating tool! It’s basically a small, insulated pot that you plug into the wall (which means fewer dishes and easy cleanup!) and use to melt your candy melts. These pots have two temperatures, one that melts the chocolate and one that keeps it warm while you are making your dipped or decorated treats. You can find candy melting pots in any craft store (some even sell disposable versions) or online. I have even seen them in my local grocery stores. I prefer to use this method over microwaving my candy melts because the chocolate stays melted and I don’t have to constantly reheat it when it starts to harden, but you can certainly use the microwave to melt your chocolates if you’d prefer.
A candy melt dipping scoop is a great tool for scooping and dipping the various treats you will be making easily into melted chocolate. It is a fancy wired slotted spoon that helps excess chocolate drip back into the bowl or melting pot, which makes treat making easier and less messy. I find that having a couple dipping scoops on hand is helpful if you’re making different-colored treats, but one will do just fine. You can find these scoops online or in your local craft stores.
A cookie scoop is another one of my favorite kitchen tools to have on hand. Similar to an ice cream scoop, a cookie scoop has a handle that you squeeze to push all of the cookie dough out of the scoop and onto your plate, baking sheet, or Silpat. It’s great for shaping bonbons, scooping cookie batter, and even shaping some savory foods. For the treats you will find throughout this book, I recommend using a 1-inch cookie scoop, since it makes the perfect-sized treats.
These cake-decorating bags—cone-shaped plastic bags that hold icing, frosting, or dough and a decorating tip—are great assistants to use when you’re decorating your kids’ treats. Using decorating bags results in less mess and cleaner lines then trying to do intricate decorating with spoons or toothpicks. I like to use disposable bags for easy cleanup but you can also use the reusable, polyester bags if you’d prefer. To place the frosting in the bag, fold the top edge over about 2–3 inches, then scoop your icing into the bag with a spoon. Once the icing is in the bag, just fold the top edges back up and twist the top of the decorating bag to remove air. Cut off the tip of the bag. This process helps keep the edges of the bag clean.
Cake-decorating tips—metal or plastic tips that you place inside the decorating bag to change the way the frosting or icing looks on your treat—are a fun way to add designs to your Oreo treats, cupcakes, and more! My favorite decorating tip sizes are 1M, 1, 2, and 4 and you’ll see these sizes used frequently throughout the recipes in the book when it’s time to add the finishing touches to the treats you will be making.
Couplers are small, two-piece, cake-decorating devices that allow you to change your cake-decorating tips without having to change the bag. I use these when I want to use the same icing color but want multiple designs. These can be helpful when decorating kids’ treats but are not necessary. If you do decide to use a coupler, insert the larger of the two pieces inside the cake-decorating bag and push it down into the bag’s tip. Use a pen to mark a spot in the middle of the coupler’s threads, then use scissors to cut off the top of the bag at that mark, and return the coupler to the bottom of the bag. Next, flip the bag over and add your chosen decorating tip to the top of the coupler, making sure to keep the tip outside of the bag so it’s easy to change out as needed. Then, take the unused, circular piece of the coupler and screw it over the decorating tip to secure it to the bag.
Sprinkles are my go-to embellishing tools when creating fun treats for kids. I love to use the round rainbow sprinkles, but I also like to have colors such as brown, pink, blue, green, and more in stock. Use sprinkles to add color and texture to your treats and you’re guaranteed to have happy kids—every time!
Silicone baking sheets or parchment paper are great to use when baking or transferring treats. I prefer to use a Silpat, a nonstick, silicone surface that lies over a cookie sheet and can be used for both baking and cooking. A Silpat is a great tool when decorating treats, makes for easy transfer from refrigerator to counter, and ensures that cleanup is a breeze. If you decide to use a Silpat or other silicon baking sheet, be sure to avoid cutting anything on the mat as the blade of a knife or pizza cutter can cut right through, destroying the mat. Also, if you don’t have or want to use a silicone baking sheet, you can use parchment paper in the same way.
The brushes in a cake-decorating paint set are used to paint details, facial features, and designs on your kids’ treats. For example, you can use the bottom of the paintbrushes to create eyes and polka dots. You can also use a toothpick for your designing, but paintbrushes create a much smoother and cleaner look. You can find these paintbrushes online and in the cake-decorating sections of your local crafts stores.
Gel icing colors are a fun way to add some color to your kids’ favorite treats! A thicker version of the liquid food coloring that you may have grown up with, these give you an array of colors that will match any party or occasion. I use gel colors because the colors are brighter than liquid colors and the consistency is the same as icing. I personally like to use the AmeriColor and Wilton brands that you can find in your local craft stores and online. I like all the color options these two brands offer as well as the brightness of the colors.
Many of the kids’ treats you will create with your little ones start with a basic recipe base. In this section, you’ll find a collection of some delicious recipes that you will use to make the treats found throughout the book. But while these basic recipes are used over and over again in the following chapters, they’re meant to be starting points for you and the little ones’ creativity. If you prefer vanilla over chocolate, feel free to make the switch! Also, all of these recipes can be made in halves, quarters, or can even be doubled depending on how many treats you want to make. I tend to halve most of these basic recipes when making treats for my two little ones, but do what works best for you and your family.