
Your Body’s Needs … Exposure Dangers … How to Stay Cool … Vapor Barrier Magic … Make Yourself a VB Vest … Make Your Clothes Work … Clothing Critique … Boots … Socks … Foot Care Tips … Solo Travel Precautions … Treating Shock & Bleeding … Dealing with Sprains … Snakebite … Sunburn vs. Tan … Beware Sunglasses … Altitude Sickness … Hypothermia
To know how to stay comfortable, warm and fit with the clothing you brought along, you first need to understand that highly sensitive organism, the human body. You must meet its basic needs or pain will swiftly follow. The body wants air temperature at the skin to be about 75°F, ranging from 72°F in the hands and feet to about 78°F in the head and trunk. Take away body heat faster than it’s generated and the body turns dramatically defensive. To protect crucial head and trunk temperatures it swiftly cuts down blood circulation to the skin by constricting capillaries. If cooling continues, it severely shuts down blood flow to the arms and legs, chilling hands and feet. By allowing skin temperature to drop 20 degrees and reducing blood circulation to the feet by up to 95%, the body can cut overall heat losses by a startling 75%. When the body is threatened it doesn’s fool around!
The body’s thermostat is located in the chest area. If you chill the chest while trying to vent excess heat, you’re liable to trigger the production (and resultant energy loss) of massive amounts of heat and moisture. So if you want to cool off without threatening the body, keep your front zippers closed and rely on venting at the shirttails, neck, cuffs—and armpits if your garments have underarm zippers.
The head is the only part of the body in which the capillaries do not contract, because the body knows survival depends on continued alert functioning of the brain. So when your skin turns cool and your hands and feet grow cold, pay attention. The body is trying to warn you that heat production can’t keep up with heat loss. No mittens in the world will keep your hands warm if the body believes trunk temperature is threatened. So if your feet get cold, put on a hat and jacket—especially when sleeping with the head exposed.
Almost as important to the body as maintaining an average 75°F temperature is the maintenance of moist—but not wet—skin. Comfort, to the body, is a surprisingly high relative humidity of 70–95%, despite the mind’s belief that comfort means dry skin. This isn’t the contradiction it seems. What the mind calls dry skin, really isn’t. Truly dry skin quickly turns chapped, stiff, cracked and flaky. Open sores and bleeding follow. Properly moist, humid skin, on the other hand, isn’t wet, either. What the body wants is a quarter inch thick cushioning layer of moist warm air, like an invisible second skin, shielding and lubricating but not wetting the skin. Humor the body by providing 70°F air with a normal 50% relative humidity, and it will easily maintain this suit of invisible armor with as little as a pint of water a day. Destroy this protective layer by exposure to a harsh environment and the body goes wild in an effort to restore it. Sweat glands open wide and the body goes all out to pump heated water vapor through the skin. Until the layer is rebuilt, heat and water loss from the body will be a terrific 6–800% above normal—though at the time the mind may notice nothing because evaporation is immediate. But after hiking in dry or cold air for several hours you’ll suddenly discover an insatiable thirst. Your body is signaling dehydration and demanding replacement of water—by the quart!
When the skin is below 75°F water vapor passes off unnoticed as “insensible perspiration”—after doing its job; keeping the skin moist. But when skin temperature climbs much above 75°F the body reacts to what it considers uncomfortable overheating by opening the sweat glands wider and pouring out heated water to wet the skin with what we regard distastefully as sweat. So in reality there are two kinds of sweat: the one you don’t feel or see that keeps your skin comfortably moist and alive, and the wet one produced by overheating.
The colder the air the less water it can hold. From the body’s standpoint winter ski touring conditions are as dry as those in the desert: it’s a struggle to get enough water. At 30° F the relative humidity on bare skin is an arid 15%—even though there’s nothing but frozen water (snow) in sight! And liquid water can be just as hard to come by as in the desert. The body may need a gallon a day!
Though dry air sucks up ample moisture (and with its body heat), the two greatest threats to body heat are wind (convection) and water (conduction) because each has the capacity to swiftly obliterate that layer of moist warm air that shields the body. Water’s great conductivity—20 times that of still dry air—instantly destroys the air layer and enormous heat loss follows. Ten minutes exposure of the body to a 34°F water (if you fall through thin winter ice on the pond) means likely death by freezing! But the water doesn’t have to be frigid to chill you. Air temperature of 68°F in a heated home is comfortably warm, but the same 68°F in a swimming pool water feels freezing. Why? In the house the body easily maintains its cushion of moist 75°F air. In the water it can’t and the sudden 7° drop on bare skin is a shock.
Slicing it even finer, if you work up a sweat jogging and return to that 68°F house after you’ve cooled down, the dampness of your clothes and skin produces chilling evaporative heat loss that will make the house seem chilly, no matter what else you do. But take a shower and put on dry clothes and presto! the 68°F house is warm again.
Wind chill may be even more threatening to the exposed body because the danger is less evident. Most deaths from hypothermia (brain and body core chilling) occur in deceptively mild (above freezing) air temperatures which have been drastically lowered (in chilling effect) because wind has blown away the body’s protective layer of still, warm air, permitting rapid heat loss by convection. And it doesn’t take much wind. On a 30°F day with a mild 10 mph wind, the effective air temperature on bare skin is a chilly 16°F. If the wind freshens to a moderate 25 mph, the effective temperature drops to zero. And on a zero winter day a 30 mph wind is equivalent to a dangerous 50°F below on bare skin!

Combine the threats of wind and water and you multiply the danger by adding the terrible cooling power of evaporation. Exposed wet skin loses heat more than 200 times as fast as dry protected skin! Stand wet and naked in the wind after a swim on a cool summer day and you’ll experience severe chilling in a matter of seconds. Even after you dry and dress it will take a long time to get warm. Sweat up your sleeping bag on a warm autumn evening and you’re headed for trouble in the cool before dawn.
Though few campers are aware of it, it isn’t uncommon for the weight of your sleeping bag to mysteriously jump 1½ to 2½ pounds in the space of a single summer night from accumulated condensed water vapor given off by the sleeping body.
But the cooling effect of evaporation can be put to work in warm climates. Soak your hat and shirt (or everything but your boots) everytime you pass a stream, for blessed relief. If water is scarce, take advantage of what’s known about blood circulation to the head and neck. Veteran desert travelers know the most effective use of precious water to combat overheating is repeated wetting—for evaporative cooling—of the back of the neck and the forehead.
It is important in cold country to be aware of conditions that sabotage heat production. Such stresses as fatigue, wet skin, altitude, poor health, hunger, anxiety and lack of adequate prior conditioning will all make it harder to get warm once chilling occurs. So if the body is under stress or conditions are extreme, take extra precautions against chilling and pay attention to the body’s warning system.
So what’s the best strategy for staying comfortable and warm, but not wet? Breathability adherents claim water vapor will be satisfactorily dispersed if you put porous fabrics next to the body and avoid sealed (waterproof) fabrics. Unfortunately breathability doesn’t work, except under ideal conditions when it’s not needed. Porous fabrics simply don’t pass enough water vapor, and evaporative heat loss is ignored.
In stark contrast to breathability, the vapor barrier approach takes clever advantage of body function. Instead of unrealistically trying to rid the body of moisture while ignoring accompanying heat loss, vapor barriers contain body moisture and reduce its production while stopping heat loss. In short, breathability tries in vain to keep you dry. Vapor barriers aim to keep you warm and comfortably moist while your clothes and insulation stay dry.
A vapor barrier is simply a sealed or waterproof fabric worn close to the skin to keep body moisture in instead of trying to drive it out. Don’t groan with vision of steamy streaming skin. That needn’t happen. Though sealed garments worn away from the body over clothing (like waterproof parkas) can cause oceans of condensation, sealed fabric worn close to the skin produces a startlingly different effect. Body heat makes the difference. Because it protects that moist layer of water vapor covering the skin, optimum humidity is easily maintained with minimal vapor output. Given ideal conditions of moisture and heat, the body gratefully closes sweat glands and shuts down vapor production up to 85%.

It’s ironic that striving for dry skin only makes it pump more moisture, while permitting skin humidity shrinks production of perspiration! Not only does the wearer escape the steam room condensation associated with sealed garments, clothing worn over the vapor barrier stays completely dry. The severe heat loss that always accompanies sweating is prevented, and the body’s water needs (thirst) are proportionally reduced. With the efficient retention of body heat, the outdoor traveler enjoys remarkable warmth with far less of the heavy, bulky, expensive insulation we’ve come to think is vital in cold weather. In fact the colder it is, the better vapor barriers perform. And there isn’t the slightest reduction in efficiency when conditions turn wet and humid. It isn’t until the weather grows warm that vapor barriers begin to lose their value, and that’s simply because they’re so effective at retaining heat.
If you didn’t bring vapor barrier clothing with you, you may still be able to enjoy their benefits if you happen to have plastic bags, Saran Wrap, sizeable garbage or trash bags or waterproof parka shell or pants, or plastic clothes or rain suits. If you suffer from cold feet, you can discover the benefits of vapor barriers easily. Slip a plastic bag over your bare foot (or wrap it in Saran Wrap), fold the top around your ankle and put on your normal socks and boots. Not only will your foot stay dramatically warmer, at the end of the day, instead of the bagful of sweat you probably expect, there will be nothing more than faint dampness, and your sock will be totally clean and dry. To prove to yourself how well VB socks work, try it on just one foot, and compare.
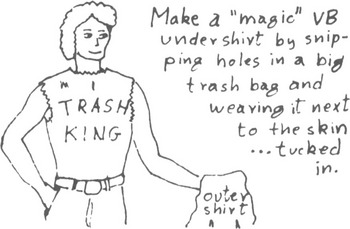
A big trash or garbage bag makes an admirable covering for your torso once you cut holes for your arms and head to make yourself a plastic vest. Put it on next to the skin (preferably), tuck it in your pants, then put on a relatively snug shirt or sweater that will hold the vest close against your body. Put on a light jacket if you want, but don’t bundle up. A waterproof rain shell or wind shirt makes an excellent VB shirt ir you wear it next to the skin and cover it with a sweater. So does a rain suit or any waterproof (vapor barrier) garment or covering. And on your next trip in cold country, resolve to gring, in addition to bags for your feet and a VB shirt or vest, a handful of cheap thin (painter’s) polyethelene gloves to keep your hands substantially warmer under mittens or gloves.
Think of a VB shirt as a magic undershirt that lets you leave your big heavy jacket at home. It will double as a windbreaker and even triple as raingear, and I know of no more valuable emergency or survival garment. Properly used, VB clothing will increase your body warmth by an astounding 20°F. The colder it is, the better they work, and they’re cheap, light and low on bulk.

If you can’t manufacture vapor barrier warmth from what you brought along, or if it isn’t cold enough to try, your best bet for obtaining moderate warmth is to wear (ideally) thin layers of loose-fitting dry clothing and rely more on ventilation than breathability to minimize condensation. The easiest way to get rid of warm air and excess humidity is to help it flow out apertures in garments (like an open neck). Take advantage of the fact that heat rises. If air is permitted to flow vertically through a garment, cool air will enter at the bottom and warm air will escape at the top. That’s what carries smoke up a chimney so it’s called the “chimney effect.” Simply put on a pullover shirt or sweater that fastens tightly around the throat and tuck it into your pants. Then exercise until excess body heat is generated. Now untuck your shirt and open the collar and note how much cooler you rapidly become. You can feel the cool air entering at the waist and the warm air flowing up around your throat.
A few words about fabrics and insulators may help you get more utility out of the clothes you brought on this trip, and help you figure out improvements if you’re dissatisfied. Extravagant claims have been made for the wonder film Goretex. Goretex is water and windproof, and it does pass water vapor, but the amount is negligible. As I’ve already said, breathable fabrics don’t do the job, and when you glue on a Goretex laminate you cut the breathability of any fabric in half. And Goretex in a parka commonly adds $50 to the price and a pound to the weight. Goretex is suitable for bivy sacks, gaiter tops, unlined mild weather rain parkas and down sleeping bag covers.
Using a rough rule of thumb, at 20°F it takes a quarter inch of insulation to keep a backpacker warm while he’s walking. Sitting around camp it takes an inch, and when he’s sleeping it takes 2–3 inches. Down has always been the premier insulator for backpackers, but don’t let that billowy jacket fool you. Under the outer shell are sewn through seams that compress insulation to zero, crisscrossing you with a grid of cold spots, and down’s vulnerability to wetting is positively dangerous if you bet your life on it in the snow. Wet down is totally useless, weighs a ton and cannot be dried in the field. Down clothing worn day after day, grows heavier and less effective as it absorbs body moisture—unless you wear a vapor barrier under it.
Polyester batting (Polarguard, Kodasoft, Hollofil, etc.) has different drawbacks. It’s heavier than down, doesn’t loft as well, and is comparatively short lived. The fibers gradually interlock or align with the friction of use aggravated by compression and heat. Matting occurs, resilience disappears and the loft that yielded insulation is permanently lost. Infrequently used parkas kept cool and never compressed may appear to last for years. Heavily used or abused garments can “go flat” (lose half their loft) in six months.
Pile has become very popular because its insulation is uniform and it doesn’t die like polyester or soak up water like down. But it’s heavy, bulky, and the wind blows right through. It isn’t meant to be used as an outer garment, except in mild weather. Ideally, pile sweaters should have underarm zippers for ventilation. I never wear wool pullover sweaters because they’re hard to take on and off and provide no ventilation control. But wool’s greatest drawback is that it sponges up sweat or rain readily and is cold and heavy to wear when saturated and very slow to dry.
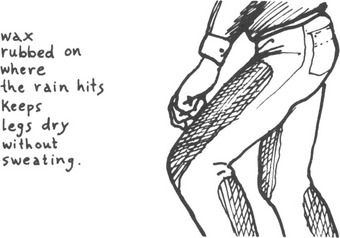
Vests, because they are open at the armpit, permit ventilation while keeping the trunk warm … If you haven’t tried polypropylene underwear for cold weather, you’re missing out. This single layer totally non-absorbent weave doesn’t itch or cling, is featherwright, cheap, stretchy, comfortable and remarkably warm … A majority of backpackers probably still wear jeans, even though they are uncomfortably tight, heavy, hot and water absorbent. When I wore them regularly, I used to waterproof the surfaces most exposed to rain (top of the thigh and back of the calf) by rubbing them with the cake of wax from my fly-tying tying kit … In Switzerland I learned that you can hike all day on snow or ice in shorts without chilling your legs—as long as you are careful to keep your torso well warmed.

Veteran outdoor travelers know the value of headgear, even if, like me, they don’t particularly like hats. When it’s cold or windy, head coverings are vital for the simple reason that since capillaries in the head and neck don’t contract when chilled, heat loss can be enormous. Protecting the head’s warmth can make the difference between overall comfort and dangerous chilling. Remember the old axiom: if your feet get cold, put on a hat. The back of some hat brims need to be turned up, perhaps fastened with a safety pin, to avoid constant rubbing when a pack is worn. Felt hats become cooler and lighter when scissors are used judiciously to cut holes for ventilation.
Bandana handkerchiefs are so endlessly useful that I sometimes take two. Extremes of temperature, wind and cold, cause noses to run, and Kleenex is extremely impractical on the trail. Besides their usefulness as handkerchiefs, bandanas often serve as hot pads, dish towels, neckerchiefs for protection against sunburn and insects, compresses, hand towels, large bandages, napkins, slings, wash cloths, etc.
If you’d like to know more about the body’s reactions, vapor barriers, clothing selection, the properties of fabrics, coatings and insulation, see my Pleasure Packing for the ’80’s.
Your boots, of course, should have been thoroughly inspected and tested before you set forth to be sure they were in good shape and fit well. You should have used silicone or Snoseal on vegetable tanned leather and Neatsfoot oil on oil-tanned leather if waterproofing was needed. When it isn’t, avoid it in the interests of better breathability and less sweaty feet. If you must seal boot seams in the field, try Chapstick, Crisco, bacon grease, salad oil, etc. Since the backpacker revolt against big heavy leather boots, more and more hikers find themselves delighted with the new lightweight non-leather boots and even sturdy running shoes. We worried at first about destroying our feet, but when it didn’t happen we found we could hike miles further with less overheating and no blisters—in fact, no break-in.
And it doesn’t really matter if they get wet splashing through a creek because they dry quickly and the water does no damage. You likewise needn’t worry that a high top is needed for ankle support. The vast majority of sprains, twists and related injuries occur well below the ankle bone. Even the most rigid high top boots do not always protect against such injuries. And keep an open mind on sole tread. The lug soles most people insist on are good on forest paths and gravel, but aren’t so good in mud because they clog quickly, and they’re inferior on some slick surfaces like bare rock … Bailing wire scrounged from old campsites can be used to replace rotten cotton or leather laces if you haven’t any nylon line or cord.
Whatever your footgear, I hope you brought along good socks to match, not old or worn out pairs or cheap cotton work socks that stretch horribly. There is no single best sock or sock combination. Too much depends on the fit of the boot, the temperatures expected, the terrain, the tendency of the feet to sweat, skin sensitivity, etc. But it is generally true that too many pairs (too thick a layer) of socks reduces boot support and increases friction, and too thin a layer can be just as bad. The choice is generally between a single heavy sock by itself and the same sock worn over a light inner sock. Generally, less sock is needed on easy terrain in well broken-in boots. Two heavy pairs of socks may be advisable for stiff boots or crosscountry hiking likely to be hard on the feet.
Whereas moisture absorption is to be avoided in most garments, in warmer weather it is the aim in socks to sponge up sweat and hold it as far from the skin as possible. Since wool is unexcelled in absorbing and holding moisture without matting or losing resiliency, it is the preferred material for socks, even though damp wool socks are slow to dry. Synthetic fabrics absorb no moisture, and cotton, though highly absorbent, collapses into a hopeless, shapeless soggy mess when wet. Avoid it like the plague and half your socks problems are already solved.
I hope it doesn’t sound contradictory to say dry socks are vital to happy feet. Wet, clean socks are far harder on feet than dirty, dry ones. Experienced hikers tend to do far more sock washing and sock changing than beginners, and they take off their boots and air (or wash) their feet at every opportunity. People unaccustomed to walking are likely to suffer from tender feet. Foot powders, Benzoin skin toughener and alcohol rubs may help, but are no substitute for adequate conditioning.
A good case can be made for carrying camp boots on the basis of sensible foot care. Many people like old tennis shoes, but feet tend to sweat in canvas and rubber shoes. I prefer Zoris (also known as thongs and go-aheads) because they are extremely light and air the feet, though they offer scant protection. I have developed the habit, once the day’s hiking is done, of immediately taking off my boots (before the sweat dries), washing and rubbing my feet, washing my socks and hanging them in a tree, then slipping on Zoris—if temperature and terrain permit. Sometimes I day hike in sturdy sandals.
A backpacking doctor says, “At the first hint of discomfort, stop, take off the boot and have a look. Wash and dry a place that is getting red, then tape a thin sheet of foam rubber over the spot.” I had always relied on moleskin for covering blisters and inflamed places on my feet. Moleskin’s disadvantage is that once it is stuck directly to the injured or tender area it cannot safely be removed (without removing the skin) until the end of the trip. In the meantime, of course, the moleskin is certain to get damp and dirty, encouraging bacteria growth. On his advice I have switched to either Molefoam or foam rubber and find both perfectly satisfactory. If I run out, I can steal a fragment from a corner of my mattress.
Often as important as bandaging an inflamed foot, is attacking the cause of the inflamation. On occasion I have had to hammer down a nail with a piece of granite or whittle away a protruding ridge of leather. More often the problem is solved by kneading new boots that pinch, removing a pebble, loosening laces, removing the wrinkle from a sock, adding an extra pair of socks, or changing to a dry pair.
Long toenails will make boots seem too short and can be painfully crippling on downhill stretches. Cutting long toenails the night before a trip will result in pain and inflammation on the trail. Great discomfort (and holes in your socks) can be prevented by awareness of the problem.
From a safety standpoint, the greatest danger in wild country is traveling alone. Unfortunately, some of the joys of wilderness travel are only to be discovered by traveling alone. I mostly hike by myself but, recognizing the danger, I try to minimize it by taking all possible precautions. I urge you to do likewise.
I tell someone responsible where I am going, what route I plan to follow both directions, when I expect to be back and the latest time (the time to begin worrying) that I could possibly be back. If the trip will take several days, I usually draw the route on an old map and make an “X” where I expect to spend the nights. Lastly, I indicate in a general way my preparation for emergencies (tent, first aid kit, extra food and clothes), so the urgency of my situation can be judged if I fail to return.
I fervently hope that you brought along a first aid kit appropriate to the trip and a booklet on the treatment of common difficulties. If not, resolve to do so on your next trip. Don’t wait until a party member is injured and you’re helpless to aid him. See my Pleasure Packing for a discussion of first aid kits and how to build your own. You’ll also learn that soap and plenty of water are better than antiseptics and first aid creams, and that tourniquets are dangerous and rarely essential since pressure and elevation should stop all but the most serious bleeding. Amateurs should never attempt to set broken bones, but splinting and immobilizing breaks is part of first aid. Seriously injured patients can be taken out to a doctor if they can travel; otherwise bring the doctor in. The following should enable you to treat the most common maladies.

Shock is a state produced by injury or fright. The victim feels cold and clammy and weak. The treatment is to lay the patient down on level ground and make him as comfortable as possible, usually by loosening constricting clothing and covering him if it is cold, until a feeling of well-being returns.
In case of a small or slightly bleeding wound, bleeding usually will soon stop if the wound is elevated so it lies higher than the heart and pressure is applied with a gauze pad. (For a cut foot or leg, the patient lies down and props his leg against a tree; a cut hand should be held above the head.) A large or heavily bleeding wound may have to be closed by hand pressure. A puncture can be firmly blocked by the palm or a finger. On a slice or cut it may be necessary to draw the edges together with the fingers before applying pressure. Closing the wound to stop the bleeding is vital. Once bleeding has been controlled, the wound should be kept elevated to reduce the blood flow and aid clotting. Never attempt to substitute a tourniquet for these procedures.
As soon as bleeding is under control, the wound should be washed with soap and water, or irrigated with water, to carry away bacteria and dirt. It may be necessary during the washing to keep the wound elevated to lessen bleeding. Once cleaned, it may be gently blotted dry with a clean cloth or towel (not to mention toilet paper or clean socks). The clean, dry wound can then be bandaged. On heavily bleeding wounds that do not respond sufficiently to elevation, it may be necessary to tape the edges of the wound together with a butterfly bandage in order to stop bleeding.
Minor cuts and scratches, especially on protected parts of the body, are better left un-bandaged. Protected but uncovered wounds are more easily kept clean and dry; healing is faster and the chances of infection are lower. Antiseptics (mercurichrome, iodine, methiolate and the like) should not be applied; they tend to do more harm than good—inhibiting scab formation and trapping bacteria which cause infection. Small wounds need only bandaids. Larger ones will require a gauze pad held in place by narrow strips of adhesive tape. The largest may require wrapping the limb or body with roll gauze. Gauze and adhesive bandages should be applied directly on top of a wound held closed by a butterfly bandage.
The greatest enemy of wounds is dampness. A wet bandage inhibits healing by providing a favorable environment for the growth of bacteria. Once a bandage has become wet, whether from blood, perspiration or water, it is a menace to health and should be replaced. No bandage at all is far superior to a wet one. The drier the wound the less the chance of infection.
Nothing is more common among backpackers accustomed to doing their walking on sidewalks than turned or sprained ankles. Severity varies greatly. Some sprains amount to nothing more than a momentary twinge. Others require the victim to be immobilized immediately. Often the wisest course for the person who has suffered a bad sprain (the ankle immediately turning black and blue) is to apply a tape cast and head for the car before the ankle can swell and stiffen.

Moderate sprains should immediately be treated with cold to constrict blood flow and prevent swelling. Putting the foot in an icy rill or applying cold compresses made by filling plastic bags with snow or ice water are fast and effective. Elevating the ankle also helps greatly to reduce the swelling. If sources of cold are not handy or it is inconvenient to stop, an elasticized ankle brace of three-inch Ace bandage may be applied.
Braces are likely to be carried only by people with weak ankles who have come to rely on them. Ace bandages have the advantage of being usable on other parts of the body. In either case, it may be necessary to remove all (or at least the outer) socks to make room for the bandage in the boots. And people (like myself) who have sensitive Achilles tendons may find it impossible to wear an elastic bandage very long. Bandages need only be worn while walking. They should be removed at night and at any other time that the ankle can be elevated.
All of the swelling that is going to take place will happen on the day of the sprain or the day that follows. On the third day, with the swelling stopped, the treatment changes from the application of cold to the application of heat. The intent now is to stimulate blood flow through the injured area in order to reduce swelling. Hot compresses made from bandanas, towels, diapers, or washrags dipped in heated water are excellent, or the ankle can be baked before an open fire. Hot water bottles can sometimes be fashioned from large plastic bags, but care must be taken not to burn the patient. The exception to heat treatment is the ankle which is immediately encased in a cast of tape. Such casts should be left undisturbed for two or three days and heat applied only after removal.
While rattlesnake bites are uncommon, a snakebite kit ought to be carried in snake country. First prerequisites in prevention are caution and the ability to recognize poisonous snakes and the sort of terrain they like. I have spent a good deal of time in heavily infested areas and have encountered a great many rattlers. But by never extending any part of my body into a concealed place that could contain a snake, I have avoided being bitten. Although the Cutters kit offers more elaborate and valuable instruction, the treatment can be summarized in three words: “Cut, Suck, Tie” (the order is important). Avoid the tendency to cut too deep (¼ inch is sufficient) and tie too tight (let the tourniquet just dent the skin). Since suction cups are useless on any but flat, fleshy, hairless skin, mouth suction will often be required. Once first aid is given the patient should be made to rest to restrict blood circulation. He should also be taken to a hospital.
Salt pills (5 grain) are not required by most people unless the perspiration is literally pouring off the body. The usual dosage in such cases is one pill every 4–8 hours, but only while drinking a quart of water per 1–2 pills. Overdosing on salt is dangerous! Poison oak, like rattlesnakes, is a hazard that can usually be avoided by caution and the ability to recognize the danger. Poison oak in the west (and poison ivy in the east) have oily-looking distinctive three-lobed leaves that are easily remembered once they have been identified. Tolerance to the oil, which remains potent for some time on clothes and on the fur of pets, varies widely. Persons exposed have a second chance to avoid the itching, easily-spread rash, by scrubbing exposed skin vigorously with soap and hot water on the same day. Skin irritation generally begins four to five hours after exposure. In the west, poison oak rarely grows above 6000 feet.
Sunburn is a constant threat, especially at higher altitudes, to city dwellers who are not deeply tanned. At 6000 feet the skin burns twice as fast as at sea level, and the liability continues to increase with altitude. Sunburn often ruins a trip when a pale backpacker tries for a fast tan. Precautions should be taken to cover—or at least shade—all parts of the body for most of the day. Few people ever acquire a deep enough tan to expose themselves all day at high altitude without burning. Special care should be taken to avoid burning the nose to prevent starting a cycle of peeling, burning and repeeling.
Nothing is worse than having to hike in the heat completely shrouded from the sun—unless it is suffering with sunburned shoulders that will have to carry a pack the next day. Trying to safely tan white skin by short periods of exposure to fierce high altitude sun is a bothersome, inconvenient process on a backpacking trip. Potent sun screen ointment is essential on most trips. So is protection for the lips. The best treatment for sunburned skin is to keep it clean and dry, but I prefer, after washing gently in the evening, to lightly rub in petroleum jelly, wiping off the excess. For the inevitable burns from fire or stove, I also rely on petroleum jelly rather than carry a burn ointment.
It isn’t widely known that sunglasses often do more harm than good. They trick the eyes into staying open wider than they should in bright conditions, resulting in eyestrain. And the darkened lenses block out healthful rays which are essential to the body. A wide-brimmed hat or sunshade is always preferable. “Dark glasses are a crutch,” said the old prospector with whom I used to travel on the desert. “Put them on when it’s bright and you’ll never take them off.” He taught me to squint and wear my hat low for a couple of days to acclimate my eyes, rather than develop a dependency on shades. And it works. I only wear sunglasses now under extreme conditions.
Murl also taught me to use “Indian sunglasses” when vision was vital under extra bright conditions. Put the tips of your middle fingers together, end to end, then tuck the tips of your index fingers together tight against them, just beneath. Hold your four fingertips against your nose in the hollow beneath your brow and look through the easily adjustable slits between your fingers. Now your shaded eyes can stop squinting and open wide for maximum vision, even when looking almost into the sun.
If you need bug repellant in quantity it makes sense to buy the diethyl metatoluamide at the drugstore and make your own dilution. A dosage of 200 milligrams/day of vitamin B-1 taken orally will make your perspiration repellent to mosquitos and thus keep them away. So will the heavy consumption of garlic.
As altitude increases the oxygen content of the air decreases. In order to adjust, the body strives to process more air by means of faster and deeper breaths, to better extract oxygen from the air. Adjustment begins at only slight elevation, but shortness of breath and dizziness do not usually appear until about 7000 feet. Individual tolerance to altitude varies widely. The more gradual the change in altitude, the easier the acclimatization. The well-rested, vigorous, healthy individual usually acclimatizes easily. Smoking, drinking and heavy eating before or during a climb make acclimatization difficult.
Failure of the body to adjust to reduced oxygen intake results in “altitude” or mountain sickness. Mild symptoms include headache, lassitude, shortness of breath and a vague feeling of illness—all of which usually disappear after a day of rest. Acute mountain sickness is marked by severe headache, nausea, vomiting, insomnia, irritability and muddled thinking. The victim must descend to a lower elevation. Mountain sickness can usually be avoided by beginning a trip in good condition, spending a night at the trailhead before starting out and choosing modest goals for the first day’s walk. Most acclimatization occurs in the first two or three days.
People who acclimatize poorly, when they reach elevations in excess of 10,000 feet, are susceptible to high altitude pulmonary edema (HAPE) (fluid accumulation in the lungs). The first symptons include a dry, persistent, irritating cough, anxiety, and an ache beneath the breast bone and shortness of breath. If the victim is not evacuated promptly to lower elevation or given oxygen, breathing may become rapid, noisy and difficult, the skin often takes on a bluish tinge, and death may occur quickly.
The number one killer of outdoor travelers is Hypothermia, defined as “rapid mental and physical collapse due to chilling of the body’s core.” When the body loses heat faster than it’s being produced, you instinctively exercise to keep warm while the body cuts back blood supply to the extremities. Both drain your energy reserves. If chilling and exposure continue, cold will reach the brain, depriving you of judgment and reasoning power without your awareness. As chilling progresses, you lose control of your hands and body. When your body can no longer summon reserves to prevent the drop in core temperature, stupor, collapse and death await.
The first line of defense is awareness, awareness that most hypothermia cases occur during mild temperatures, 30–50°F. The greater hazards are wind and wet. Wind drives away the skin’s cushion of warm air, and it refrigerates wet clothing. Remember that 50°F water is unbearably cold, and that the wet body can lose heat 200 times as fast as one protected by dry clothing! There is no better clothing for hypothermia protection than vapor barriers. If you can’t stay dry and warm, do whatever is necessary to stop exposure. Turn back, give up, get out, make camp—before exhaustion can complicate your plight. Don’t shrug off shivering. If you have to exercise continuously to prevent it, you’re in danger. Get out of wet clothes, get dry and put on vapor barriers to stop heat loss, then take hot drinks, heap on the insulation, utilize whatever heat sources are available and stay awake.
By paying attention to what your body tells you, by proper use of your clothes, and by taking precautions against injury, you can double your chances of enjoying a safe, happy trip.