Next, we will build the second and third legs of the MVC triangle, the view, and the controller. Starting with the view is the next logical step. When developing Mac applications, the easiest way to build the UI is to use Xcode's interface builder, which you can install from the Mac App Store. MonoDevelop on the Mac is built to specifically interoperate with Xcode for building the UI.
Start by opening MainWindow.xib from MonoDevelop by double-clicking on it. It will automatically open XCode with the file in the interface builder editor. The form will initially just be a blank window, but we are going to start adding views. Initially, the experience will be very familiar for anyone who has used Visual Studio's WYSIWYG editors for WinForms or XAML, but those similarities soon diverge.
If it is not already displayed, bring up the Utilities panel on the right-hand side of the screen by clicking on the button shown in the following screenshot, which you can find in the top-right corner of Xcode.

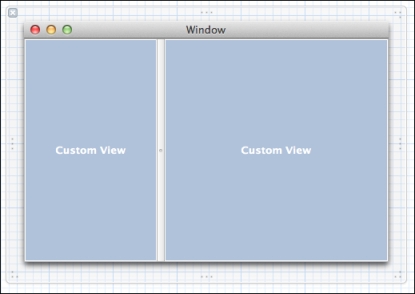
Find the object library and browse through the list of user interface elements that are available to you. For now, look for a Vertical Split View in the object library and drag it out to the editor surface, making sure to stretch it across the whole window, as shown in the following screenshot:

This lets us build a simple UI that lets the user resize the various elements to whatever makes sense for him/her. Next, we will add the user-provided options as text field elements, with accompanying labels, of course, to the left-hand panel.
- URL: This is the URL of the website that you want to scrape.
- Item Link XPath: This is on the page retrieved with the URL. This XPath query should return a list of links that you are interested in scanning.
- Content XPath: For each item, we will retrieve the HTML contents based on the URL retrieved from Item Link XPath. In that new HTML document, we want to pick a content element that we will look at.
- Trigger Regex: This is a regular expression that we will use to indicate a match.
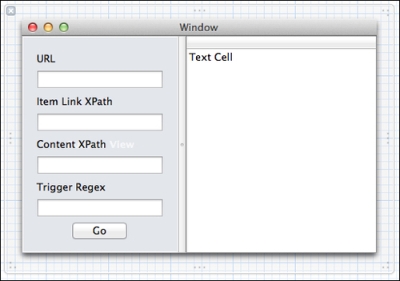
We are also going to want a way to display the results of any matches. In order to do so, add a table view from the object library into the second right-hand panel. This table view, which is analogous to the grid controls of the regular .NET/Windows world, will give us a place to display our results in list format. Also add a push button that we will use to initiate our web call.
Once completed, your interface should look like the following screenshot:

With the interface defined, we start looking to the controller. Exposing the individual view elements to the controller is something unique if you have never worked with Xcode before. Where other tools for other platforms tend to automatically generate code references to textboxes and buttons, in Xcode you must manually link them up to properties in your controller. You will be exposed to some Objective-C code for this, but only very briefly, and you don't really have to do anything with it aside from the following steps:
- Display the assistant editor and make sure that
MainWindowController.his showing in the editor. This is the header file for the controller that will interact with the view in our program. - You have to add what are called outlets to the controller and connect them with the UI elements, so you can get references to them from code. This is accomplished by holding the Ctrl key on your keyboard, and clicking-and-dragging from the control textbox into the header file.
A small dialog, shown in the following screenshot, will be displayed, it lets you change a few options before the code is generated:

- Do that for all of the text views and give them appropriate names such as
urlTextView,linkXPathTextView,contentXPathTextView,regexTextView, andresultsTableView.When you go to add the button, you will notice that you have an option to change the connection type to an Action connection instead of an Outlet connection. This is how you can wire up the button's click event. When you have completed this, the header file should have the following elements defined:
@property (assign) IBOutlet NSTextField *urlTextView;
@property (assign) IBOutlet NSTextField *linkXPathTextView;
@property (assign) IBOutlet NSTextField *contentXPathTextView;
@property (assign) IBOutlet NSTextField *regexTextView;
@property (assign) IBOutlet NSTableView *resultsTableView;

- (IBAction)buttonClicked:(NSButton *)sender;
- Close Xcode and go back to MonoDevelop and take a look at the
MainWindow.designer.csfile.You will notice that all of the outlets and actions that you added will be represented in the C# code. MonoDevelop watches the files on the file system, and when Xcode makes changes to them, it regenerates this code accordingly.
Remember that we want the user's settings to persist between sessions. So when the window loads, we want to initialize the textboxes with whatever values were entered previously. We will use the
UserSettingsclass that we created earlier in the chapter to provide those values. Override theWindowDidLoadmethod (as shown in the following code), which is executed when the program first runs, and set the values from the user's settings to the text views.public override void WindowDidLoad () { base.WindowDidLoad (); dynamic settings = new UserSettings(); urlTextView.StringValue = settings.Url; linkXPathTextView.StringValue = settings.LinkXPath; contentXPathTextView.StringValue = settings.ContentXPath; regexTextView.StringValue = settings.TriggerRegex; } - Now, we turn our attention to the displaying of data. Our primary output in this application is
NSTableView, which we are going to use to display any matching links in the target URL. In order to bind data to the table, we create a custom class that inherits fromNSTableViewSource.private class TableViewSource : NSTableViewSource { private string[] data; public TableViewSource(string[] list) { data = list; } public override int GetRowCount (NSTableView tableView) { return data.Length; } public override NSObject GetObjectValue (NSTableView tableView, NSTableColumn tableColumn, int row) { return new NSString(data[row]); } }The table view will request a row's data in the
GetObjectValuemethod whenever it needs to render a given table cell. So this just takes an array of strings and returns the appropriate index from the array when requested. - Now we define the method that quite literally puts everything together.
private async void GetData()
{
  // retrieve data from UI
  dynamic settings = new UserSettings();
  settings.Url = urlTextView.StringValue;
  settings.LinkXPath = linkXPathTextView.StringValue;
  settings.ContentXPath = contentXPathTextView.StringValue;
  settings.TriggerRegex = regexTextView.StringValue;

  // initiate data retrieval
  WebDataSource datasource = new WebDataSource();
  await datasource.Retrieve();

  // display data
  TableViewSource source = new TableViewSource(datasource.Results.ToArray());
  resultsTableView.Source = source;
}
In the
GetDatamethod, the first thing we do is pull the values from the textboxes and store them in theUserSettingsobject. Next, we retrieve the data fromWebDataSource, asynchronously of course. Now, pass the results toTableViewSourceso that it can be displayed. - Finally, implement the
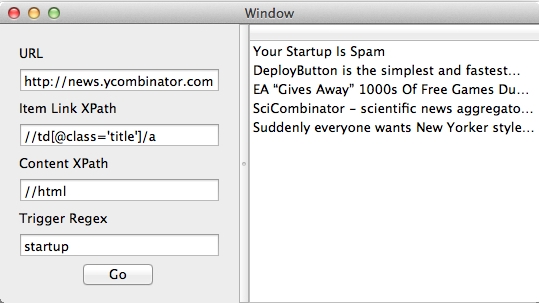
buttonClickedaction that you wired up in Xcode.:partial void buttonClicked (MonoMac.AppKit.NSButton sender) { GetData (); }Now run the program and put in some values for a web page you want to search through. You should see results like those shown in the following screenshot, you can try to use the same values as well, but please note that it will not work if Hacker News has updated their HTML structure.
