Pâte à croissant
( Croissant dough )
This viennoiserie is notoriously tricky to make because it encompasses not only the art of mixing a yeasted dough, but also the fiddly process of laminating, or ‘turning’, the dough with butter. Unlike puff pastry, the croissant dough contains yeast and has a propensity to start proving during the laminating process if your working environment is too warm. Added to that are the problems you will face if your butter begins to soften too much. So be patient and familiarise yourself with your ingredients by reading the chapter on Essential Ingredients and the entire process described in this step-by-step section before you begin. Trust me, the rewards of looking at your croissants slowly developing in the oven and the pride you will feel when you serve these beautifully flaky pastries to your friends and family will far exceed the effort spent in making them.
Makes about 1 kg (2 lb 4 oz)
500 g (1 lb 2 oz) plain (all-purpose) flour (‘0’/T55)
60 g (2¼ oz) caster (superfine) sugar
2 teaspoons fine salt
10 g (¼ oz) dried yeast
300 ml (10½ fl oz) full-cream milk
270 g (9½ oz) block cold unsalted butter
How to mix the dough and prepare the butter
Using an electric mixer fitted with a dough hook attachment, mix the flour, sugar, salt and yeast (photo 1) on low speed until well combined. Gradually add the milk (2) and mix for 5 minutes. At this stage the dough should be firm but not dry. If the mixture looks too hard or if your mixer finds it hard to mix properly, add 1–2 tablespoons of extra milk to soften it up. Some types of flour or flours made from different types of wheat have different rates of absorption and may require more liquid than others.
After 5 minutes, increase the speed slightly and mix for another 10 minutes, or until the dough is smooth and comes away from the side of the bowl (3). Be careful when increasing the speed of your mixer; this dough can be hard on small mixers, so if you feel like your mixer is struggling, reduce the speed and mix for a few minutes longer.
Stop the mixer, remove the dough and place in a bowl. Lightly dust with flour (4) and cover with a clean cloth. Set aside in a warm place for the first prove (pointage) for 1 hour, or until increased in size by half. Always check on how fast your dough is proving. The first prove is meant to stimulate the yeast only, so as soon as the dough increases by roughly half of its original size, transfer to a tray lined with baking paper. Flatten the dough over the tray as much as you can to remove as many gas bubbles as possible. Cover the tray with plastic wrap and refrigerate on the top shelf for at least 1 hour.
When the dough (détrempe) is cold, you will need to prepare the butter for the laminating process. This involves pounding the cold butter into a rectangle roughly half the size of your dough. To do this, place the block of cold butter on a piece of baking paper, cover with another piece of baking paper and use a rolling pin to pound the butter, turning it regularly by 90 degrees, into a rectangle about 18 x 20 cm (7 x 8 in). Cover the butter in plastic wrap and set aside.
| 1 |  |
 |
2 |
| 3 |  |
 |
4 |
cooking tip :
L Ideally, the proving process should be done in a humidity-controlled environment because the dough has a tendency to dry out when exposed to dry air so, if you can, prove your croissants in an enclosed space such as a cupboard or your oven (turned off) to stop them drying out.
The laminating process
Place the dough on a lightly floured work surface and dust the top with flour (5). Roll the dough from the middle all the way to the edges into a 20 x 35 cm (8 x 14 in) rectangle. Keep moving the dough and dusting with a little extra flour to stop it sticking (be frugal with the flour you use during this process). If you can’t roll your dough out to the exact dimensions, use your hands to stretch it into shape. Rotate the dough 90 degrees.
Unwrap the butter and place it in the centre of the dough rectangle. Fold both ends of the dough over the top so they meet in the middle of the butter and pinch the ends together (6, 7). You should end up with a 20 x 18 cm (8 x 7 in) rectangle, with the butter exposed at two ends, and a tightly sealed seam over the top.
With one short end facing you, begin rolling the dough from the middle to the top (8), flouring as needed. Rotate the block 180 degrees and repeat the process until you have a rectangle that measures about 20 x 65 cm (8 x 25½ in). Fold one-third of the rectangle over the middle of the block (9), then fold the other end over the top (10). This will give you a single turn. During the process of ‘turning’, make sure that you maintain your original rectangular shape either by gently rolling or stretching the dough into shape, as this will ensure an even distribution of butter throughout the croissant.
Use your finger to mark one dot in the dough (11), as a reminder that this is the first turn. (Increase the number of dots for subsequent turns.) Cover the dough in plastic wrap and refrigerate for 1 hour, or until the butter is firm.
The next and final turn is a double turn, or book turn, and for this the dough will need to be rolled out thinner to accommodate the additional fold (12). Repeat the process as for the first turn but continue rolling until you get a larger rectangle measuring 20 x 90 cm (8 x 35½ in). Once you have rolled and stretched the dough into the correct dimension (13), fold both ends up to meet in the middle of the rectangle (14, 15), then fold it in half again to end up with a block roughly the original size of the butter (16).
Wrap the croissant dough (pâton) in plastic wrap and refrigerate for 2 hours. Resting the dough in the fridge enables the gluten (protein in the flour) to relax and also helps the butter harden. This not only makes it a lot easier to work with the dough but also ensures that the butter isn’t absorbed into the thin layers of dough, which would effectively negate most of the work you have just done.
| 5 |  |
 |
6 |
| 7 | 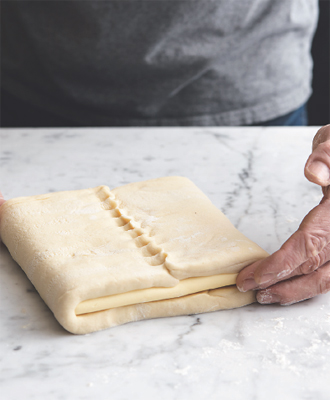 |
 |
8 |
| 9 |  |
 |
10 |
| 11 |  |
 |
12 |
| 13 | 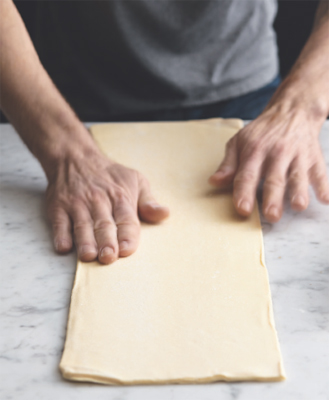 |
 |
14 |
| 15 | 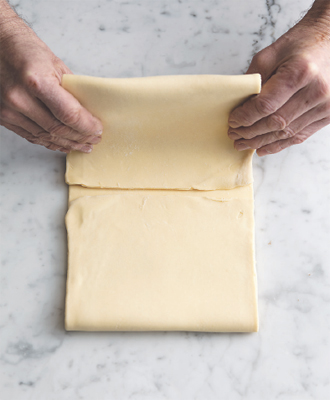 |
 |
16 |
cooking tip :
L Croissant dough does not freeze very well due to its live culture content (yeast), and domestic freezers are not designed to maintain the cold temperatures required to stabilise the yeast properly. My advice is to bake all the croissants on the day and keep any leftover to make Almond Croissants or Bread and Butter Pudding.
Ever wondered how many layers of butter there are in a croissant?
L Croissants are made using two different types of turns, or folds: a single turn and a double turn, or book turn. Even though a book turn is generally referred to as a double turn, it is not entirely mathematically correct. To save you the trouble of having to count each and every layer of your croissant or puff pastry at breakfast, here is a simple equation that illustrates the mechanics of laminating:
| Single turns: | Double (book) turns: |
| First turn: 3 layers of butter | First turn: 4 layers of butter |
| Second turn: 3 x 3 = 9 layers | Second turn: 4 x 4 = 16 layers |
| Third turn: 9 x 3 = 27 layers | Third turn: 16 x 4 = 64 layers |
| Fourth turn: 27 x 3 = 81 layers | Fourth turn: 64 x 4 = 256 layers |
| Fifth turn: 81 x 3 = 243 layers | Sixth turn: 243 x 3 = 729 layers |
So if you’ve ever wondered how many layers of butter are in your croissant, the answer is 12: three layers for a single turn x four layers for a double turn.