Surface Reactions: Just One of the Mysteries of Infrared
Some infrared images that are brought into post-processing can cause a photographer to stare at the monitor in disbelief. You may say to yourself, “Whoa! What strange thing just happened?” Colors change from dark to light, trees glow like a neon sign, and sometimes wedding parties look like they were photographed at a Dia de los Muertos convention. The surprises don’t end there. Your image results will depend on your camera, the type of conversion, the filters used, and the lens used to capture the shots. Also, you may find that your images will appear one way on the LCD, another way when you open them in your image browser, and different still when you view them in your RAW editor.
One thing is for certain with infrared: nothing is certain. Just when you think you have a handle on things, some aspect in a situation you thought was under control will throw everything off. Each new shoot requires careful strategy and a little luck. Don’t throw all your pixels into one basket. For security, keep a conventional camera on hand to capture critical images during important photo shoots.
One of the benefits of shooting black & white infrared portraits is that your subject’s skin may take on an alabaster appearance. (The reason for the transformation, some say, is that wavelengths penetrate a few millimeters into the skin to give it a smooth, milky look.) The effect can be superbly flattering; in some cases, though, it can be so extreme that the results look creepy and alienesque.
Teenage skin loves infrared. It can make acne disappear.
But Wait!
Yes, infrared typically flatters the skin, but it can cause close-to-the-surface veins to stand out.
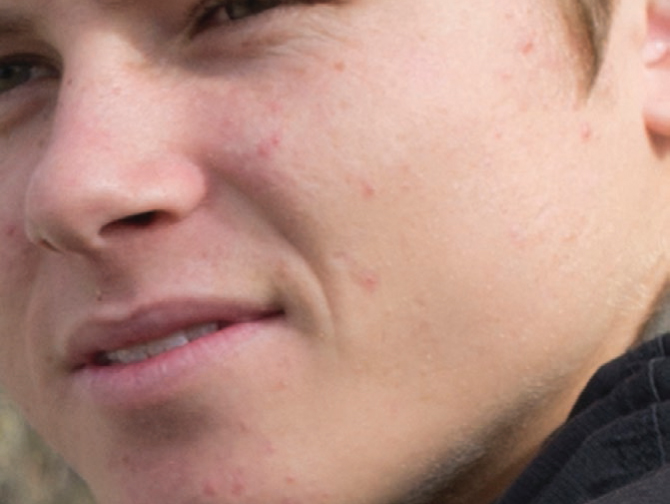

In the black & white infrared image, the teen’s acne has magically faded—with no retouching.

In this beautifully enchanting image by Ikan Hiu Pegel Pegel, the model appears to have skin of porcelain. However, infrared tends to accentuate veins, as detected on the woman’s hand behind the tall grass.
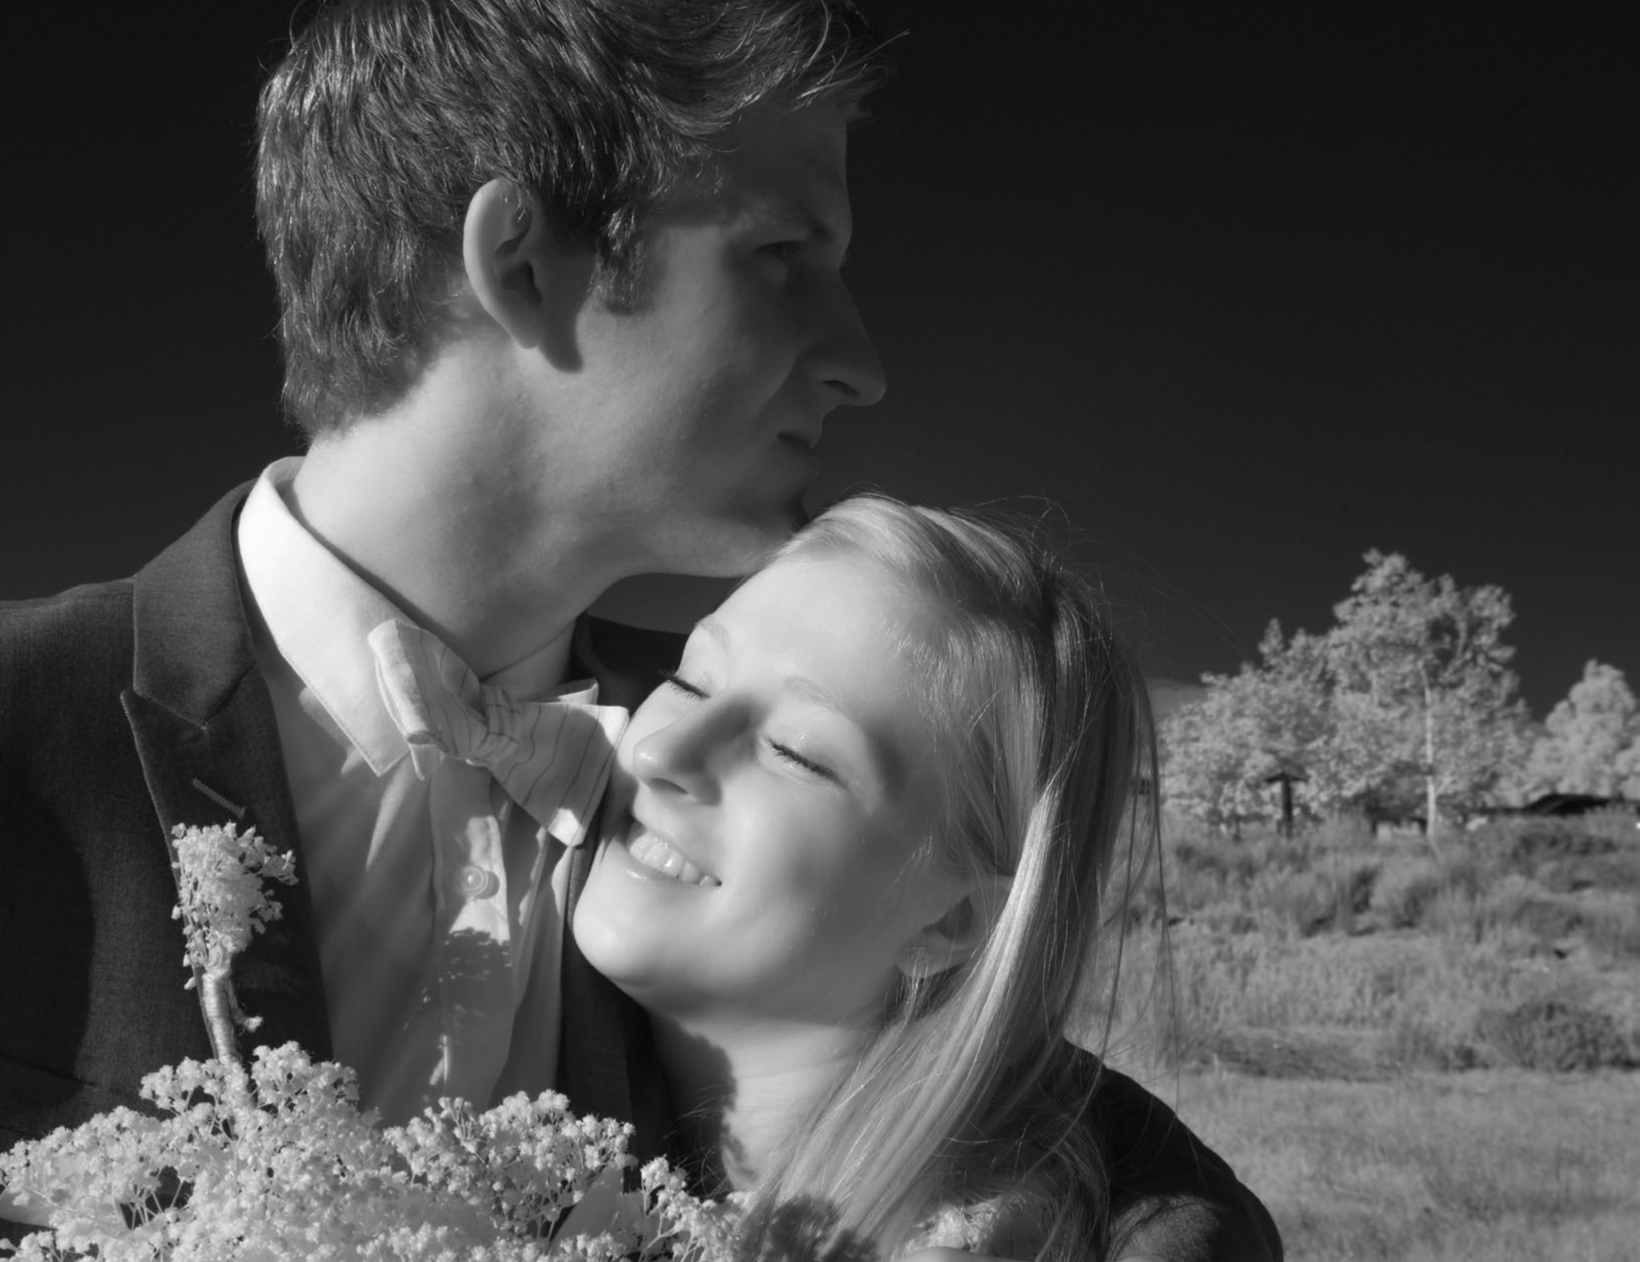
It isn’t easy to get the eyes right when shooting infrared. In Jayme Blaschke’s portrait of a bride (facing page), however, the subject’s eyes are deliciously blue and strikingly bright. Success with infrared depends heavily on lighting (and lots of it).
In Photoshop, Jayme adjusted the Levels, swapped the red and blue output channels to attain the false color effect he calls “Winter Wonderland,” then made final color adjustments. The subject’s eye color was sampled from her hair and applied using a color overlay layer. Lastly, after flattening the final composition, Jayme applied a Photoshop action of his own to simulate the ethereal glow of infrared film. Eyes tend to be ghostly with irises registering as dark, while whites take on a grayish hue. Remember that the camera lens used and the light that is present will play a big role in the outcome of your images.
When infrared gets eyes wrong, Blaschke calls them “dead pools of black.” He cheerfully adds, “That’s great if you’re going for a vampire or zombie theme, but eyes like that aren’t good for anything else.” His constructive advice is, “Eyes are the key for any portrait/glamour work. Going against the conventional advice to shoot infrared at midday, I prefer to shoot portraits in the morning or evening to avoid harsh shadows. I like to shoot in bright, indirect light and try to have models look up, asking them to open their eyes wider than feels natural. Sometimes I’ll use an off-camera strobe slightly below a typical key light position to throw a little extra infrared on the eyes. In the studio, I follow much the same procedure—head up, eyes wide, making sure at least one light is illuminating the face so that the eyes are not shadowed. Big softboxes are good for this, but infrared spills everywhere, affecting backgrounds that reflect infrared brightly, so this quickly becomes an issue if wanting to shoot something other than high key.”
Fortunately, I captured this teen hugging her just-married brother while her eyes were closed. This meant I was able to avoid the problem of “living dead” eyes.

This was the first infrared image Jayme Blaschke (www.jaymeblaschke.com) took that convinced him of the genre’s potential for portraiture. The evening sun had passed behind a cliff in the garden where he was photographing, and the bride was cast in shadow. However, dense vegetation opposite her acted as a giant reflector, bathing her in bright, diffused, directional light. The result is sublime, almost translucent skin and strikingly bright blue eyes.
Even infrared-savvy individuals may have difficulty spotting architecture that was shot in infrared—unless the photograph includes telltale white foliage. Buildings tend to look better when photographed in black & white than they do in color. This is because the architectural lines are crisper in black & white images.
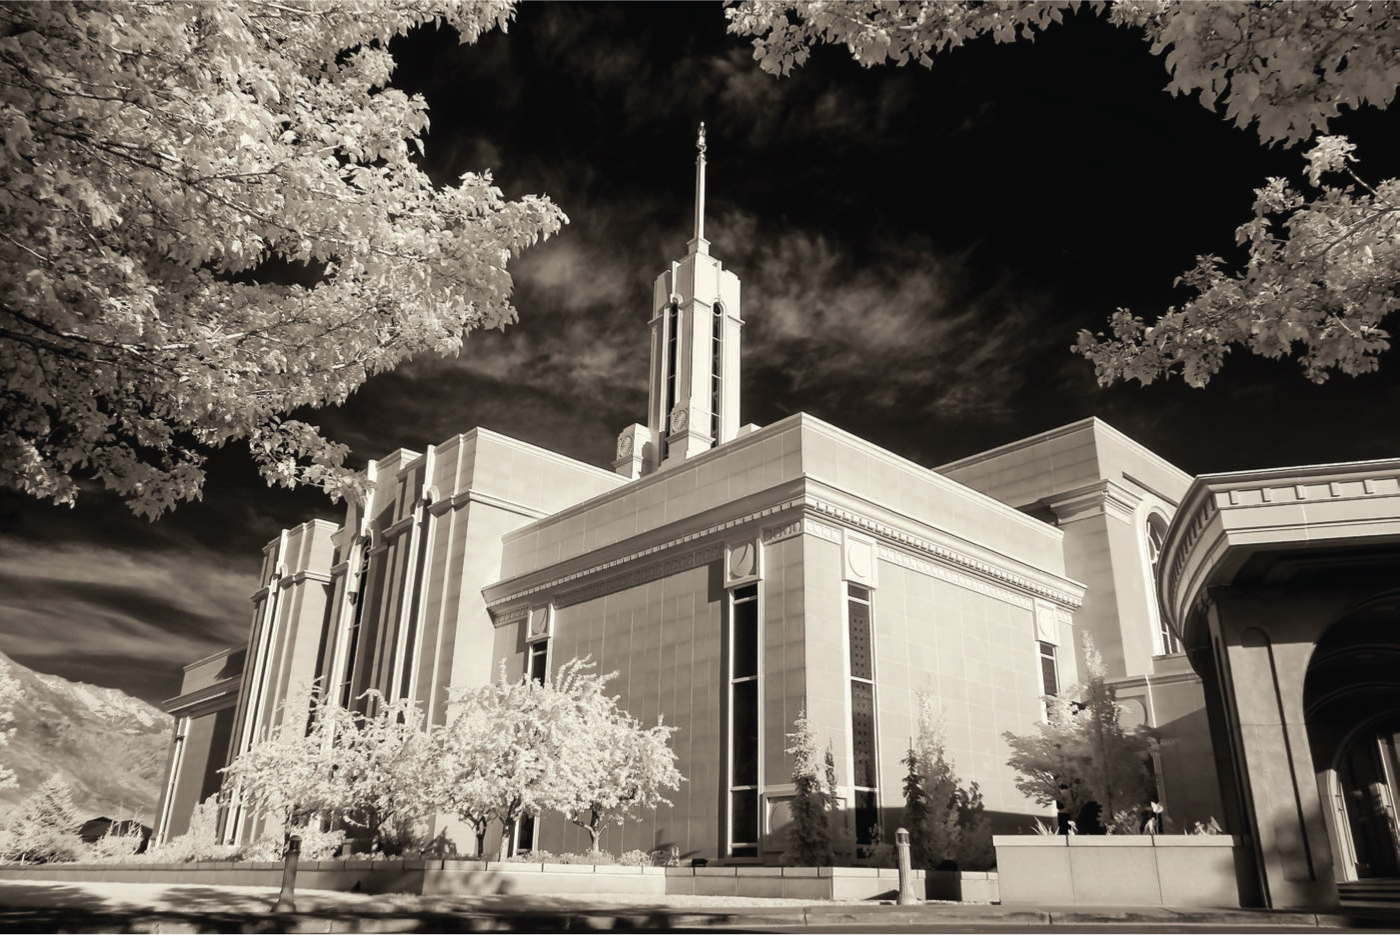
Beautiful straight and crisp architectural lines embellish this striking image of a Mormon temple captured by Clarence Spencer. Without the trademark white foliage and ebony sky, it would be difficult to identify this as an infrared image.
Black & white infrared images are sharper than color infrared shots.
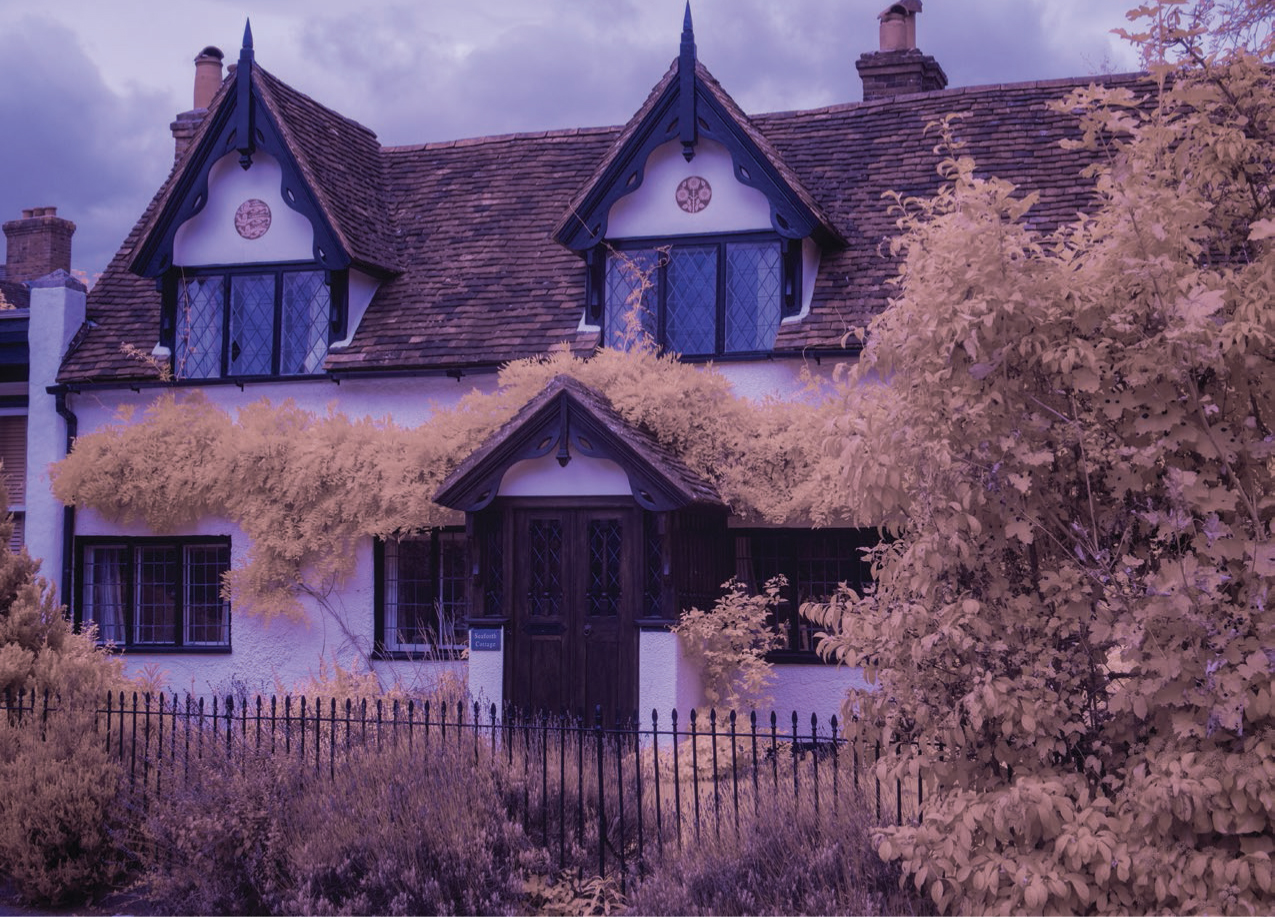
Vegetation surrounds this home in Shere, UK, where The Holiday was filmed. A semi-overcast sky made this color infrared image rather dreary.
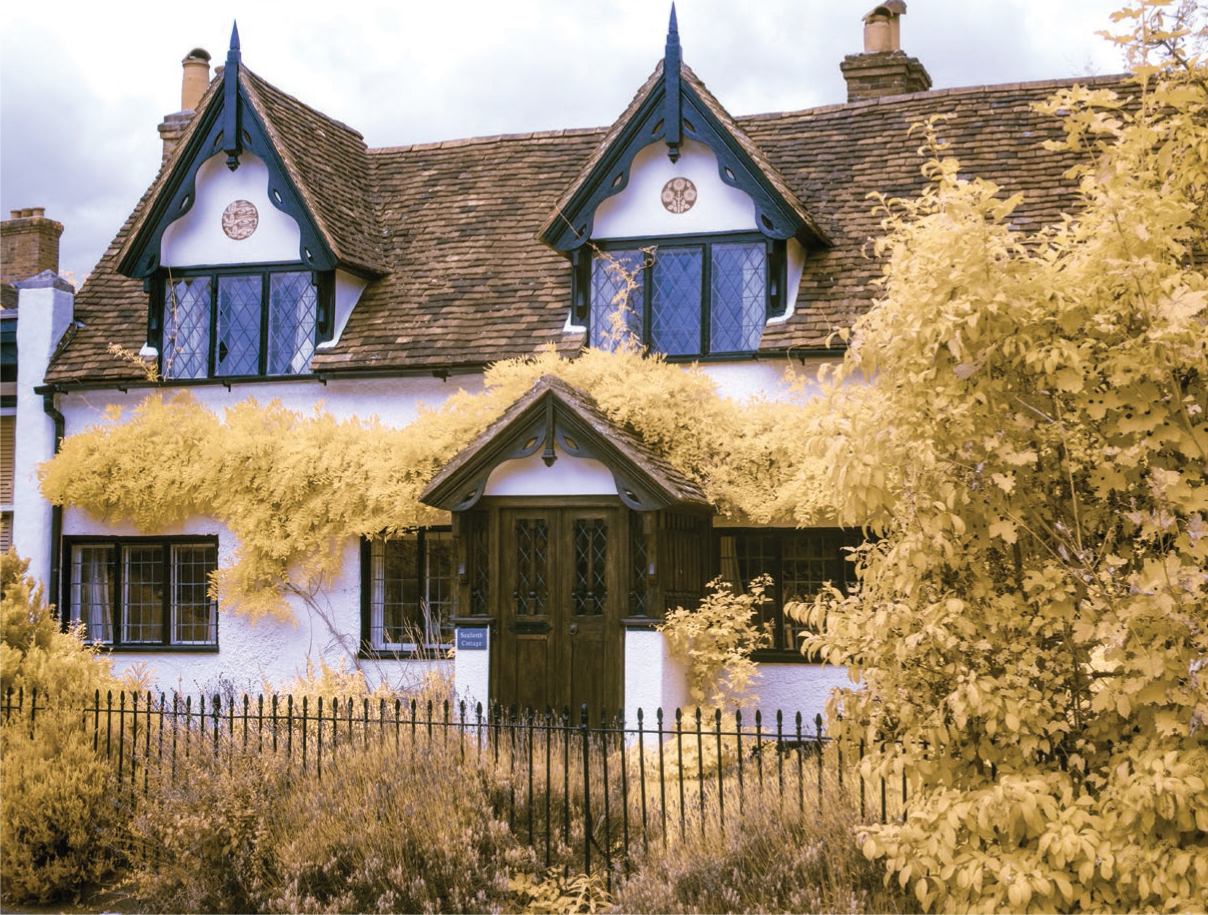
Post-processing improved this image.
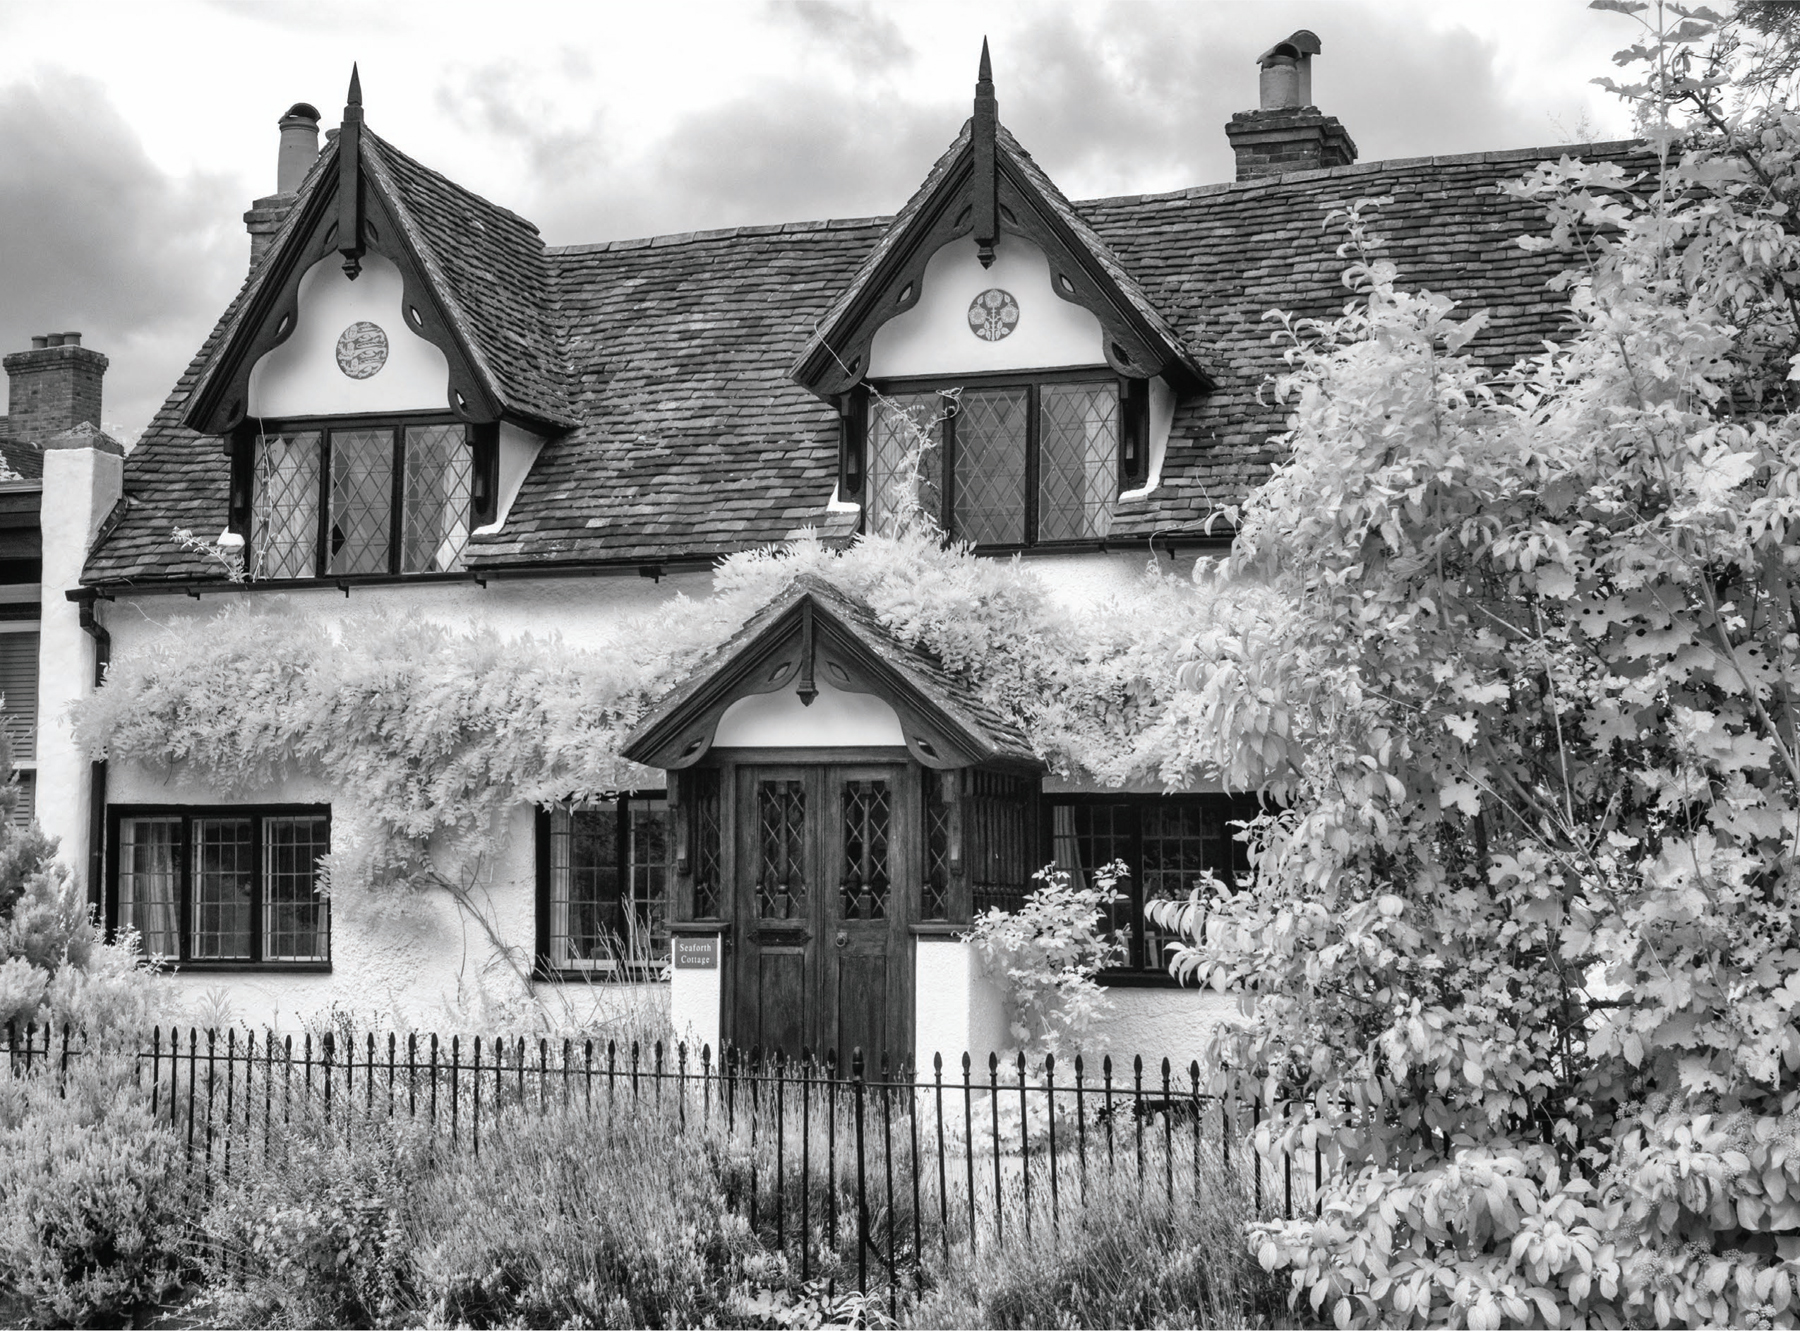
The image is much improved after conversion to black & white. If this shot had been captured in true black & white infrared instead of color, the foliage would have appeared even brighter and sharper.
In this image by Jayme Blaschke, the foliage in the background shows typical white infrared characteristics, but the foliage in the foreground is dark because it is not reflecting sunlight. The image was taken with an unconverted Canon Rebel XTI using a tripod and bracketed exposures. Jayme composed the image and focused before attaching an opaque screw-on 720nm infrared filter to the lens. He then covered the eyecup to keep stray light from reaching the image sensor. Jayme bracketed his exposures and says that 25 seconds resulted in the best dynamic range. The RAW file was processed in Photoshop. The red and blue color channels were swapped, levels were adjusted, and the color balance was tweaked.

Evergreens tend not to reflect much light. Trees with leaves will appear much brighter.
Vegetation (Leaves, Grass, Shrubbery)
For the most part, grass, bushes, and trees will almost glow in your infrared photos. The characteristic white “bloom” on foliage is more apparent in spring due to peak photosynthesis conditions—but don’t wait until spring to photograph in the wild.
But Wait!
• Foliage will only appear brilliant when it reflects sunlight. When it is backlit, it appears dark.
• Evergreens appear dark in infrared. They lack the characteristic glow often seen in other vegetation.
Bright skies can provide for some great infrared imaging opportunities. Stormy skies are a close second; they too can add oomph to infrared photos. Overcast skies are an option if you have nothing better to do. Also, when there are clouds, rain may follow, and it can be a challenge to keep stray raindrops off of the lens.

The brilliant blue sky is reflected in the water in Vince Ha’s image (www.vinceha.com).

The dramatic skies captured by Vince Ha pair nicely with yellow foliage and blue water.
Clouds can add drama to infrared images, but they are not absolutely critical for success. This image of a majestic peak in Zion National Park holds its own without any accompanying clouds at all. The dark sky provides that je ne sais quoi that sets it apart—even without glowing vegetation or puffy clouds.
Clouds may also draw attention away from the main subject, as demonstrated in this image of the same peak surrounded by clouds and shadowed by clouds. Clouds would have interfered with the white outline created by tall aspen trees reaching for the sky.

In this image, the black sky sets off and defines the tree line. Clouds would have polluted the pot, and an overcast day would have ruined it all!
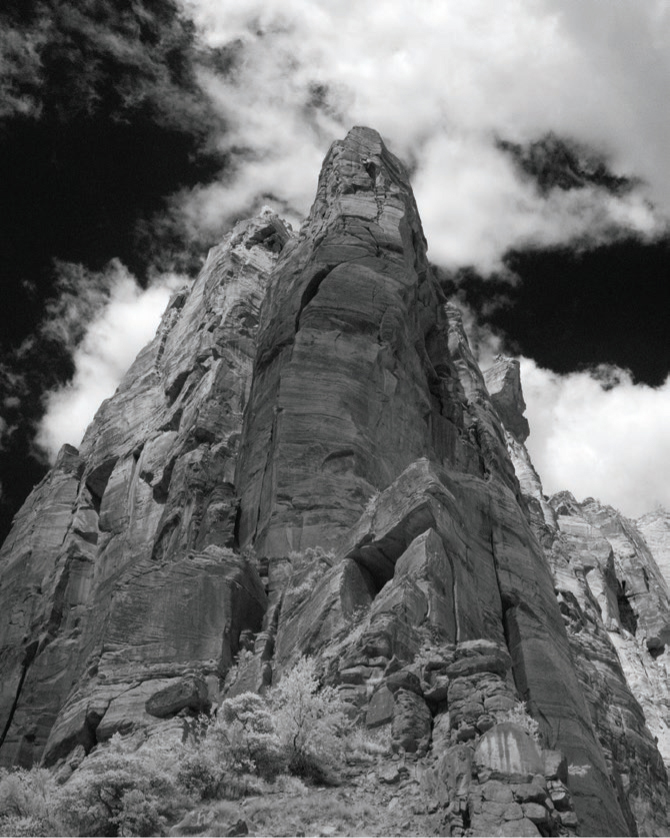
Here is the same peak on a different day, in different light, with a different sky. The image proves that great infrared results when many factors fall into place. These factors may vary from one scene to the next.

Is this image effective without clouds? Definitely. The black sky sets off and defines the peak!
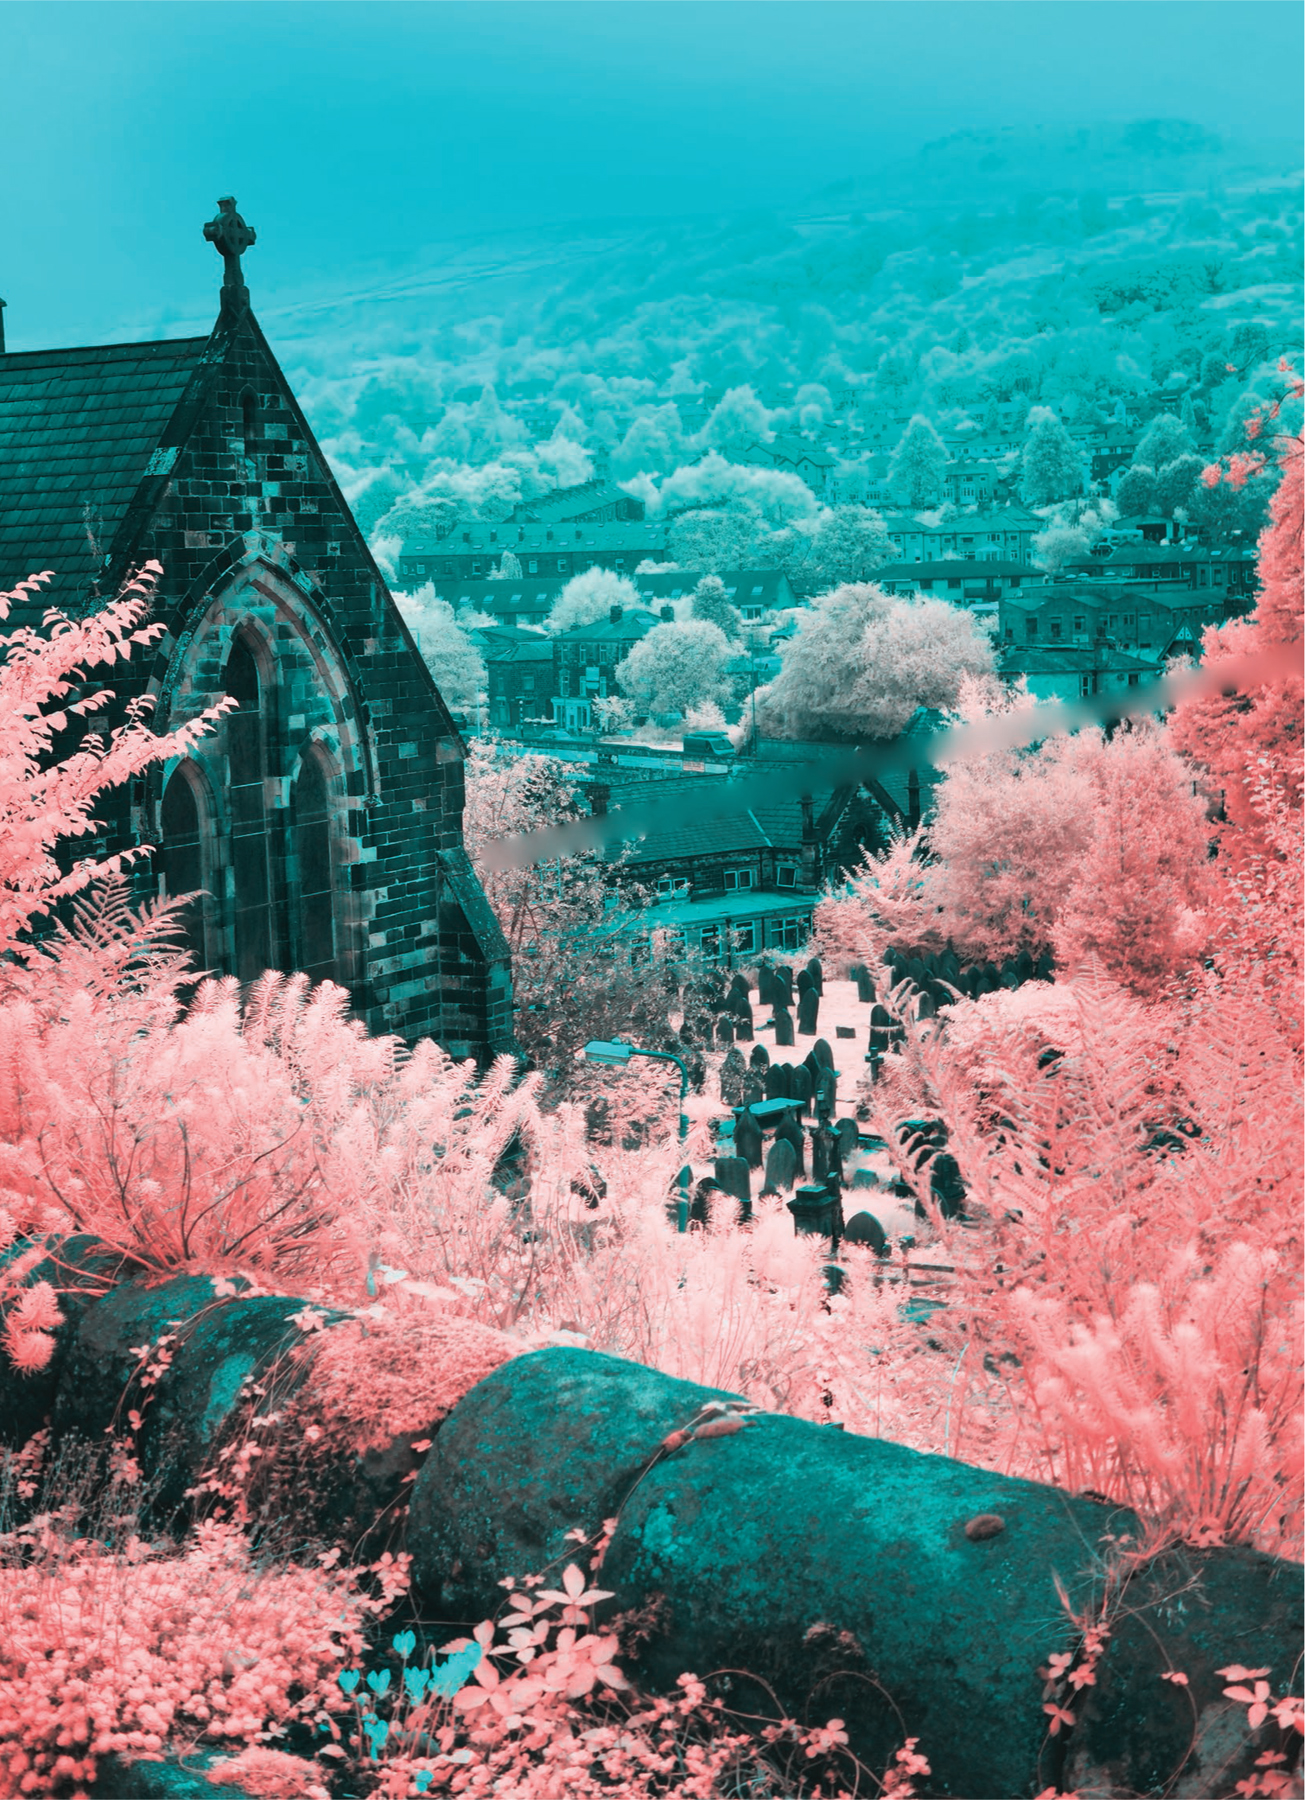
The hill above the cemetary indicates how low the clouds were hanging. Processing this image brought out the pink and azure tones.

Sometimes overcast skies work. In this case, the color infrared image is dramatic, though the visible light capture is somewhat ordinary.
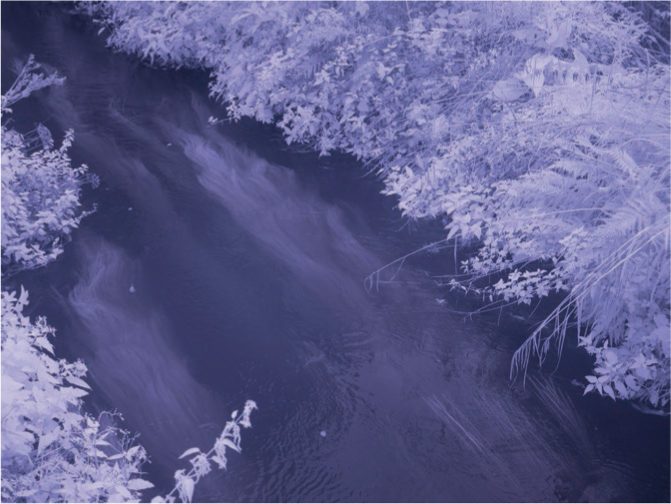

Shooting into the water doesn’t offer much impact. There are no reflections to give the impression of water, but there is a little bit of a see-through quality.
But Wait!
Overcast skies usually mean poor infrared image results, but when all of the other image elements come together, the results might be pleasing.
When you are photographing water, it’s all about the light and the reflections that appear on the surface. If the light, angle, and reflection are good, you’ll have a winning image.


Water can appear deep and murky or shimmer with refections; it’s all about how much light is available to be reflected or absorbed.
The appearance of animals—especially those with fur or feathers—doesn’t seem to be altered much by infrared capture.
While we are on the topic of animals and infrared, it is interesting to note that many animals can perceive a wider range of light waves than we humans can. There you have it; more cocktail party conversation.
Be prepared for surprises when photographing textures or fabrics with infrared. Dark surfaces that reflect infrared light appear white, while those that absorb light will stay black. How do you know what to expect? A crystal ball might help—if you can fit one into a lens pocket. Remember the black scarf that was rendered white and the odd white appearance of some parts of the men’s tuxedos? Sometimes, your subjects’ clothing will surprise you.
If you are the type of photographer who obsesses over sensor debris, it’s worth noting that sensor dust may show up as white or dark spots in your infrared images.
Vehicles, Robots, and Other Metal Objects
There aren’t any pictures of robots in this book, but just in case one comes your way, it will be helpful to know how metal objects photograph in infrared. Metallic and painted metal may provide a harsher reflection and therefore require careful observation of black holes and blown-out areas. Nevertheless, infrared captures of vehicles can be extremely compelling.
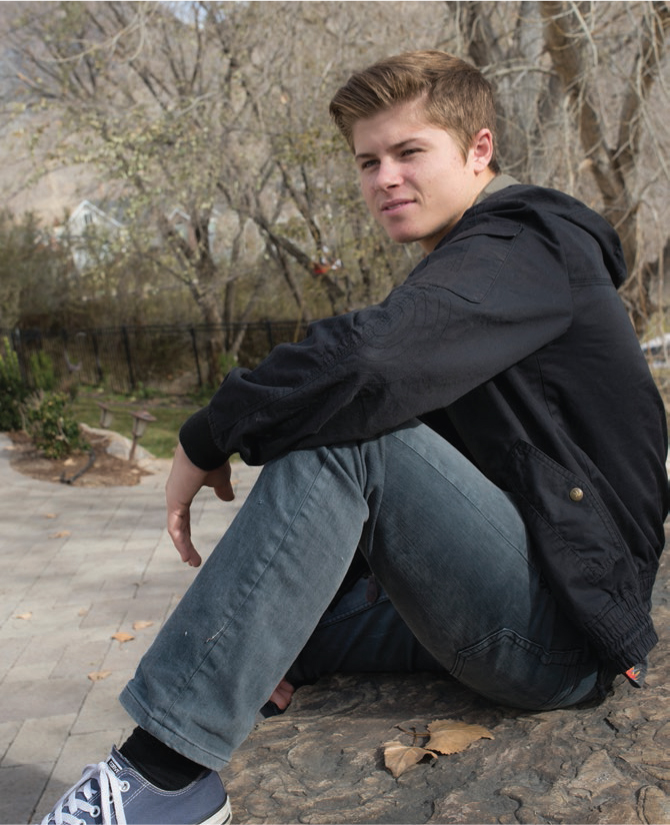

Clothing can play tricks on the photographer shooting infrared. The straight-out-of-the-camera black & white infrared photograph shows light-colored clothing, but the boy’s pants were dark denim and his jacket was actually black. Notice how some faint color came through in the black & white infrared shot.

A pastoral image of cows seemed a natural fit for a sepia treatment.
In a RAW editor, correct the exposure (if necessary) without blowing out the white areas. For most outdoor images, I like to bump up the blacks, then work on bringing out the shadows, highlights, and whites.

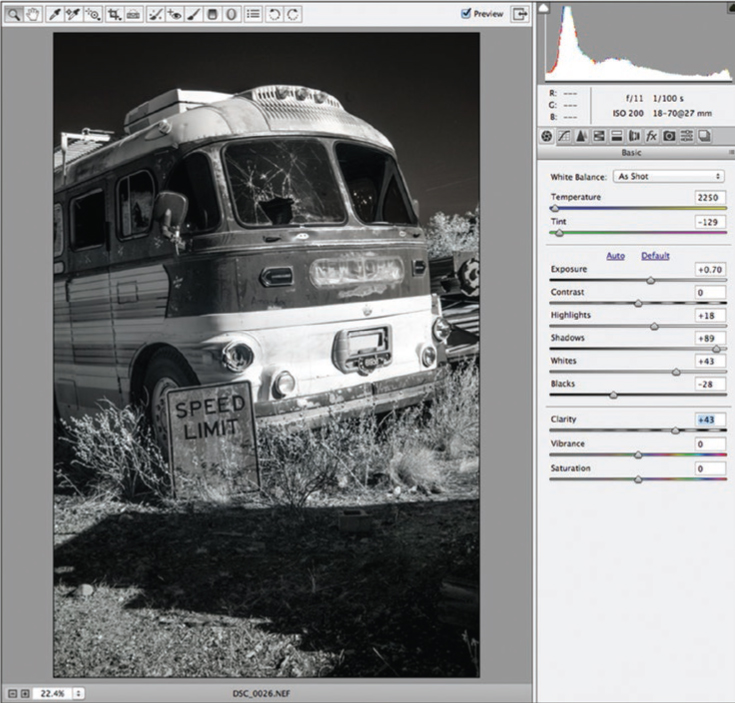
A junked bus looks crisp and perky in infrared. The vegetation is not very vibrant because the image was made in winter.
September 5, 2014
Todmorden, England
This quaint little town in Yorkshire is close to where I attended art college. Overcast skies allowed a beautiful aqua color to be introduced into this photo in post-processing. The colors work nicely together and make an English cemetery come alive (in color only).
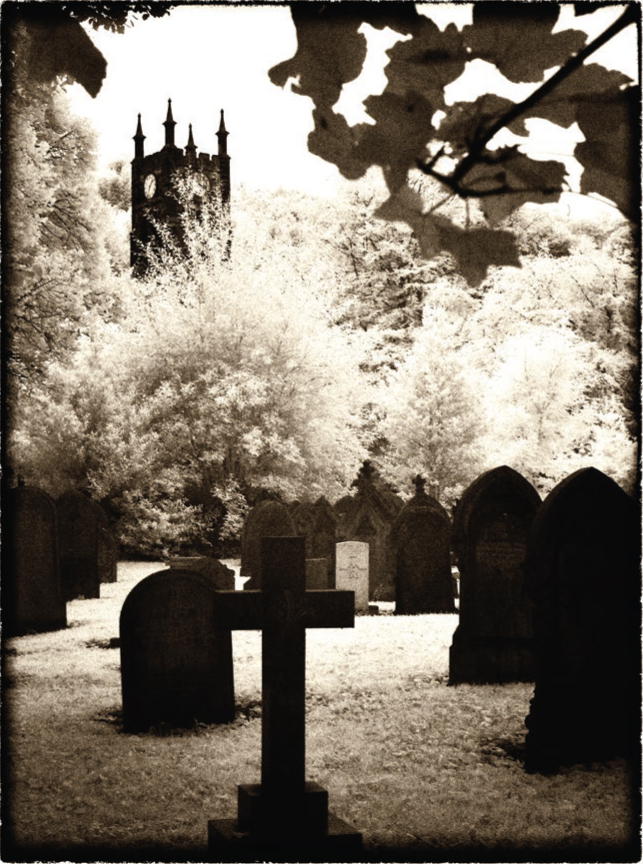
The white sky sets off the steeple of the old church, balancing the dark leaves and gravestones. The foliage in the background is light, but it’s dark at the top of the image. It all comes down to where light is being reflected.

For this version of the image, I switched the screw-on filter on my full-spectrum converted camera from black & white to color.