
CHAPTER |
5 |
An Outline of Yin Yoga Postures |
We will start our examination of the yin poses with Pentacle. The reason for this is it is often difficult to feel chi and blood moving in our bodies while we are practicing the poses. The effort required to do them often obscures the subtle sensations. But if we relax in the Pentacle after practicing a difficult posture, then it is quite easy to feel the blood and chi rush into or out of certain areas of our body. Even the discomfort that we feel in the joints we have been stretching is a form of chi and we can learn to observe it objectively. This practice is a great aid to learning to guide the chi when meditating.
Pentacle is done by lying on one’s back and spreading the arms and legs out in any comfortable and completely unguarded position. Close your eyes and let the physical body sink into the floor. The ultimate mental yin attitude of mind is to wait without anxiety. Try to feel the various sensations of chi, blood and fluids moving into or out of the parts of the body that were stressed during the previous postures.
The body position as described above is only a suggestion. By spreading the arms and legs, more of the body makes contact with the floor, which is helpful in learning to feel the body, but any relaxing posture will suffice.
Practice Pentacle for one to five minutes or more whenever desired.
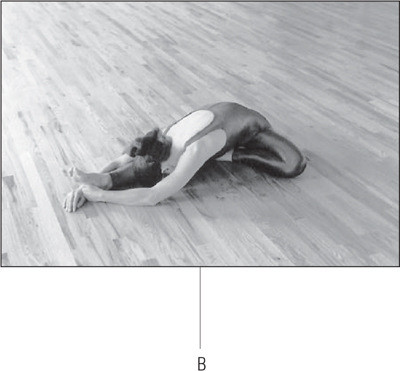
Half Butterfly stretches the back of the straight leg and the spine on the opposite side. It helps to correct imbalances in the flow of chi on each side of the spine. It also helps to decompress the spine, which is valuable in a culture where 80 percent of the population ultimately experience low back problems.
Half Butterfly is done by sitting with one leg stretched forward and the other leg folded with the foot near the opposite groin (A). Drop your chin to your chest, lean forward and try to grasp hold of your ankle or foot (B). Try not to lose your grip as it gives more leverage to the stretch. The knee of the extended leg may be bent a bit in the beginning, but this is fine as long as you feel the stretch along the back of the leg.
Hold this pose three to five minutes.
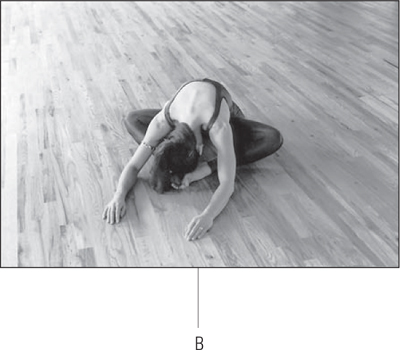
Butterfly is a stretch for the lower spine and groin.
Sit with the soles of the feet touching together (A) and lean forward (B). If you start with the feet closer to the groin, the groin muscles are stretched more. If you start with the feet further from the groin, the lower spine is stretched more.
I sometimes suggest this pose to people with very tight hamstrings as it is a good way to stretch the lower spine and doesn’t require hamstring flexibility.
Hold Butterfly three to five minutes.
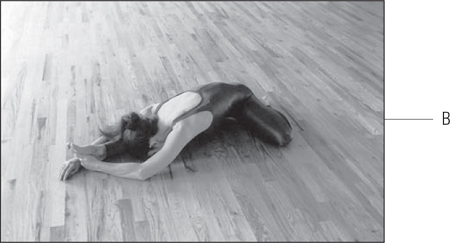
Half Frog stretches the hamstrings and the groin. Because the pelvis is pushed forward by the Half Frog position, the stretch on the hamstrings and groin is both easier to achieve and more effective than in Half Butterfly. The beginner will feel the hamstrings more than the groin, but as the student loosens up the groin is also stretched.
Sit with one leg straight and the other leg folded with the foot near your buttocks. The foot of the bent leg may be pointed or flexed (A). Open the legs to a comfortable width and lean forward. If your torso stays over your straight leg, the hamstrings are stretched more (B). If you swing your torso toward the middle of your legs, the groin of the extended leg and the hip of the bent leg are stretched more (C). Be careful not to strain the bent knee.
Hold Half Frog two to three minutes each side.

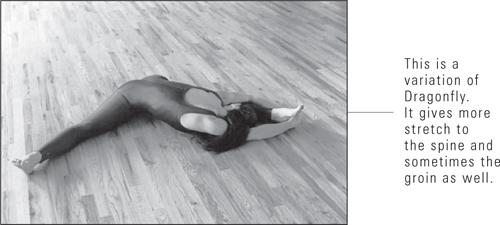
Dragonfly stretches the back of the thighs, lower spine and particularly the groin. This pose can be very frustrating for a beginner as progress seems slow to non-existent. The only advice I can offer is persistence. Stay with it and as you progress in the other forward bends this pose will eventually respond to your efforts as well.
Dragonfly is done by sitting with the legs about 90 degrees or more apart (A) and then leaning forward. Try to touch your hands on the floor in front of you. As your flexibility increases try to rest first your elbows and eventually your head on the floor (B).
Hold Dragonfly three to five minutes.

Sleeping Swan externally rotates the femur of the front leg and stretches all the muscles and connective tissue on the lateral side of the buttock and thigh. It also gently stretches the hip flexors of the rear leg.
Get on your hands and knees and then move your right knee back a foot or so. Move your left foot and place it in front of the right knee (A). Keeping your left foot where it is slide, the right knee backwards as far as possible so your pelvis lowers toward the floor. Lean forward and take some of your weight on your elbows. Your pelvis should be suspended just above the floor with tension in both legs but primarily in the left hip and thigh (B). As you get more flexible you can move the front foot more forward and try to lay on it with your chest.
Hold Sleeping Swan three to five minutes and then change sides.
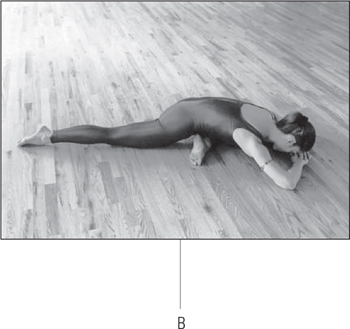
Swan adds a back bend movement to the Sleeping variation. It also stretches the hip flexors of the back leg more effectively. Some students find that it also stretches the front hip better than the Sleeping Swan and so prefer it.
Swan is done by first assuming the Sleeping Swan position and then using your arms to push the torso up and even backward. If you drop your head back, the bend on the spine is increased. When bending backwards, you should experiment with keeping your pelvis down and with letting it twist up as you bend back. These variations will reach into different parts of the spine.
Hold Swan a minute or two each side.
Square has much the same effect on the hips and thighs as Sleeping Swan but also stretches the lower spine.
Sit with your legs folded in front of you. Pick up the left leg and try to lay the outer bone of the ankle on top of the right thigh, near the knee (A). Depending on your flexibility, your left knee may be high in the air. You should feel a stretch along the hip and thigh similar to Sleeping Swan. Now try to lean forward. As you do so your chest will push against the left leg and increase the stretch (B). If your hips are loose enough and you can go down further, then you will also begin to feel the stretch along your lower spine.
Hold Square three to five minutes then change sides.

A variation of Square is Shoelace. Cross your knees so that they very nearly overlie each other (A) and then lean forward (B). Due to indidvidual differences in anatomy you may prefer Shoelace or Square. Let experience be your guide.
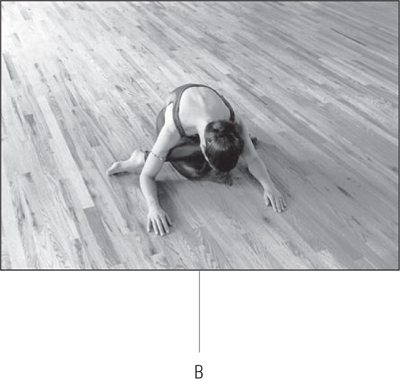
Caterpillar is one of the most basic and important postures. It stretches the legs and the entire spinal column and balances the chi flow. It is a great aid in relaxing the mind and drawing the senses inward, therefore it is a good preparation for meditation.
Caterpillar is done by sitting with both legs stretched out in front of you, feet about hip width apart or narrower if you prefer. Drop your chin to your chest so the muscles and ligaments at the base of the skull are stretched. Now lean forward and try to grasp your ankles or feet. Try to keep your legs straight but don’t work too hard. The thighs should be relaxed and a slight bend of the knees is fine as long as you still feel the stretch. Relax the muscles of the legs and spine and feel the stretch move up through the legs and hips and all the way up to the skull.
Try to hold this pose three to five minutes or more.
Leg raises are a muscular (yang) exercise (see page 11). Increasing the flexibility of the lower spine brings with it a greater need for abdominal, lower back (quadratus lumborus) and hip flexor strength. Leg Raises effectively strengthen these areas. Some students, especially after forward bends, also experience wonderful adjustments of their sacrum when performing this exercise.
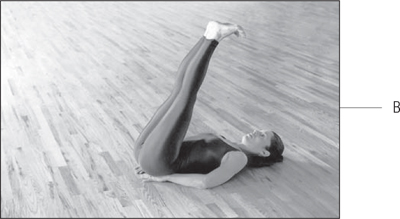
Lying on your back place your hands under your buttocks, bend your knees and draw them up toward your chest (A). Now try to straighten your legs and lock your knees (B). Lift your chin to your chest and slowly lower your feet toward the floor (C). Stop when your feet are just a few inches off the floor and take a few breaths. This is one repetition.
You should repeat this five times or more.
To vary the training, pause for several breaths with the legs at various heights above the floor. If you tilt your head back, the stress on the lower spine/hip flexor muscles is increased. You can also vary the exercise by bringing the legs up straight rather than bent.

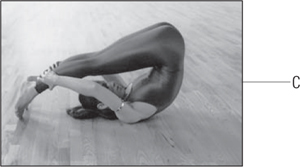
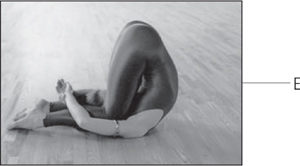
Snail stretches the entire spinal column and induces a withdrawal of energy from external senses and turns the mind inward. Most people, even those for whom this is a difficult pose, find the after effects pleasant.
Snail is done by first lying on one’s back with hands under the buttocks and then rolling the legs up over your head (A). Beginners should endeavor to keep the legs straight and may want to use their hands on their hips for balance (B). The feet may not touch the floor but the muscles of the legs and spine will be strengthened and stretched effectively.
After some months the feet should touch the floor at which time you may want to clasp hold of your calves or ankles. Note that at this phase of the Snail you may not want to roll up on your neck but rather keep the hips low and the weight more between your shoulder blades. This version gives a nice stretch to the lower and middle spine as well as the legs (C).
A final variation is to roll up onto the neck and shoulders as much as possible (D), even bending the knees down toward the floor (E). This version is the most strenuous for the neck and upper spine.
Use plenty of padding under your spine and shoulders so the tips of the spinous processes are not bruised. Don’t do this pose if you have eaten in the past two or three hours. If it is a struggle for you to roll yourself up into this posture then avoid it for now and continue with Half-forward bend and Forward bend until your spine is more flexible. Women in their period should avoid this pose.
Try to hold Snail one to three minutes or more and then slowly roll down.


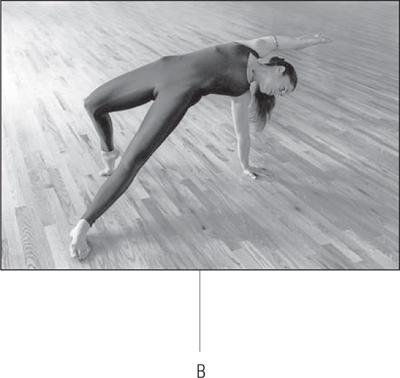
Tripod is a muscular (yang) exercise, it strengthens the upper body (see pg. 11) and is a wonderful stretch for all the muscles of the torso. It is a nice counter to forward bends and prepares the body for backbends.
Sit up and place your left hand a few feet behind you on the floor. Keep your left leg straight but bend the right knee and place the right foot near your buttocks (A). Using all the muscles of your body, particularly those in your arm and upper back, push your pelvis up as high as possible. Turn to look at the floor while reaching up and over your head with your right hand (B). Stretch your waist and ribs like you're taking a deep yawn.
Hold Tripod one or two breaths and then change sides. Since Tripod is a muscular yang pose I suggest repeating it three times or more.
Crocodile is a yang, upper body strength posture (see pg. 11). It is the old fashioned push-up. Don't let bad gym-class memories spoil your appreciation of this pose, it is a wonderful way to develope overall body strength and confidence. Although Crocodile is felt most keenly in the arms and shoulders, it develops the strength of the stomach and spine as well.
Starting on your hands and knees, straighten your legs and keep your body perfectly straight (A). Inhale and then exhale and slowly lower your torso toward the floor, keeping your elbows near your ribs (B). Hold this position for a few seconds, inhale and then exhale and push back up to the starting position. As a beginner you may want to do this posture with your knees on the floor until you are stronger.
Repeat three times or more.

This pose is a yang stimulation for all the muscles along the spinal column. It also stimulates blood circulation in the abdominal organs.
Lie on your stomach with your arms at your side. Now inhale and raise your head and chest up as high as is comfortable. You may or may not want to raise your legs and you may or may not want to keep them together. Follow your instincts as to whatever variations strengthen the spine more.
Hold Infant three to five breaths. Repeat if you like.
This pose is a strong arch for the lower spine. This is the area of the body where most people are very stiff at best and in pain at worst. Seal works to reestablish a lumbar curve in the spine. This curve is abused and eventually lost by sitting in chairs for hours everyday for years and years. Since most of us will continue to be chair — bound by our jobs, cars, restaurants and social decorum, the need to constantly combat the abuse of the lower spine is ever-present. If you are one of the many who have a “bad back,” this posture will be a struggle for quite a while but don’t despair, if you gently persist your spine will bend again.
Lie on you stomach as in Infant, with your hands on the floor in front of and to the side of your shoulders. Everyone’s body proportions and flexibilities differ so you will want to experiment with exactly where you place your hands. Straighten your arms and raise the torso off of the floor. Turn your hands so the fingers are turned out to the sides, this makes it easier for most people to straighten the arms. The spine and belly are suspended above the floor. Depending on one’s proportions and flexibilities, one’s pelvis may or may not be lifted above the floor. Some Yogis like to tense the muscles along the spine and others prefer to just “hang” and slowly let the spine form itself into an arch.
Variations of the Seal can effectively isolate different parts of the spine. If you keep your legs apart, the stress in the lower spine will be more pronounced. If you keep your legs together, the stretch is more evenly distributed along the spine. Keeping the buttocks and thighs flexed or relaxed also changes the stress but not in a uniform way for everybody. You will have to experiment for yourself. If you tilt your head back there is more curve placed into the neck and lower spine.
Hold the Seal for a minute and then slowly lower yourself down. Repeat as many times as you feel the need.
This posture gently stretches the spine so it is a natural counter to backbends. It also inclines the head so the heart can rest instead of trying to force blood upward to the brain. If you are feeling cold or vulnerable after practicing postures, then Child’s Pose helps.
Child’s Pose is done by kneeling with buttocks on heels and folding forward to rest your head on the floor with your arms resting comfortably beside you or in front of you. Close your eyes and empty your mind.
Rest in Child’s Pose one minute or more.
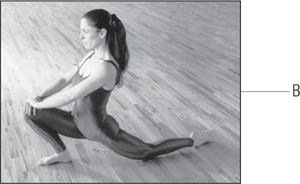
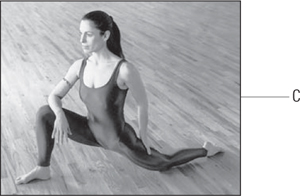
Dragon stretches the groin, ankles, and hip flexors. It also makes backbends easier to do because the pelvis becomes freer in its movements.
Dragon is done by placing one foot forward on the floor in front of you and resting the opposite knee on the floor behind you. Use your hands for balance and slowly lower the thigh of your rear leg to the floor so the top/front of the thigh takes the strain (A). Depending on your flexibility, you might also feel a stretch in the groin of the front leg.
If your stance is not too wide, you can push down on the front knee and exaggerate the stretch on the ankle and achilles tendon (B). If your stance is wide, you will feel the hip flexors on the back leg more (C). Front splits is a variation of Dragon (D).
Try to hold Dragon two or three minutes then change sides.
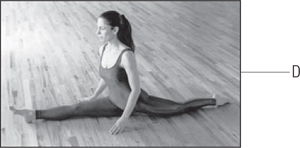
This pose stretches the feet, knees, thighs, and arches the lumbar and sacral vertebrae.
Saddle is done by sitting on your feet with knees spread apart. For many this is enough stretch for the ankles, knees, and thighs (A). As you become more limber, try to lower yourself backwards and support your weight on your arms. If this becomes easy, go to your elbows. If this becomes easy, arch back and rest the weight on your head (B). If even this becomes easy, you may rest your upper spine on the floor (C). Let the lower spine arch and take the pressure of the bend.
Coming out of Saddle is perhaps more difficult than getting into it. I have consulted many different Yoga books over the years and all advise to just “come up out of the pose.” My own experience has been that for many it is less stressful to roll or lean to one side and unfold the legs one at a time. Let experience be your guide.
Try to stay in Saddle one minute and gradually build to three or more.
CAUTION: When people cringe at the thought of overstressing a joint, this is one of the postures they are thinking of — and for good reason. Foolish aggressiveness or impatience can prove disastrous here. Strong medicine can be strongly abused. It may take years for you to comfortably do the more advanced versions of this pose. Be cautious but don’t be paralyzed with fear. Our chair–bound society with its dangling legs has injured many of us, but basic ranges of motion can be recovered by a sane and patient yoga practice.


Camel is a variation of, or preparation for, Saddle. If your knees or ankles are too tight to do Saddle, Camel pose will help loosen the thighs and arch the spine. Even if you can practice Saddle effectively, you may like to do Camel as well since the arch in the middle and upper spine is more complete.
Kneeling with knees apart, try to reach back with your hands and support yourself on your feet or calves. Try to keep the pelvis pushed forward and drop your head back.
Try to hold Camel a minute or so.
Another variation of Saddle is Half-Saddle. This pose is much like the Saddle but done with only one leg at a time. The arch on the sacro-lumbar spine is less than in the full Saddle but the stretch on the thigh is more.
Half-Saddle is done with the foot resting alongside rather than under the buttock. The free leg can be positioned as one wishes (A or B).
Hold Half-Saddle one to three minutes each side.

This pose is a gentle stretch for the spine and a mild exercise for the hip joints. It is a nice way to help unwind any tension in the spine from doing backward bends such as Saddle.
Lying on your back draw your right knee to your chest clasping both hands on the knee (A). For a gentle stretch of the upper spine, you may bring your forehead toward your knee as well.
Hold this posture about three breaths, then change sides. After doing each side do both legs together (B).
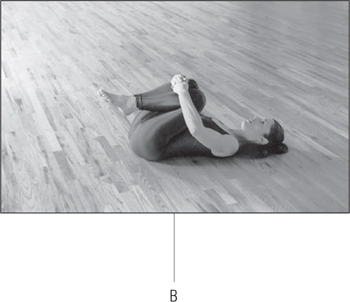
This pose relaxes tension in the muscles and meridians. It is an excellent pose to end your practice with since it helps relieve any kinks or strains that sometimes occur from Yoga practice.
To do the Spinal Twist, first lie on your back and bring both knees up toward the chest, feet off the floor. Cross the left leg over the right (A), and then twist both legs to the right (B). You may want to lay your right hand over the knees to hold them closer to the floor and you can also turn your head and reach with your left arm to bring the left shoulder closer to the floor and make the twist more complete. How high up you draw your knees varies the twist so you should experiment with different positions.
Hold the pose a minute or so and then change.

This version of Shoelace is useful to anyone with tender spines or knees, but even young and healthy yogis like this stretch because it can be relaxing. It is an effective variation of Sleeping Swan, Shoelace, or Square pose.
The target areas of the pose are the muscles and connective tissue on the lateral areas of the buttocks and thighs.
Lie down on your back with your buttocks close to a wall and your legs extended up the wall (A). The closer your pelvis and buttocks are to the wall, the more intense the stretch will be, so adjust your distance accordingly.
Bend your knees to move your feet down and then, bracing yourself with your arms, use your legs to lift your pelvis up off the floor (B).
Place your left ankle just above your right knee, as shown (C). Your right foot is pressed against the wall for the duration of the pose.
Slowly lower your hips (D). This will cause the legs to fold in toward the torso and create a stretch in the buttock or thigh.
Hold Shoelace on the Wall for three to five minutes and then change sides.


This pose is a substitute for either Dragonfly or Half Frog. The target area is the groin muscles.
Lie down on your back with your buttocks close to a wall and your legs extended up the wall (A).
Bend your knees and slide both feet down the wall (B). Then, with a hand on each shin, open your knees and walk your feet out to the sides so that the feet are about the same width as the knees (C). The wider your knees, the stronger the stretch, so adjust your width accordingly. The closer your pelvis and buttocks are to the wall, the more intense the stretch will be, so adjust your distance accordingly.
You might choose to gently rest or press your hands on your knees, but do not force the stretch.
Hold Frog on the Wall for three to five minutes.
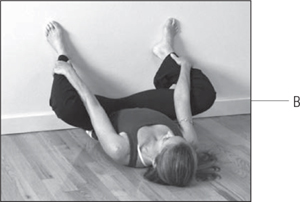

This pose is a substitute for Dragonfly. Its target areas are the groin and hamstrings.
Lie down on your back with your buttocks close to a wall and your legs extended up the wall.
Slowly spread your legs apart and slide your feet down the wall. The wider your legs, the deeper the stretch, so adjust yourself accordingly. The closer your pelvis and buttocks are to the wall, the more intense the stretch will be, so adjust your distance accordingly.
Your legs do not have to be completely straight in the beginning, but as your flexibility increases they will get straighter. Do not rush. It is the stretch that is important, not the aesthetics.
Hold Dragonfly on the Wall for three to five minutes.
