Southern Biscuits Step-by-Step
It will take more time to read this recipe than it will take to actually make the biscuits. The simple steps explain the basic technique of biscuit making, and the accompanying photographs show you what the key steps look like. The recipe isn’t as difficult as it looks—it simply gives all the details you need to know to bake a good biscuit.
This isn’t the only way to make great biscuits, but it’s a good way to get started, to get the feel of the dough, to learn how moist you should make the dough and how much to handle it—the keys to making a perfect biscuit.
MAKES 12 BISCUITS
2 cups soft wheat self-rising flour
5 tablespoons vegetable shortening, unsalted butter, or lard, cut into 1/2-inch chunks and chilled for 15 minutes
3/4 cup whole buttermilk, plus more if needed
All-purpose flour for dusting
Melted butter for brushing the tops
Preheat the oven to 500°. If you have a convection oven, preheat it to 425°. If you’re using a silicone or parchment paper liner, don’t bake at a temperature higher than 425°. Turn the oven on before you start to make the biscuits because preheating the oven will take longer than making the biscuits and you don’t want to let the dough sit while you wait for the oven to preheat because the leavening will start to react and lose its effectiveness in baking.
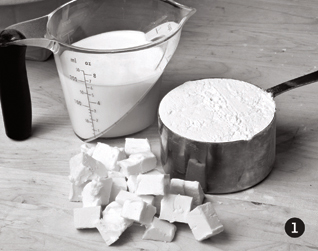
Spoon the flour lightly into a nesting-type measuring cup. (If you use the measuring cup to scoop the flour, you’ll get too much flour.) Level the flour using a flat utensil such as a pastry knife or bench knife. (See photo 1.)
Pour the flour into a large shallow bowl to make the process of cutting in the fat easier. Sprinkle the cold chunks of shortening, butter, or lard over the flour. Use a pastry blender or your fingertips to break up the chunks, but don’t overwork the dough. If using your hands, work fast so you don’t melt the fat.
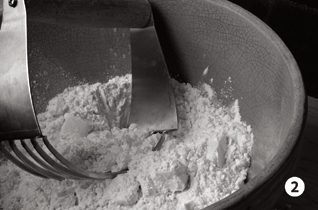
The fat will create the flakes in the biscuits as it melts between the baked layers of dough, so you want the chunks to be pebbly. Shake the bowl, which will make the larger pieces rise to the top, and continue working in the fat until all the chunks are pea-sized. (See photo 2.)
Up to this point, you really can’t go wrong, but be sure to follow the instructions for adding the liquid and shaping the dough very carefully to avoid making a hard biscuit. Every time you stir, fold, pat, or touch the dough in any way, you’re making the biscuits less tender.
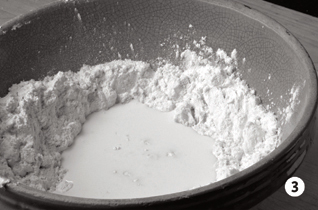
Make a well in the center of the bowl and add the buttermilk (photo 3). Toss the flour over the liquid with a spatula or dough scraper and continue tossing the mixture together. Don’t stir.
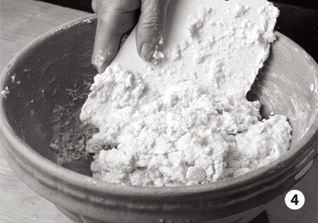
At this point, you’ll have to determine whether to add more liquid. A recipe can’t tell you exactly how much liquid to add because the fat content of the milk, the amount of protein in the flour, and even the weather can affect the moistness of the dough. Biscuit dough has the right amount of liquid when it pulls away from the sides of the bowl, is wet but not runny and sticky, and looks messy, a bit like wet sand for a sandcastle. (See photo 4.) It shouldn’t be smooth like yeast dough or cookie dough.
If the dough is too wet, toss in a dusting of flour and keep on tossing in more flour until it looks right. If the dough is too dry, add more liquid and toss with the flour until it’s just wet.
Once the liquid has been incorporated into the dough, lightly dust a rolling surface with all-purpose flour. I use all-purpose flour because the leavening in self-rising flour gives biscuits a bad flavor. The type of surface doesn’t really matter as long as it’s dry and smooth—a countertop is fine—but the amount of flour does. Use the smallest amount of flour possible, then place the dough on the flour.
Now make a pile of flour near the dough—bakers call this bench flour. Dust your hands with some of the flour to keep the dough from sticking to your hands.
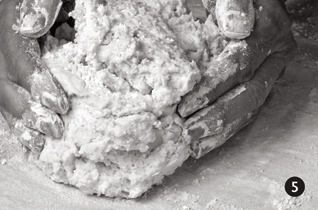
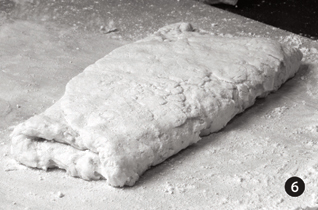
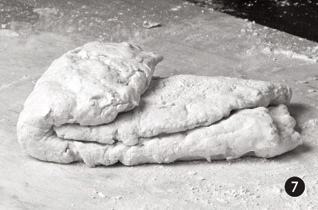
To knead the dough, cuddle it with your floured hands (photo 5), then pat the top, pressing lightly to flatten it about 1/4 inch thick. Pick up the right side of the dough and fold it a third of the way toward the center. Pick up the left side and fold it over the right side like a letter (photo 6). Fold the back side of the dough a third of the way toward the front (photo 7) and then fold again.
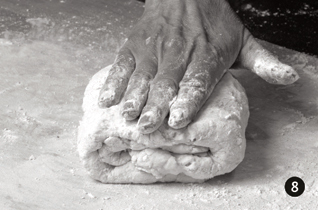
Pick up the dough, using a bench knife if it sticks to the surface. Dust the surface underneath the dough lightly with more flour. Place the dough down and pat it again (photo 8), repeating the folding steps.
Kneading biscuit dough isn’t the same as kneading bread dough. A bit of kneading makes biscuits flaky, but the less you handle the dough, the lighter the biscuit.
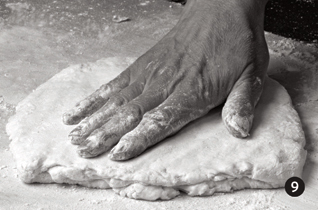
If you want a smooth top, use a floured rolling pin to roll the dough 1/2 to 1 inch thick, depending on how tall you want the biscuits to be. Use a light touch to roll the dough because if you press too hard, you’ll make the dough sticky. If you prefer rougher tops, gently press the dough with your hands to the desired thickness (photo 9).
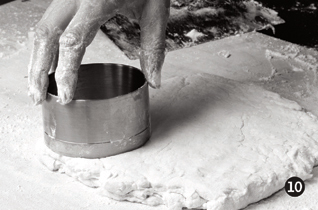
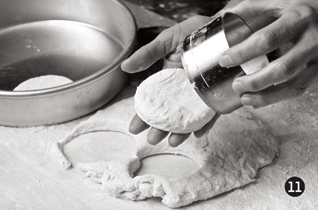
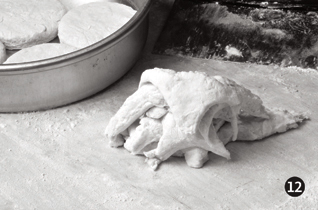
To cut the biscuits, flour a 2-inch biscuit cutter. Press the cutter into the dough without twisting it (photo 10), then pick up the biscuit (photo 11). If it sticks, loosen it with a bench knife or metal spatula. Cut the biscuits as closely together as possible. When all the dough has been cut, pick up the scraps of dough (photo 12) and, with as little handling as possible, press them back together and cut out the remaining biscuits.
Place the biscuits on a nonstick cake pan or baking sheet. If you want soft sides, place the biscuits so they touch; if you want crisp sides, place them about 1/2 inch apart.
Bake the biscuits in the center of the oven for about 8 minutes for a 2-inch cutter, 12 minutes for a 3-inch cutter, and 16 minutes for a 4-inch cutter. If you’re using soft wheat flour, the biscuits are done when the tops are very light brown. If you’re using flour with more protein, the biscuits are done when the tops are dark golden brown. The best way to check for doneness is to look at the bottom of a biscuit to see if it’s brown and break one open to determine if the inside is no longer doughy.
Brush the tops with melted butter as soon as the biscuits come out of the oven and remove them from the pan. The butter will brown a bit, making the top more golden brown. Serve immediately.