
Children, children, don’t forget
There are elves and fairies yet;
Where the knotty hawthorn grows
Look for prints from fairy toes.
—“Children, Children, Don’t Forget” by Dora Owen
Look for footprints of Chrainn the elf around all types of trees, not just hawthorn. He wanders the Wood, caring for trees and animals and protecting the forest from harm.
In Spring, Chrainn collects sticks and twigs to help birds build their nests. When Summer comes, he often has his toes in a stream, making sure the tadpoles are growing nicely and the catfish aren’t picking on them.
Autumn is Chrainn’s favorite season; he gathers feathers for the wood mice to line their dens in preparation for sleep, and he dances with the leaves as they turn color and fall. You will often see him in Autumn leaning on his stick, listening to the voices of the trees as they grow slow and drift off to sleep.
Chrainn has few charges to look after in Winter as the Wood sleeps under its blanket of snow. After making sure the chickadees and jays are fed, Chrainn takes advantage of his free time in games of tag with windblown snowflakes, and fashioning ice skates from spiderwebs and locust tree thorns to zip across frozen ponds.
If you happen to meet Chrainn while wandering, be sure to say hello!
Polymer clay colors: flesh tone of your choice, gray
Acrylic paint colors: Burnt Umber, Terra Coral
Fabrics: black felt, black silk, brown microsuede, teal four-ounce leather, Tibetan lambskin or faux fur, white cotton
Sculpting tools: craft knife, manicure stick, needle tool, needle-nose pliers, wooden sculpting tool
Other supplies: aluminum foil, 1⁄8" (3mm) armature wire (approximately 12 gauge), baby oil, boxwood dowel, fabric glue, feathers, 1⁄2" (12mm) floral tape or masking tape, floral wire (32 gauge), hot glue gun and glue sticks, knitting needle for pressing fabric into hot glue, no. 4, filbert brush, nos. 3 and 8 round brushes, 1⁄3" (8mm) onyx beads (2), paper towels, polyfill for baking, quilt batting, sanding stick, scissors, small container of water for burnt fingers, super glue, white craft glue

STEP 1: Form the Head and Establish Placement of Features
Cut a 7-inch (18cm) piece of 1⁄8-inch (3mm) wire for the head wire portion of the armature. Coil about 1⁄2" (12mm) of each end, and bend one coil at a right angle to the rest of the wire. With a 12-inch (30cm) square of aluminum foil, create a 2-inch (5cm) ball for the head over the bent coil. Completely cover the foil ball with 1⁄2-inch (12mm) floral tape.
Roll a 2-inch (5cm) ball of flesh-colored clay into a 5-inch (13cm) circle, 1⁄8" (3mm) thick. Press the clay over the foil ball with the seams towards the neck wire. Remove the excess clay and smooth the ball by rolling it between your hands. The foil is still moldable, so squish the ball to make it a little narrower side to side.
Use a needle tool to create a vertical line that aligns with the neck wire and a horizontal line that crosses in the middle. This forms the eyeline. For the eyes, place an onyx bead at either end of the horizontal line.

STEP 2: Place Clay Shapes to Form the Features
Make two 1⁄2-inch (12mm) balls of flesh-colored clay, flatten them into 1⁄2-inch (12mm) circles, and cut each circle in half. Place a half circle over the top and bottom of each eye for the eyelids. Flatten a 1⁄2-inch (12mm) ball into a 1" × 1⁄2" (25mm × 12mm) rectangle and place horizontally beneath the eyes. Flatten a 1⁄2-inch (12mm) ball into a 1 1⁄2-inch (38mm) snake, and place it over the eyes for the forehead. Place a 3⁄8-inch (10mm) ball under the rectangle for the chin. Place a 1⁄2-inch (12mm) ball between the eyes for the nose. Place a 3⁄8-inch (10mm) ball just below each eye for the cheeks. Use the needle tool to draw a short line for the mouth halfway between the nose and the chin.

If an air bubble forms while you’re working clay (you’ll be able to feel it sliding beneath the surface of the clay), pierce it with a craft knife or needle tool and press the air out.

STEP 3: Blend and Shape the Features
At the corners of the eyes, tuck the lower eyelids under the upper eyelids with the rounded end of a manicure stick. Open the eyes and flatten the upper eyelids.
Use the rounded end of a manicure stick to blend the top of the brow bone into the head. Blend the outer edges of the brow bone down and the edges of the cheekbones up. Blend the top of the cheekbones into the lower eyelids.
Blend the top of the nose with the brow bone. Press with the rounded end of a manicure stick to make a dent at the place where the nose and brow bone meet. Then blend the sides of the nose onto the cheekbones. Blend the bottom of the nose and the bottom of the cheekbones into the face. Pinch the nose with your fingers to bring it out into a point. Insert the pointed end of a manicure stick under the nose next to the face to create the nostrils. Model the outer part of the nostril with the rounded end of a manicure stick.
Roll a 1⁄4-inch (6mm) ball of flesh clay into a snake the length of the mouth. Place it even with the mouth line and blend the lower edge to form the bottom lip. Add small smile lines even with the sides of the nose. Blend in the chin. Use the round end of a manicure stick to create the space between the nose and mouth. Use a no. 4 filbert and baby oil to smooth out any fingerprints or unwanted indentations.

STEP 4: Add the Ears and Neck
Roll two 5⁄8-inch (16mm) balls of flesh clay into 1 1⁄2-inch (38mm) teardrops for the ears. Gently squeeze the long edges together to create a slight curve. Place the ears halfway back on the head, making the top of the base even with the eye. Use the pointed end of the sculpting tool to blend and attach the ears. Use the pointed end of the manicure tool to make a backwards C-shape in his left ear and a regular C-shape in the right ear. Above each C-shape, draw a line following the top of the ear. Press in on the clay making an ear opening behind each C-shape. Gently pull out and up on the tip.
Roll a 5⁄8-inch (16mm) ball of flesh clay into a 1-inch (25mm) cylinder. Use a craft knife to slit halfway through the cylinder vertically and wrap it around the neck wire with the seam in the back. Smooth the seam together, and blend the neck into the head.

STEP 5: Make the Staff
Round the ends of a 9-inch (23cm) piece of boxwood dowel with a sanding stick. (In a pinch, you could use a chopstick, though you’d also need to sand the edges to make it round.) Paint the staff with a no. 8 round and Burnt Umber.

STEP 6: Cut Rectangles for the Hands, Divide the Fingers
Flatten two 3⁄4-inch (19mm) balls of clay into 1" × 1 1⁄2" (25mm × 38mm) rectangles, about 1⁄8" (3mm) thick. Use a craft knife to divide the hand into three fingers.

STEP 7: Refine the Fingers and Add the Fingernails
Use your fingers to gently smooth the cut edges of the clay fingers. Carefully pull the clay to lengthen and shape. Fingers aren’t round tubes—they’re slightly flat across the top, and they taper at the end. Make the middle finger the longest, the forefinger a little shorter, and the little finger the shortest.Use the round end of the manicure stick to mark the fingernails (don’t lift the end of the fingernail this time). Roll two 3⁄8-inch (10mm) balls into 3⁄4-inch (19mm) teardrops for the thumbs. Use the round end of the manicure stick to mark the thumbnail. Attach one to each hand (be sure to make a right and left hand!). Insert short, straight wires into the wrist end of each hand as a placeholder for the arm wire. Pose the fingers. Wrap the right hand around the staff, scoring the underside of the fingers to make them bend. Redefine fingers as needed. Leave the staff in place and bake at 275° F (135° C) for 20 minutes, or according to the package instructions.

STEP 8: Build the Boot Bases
Form two 1 1⁄8-inch (28mm) balls of dark gray clay. Shape each into a rectangle with a flat front. Pinch the back of the boot shape, gently rounding it to make the heel. Pull one side of the front into a point for the big toe with your fingers. Repeat on the other boot, making sure that you have a right and a left. Continuing with your fingers, pull the little toe side out wider on each boot. Stick a short, straight piece of wire at the back of each boot as a placeholder for the armature leg wires. Make two 5⁄8-inch (16mm) balls of dark gray clay, and roll each into a 1-inch (25mm) cylinder, flattening each end. Slice open each cylinder and wrap one around the wire of each boot, then blend the boot and cylinder together. Stick a short, straight placeholder wire in the top of each boot.

STEP 9: Add the Boot Tops and Details
Flatten two 5⁄8-inch (16mm) balls into two 1 3⁄4" × 1⁄2" (44mm × 12mm) rectangles. Form a loose circle around the shaft of the boot. Gently press the front and back together so the bottom edges connect to the boot. Leave the rest of the cuff loose.

STEP 10: Build the Armature
Cut a 12-inch (30cm) piece of 1⁄8" (3mm) wire for the legs and a 10-inch (25cm) piece for the arms. (See the armature map in the patterns appendix.) Bend both wires in half with the needle-nose pliers. Bend the leg wires out at an approximately 50-degree angle for the hips (see the armature map), and then bend the wires straight down. Bend the arm at a 90-degree angle 1 1⁄2 inches (38mm) from the center bend and then bend another 90-degree angle 1 inch (25mm) out from the first bend. Slip the coil from the head wire into the middle bend of the leg wire and wrap with floral wire. Lay the arm wire over the other two wires and continue wrapping with floral wire. Secure the armature with hot glue. Trim the arm and leg wires if needed, using the armature map for guidance.

STEP 11: Add the Hands and Feet
Twist and remove the placeholder wires from the hands and feet. They pop out easily once the clay has cooled. Do the same to remove the staff from the right hand. Add a drop of super glue to the hole in each hand, and stick the right arm wire into the right hand and the left arm wire into the left hand. Repeat this process with the feet. There should be 3" (8cm) of leg wire between the tops of the boots and the hips, and 2" (5cm) of arm wire between the tops of the hands and the shoulders. Trim if needed.

STEP 12: Add Color to the Completed Sculpt
Use a no. 8 round to paint a thin diluted wash of Burnt Umber over the head and hands, and gently wipe off most of the paint with a paper towel. Repeat as needed, or use water to remove excess paint. Dab on a thin layer of Terra Coral over the tips of the ears, the forehead, the end of the nose (a little darker here), the lips and the cheeks with a no. 3 round. Pat the edges lightly with your finger so there isn’t a sharp line. To remove dry paint, scrape gently with a craft knife.

STEP 13: Wrap and Pad the Torso, Arms and Legs
Use 1-inch (25mm) strips of quilt batting to build the body. Dot the front of the torso with hot glue, attach one end of a strip, and begin wrapping the torso, moving up and then down. Secure the end of the strip with another dot of hot glue. Drape a 48-inch (122cm) strip behind the neck, and use half of the strip to wrap each arm, moving down and then back up the arm. Cross the leftover batting strip from the right arm over to the left side of the body, and start wrapping down the left leg and vice versa. Drape a 36-inch (91cm) strip around the waist from the back and continue wrapping the legs. Generally the legs and arms should have two layers of batting with an extra layer around the torso.


Dilute the paint used for the overall wash to the consistency of 2% milk. Paint it all over the sculpt, then wipe off most of the color with a paper towel. Repeat as needed to achieve the desired color. If the paint gets too dry to remove easily, scrub the sculpt gently with an old paintbrush under running water. Let it dry thoroughly and begin again.


STEP 14: Make the Pants
Cut a 5" × 5" (13cm × 13cm) piece of brown microsuede (see the trousers pattern in the appendix). Place a drop of fabric glue on the back of the waist. Stretch the fabric around the waist (make sure you work with the stretch of the fabric) and glue down both edges. Using scissors, cut the fabric between the legs, stopping short of the crotch. Run a bead of fabric glue down one edge of one pant leg. Fold over the other edge and press the edges together. Repeat for the other leg. Trim the pant legs if necessary, leaving enough to tuck into the tops of the boots. Use a knitting needle to press the edge of the pant legs into the boot cuffs.

All fabric measurements are approximate. Hold the fabric up to your doll to make sure you’re cutting the right size.

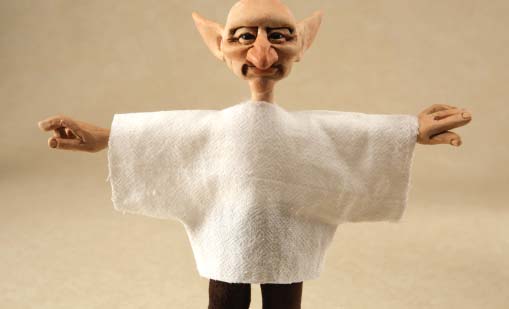
STEP 15: Make the Shirt
Cut a 6" × 7" (15cm × 18cm) piece of white cotton. Fold the fabric in half, putting the 7-inch (18cm) sides together. (See the shirt pattern in the appendix.) Cut a 1" × 1" (25mm × 25cm) notch from each unfolded corner, cutting through both layers. Cut halfway up the folded edge, turn the scissors 90 degrees and cut a 1⁄2-inch (12mm) slit. Drape the shirt over the shoulders, with the long slit in the back. Lay a bead of fabric glue down one edge. Fold the other edge over and press together to form a seam. Run a line of glue down each side of the shirt, and press the seam closed, right sides together. Glue the seam on the underside of the sleeves in the same manner.
To gather the shirt’s waist, put a dot of glue at the center of the back. Press the fabric into the glue and hold until set. Put a dot of fabric glue at the center front of his waist. Press the fabric into the glue and hold until set. Pull the fabric away from his side to find the center, and secure with fabric glue. Do the same on the other side. Continue in this manner all around his waist, always securing at the center point between two glued spots. The shirt will be glued to his waist in eight places.

STEP 16: Add a Sash
Cut a 6 1⁄2" × 2" (17cm × 5cm) piece of black silk. Place a dot of glue on the back waist, then stick down a short edge of the silk. Wrap the sash around the front, folding over the top and bottom edges to make it neater, and glue the other end in the back.

STEP 17: Add Cuffs to the Shirt
Pull the sleeve up slightly and put a dot of fabric glue at the top center of the wrist. Press the sleeve into the glue. Put a dot of glue at the bottom center of the wrist, opposite the first dot. Press the fabric into the glue.
Pull the fabric between the two glued spots away from the arm to find the center, and put a dot of glue on the arm, between the two previous dots of glue. Press the center of the fold into the glue. Continue securing at the center point between two glued spots until the sleeve is glued down in eight places. Repeat for the other sleeve.
Cut two 2" × 1⁄2" (5cm × 12mm) strips of white cotton. Fold the fabric in half lengthwise and secure with fabric glue. Repeat for the other cuff. To attach the cuffs, glue down one edge on the back of the wrist. Wrap the cuff around the wrist, and glue down the other end. Repeat for the other cuff.

STEP 18: Cut Strips of Fur for the Hair
Hold a piece of blond Tibetan lambskin so the hair trails down. Flip it over and place on a flat surface. Use a craft knife to cut six 1⁄4" × 2" (6mm × 5cm) strips, cutting through the skin but not the hair. (You can mark the measurements with a fabric marker or pencil on the back of the skin before you cut it.)


STEP 19: Apply Strips of Prepared Hair to the Head
Starting at the front, put down a bead of white craft glue along the hairline, going around the head. Fill in the hair area with a thin layer of glue (watch for drips and runs!). Laying the hair over the face, place one strip of skin in the glue. Then, starting in the back, continue laying pieces in the glue, working up the head to the front. Butt the strips together so none of the head shows through. (It’s OK if a little shows at the top since we’re going to glue on a hat.) Brush the front piece of hair to the sides and back over the rest of the hair. Make sure none of the scalp shows through. Smooth the hair and style however you like.

If you drop a craft knife, don’t try to catch it!

STEP 20: Add the Collar/Cape
Cut a 3" × 10" (8cm × 25cm) strip of teal four-ounce leather. Put a drop of fabric glue on the front of the shirt at the neckline. Fold the long edge of the leather under and press the middle of the long edge into the glue. Flip up the bottom of the long edge, and drape both sides over the shoulders to the back, adding a drop of glue on each shoulder to hold it in place. You can also glue down the long ends in the back to secure them better.

STEP 21: Cut Shapes for Hat
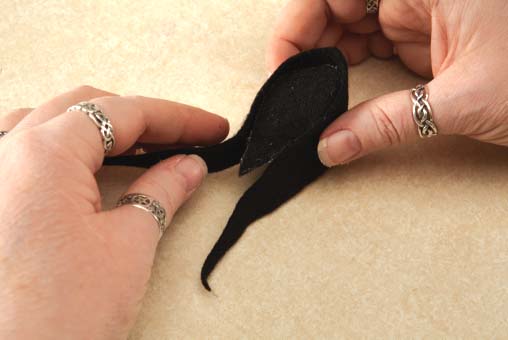
Using the elf hat pattern in the appendix, cut the hat shapes out of black felt. Fold the felt in half. Put the back of the hat pattern on the fold, and cut through both layers. Cut one teardrop pattern out of a single layer of felt.
STEP 22: Assemble the Hat
Use fabric glue to assemble the hat. Run a bead of glue along the edge of the teardrop. With the corner of the long piece pointed up, position it at the base of the teardrop and wrap it around the teardrop. Glue the points of the long piece together in the front.

STEP 23: Add a Feather
Position the hat on the head and glue it down. Cut two small slits on the side of the hat with scissors or a craft knife, and run the quill of a feather through the slits, with the plume towards the back of the hat. Secure the feather with dots of glue.

Chrainn is ready to set off on adventure!
Think of some other accessories an adventurer could use—perhaps a belt with a pouch or a bag that slings over the shoulder. In addition to wearing feathers on his hat, he might tie some to his stick as well.

Hatmaking, also called millinery, is an art all its own! You can really get carried away with hats, adding feathers, lace or anything else your character desires. Do some research and find some funky hats from history for inspiration.