
When the flowery hands of Spring
Forth their woodland riches fling,
Through the meadows, through the valleys
Goes the satyr carolling.
—“The Satyr” by C.S. Lewis
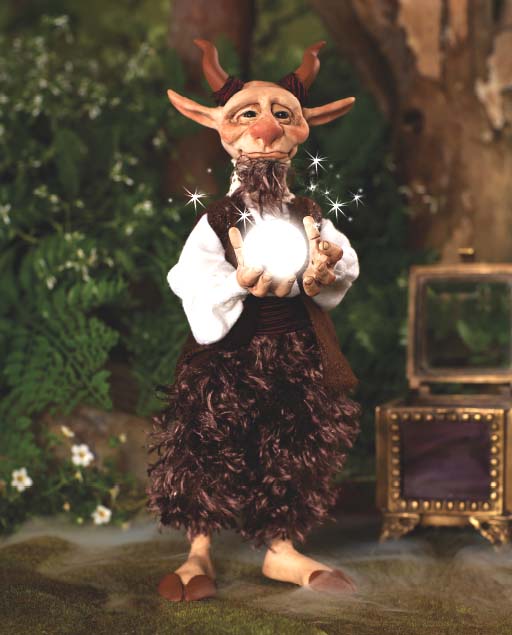
Teigh is the Seer of the oddfae. If it’s a method of divination, Teigh has given it a try—even the Magic Eight Ball!
Don’t for one second think he is just a sideshow charlatan; Teigh always has a Clear View. He can see when the Seasons will change, when the fairies should start painting the flowers … and where I keep my stash of sesame seeds.
Teigh is very old and wise, having learnt his craft at the feet of the Oracle at Delphi, and has honed his skills over many centuries. His most cherished possession is his gazing crystal, made of glass as finely spun as a spider’s web. He won it eons ago in a dance competition (satyrs are fantastically gifted dancers) and claims it was awarded him by Athena herself.
Looking into the Future and reading the Past is very taxing, so periodically Teigh retires to a spa to have his horns trimmed and his fur groomed and scented. The redcaps at the spa are skilled with any sharp implements and administer an expert mani and pedi.
Much refreshed and looking straight from the pages of Olympus Quarterly, Teigh settles against a tree at the edge of the meadow and once more begins his augury.
Is Teigh seeing a tall, dark stranger in your future? Don’t get too excited … that giant is traveling around the World to the left, and everyone meets him sooner or later.
Polymer clay colors: brown, flesh tone of your choice
Acrylic paint colors: Burnt Umber, Terra Coral
Fabrics: brown microsuede, cotton lace, faux fur, red and black striped silk, white cotton
Sculpting tools: craft knife, manicure stick, needle tool, needle-nose pliers, wooden sculpting tool
Other supplies: aluminum foil, 1⁄8" (3mm) armature wire (approximately 12 gauge), baby oil, cotton balls, fabric glue, 1⁄2" (12mm) floral tape or masking tape, floral wire (32 gauge), glass ball or marble, hot glue gun and glue sticks, knitting needle for pressing fabric into hot glue, no. 4 filbert brush, nos. 3 and 8 round brushes, 1⁄3" (8mm) onyx beads (2), paper towels, polyfill for baking, quilt batting, scissors, small container of water for burnt fingers, super glue, white craft glue, wire (20 gauge)

STEP 1: Form the Head and Place Clay Shapes to Form the Features
Following the process outlined in step 1 of the Chrainn the Elf demonstration, make the head portion of the armature. Cover the ball with a circle of flesh-colored clay, pressing the seams towards the neck wire, and establish the placement of features.
Make two 1⁄2-inch (12mm) balls of flesh-colored clay, flatten them into 1⁄2-inch (12mm) circles, and cut each circle in half. Place a half circle over the top and bottom of each eye for the eyelids. Flatten two 7⁄8-inch (22mm) balls of flesh-colored clay into 1 1⁄2" × 3⁄4" (38mm × 19mm) rectangles and layer both below the eyes, with the longer side horizontal. Form a 5⁄8-inch (16mm) ball into a 2-inch (5cm) snake and place it above the eyes for the forehead. Roll a generous 1⁄2-inch (12mm) ball of flesh clay into a 1-inch (25mm) cone for the nose. Place the point between the eyes. Form a 3⁄8-inch (10mm) ball of clay and place it under the face for the chin. For the cheeks, roll two 1⁄4-inch (6mm) balls into 3⁄4-inch (19mm) teardrops. Place the point of each teardrop at the nose and the base on the outside of the cheeks. Use a needle tool to draw a line for the mouth halfway between the nose and chin.
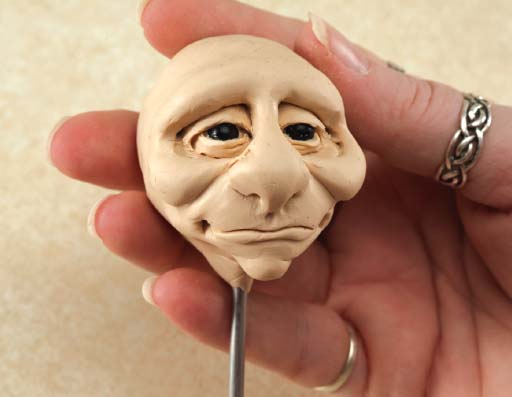
STEP 2: Blend and Shape the Features
Blend the brow bone into the head with your thumbs. Use the round end of a manicure stick to tuck the corners of the lower eyelids under the upper eyelids, open the eyes and flatten the upper eyelids. Then blend the nose up into the brow and the brow down into the nose. Insert the pointed end of the manicure stick at the point where the eyelid, nose and brow come together.
Blend the cheeks into the lower eyelids with the rounded end of the manicure stick. Blend the outer ends of the brow bone and the cheeks together. Blend the sides of the nose into the face. Using the round end of the manicure stick, move a little clay from the end of the nose up into the bridge of the nose. Blend the end of the nose into the face. Put your thumb on the end of the nose and press gently to flatten and spread. Insert the pointed end of a manicure stick at the base of the nose, against the face, to form the nostrils. Use the rounded end of a manicure stick to shape the nostrils from the outside.
With the same tool, blend the bottom of the cheeks into the face. Blend the sides of the face rectangles and cheeks back into the head with your fingers.
Continuing with your fingers, blend in the chin. Redefine the mouth with the round end of a manicure stick, then draw a line from either corner of the nose toward either side of the mouth. Bring the edges of the mouth out a little and add smile lines on either end. Use the pointed end of a manicure stick to form the lower lip. Switch to the rounded end and draw a short philtrum between the bottom of the nose and the top of the mouth. Use the same tool to add wrinkles at the outer corners of the eyes. Use a no. 4 filbert and a little baby oil to smooth and refine the face.
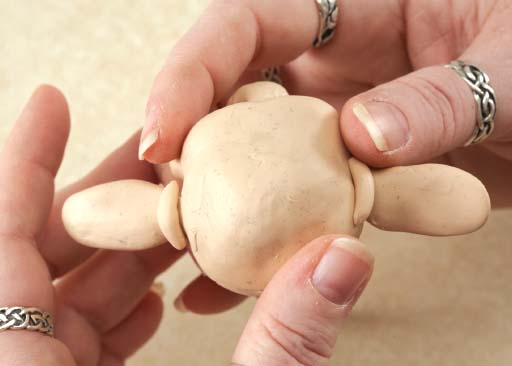
STEP 3: Add the Ears
Flatten two 5⁄8-inch (16mm) flesh clay balls into 1 1⁄2" × 1⁄2" (38mm × 12mm) ovals. Roll in the long sides of each oval slightly and attach them to the head. Roll two 1⁄4-inch (6mm) balls of clay into 1⁄2-inch (12mm) snakes and wrap one around each ear. Blend in both parts. Pull the ends of the ears back slightly.
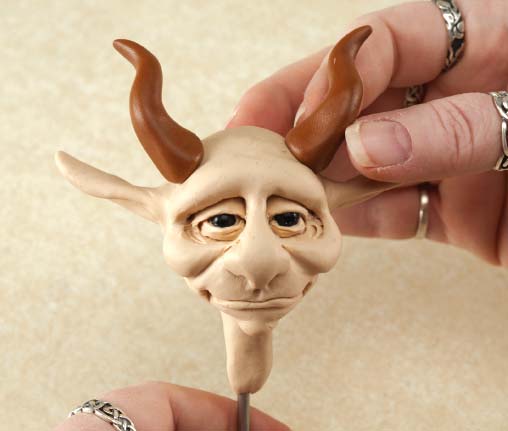
STEP 4: Add the Neck and Horns
Roll a 3⁄4-inch (19mm) ball of flesh clay into a 1 1⁄2-inch (38mm) cylinder. Cut halfway through the cylinder; wrap it around the neck wire and blend into the head. Roll two 5⁄8-inch (16mm) balls of brown clay into 1 3⁄4-inch (44mm) cones, flattening each base. Cut two 1-inch (25mm) pieces of 20-gauge wire and insert one into the head above and between the ear and brow on either side. Press a cone over each wire. Shape each horn into an S-curve.

STEP 5: Cut Rectangles for the Hands, Divide the Fingers
Flatten two 3⁄4-inch (19mm) balls of clay into 1" × 1 1⁄2" (25mm × 38mm) rectangles, about 1⁄8" (3mm) thick. Use a craft knife to divide the hand into three fingers. Make the middle finger the longest, the forefinger a little shorter, and the little finger the shortest of the three.
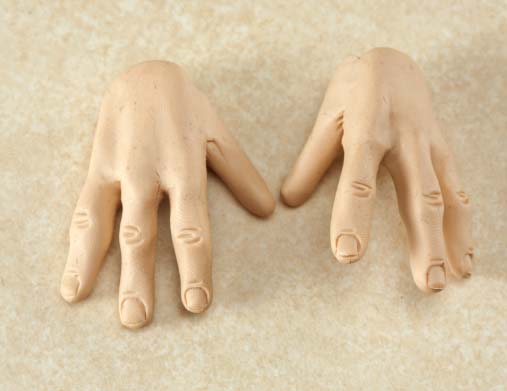
STEP 6: Refine the Fingers and Add the Fingernails
Use your fingers to gently smooth the cut edges of the clay fingers. Carefully pull the clay to lengthen and shape. Form the fingernails and draw the knuckle lines. Use the pointed end of the manicure stick to make depressions between each of the fingers, then use your fingers to pull up a small bit of clay for each knuckle. For the thumbs, make two 3⁄8-inch (10mm) balls of clay and roll each out into a 1-inch (25mm) teardrop. Place the larger end of the teardrops on the palms of the hands. Blend and smooth the thumbs and add the nails and knuckle lines.

STEP 7: Pose the Hands With the Crystal Ball
Gently pose both hands around a 1 1⁄8-inch (28mm) glass ball or marble. Score the underside of the fingers so they will bend more easily. Pose one hand at a time with the ball or marble. Redefine the fingernails as necessary. Insert a short, straight wire at the base of each hand as a placeholder for the armature arm wires.
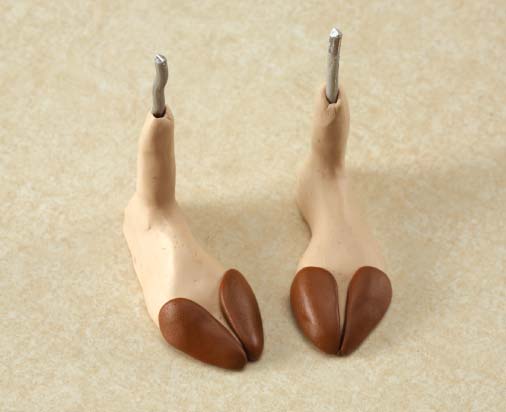
STEP 8: Sculpt the Legs and Hooves
Form two 1 1⁄8-inch (28mm) balls of flesh clay. Shape each into a rectangle with a flat front. Pinch the back of each foot shape so it is gently rounded to make the heel. Flip each foot over and use your thumb to make an indentation for the arch. Insert a short, straight wire at the base of each foot. Make two 5⁄8-inch (16mm) balls of flesh clay, and roll each into a 1-inch (25mm) cylinder, flattening each end. Use a craft knife to cut halfway through each cylinder and wrap a cylinder around each leg wire, blending into the foot. Roll four 1⁄2-inch (12mm) balls of brown clay into 1-inch (25mm) flat teardrops. Press one on either side of the toe of each foot to form the hooves. Do not blend the hooves into the feet.
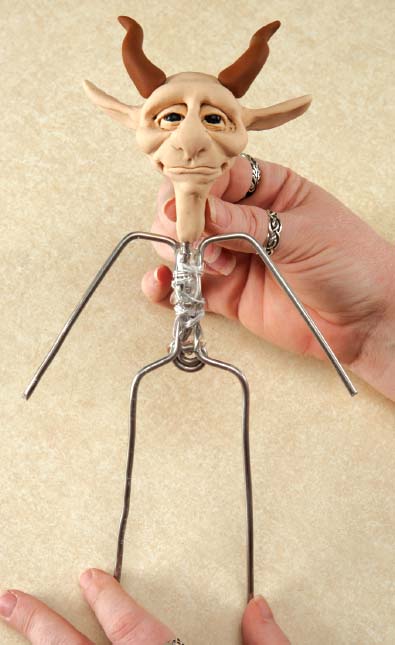
STEP 9: Build the Armature
Following the process outlined in step 10 of the Chrainn the Elf demonstration, assemble the armature.
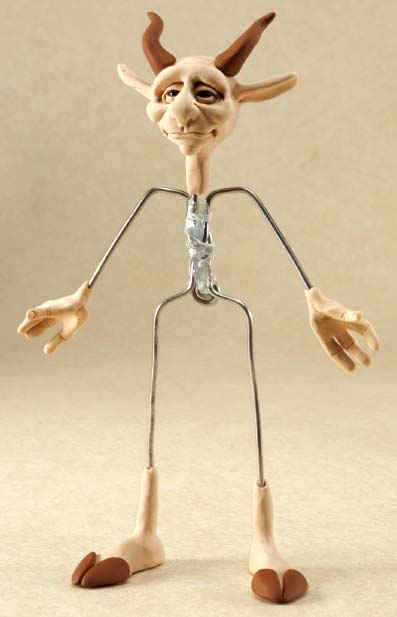
STEP 10: Add the Hands and Feet
Twist and remove the placeholder wires from the hands and feet. Add a drop of super glue to the hole in each hand, and stick the right arm wire into the right hand and the left arm wire into the left hand. Repeat this process with the feet. There should be 3" (8cm) of leg wire between the tops of the clay legs and hips, and 2 1⁄2" (6cm) of arm wire between the tops of the clay arms and the shoulders. Trim the wires if needed.

STEP 11: Add Color to the Completed Sculpt
Use no. 8 round to paint a thin diluted wash of Burnt Umber acrylic paint over the head, hands, feet (including the hooves) and horns. Gently wipe off most of the paint with a paper towel. Repeat as needed or use water to remove excess paint. Dab on a thin layer of Terra Coral over the tips of the ears, the forehead, the end of the nose (a little darker here), the lips and the cheeks with a no. 3 round. Pat the edges of the Terra Coral areas lightly with your finger so there isn’t a sharp line.
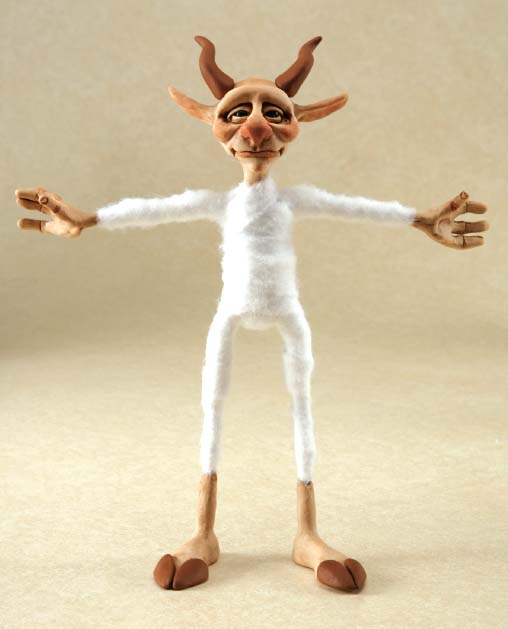
STEP 12: Wrap and Pad the Body
Following the process outlined in step 13 of the Chrainn the Elf demonstration, wrap and pad the body. When wrapping the torso, hot glue a cotton ball to the tummy, and continue wrapping over the ball. The arms should have two layers of batting and the legs just one layer, with an extra layer closer to the body.

STEP 13: Add Fur to the Legs
Place synthetic fur fur-side down on a flat surface. Use a craft knife to cut two 3" × 5 1⁄2" (8cm × 14cm) strips. Holding each strip so the hair flows down toward the foot, wrap one around each leg and glue the edges together with fabric glue. Pull the excess fur at the top of the legs around to the back and glue over the backside. Run a line of glue around the top of the clay leg, then push the excess fur up the leg and press against the glue.
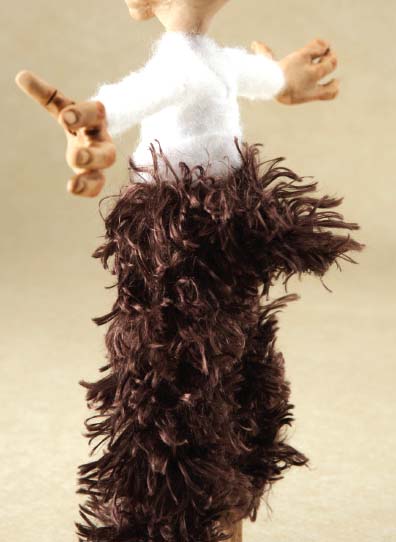
STEP 14: Make and Attach the Tail
Use a craft knife to cut a 2" × 1" (51mm × 25mm) piece of synthetic fur (place the fur fur-side down on a flat surface to cut). Roll the piece lengthwise and glue the long sides together with fabric glue. Glue the tail just above the furry legs in the back.
When wrapping Teigh’s legs with the batting, keep in mind that they should look too thin when you’re finished. His fur is going to add a lot of volume, and you don’t want his bottom out of proportion to his top. Being out of proportion makes it really hard to tango.

STEP 15: Make the Shirt
Cut a 6" × 10" (15cm × 25cm) piece of white cotton. Fold the fabric in half, putting the 10-inch (25cm) sides together. (See the shirt pattern in the appendix.) Cut a 1" × 2" (25mm × 51mm) notch from each unfolded corner, cutting through both layers. Following the process outlined in step 15 of the Chrainn the Elf demonstration, assemble the shirt.
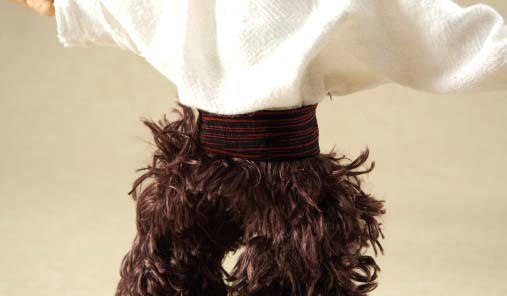
STEP 16: Make the Sash
Cut a 6 1⁄2" × 2" (17cm × 5mm) piece of red and black striped silk. Place a dot of glue on the back waist, then stick down a short edge of the silk. Wrap the sash around the front, folding over the top and bottom edges to make it neater, making sure to cover the top of the fur and the bottom of the shirt. Glue the other end in the back.
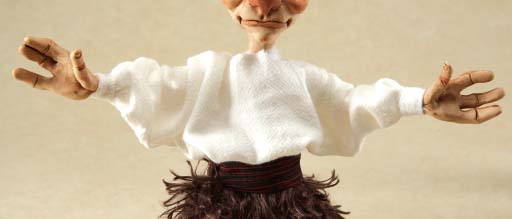
STEP 17: Add Cuffs to the Shirt
Following the process outlined in step 17 of the Chrainn the Elf demonstration, add cuffs to the shirt.
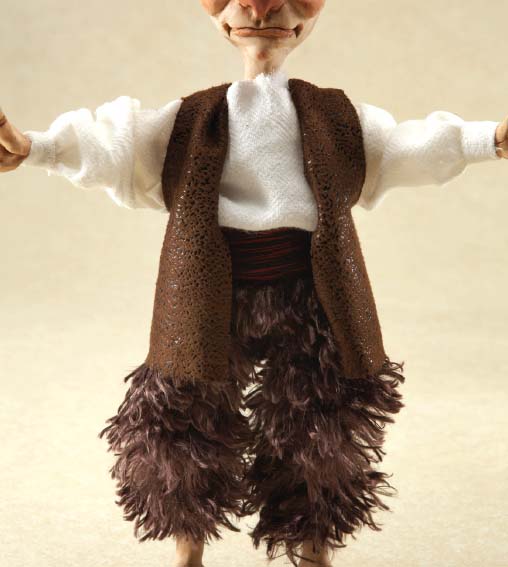
STEP 18: Make the Vest
Cut a 7" × 5" (18cm × 13cm) piece of brown microsuede fabric. Fold the fabric in thirds, bringing the short edges in to meet at the middle. (See vest pattern in appendix.) Cut about half way down on both folds. Wrap the fabric around the figure, bringing the short edges around to the front. Glue the vest to the shirt in the back and on top of the shoulders. Fold under the front edges on top of the shoulders and glue to the back edge with fabric glue.
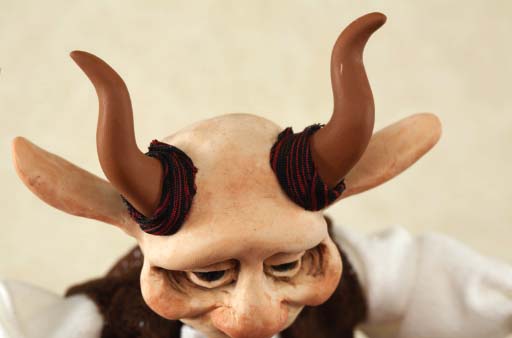
STEP 19: Add Horn “Turbans”
Cut two 1" × 3" (25mm × 8cm) strips of the sash material. Use fabric glue to tack down one short end of one strip to the back of one of the horns. Wrap and twist the fabric around the base of the horn and glue down the other end. Repeat for the other horn.
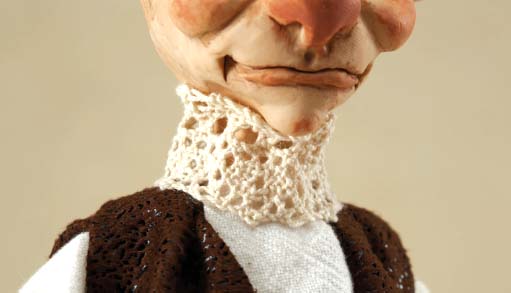
STEP 20: Make the Collar
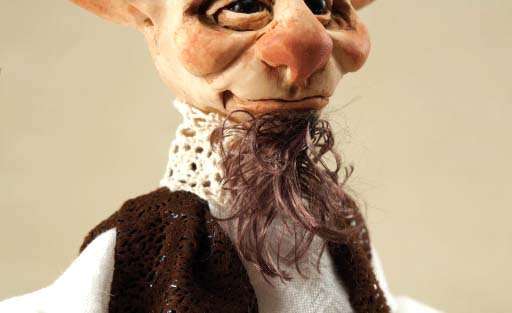
Use fabric glue to tack down one end of a strip of 1-inch (25mm) cotton lace behind the neck, covering the top of the vest. Continue tacking and wrapping the lace around the neck. Trim and tack down in the back.
STEP 21: Add the Facial Hair
Cut a tiny piece of synthetic fur and glue it to the chin with fabric glue.
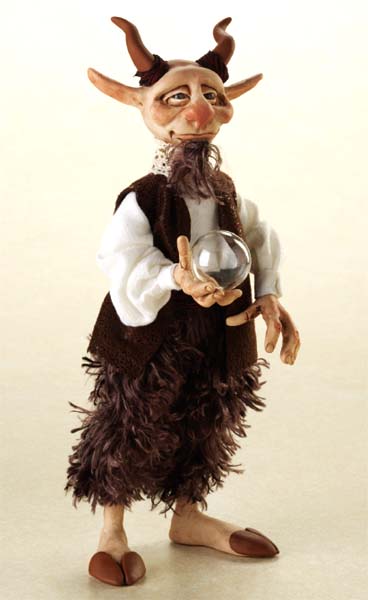
Teigh sees more than his eyes tell.
Place a dot of white craft glue in the palm of the right hand. Press the glass ball or marble into place. Lengthen Teigh’s vest to his ankles and use a fabric with stars or moons on it to make him more “mystical.” If you want a more traditional satyr, wrap his torso and arms with cheesecloth and dress him only in the vest, leaving off the shirt. Give him a flute or panpipes. Wrap a scarf around his neck rather than lace.