Let’s Get Going
Now that you have decided where to locate your garden, have chosen your plants, and have gathered your tools, it’s helpful to map the garden out. This will save time when you are ready to start digging.
Put Your Ideas on Paper
Creating a map of your intended garden will help you determine where to place the different types of plants as well as how many you will need to buy. Using graph paper helps plan your garden to scale, or there are Smartphone apps for this as well. Whichever method you use, paper or app, you will also need a long tape measure and some wooden stakes to mark the garden boundary. Using stakes makes it easier to measure and will serve as guidelines when you are ready to dig.
Once you measure the outline of the garden, sketch in adjacent features such as shrubs, a wall, or a patio. If you have a big old tree like I do, you may need to note where some of its large roots extend above ground. Include paths, stepping stones, or any other feature you may be thinking of adding to the space. After the “hard” features are on paper, you are ready to sketch the plants. These can be indicated as circles for the areas each type of plant will occupy or a circle for each individual plant. Your map can be as detailed or as broadly defined as you prefer. Whenever possible, plant the same type of herb in groups of three for a cohesive appearance rather than scattering them all over. A small grouping is visually pleasing but does not present a large target for pests to zero in on.
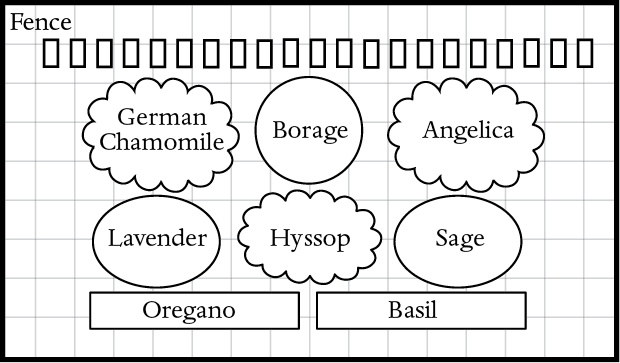
Figure 1.4. A garden layout on paper can be simple or detailed and is a time-saver when you are ready to plant.
While you have paper handy, you may want to consider keeping a garden journal. This way you will know what you planted each year and you will have a record of what worked well and what did not. There are ready-made gardening journals, but making your own and adding pictures or seed packets or even pressing a few leaves or flowers inside can be an interesting and fun way to track the progress of your garden from year to year. In addition, keeping track of how you dealt with pests and the results of your harvests can provide valuable information in the years ahead. Your journal can be as simple or elaborate as you care to make it. The important thing is that it be fun and interesting for you.
How to Lay Out Your Plan
The first step in starting a new garden is to establish its outer edges. Mark the corners with stakes and use string to define the outline. If your design calls for flowing instead of straight borders, use more stakes and a garden hose or a rope to define the boundary. For a round garden, put a stake in what will be the center and attach a piece of string that is a little longer than the garden’s radius (half its diameter). Fill a bottle with sand and then attach it to the other end of the string, making it the length of the radius. Slowly walk in a circle shaking out a little sand as you go to define the outer boundary of the garden.
Once you have defined the outer edges of your garden, step back and take a look to make sure it is the size and shape you want. You can always expand a garden later but if it seems too big, now is the time to adjust your plan. If you are including paths in your garden, also mark these with stakes and string.
When first digging a garden, begin at the outer edges to establish the border. If you are starting with bare ground, remove any fallen branches, rocks, or other debris and then turn over the soil with a shovel or a spading fork. Over time, soil packs together and loosening it allows roots to grow more easily. This will also help water to penetrate the soil as well as drain away.
If you are claiming a piece of lawn for a garden, you will need to get rid of the grass. There are several ways to do this. In the autumn, put down a thick layer of mulch or cover the area with a couple of inches of newspaper, and then cover it with a thin layer of topsoil. The grass will die back and the newspaper will disintegrate. Instead of waiting for mulch or newspaper to smother the grass or if you are starting in the spring, you can simply turn the grass under. Break up each shovelful of soil and pull out big clumps of grass and roots to prevent them from getting reestablished.
While the ground may look level, once you start working it you may find a lot of bumps and dips. In addition to dealing with these, you may find that one end is higher than the other. If so, find a medium point and redistribute the soil with a rake to make it as level as you can. If paving stones or bricks are part of your plan, dig out those areas, too, even if you are placing a few stepping stones here and there. Digging out the path will make it easier to create a stable base so the stones won’t become uneven as they settle. Another reason to dig out the entire garden area is to rid it of any bindweed or knotweed roots that creep underground and make their presence known where you least expect them. I’m sure my neighbors thought I was a real crackpot doing so much digging when I was starting my garden, but I was battling Japanese knotweed, and my vigilance paid off.
When laying out a path, dig to double the depth of the bricks or stones. Tamp down the ground and then put in a thick layer of gravel and sand. This will create a stable base on which to set the stones. Consider leaving a little space between the stones or bricks where low-growing herbs such as creeping thyme or Roman chamomile can grow.
After the paths or stepping stones are in place, continue to dig out the remaining bedding areas. If your garden is bordered by a lawn, adding a hard edge helps keep the grass from creeping in. A wide range of ready-made edging material is available at garden centers or you can use bricks or stones. Dig down a little to sink part of each border stone or brick into the ground so they will stay in place.