The Buildroot project website is at http://buildroot.org.
Current versions of Buildroot are capable of building a toolchain, a bootloader (U-Boot, Barebox, GRUB2, or Gummiboot), a kernel, and a root filesystem. It uses GNU make as the principal build tool.
There is good online documentation at http://buildroot.org/docs.html, including The Buildroot User Manual.
Buildroot was one of the first build systems. It began as part of the uClinux and uClibc projects as a way of generating a small root filesystem for testing. It became a separate project in late 2001 and continued to evolve through to 2006, after which it went into a rather dormant phase. However, since 2009, when Peter Korsgaard took over stewardship, it has been developing rapidly, adding support for glibc-based toolchains and the ability to build a bootloader and a kernel.
Buildroot is also the foundation of another popular build system, OpenWrt (http://wiki.openwrt.org) which forked from Buildroot around 2004. The primary focus of OpenWrt is to produce software for wireless routers and so the package mix is oriented towards networking infrastructure. It also has a runtime package manager using the .ipk format so that a device can be updated or upgraded without a complete re-flash of the image.
The Buildroot developers produce stable releases four times a year, in February, May, August, and November. They are marked by git tags of the form <year>.02, <year>.05, <year>.08, and <year>.11. Typically, when you start your project, you will be using the latest stable release. However, the stable releases are seldom updated after release. To get security fixes and other bug fixes you will have to either continually update to the next stable release as they become available or backport the fixes into your version.
As usual, you can install Buildroot either by cloning the repository or downloading an archive. Here is an example of obtaining version 2015.08.1, which was the latest stable version at the time of writing:
$ git clone git://git.buildroot.net/buildroot
$ cd buildroot
$ git checkout 2015.08.1
The equivalent TAR archive is available from http://buildroot.org/downloads.
Next, you should read the section titled System Requirement from The Buildroot User Manual, available at http://buildroot.org/downloads/manual/manual.html and make sure that you have installed all the packages listed there.
Buildroot uses the Kconfig and Kbuild mechanisms as the kernel, which I described in the section Understanding kernel configuration in Chapter 4, Porting and Configuring the Kernel. You can configure it from scratch directly using make menuconfig (or xconfig or gconfig), or you can choose one of the 90 or so configurations for various development boards and the QEMU emulator which you can find stored in the directory configs/. Typing make help lists all the targets including the default configurations.
Let's begin by building a default configuration that you can run on the ARM QEMU emulator:
$ cd buildroot
$ make qemu_arm_versatile_defconfig
$ make
The build will take half an hour to an hour, depending on the capabilities of your host system and the speed of your link to the Internet. When it is complete, you will find that two new directories have been created:
dl/: This contains archives of the upstream projects that Buildroot has builtoutput/: This contains all the intermediate and final compiled resources
You will see the following in output/:
build/: This is the build directory for each component.host/: This contains various tools required by Buildroot that run on the host, including the executables of the toolchain (inoutput/host/usr/bin).images/: This is the most important of all and contains the results of the build. Depending on what you selected when configuring, you will find a bootloader, a kernel, and one or more root filesystem images.staging/: This is a symbolic link to thesysrootof the toolchain. The name of the link is a little confusing because it does not point to a staging area as I defined it in Chapter 5, Building a Root Filesystem.target/: This is the staging area for the root directory. Note that you cannot use this as a root filesystem, as it stands, because the file ownership and permissions are not set correctly. Buildroot uses a device table, as described in the previous chapter, to set ownership and permissions when the filesystem image is created.
Some of the sample configurations have a corresponding entry in the directory boards/, which contains custom configuration files and information about installing the results on the target. In the case of the system you have just built, the relevant file is board/qemu/arm-vexpress/readme.txt, which tells you how to start QEMU with this target.
Assuming that you have already installed qemu-system-arm as described in Chapter 1, Starting Out, you can run it using this command:
$ qemu-system-arm -M vexpress-a9 -m 256 \
-kernel output/images/zImage \
-dtb output/images/vexpress-v2p-ca9.dtb \
-drive file=output/images/rootfs.ext2,if=sd \
-append "console=ttyAMA0,115200 root=/dev/mmcblk0" \
-serial stdio -net nic,model=lan9118 -net user
You should see the kernel boot messages appear in the same terminal window where you started QEMU, followed by a login prompt:
Booting Linux on physical CPU 0x0
Initializing cgroup subsys cpuset

Linux version 4.1.0 (chris@builder) (gcc version 4.9.3 (Buildroot 2015.08) ) #1 SMP Fri Oct 30 13:55:50 GMT 2015

CPU: ARMv7 Processor [410fc090] revision 0 (ARMv7), cr=10c5387d

CPU: PIPT / VIPT nonaliasing data cache, VIPT aliasing instruction cache
Machine model: V2P-CA9
[...]
VFS: Mounted root (ext2 filesystem) readonly on device 179:0.
devtmpfs: mounted
Freeing unused kernel memory: 264K (8061e000 - 80660000)
random: nonblocking pool is initialized
Starting logging: OK
Starting mdev...
Initializing random number generator... done.
Starting network...

Welcome to Buildroot
buildroot login:
Log in as root, no password.
You will see that QEMU launches a black window in addition to the one with the kernel boot messages. It is there to display the graphics frame buffer of the target. In this case, the target never writes to the framebuffer, which is why it appears black. To close QEMU, either type poweroff at the root prompt or just close the framebuffer window. This works with QEMU 2.0 (default on Ubuntu 14.04), but fails with earlier versions including QEMU 1.0.50 (default on Ubuntu 12.04) because of problems with the SCSI emulation.
Next, let's use Buildroot to create a BSP for our Nova board, using the same versions of U-Boot and Linux from earlier chapters. The recommended places to store your changes are:
board/<organization>/<device>: contains any patches, binary blobs, extra build steps, configuration files for Linux, U-Boot, and other componentsconfigs/<device>_defconfig: contains the default configuration for the boardpackages/<organization>/<package_name>: is the place to put any additional packages for this board
We can use the BeagleBone configuration file as a base, since Nova is a close cousin:
$ make clean  #  Always do a clean when changing targets
$ make beaglebone_defconfig
Now the .config file is set for BeagleBone. Next, create a directory for the board configuration:
$ mkdir -p board/melp/nova
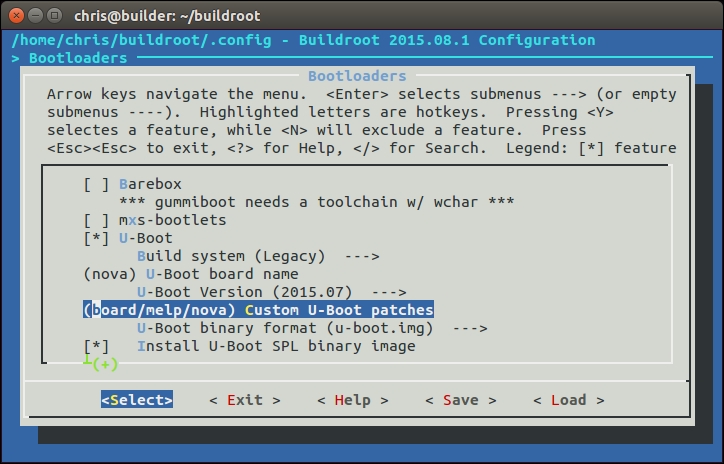
In Chapter 3, All About Bootloaders, we created a custom bootloader for Nova, based on the 2015.07 of U-Boot version and created a patch file for it. We can configure Buildroot to select the same version, and apply our patch. Begin by by copying the patch file into board/melp/nova, and then use make menuconfig to set the U-Boot version to 2015.07, the patch directory to board/melp/nova and the board name to nova, as shown in this screenshot:
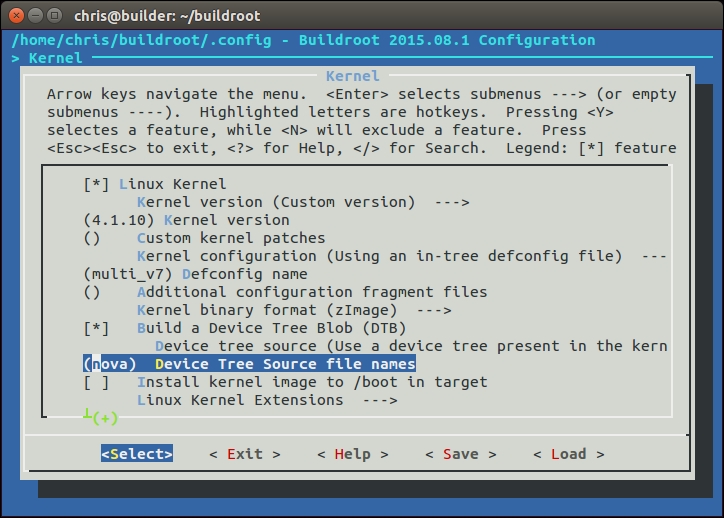
In Chapter 4, Porting and Configuring the Kernel, we based the kernel on Linux 4.1.10 and supplied a new device tree, named nova.dts. Copy the device tree to board/melp/nova and change the Buildroot kernel configuration to use this version and the nova device tree as show in in this screenshot:
Now you can build the system for the Nova board just by typing make, which produces these files in the directory output/images:
MLO nova.dtb rootfs.ext2 u-boot.img uEnv.txt zImage
The last step is to save a copy of the configuration so that you and others can use it again:
$ make savedefconfig BR2_DEFCONFIG=configs/nova_defconfig
Now, you have a Buildroot configuration for the Nova board.
Suppose that there are some programs that you have developed that you want to include in the build. You have two options: firstly to build them separately, using their own build systems, and then roll the binary into the final build as an overlay. Secondly you could create a Buildroot package that can be selected from the menu and built like any other.
An overlay is simply a directory structure that is copied over the top of the Buildroot root filesystem at a late stage in the build process. It can contain executables, libraries and anything else you may want to include. Note that any compiled code must be compatible with the libraries deployed at runtime, which means that it must be compiled with the same toolchain that Buildroot uses. Using the Buildroot toolchain is quite easy: just add it to the path:
$ PATH=<path_to_buildroot>/output/host/usr/bin:$PATH
The prefix for the tools is <ARCH>-linux-.
The overlay directory is set by BR2_ROOTFS_OVERLAY, which contains a list of directories separated by spaces, which you should overlay on the Buildroot root filesystem. It can be configured in menuconfig with the option System configuration | Root filesystem overlay directories.
For example, if you add a helloworld program to the bin directory, and a script to start it at boot time, you would create an overlay directory with the following contents:

Then you would add board/melp/nova/overlay to the overlay options.
The layout of the root filesystem is controlled by the system/skeleton directory, and the permissions are set in device_table_dev.txt and device_table.txt.
Buildroot packages are stored in the package directory, over 1,000 of them, each in its own subdirectory. A package consists of at least two files: Config.in, containing the snippet of Kconfig code required to make the package visible in the configuration menu, and a makefile named <package_name>.mk. Note that the package does not contain the code, just the instructions to get the code by downloading a tarball, doing a git pull, and so on.
The makefile is written in a format expected by Buildroot and contains directives that allow Buildroot to download, configure, compile, and install the program. Writing a new package makefile is a complex operation which is covered in detail in the Buildroot User Manual. Here is an example which shows you how to create a package for a simple program stored locally, such as our helloworld program.
Begin by creating the subdirectory package/helloworld with a configuration file, Config.in, that looks like this:
config BR2_PACKAGE_HELLOWORLD
bool "helloworld"
help
  A friendly program that prints Hello World! every 10s
The first line must be of the format BR2_PACKAGE_<uppercase package name>. That is followed by a Boolean and the package name as it will appear in the configuration menu and which will allow a user to select this package. The Help section is optional (but hopefully useful).
Next, link the new package into the Target Packages menu by editing package/Config.in and sourcing the configuration file as mentioned in the preceding section. You could append this to an existing sub-menu but, in this case, it seems neater to create a new sub-menu which only contains our package:
menu "My programs"
  source "package/helloworld/Config.in"
endmenu
Then, create a makefile, package/helloworld/helloworld.mk, to supply the data needed by Buildroot:
HELLOWORLD_VERSION:= 1.0.0
HELLOWORLD_SITE:= /home/chris/MELP/helloworld/
HELLOWORLD_SITE_METHOD:=local
HELLOWORLD_INSTALL_TARGET:=YES

define HELLOWORLD_BUILD_CMDS
  $(MAKE) CC="$(TARGET_CC)" LD="$(TARGET_LD)" -C $(@D) all
endef

define HELLOWORLD_INSTALL_TARGET_CMDS
  $(INSTALL) -D -m 0755 $(@D)/helloworld $(TARGET_DIR)/bin
endef

$(eval $(generic-package))
The location of the code is hard-coded to a local path name. In a more realistic case, you would get the code from a source code system or from a central server of some kind: there are details of how to do this in the Buildroot User Guide and plenty of examples in other packages.
Buildroot is based on open source software, as are the packages it compiles. At some point during the project, you should check the licenses, which you can do by running:
$ make legal-info
The information is gathered into output/legal-info. There are summaries of the licenses used to compile the host tools in host-manifest.csv and, on the target, in manifest.csv. There is more information in the README file and in the Buildroot User Manual.