Basic Tools
Safety and Safety Equipment
Whatever tools you might assemble for a project, the list should start with items that help keep you safe and healthy. Item one? Your brain. Trust its intuition when a task seems inherently dangerous or too difficult to tackle alone. Don’t work in adverse conditions that can make a routine job dangerous, and never work with tools if your judgment or motor skills are impaired by medication, alcohol or other substances.
Equally important, don’t think only in terms of acute injuries or accidents. Cumulative health risks often pose greater hazards to your sight, hearing and respiratory functions, so take preventive measures to protect yourself.

Hearing protection. Irreversible hearing loss from exposure to loud noise is deceptively gradual, often going undetected until it’s too late. You can prevent this by taking simple precautions in the form of disposable foam earplugs, reusable rubber earplugs (tethered pairs stay intact longer) or earmuffs.

Eye protection. A ricocheting nail or a splash of harsh solvent can permanently damage an eye before you have time to react. Safety glasses or goggles help protect you from these and other needless injuries. The best have impact-resistant polycarbonate lenses and wraparound side shields to prevent indirect impact.

Respiratory protection. Fine sawdust, drywall dust, insulation fibers and vapors from solvents or adhesives all pose respiratory risks. To avoid breathing these and other airborne contaminants, wear a dust mask or a respirator, depending on the task at hand. Moldable form-fitting masks are better than the single-layer disposables. Use a respirator with cartridge filters for fumes.
The Indispensable Dozen
True do-it-yourselfers know you can never have too many tools, but if you were stranded on the proverbial desert island (with an electrical outlet and a house that needs remodeling!) and had to pick your best 12, here’s a mix that would be tough to beat. Opinions vary, but these tools rank as must-have items in even the most modest toolbox, and they’ll allow you to tackle a wide array of projects. If we had to add a 13th, it would surely be the basic pliers.

16-oz. hammer
16-oz. hammer. Nimble enough to drive a small finish nail and stout enough for a 16-penny sinker, these midsize hammers have a curved claw for nail pulling or rip/straight claw for prying.

Pry bar
Pry bar. Great for dismantling framing, pulling nails, removing trim and moldings, and for demolition work.
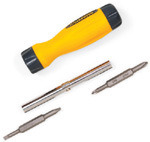
Multi-head screwdriver
Multi-head screwdriver. This self-contained kit typically features #1 and #2 Phillips tips, plus small and midsize standard slotted or square-drive tips.

Non-contact voltage tester
Non-contact voltage tester. Guesswork is not recommended when working on electrical repairs or improvements. A non-contact voltage tester detects live current in a wire or cable.

25' tape measure
25-ft. tape measure. A 25-ft. tape measure is light and compact for small-scale work and still stretches enough to handle bigger chores, such as framing.
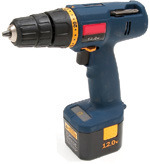
Cordless drill
Cordless drill. A middleweight 12-volt model will handle most drilling and screwdriving tasks. Get a kit with two battery packs and a one-hour charger; add a good set of drill and driver bits.
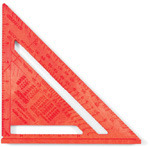
Angle square
Angle square. Use this versatile tool for layout or cutline marking, to check corners for square or to find and mark angles from zero to 90°. It’s great for rafter layout.
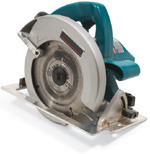
Circular saw
Circular saw. Get a model with 7-1/4-in. blade diameter with a ball-bearing motor rated at 12 amps minimum. Substituting specialty blades allows you to cut plastics, metals and concrete.

Adjustable wrench
Adjustable wrench. A 10-in. (25-cm) model is a good all-around size; buy a smaller one as a spare and because you often use them in pairs.

24" level
24-in. level. This midsize level is compact enough for aligning pictures, yet big enough to plumb a fence post or level a deck beam.

Utility knife
Utility knife. Use to cut vinyl flooring, roofing shingles, builder’s felt and other building materials.
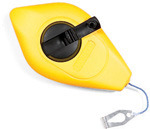
Chalk box
Chalk line. Use a chalk line to snap straight guidelines for cutting plywood, installing shingles or establishing tile layout on a floor. Locking versions double as plumb bobs.
Organizing a Workshop
An improvised work area on the back porch might suffice for the occasional screen-door repair or for assembling a piece of store-bought garden furniture, but to tackle more complex projects or actually make anything, you need a real workshop. For most homeowners, the garage presents the best site for setting up a shop, but that big boxy space is just the beginning. Aside from such essentials as shelter, adequate light and ventilation, you need organized storage, a stable workbench and accessories, such as a heater or air cleaner to make the shop safe and comfortable. To keep the space available for parking cars, try to concentrate all the shop storage around the garage’s perimeter. Large items, such as workbenches and machines, should be mounted on casters for mobility, so you can roll them aside when they’re not needed. Walls and even the ceiling are prime candidates for mounting shelves, cabinets, racks and other storage accessories. After you set up these basics, tailor the details to the kind of work you do most.
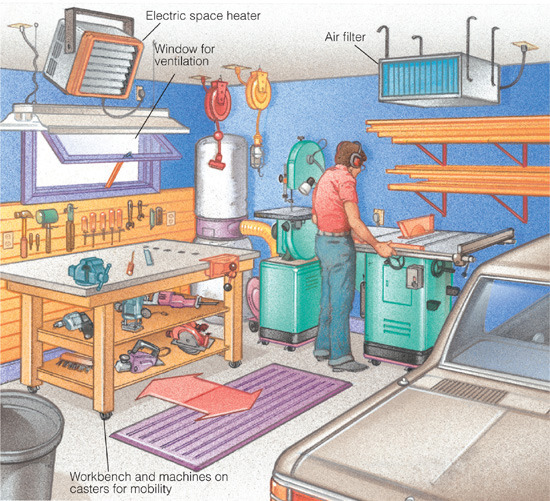
An efficient workshop. Compact but well-organized, this shop area can expand by rolling the machines and workbench into the center of the garage. An awning window provides natural light and ventilation, supplemented by a ceiling-mounted light fixture and air cleaner. Also overhead are an electric space heater and two reel-type extension cords, one with a built-in service lamp. Slat-wall sheeting provides hand-tool storage; portable power tools have a home on platform shelves built into the workbench.
In colder climates, insulate walls and ceiling, warm up wood for one to two days before gluing, and store paints, glues and liquids in an area not subject to freezing.
Light and Electricity
Most garages sport only an overhead outlet for an electric door opener plus one or two wall receptacles, all for 120-volt current. Plan to upgrade your home’s electrical panel with several dedicated shop circuits—two 20-amp single-pole (120-volt) breakers and two 20-amp double-pole (240-volt) breakers make a good combination—to handle the requirements for running common power tools, stationary machines, a dust collector and a space heater. In most locales, you’ll need a permit and inspection.
Some of your added electrical capacity will go toward lighting, which should be a mix of general ambient and specific task lighting. Ceiling-mounted fluorescent fixtures are inexpensive and efficient; combine them with spot-type fixtures to create a good mix.
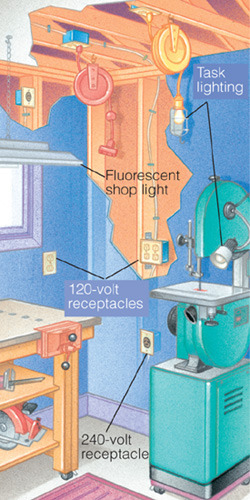
Electrical upgrades. Work efficiency and safety concerns should be equal priorities in a home workshop. For best results, mix lighting types and route wiring to locate receptacles at convenient locations throughout the shop. Target a worst-case scenario of combined electrical demands—a table saw, dust collector and space heater, for example—to calculate how much of an upgrade your system will need. If it’s substantial, consider adding a separate electrical subpanel in the garage.
Workbenches
Simple
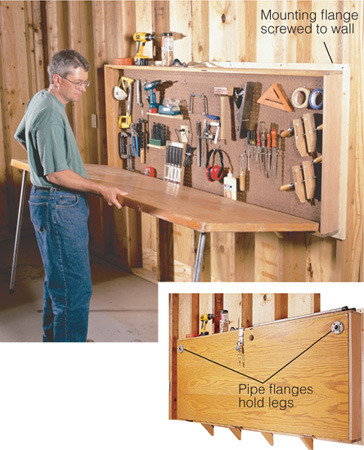
Workbenches don’t have to be complicated or expensive. Space-saving wall-mount versions have been around for decades, used by apartment dwellers or homeowners who didn’t have the space or need for a large fixed bench. The foldaway version shown here cleverly employs a pre-hung solid-core door fitted with reinforced jamb corners and a wood flange for fastening to the wall studs. The flange also provides a mounting base for a pegboard panel to store and organize tools; the storage bay is deep enough to hold most hand tools. To support the bench when it’s in the open position, a pair of 3/4-in. pipe legs thread into flanges attached to the door face.
If even this seems too ambitious, plenty of workbench kits are available at home centers and tool outlets. Most are freestanding benches, without the wall-mount option, but they offer a large, flat work surface and usually some storage features.
Customized
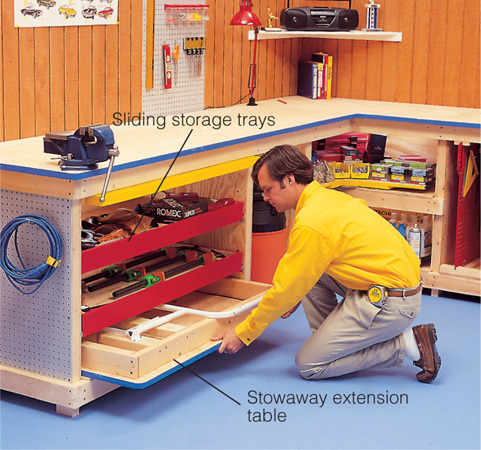
Tailoring a workbench to your shop space and your specialized uses can help you complete projects more successfully. The bench’s shape, dimensions, storage, clamping features and materials should all reflect an intended specific purpose but offer versatility for other tasks. Whether you restore vintage jukeboxes, make wood jigsaw puzzles or tinker with small-engine repairs, imagine a typical project scenario and design from there. Designate separate storage features for the tools of your craft and the hardware and materials you use regularly. Use modular construction so you can change storage options without rebuilding the entire bench.
This L-shape corner bench features sliding tool-storage trays mounted on ball-bearing drawer guides; roll them out and quickly scan the contents to find what you need. Below the drawers is a stowaway table extension to provide an additional work surface as needed. The bench’s other end stores fasteners, hardware and other materials, all organized for ready access.
Woodworking
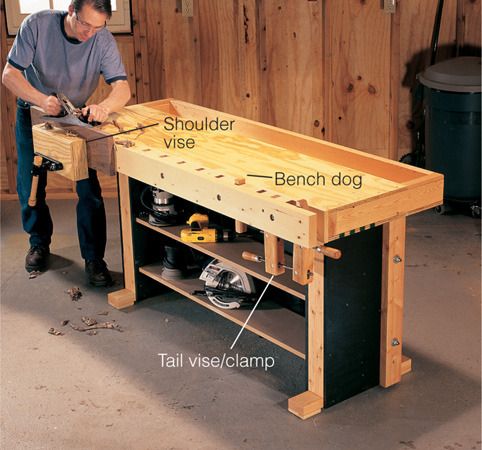
When home-shop woodworkers get serious about their craft, their all-purpose workbench suddenly seems less purposeful. Unlike the generic table-style work surface, a traditional joiner’s bench is an exercise in heft and clamping capacity. Hand-planing a hardwood plank or cutting precise joinery demands a weighty, unshakable workbench that won’t deflect or shimmy across the floor. Heavy bases and thick hardwood tops provide the mass; built-in vises secure the material.
The shoulder vise (shown in use, above) excels at gripping stock for edge planing or cutting joinery. At the other end of the bench is a tail vise, capable of clamping stock edge-to-edge so it can lie flat and unobstructed on the benchtop. The bench featured above substitutes a traditional joiner’s clamp (called a hand screw) to accomplish the same thing; holes in the work surface accept adjustable bench dogs, which are retractable stops used to grip and hold material at its edge or end. Base cabinets or shelves provide storage for tools (or for sandbags if you want even more weight).
Sawhorses
Adjustable Sawhorses
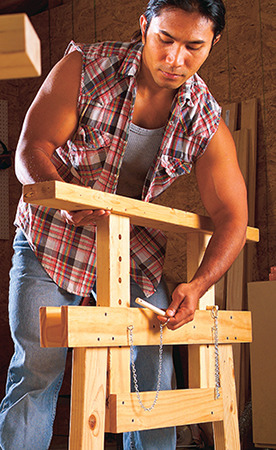
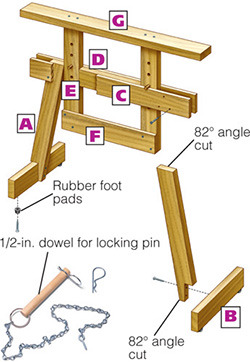
These versatile sawhorses offer a feature most don’t—adjustable height settings. You can vary the setting according to your own height or preferences, the type of project or a table saw’s height to provide outfeed support of long boards. Although it looks more complicated than a standard sawhorse, it’s an assembly of two fairly simple structures: a splayed-leg base with a wide footing for support, and a movable center frame that incorporates the work rail. It’s made from standard nominal 1x4 and 2x4 lumber, so no special milling is required.
The unusual feature is a pair of adjustable slides, which are vertical frame members with 1/2-in. (13-mm) holes drilled at a 2 in. (5 cm) center-to-center spacing along the length of their faces. Two hardwood dowels, tethered to the frame rails with chains, function as locking pins to secure the height setting you want.
Cutting List
Key |
Pcs. |
Size & Description |
A |
2 |
1-1/2" x 3-1/2" x 25" legs |
B |
2 |
1-1/2" x 3-1/2" x 18" feet |
C |
2 |
3/4" x 3-1/2" x 36" upper rails |
D |
1 |
1-1/2" x 3-1/2" x 13" spacer block |
E |
2 |
1-1/2" x 3-1/2" x 21"adjustable slides |
F |
1 |
3/4" x 3-1/2" x 20" slide brace |
G |
1 |
3/4" x 3-1/2" x 40" work rail |
Square-cut Sawhorses
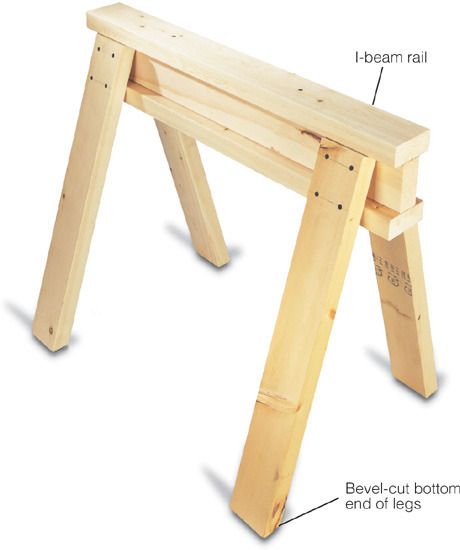
The only materials required to build this sturdy sawhorse are a pair of 12-ft.-long 2x4s and a handful of 3-in. drywall or all-purpose screws. Cut one of the 2x4s into three equal lengths for the I-beam rail assembly; use screws to secure upper and lower flanges to the center rail, as shown. (If during use you’ll be cutting through workpieces and into the upper flange, drill counterbores so the screw heads nest about 1/2 in. (13 mm) below the surface.) For the legs, cut the remaining 2x4 into four equal lengths, up to 36 in. (90 cm) long. The upper ends can be cut square, but if you want to bevel the lower ends, as shown here, clamp the legs in place for a test fit. Place a 1x4 gauge block on the ground, scribe a pencil line on the leg to indicate the bevel angle and cut accordingly.
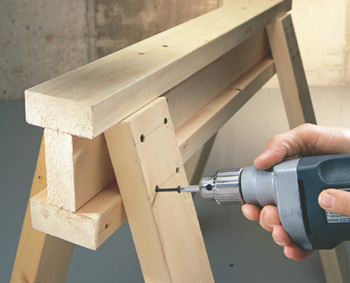
To attach the legs, nest them against the sides of the I-beam as shown above; then drive screws to fasten them to the center rail and lower flange.
Hammers
Hammers look simple, but they are the result of complex metallurgy and engineering to ensure they perform well over a lifetime of use. Although most are versatile enough to handle a variety of situations, each is in fact designed to excel at a few specific tasks.
The head’s size, shape and weight determine its best uses, so don’t expect a common 16-oz. household hammer to work as effectively as something much larger or more specialized.
Good balance and a comfortable handle help prevent unnecessary fatigue; if a tool doesn’t feel right in the store, odds are it won’t improve when you’re swinging it on your project site.
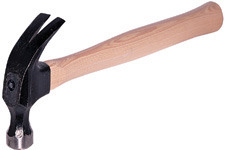
Curved claw. This hammer’s head weighs up to 20 oz.; the curved claw adds leverage for pulling nails.
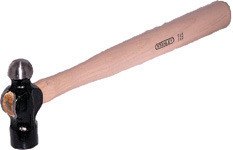
Ball peen. This metalworker’s hammer sets steel rivets and gives sheet metal a textured appearance.
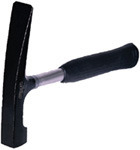
Brick hammer. The chiseled end can trim bricks, chip mortar or score a break line on stone or brick.
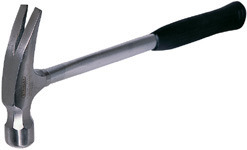
Straight claw. The head weighs up to 28 oz.; the straight claw excels at prying boards apart.
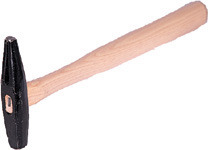
Tack hammer. The narrow magnetic head holds small nails and gets into tight spaces.

Sledgehammer. With a 2-lb. or larger head, this heavyweight offers brute force for driving stakes.

Hammer Handles
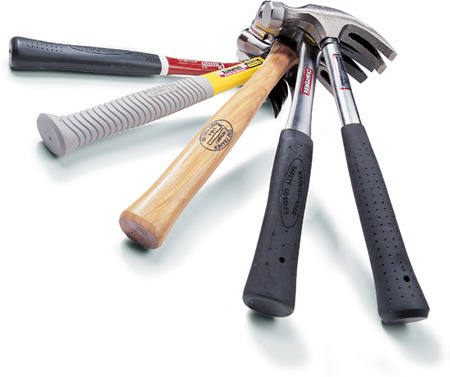
In the days when Henry Ford offered the Model A in any color, as long as it was black, hammer handles offered a similarly singular option: wood. The toughness, durability and relatively low cost of straight-grained ash or hickory handles still merit their use, but today the playing field is much bigger.
Solid-steel hammers cured the broken-handle problem by forging the head and stem of the hammer from a single piece of steel and fitting it with a rubber cushion grip. But some stress and vibration still are transmitted to the user’s arm and hand. Fiberglass and graphite handles, also fitted with cushion grips, are better at dissipating the impact shock before it reaches your arm, and the latest generation of hammers combine these proven materials with polycarbonate, vinyl or other composites for a mix of comfort and durability. Most also feature molded head-to-handle connections to enhance their shock-absorbing properties.
Replacing a Wood Handle
A broken wood handle is no reason to discard a perfectly good hammer. Whether the head has worked irreparably loose over time or is dangling dangerously from a splintered shaft, your local hardware store or home center is likely to have a replacement handle kit for a hammer of almost any size or age.
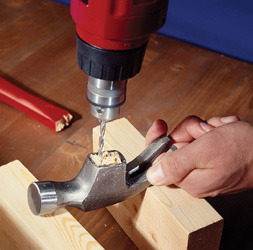
1 Start by drilling multiple holes in the handle remnant. Then use a nail set or punch to clear the debris from the eye of the head.
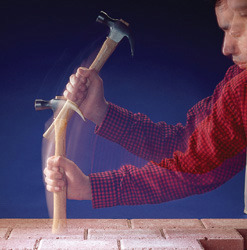
2 Fit the head on the new handle. Seat it firmly by rapping the handle end on a solid surface. Trim part of handle protruding past head.
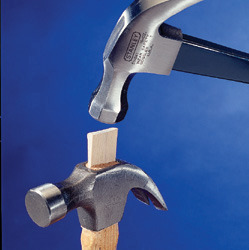
3 With the head firmly seated, drive a tapered wood shim into the precut kerf in the handle.
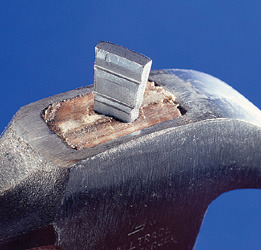
4 Check the head for a tight fit; then drive a metal wedge at an angle to the wood shim.
Using a Hammer
Simple as they are, hammers still warrant some basic safety guidelines. First, always wear eye protection to avoid injuries from ricocheting nails, debris or a shattered hammer head. This latter danger is a relatively rare occurrence, but the hardening treatment that makes nail hammers so durable also makes them brittle. Never strike one hardened hammer face to another or use a hardened nail hammer to strike other hardened tools, such as cold chisels or punches. Also, don’t strike anything with the side, or cheek, of the hammer. When nailing, always use at least one set stroke to ensure the nail tip is firmly embedded in the material before taking a full swing. Always keep your attention focused on the nail or other target, not on the hammer.
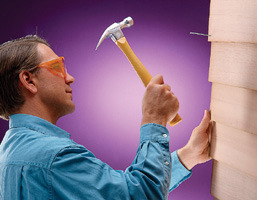
Swing. Adjust your swing and pivot point to the size of nail you’re driving. Swing from the wrist for smaller nails, elbow for midsize nails and shoulder for large nails. Release the nail after the set stroke; then swing in a smooth arc.
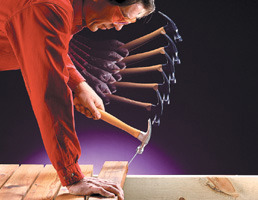
Toenailing. When face nailing isn’t possible because of space constraints or you want to conceal the nail head in the edge of a board, driving nails at an angle—a technique called toenailing—offers a simple solution.
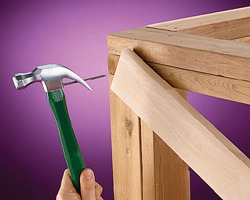
High places. Reaching above your head to drive nails sometimes requires a one-hand trick. Wedge the nail between the hammer claws to hold it, seat it with a light set stroke, then resume normal grip on the hammer to drive the nail home.
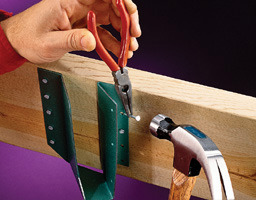
Awkward spaces. For tight spaces where you can’t fit your fingers at all or without exposing them to hammer blows, use a pair of needle-nose pliers to hold the nail until you set it.
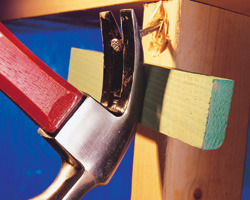
Leverage. To increase the tool’s leverage for pulling nails, insert a scrap block under the hammer’s head. This not only reduces the effort required but helps prevent breakage of wood handles.
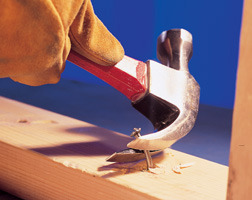
Sidewinder. To remove nails in tight spaces or with broken heads, wedge the nail shank in the hammer claws and “walk” it out by turning the hammer on its side in one direction and then the other.
Replacing a Fiberglass Handle
When it’s time to replace a broken or damaged wood handle, fiberglass tool handles offer a more durable option and cost only slightly more than a wood replacement kit. Especially common for sledgehammers and other large tools, these fiberglass repair kits substitute epoxy for the wedges that secure wood handles.
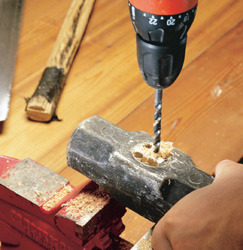
1 After cutting off the wood handle, place the hammer head onto an open bench vise and drill multiple holes in the remaining plug.
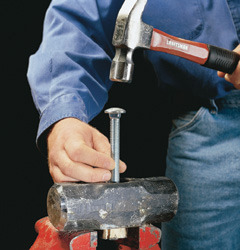
2 Knock the plug from the head using a hammer and the largest bolt you have available. Hard blows will loosen the plug until it releases.
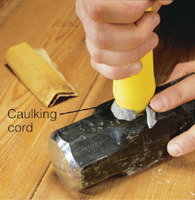
3 After wire brushing the hole sides, fit the new fiberglass handle into the sledge head and seal the connection with caulking cord.
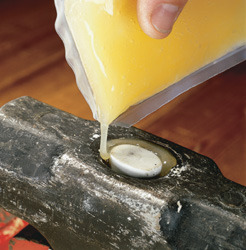
4 Mix the supplied epoxy packet as per the instructions and pour it into the tool eye, around the handle. Let it cure one week before using.
Saws
It’s no secret that stationary and portable power saws have displaced manual cutting tools for many tasks, but handsaws still have a vital role in every kind of woodworking, from rough carpentry to building fine furniture. Featuring a thin flat blade with one or two serrated edges, handsaws offer cordless convenience and can make deep or close-quarters cuts that are off-limits to many power saws. Handsaws are usually defined by the number of teeth per inch (tpi) or “points,” and by the particular grind and set (offset angle) of the teeth, which determines what kind of cutting they do best. Some can be resharpened and reset; others feature replaceable blades.
Handsaws

The traditional Western-style handsaw for general carpentry features a long blade with a hardwood handle, and excels at cross-cutting. The teeth are offset alternately to create a cutting gap (called a kerf) slightly wider than the blade thickness. Recently, shorter saws have become more popular, and a chisel grind on the teeth cuts on both the pull and push strokes.
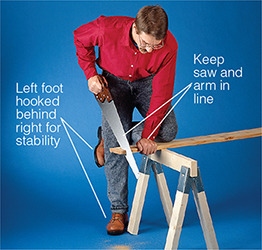
Position. For accurate, safe cutting, place the workpiece on steady supports at about knee height. Cut with the blade and your arm square to the board.
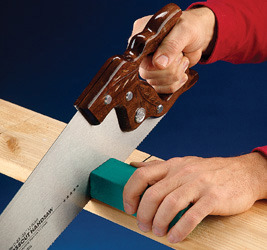
Start cut. Start a cut by pulling the saw backward at a low angle for a few strokes. Use a guide block to protect fingers and ensure a square cut.
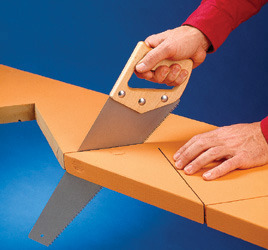
Finish cut. Use a steeper angle (about 45°) as you progress through the cut. For a stopped cut like the one shown, the saw should finish at a 90° angle.
Pull Saws

Pull saws, such as the Japanese-style dozuki (above), differ from traditional Western saws in two ways: They typically have in-line rather than transverse handles, and the teeth cut on the pull stroke, allowing for thinner blades, smaller kerfs and, proponents say, better control in the cut. A dozuki saw has a steel reinforcing channel along its back, ensuring a straight blade for cutting precise joinery.
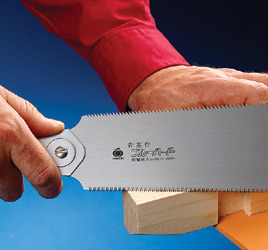
Using a pull saw. Use light touch when starting cut, letting blade score the wood first. Double-edge varieties have one side for cross-cutting, the other for ripping boards to width.
Coping Saws
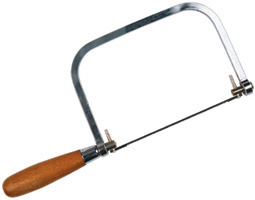
Featuring a very narrow, flat blade tensioned in a steel bow frame, a coping saw excels at cutting intricate curves. These saws are commonly used to cut contours on the ends of wood molding. Smaller versions, called fretsaws, are used in making jewelry and musical instruments.
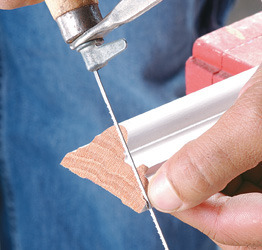
Using a coping saw. To cope the end of a molding, first cut an inside miter on the piece. Then follow the contour line of the molding face with the coping saw.
Miter Saws
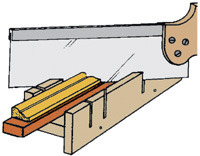
Wood miter box
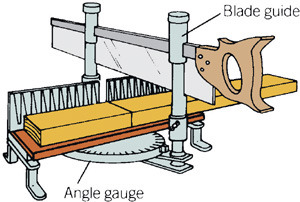
Adjustable metal miter guide
Miter saws are actually two tools—a saw that does the actual cutting and a guide to create a precise, controlled cut. Metal versions feature an adjustable-angle base; wood versions are simple boxes with precut kerfs at 90° and 45°.
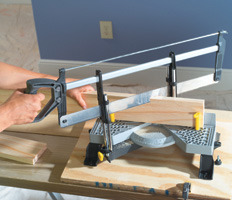
Newer metal miter saws feature light-weight tension-type blades and telescoping post guides that control the saw’s movement.
Hacksaws
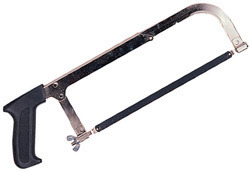
Carpenter’s saws don’t have the right kind of teeth or hardened edge to cut steel and other metals; that job requires a hacksaw. Hacksaws use a narrow replaceable blade tensioned in a bow frame, and the teeth are much smaller and shorter than those found on woodworking saws. Blades are typically classified by the number of teeth per inch—fine (32 tpi), medium (24 tpi) and coarse (18 tpi). Coarser blades cut faster and more aggressively but leave a rougher edge. A properly tensioned blade is critical for making a clean, accurate cut; with too little tension, the blade will flex and drift rather than cut straight.
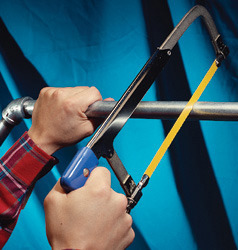
Hacksaws are great for plumbing and electrical work, but never work on pipe or conduit without shutting the water or electricity off.
Keyhole Saws
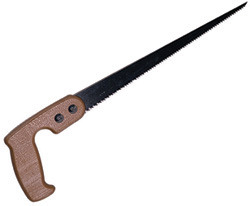
Keyhole saws feature a long pointed blade designed for inserting through small openings to cut them larger or for making curved or irregular cuts that a standard handsaw can’t make. One or more starter holes must be drilled into the material first. Even though the blade can be removed from the handle, replacement blades aren’t always sold separately. Standard versions are designed for cutting wood only; for cutting abrasive materials, buy a version with specially hardened teeth for that application.
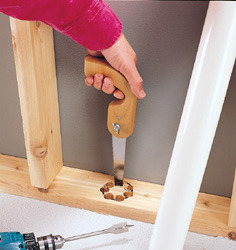
Keyhole saws work more effectively if you predrill holes and use the saw just to cut through the remaining waste portion.

Making the Cut
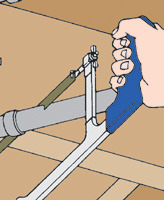
1 When required, a hacksaw blade can be installed upside down with the cutting edge toward the frame.
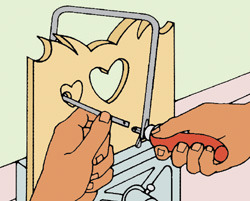
2 To use a coping saw for a closed cutout, drill a starter hole and feed the blade through it. Then reattach the blade to the frame.
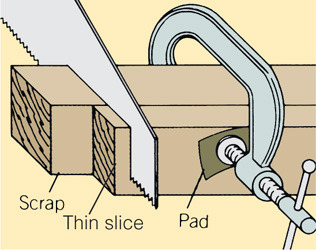
3 To prevent tear out and splintering a workpiece or to cut a thin slice, clamp a sacrificial wood block to the board, then saw through both pieces.
Staple Guns
Nails, bolts and screws might be the fasteners you typically associate with home improvements and repairs. For some projects, though, those items are outnumbered by a much smaller piece of hardware—the staple. Used to fasten fabric, felt roofing underlayment, screen mesh, insulation, carpet padding and dozens of other materials, staples for home use vary in length from 1/4 in. to 9/16 in. long, typically in 1/16-in. increments. The guns that drive them are medium-duty tools, beefier than a household stapler but less powerful than an industrial pneumatic tool.
You’ll find three basic types of staplers designed for building or project applications: a standard manual gun, a manual hammer tacker and an electric staple gun. If you tackle a variety of home improvement projects, the two manual versions are affordable enough to warrant owning one of each. An electric gun is slightly more expensive but requires only a light trigger pull to operate; for frequent use, it might be worth the investment.
Hammer Tacker
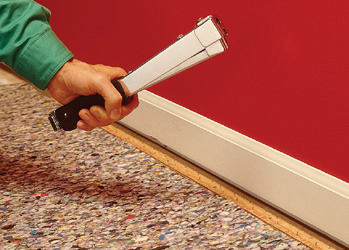
Use a hammer tacker for covering large areas quickly. Installing carpet padding or securing roofing felt are two prime uses. As the name implies, you swing it like a hammer. On impact, the tool’s momentum compresses the head and drives the staple. It’s fast, but not designed for precision work.
Standard
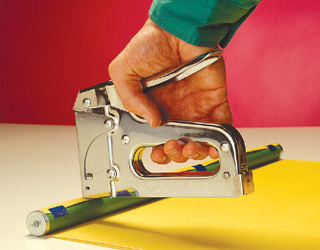
A standard staple gun features a spring-action drive that activates when you grip the tool body and press the lever handle down firmly with your palm. Precise placement of the staple is this gun’s strong suit, so it’s great for tasks where careful work is more important than speed.
Electric
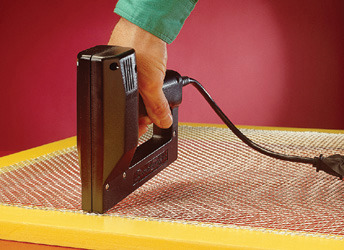
Electric staple guns take the fatigue out of firing repeatedly and make it possible to drive staples into and through tougher materials. Unlike the blunt force of a standard staple gun or a hammer tacker, the electric gun’s direct impact is to the staple only, not the workpiece, so delicate materials fare better.
Utility Knives
Many flexible materials have to be cut before or after installation. For such trimming, there’s no better tool than a utility knife. This inexpensive cutting tool can feature a retractable or fixed blade. Each blade typically has two cutting ends, which you can rotate before swapping the blade for a new one. Some have multi-section blades that snap off on scored lines to give you a fresh edge. The interchangeable blades provide versatility. Standard blades cut screen cloth, roofing felt, the paper face on wallboard and dozens of other materials. Linoleum blades specialize in cutting resilient sheet flooring; laminate-scoring blades etch a razor-thin line in plastic laminates to snap a clean break. Hook blades slice through shingles and other material in one pass without cutting the surface below.
Newer generation blades include more durable “tri-metal” blades and special serrated blades designed for cutting drywall. Newer-generation handle designs feature quick-change features and ergonomic contours and cushioned grips for comfort.

Standard

Laminate-scoring blade
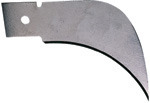
Linoleum blade

Hook blade
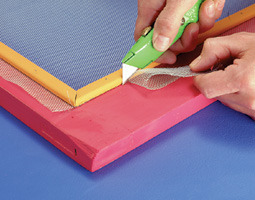
Utility knives outperform almost any other tool, manual or powered, for precise trimming of flexible materials. A sharp blade is less likely to stray from where you direct it, so change blades as often as required.
Screwdrivers
Few tools are this basic and essential. Screwdrivers have a centuries-old history, but modern versions have evolved from the simple flat-blade type to include other drive tips. The Phillips drive offers a greater grip area for the fastener head and the convenience of a tip that screws can cling to. Square-drive, or Robertson, tips provide an even better grip with less chance of slipping or stripping.
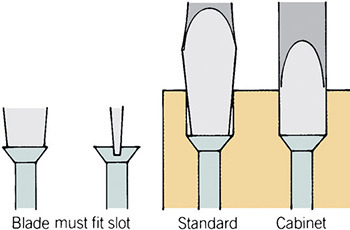
Basic Types

Standard

Phillips

Robertson or Square
Specialty Screwdrivers

Stubby. Working in confined spaces—a car engine is among the worst—often doesn’t allow room for a full-size screwdriver with a normal handle and blade length. “Stubby” short-handled versions pack the function into a compact size.
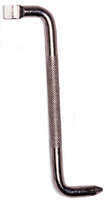
Offset. For clearances so tight even a stubby won’t fit, an offset screwdriver features a bent double-ended blade and no handle. Available in standard and Phillips versions, you can also find these with ratcheting heads to work a little faster.
Renewing the Tip
When screwdrivers lose their edge and start slipping, they can easily be renewed. Square-drive tips can be restored by simply filing back the blunt end.
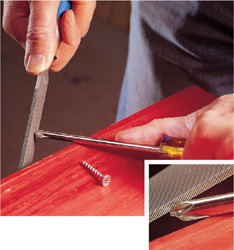
Phillips. Start by filing the nose or point of the tip down slightly to flatten it. Then use the edge of the file (inset photo) to shape and sharpen the grooves.
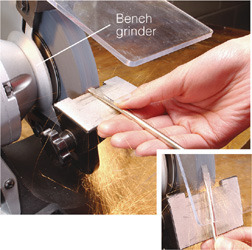
Standard. With the tool rest set square to the wheel edge, grind off the worn or damaged portion. Change to a steep angle (see inset photo) to taper the new tip.

Work Smarter

Screw starter. To start a screw in a hard-to-reach place, poke the tip through a piece of tape and stick the tape ends onto the screwdriver blade. Drive the screw; then pull off the tape.
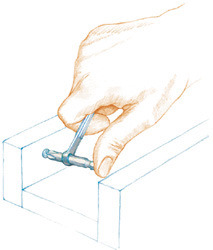
Tight spots. You can improvise an offset screwdriver by inserting a hex-shank screwdriver bit into a 1/4-in. box-end wrench. Use thumb pressure to make sure the tip stays in the screw head.
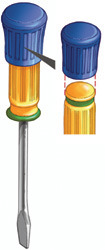
Screwdriver grip. Plastic screwdriver handles are tough on your palms. Improve your grip and comfort level by pressing a rubber chair leg tip onto the handle.
Wrenches
Virtually every household has items that require wrenches for assembly, adjustment or repair. There are other variations, but the nuts, bolts and screws that require wrenches typically feature a hexagonal (six-sided) shape (square heads were common in older hardware but are seldom used today). Whatever the wrench type, it works by gripping two or more sides of the nut or bolt head so it can be rotated. Some versions are adjustable, but others are fixed sizes that must be matched precisely to the fastener size.
In fixed-size wrenches, two standards are common. Imperial sizes, common in the United States and the United Kingdom, are labeled in fractions of an inch (7/16 in., for example). Metric sizes are labeled with a single number that indicates millimeters (12 mm, for example).
Socket Wrenches
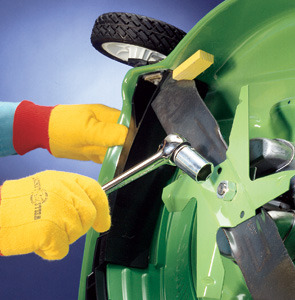
Socket wrenches are hollow cylindrical wrenches with flat or angled edges machined on their inside faces. They nest snugly over the bolt head like a cup. The socket’s other end is machined to accept a square driver, typically on a ratcheting handle that can be set to engage the driver in only one direction, to tighten or loosen. A 3/8-in.-drive socket set is the most common for household use, but 1/4- and 1/2-in. sizes are also widely used. (Industrial-duty sockets often feature even larger drives.) Most socket wrenches are fixed-size models purchased in sets, although adjustable versions with movable jaws are available.
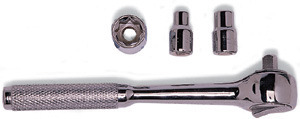
Ratchet handle and socket. Ratchet handles, which work with interchangeable sockets, are much faster than fixed-handle wrenches.

Box-end ratchet. Box-end ratchets fit where there isn’t clearance for a standard ratchet handle and socket.

6-Point vs. 12-Point
If you’re shopping for socket sets, you might notice that some have a different internal shape. Mechanics like 12-point sockets because they fit onto bolt heads faster, but they grip only at the corners and can sometimes strip a nut. They’ll also grip square-head nuts. A 6-point socket provides a bearing surface on the flats, creating a stronger grip.
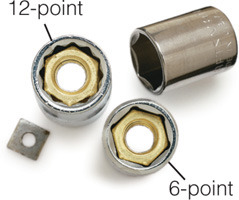
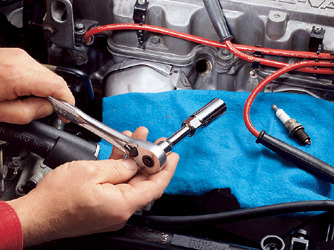
Extensions. Hard-to-reach areas can be made more accessible by fitting a drive extension between the ratchet handle and the socket.
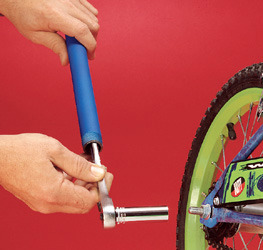
Cheater bar. For dealing with stubborn nuts or bolts, extending the ratchet handle length with a pipe will increase the tool’s leverage.
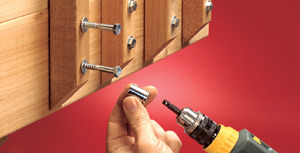
Adapters. Driver adapters let you fit a socket onto an electric drill, offering better power and speed for driving lag screws or tightening bolts.
Nut Drivers

Nut drivers work on hex-head bolts and nuts, but they’re fitted with an in-line handle like a screwdriver—hence the name. Nut drivers are convenient for getting into tight spaces where a wrench won’t fit. They’re available in fractional inch and metric, but in a limited range of smaller sizes.
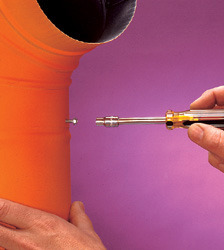
Spinner handles. A spinner handle is a variation on the nut driver. It features a square-drive tip (usually 1/4 in.) designed to accept interchangeable sockets like a ratchet handle.
Fixed
With fixed-size wrenches, you have to buy multiples to handle different fastener sizes, but the crisp, exact fit is worth the expense. They’re faster to use and maintain a solid grip.
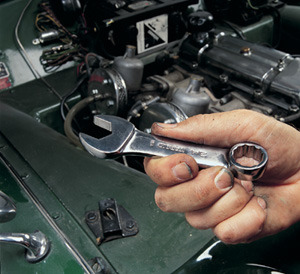
A stubby wrench has the same “business ends” as a standard wrench, but the shorter handle allows you to get into cramped spaces.

Double open end. Flat on both ends, these wrenches combine two sizes (one increment apart) in one tool.

Combination. In a combination wrench, a flat open-end wrench teams with a slightly angled box-end wrench of the same size.

Offset double box end. These models have the same wrench type on each end, but the sizes are different (one increment apart).

Wrenches
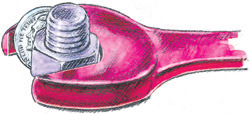
Improvised size. If you don’t have an adjustable wrench or the exact fixed size you need, try inserting a coin as a shim between the jaw and the nut.
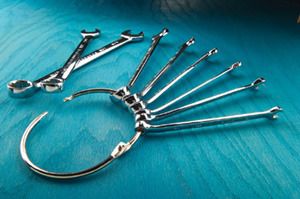
Stay organized. To avoid searching your toolbox for one elusive wrench, thread the whole set onto a loose-leaf binder ring and store them together. Open the ring to free the size you need.
Adjustable
Like any general-purpose tool, an adjustable wrench offers versatility in exchange for a slight loss in precision. It’s difficult to get the snug fit that a fixed wrench provides, and the movable jaw tends to creep slightly during use. But a single adjustable wrench can sometimes substitute for an entire set of open- or box-end wrenches. Because their jaw size is not fixed, adjustable wrenches are designated by their handle length; the maximum jaw opening is usually stamped on the handle. Plan to buy at least one small and one large size. Using an oversize wrench on a small fastener is awkward, and you often use wrenches in pairs anyway, so it pays to have two.
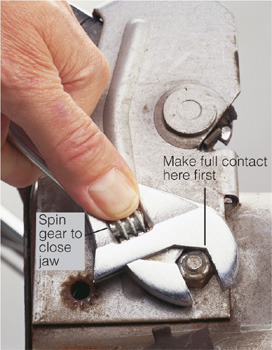
To ensure a tight fit with an adjustable wrench, place it firmly against the nut before threading the jaw closed. For best results, turn the wrench handle toward the lower jaw, never away from it.

Pipe wrench A pipe wrench has a coarse thumb-wheel adjustment and jaws lined with angled teeth. The jaws grip when rotated in one direction and release in the other.

Monkey wrench Designed to handle flat-sided fasteners, such as square-head bolts and pipe plugs, the monkey wrench is one of the oldest styles of adjustable wrench.

Adjustable wrench A mechanic’s-style wrench has slightly angled jaws oriented toward the tool’s end. The adjustment mechanism is fairly fine.

Multi-wrench The pivoting ends on this wrench self-adjust to fit nuts and bolts of different sizes and can adapt to irregular shapes, if necessary.
Pliers
Gripping Pliers
Where fingers can’t fit or offer a sufficiently tight grip, these tools are indispensable. Most have wire cutters built into the jaws.
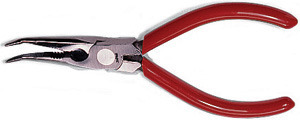
Bent-nose pliers. Almost as precise as tweezers but much stronger, these pliers reach into tight or awkward spaces.

Long-nose pliers. With a long reach, these pliers are great for narrow spaces and for electrical work. They can form tight wire loops to connect terminals.

Lineman’s pliers. Designed for heavy-duty electrical work, these pliers can cut through thick cable. They have flat, serrated jaws for a strong grip.
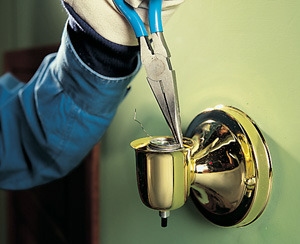
Freeing the base of a broken light bulb is an easy task for the narrow tip of a long-nose pliers. (First, confirm that the power is off!)
Adjustable Pliers
Because one size really can’t fit all, these pliers feature movable pivots that allow them to expand or reduce the jaw opening range as required.

Groove-joint pliers. These tools feature multiple curved grooves on the inside face of one part and a matching tongue machined on the other. By repositioning the pivot post along the slot, you can adjust the jaws’ working range to create the size you need.

Slip-joint pliers. Similar in concept to groove-joint pliers, slip-joint pliers offer just two pivot positions and a narrower range of jaw sizes. The jaws feature flat and curved portions, both serrated, for gripping a variety of objects.

Plumbing repairs, especially involving the large pipe sizes used in drains, are an ideal application for groove-joint pliers.
Cutting Pliers
Like their name implies, these tools are designed to cut—specifically wire, small nails and other small metal parts.

Diagonal-cutting pliers. With a spear-shape nose and an offset side-cutting jaw, these pliers can get into tight spaces to snip wires or nails.
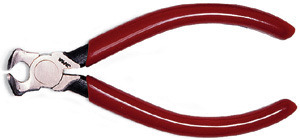
End-cutting pliers. With sharp chisel-edge jaws and a rounded head, end-cutting pliers can snip nails virtually flush with a surface.
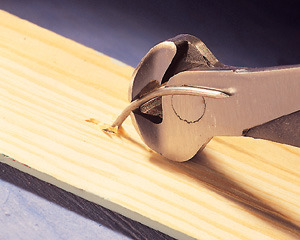
Salvaging wood molding requires pulling finish nails through the wood, a task made easy by the tenacious grip of an end-cutting pliers.
Locking Pliers
When hand strength isn’t enough to keep standard pliers gripping an item, locking pliers provide crushing jaw pressure that won’t let up.

Long-nose pliers. Like other long-nose pliers, these locking models are designed for hard-to-reach places. Turning the knurled end knob adjusts the clamping pressure at the jaws’ tips.

Curved-jaw pliers. To get a secure grip on pipes and other round or irregularly shaped items, use a locking curved-jaw pliers. Pressure is released by the small lever inside the handle.
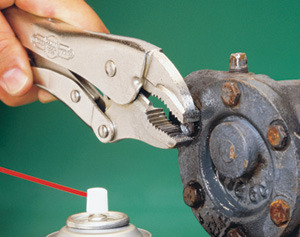
Rusted bolts or nuts may be too corroded to turn with an ordinary wrench. Locking pliers have serrated jaws that dig in better.
Vises
Metal-Jaw Vise
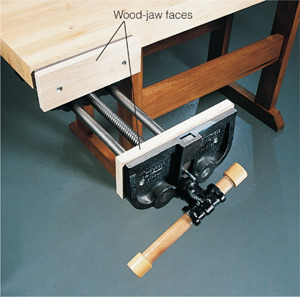
For quick, efficient clamping of workpieces, most woodworkers give top honors to metal-jaw vises. A metal-jaw vise offers a complete package, with cast-iron jaws and a base fitted to guide rails and the center screw. The only thing you’ll want to add is a pair of wood-jaw faces. The metal jaws are often taller than the workbench thickness; for a flush mount, simply secure a wood block on the underside of the benchtop and then install the vise. The simplest way to mount the vise is butted against the bench’s edge, which leaves the fixed jaw slightly proud, as shown in the example. Some users prefer the jaw face flush with the benchtop edge, so they notch the bench to create an inset fit.
For light-duty use, jaw width can be in the 6- to 7-in. (15- to 20-cm) range, although serious woodworkers usually opt for a larger vise. User-friendly features include a quick-release screw for fast adjustment, “toe-in” jaw alignment for a better grip and a vise dog, which is a retractable stop that’s used for clamping a workpiece at its edge or end.
Wood-Jaw Vise
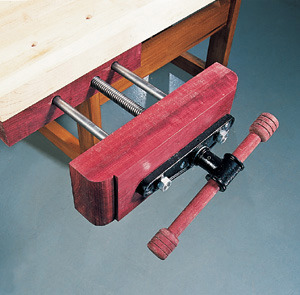
A more traditional style for a cabinetmaker’s bench, the wood-jaw vise typically comes with only mounting hardware, guide rods and a vise screw. Some versions use the bench edge as a fixed jaw and require a thick wood block for the movable jaw. Others require that you make two wood jaws. A few versions have quick-release screws, but most do not, and you often have to make your own handle out of steel pipe or a wood dowel.
On the plus side, a wood-jaw vise is less likely to nick plane irons and chisels if they stray from the workpiece. Their feel isn’t quite as crisp as that of metal-jaw vises, however, and you don’t get the toe-in feature that makes metal-jaw vises grip so well. Still, most provide plenty of clamping power.
The hardware for wood vises varies according to where it will be mounted. The proportions and mounting details for a shoulder vise mounted to the front edge of a bench differ from those for mounting a tail vise on the end of the bench.
Machinist Vise
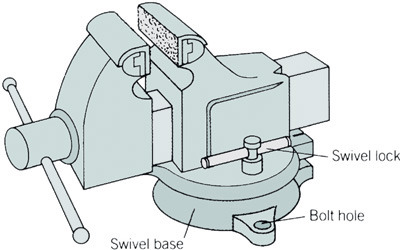
For general shop work that involves metalworking or small parts, a machinist vise is a great accessory to your workbench. This type surface-mounts to the bench and features much smaller jaws, which are serrated to grip hard or smooth metals. Most also feature a notched area below the jaws, ideal for gripping pipe. A swivel base lets you rotate the work for easier access.

Make it Portable
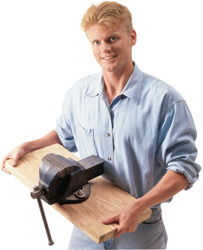
If your machinist vise sees only occasional use and you don’t want it occupying permanent space on your workbench, simply bolt it to a thick plywood base and use clamps to secure it to the bench when in use.
Clamps
For tools that have just one basic purpose—to create and hold pressure in a concentrated spot—clamps come in a remarkably wide range of sizes and shapes. Even limiting the category to home-workshop uses doesn’t pare it down much. It’s true that all clamps perform basically the same function, but their size, the amount of pressure they generate, their speed and range of adjustment and the particular ways they hold items together can vary greatly. Furniture and other woodworking projects often require clamps—lots of them—but even simple tasks, like sharpening a lawn mower blade or repairing a damaged door, require more holding power than hands can provide.
Sometimes, clamps coax stubborn parts into position or just keep an assembly together while fasteners can be driven or adhesive cures. Whether the task is a moment’s holding power or an overnight glue-up, clamps provide the muscle.
C-clamps
Named for their body or frame shape, C-clamps are among the oldest and simplest clamp designs. Relatively compact, they can fit into tight spaces. Sizes from 1- to 8-in. (2.5- to 20-cm) length are common for general shop use. Typically, the threaded spindle features a small sliding handle on the outboard end and a ball-and-socket shoe that swivels and pivots to accommodate slightly irregular angles. These are not fast-adjusting clamps and their overall capacity depends on throat depth and spindle length, so sizes tend to be modest.
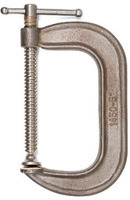
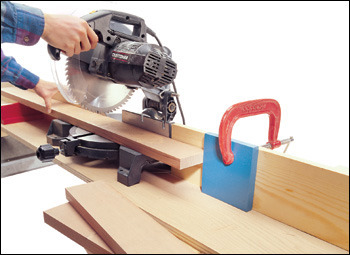
C-clamps, with their compact size and strong holding power, excel at improvised shop setups, like this simple miter-saw cutoff stop. The jaws typically dent the surface, so for finished pieces, use scrap blocks to absorb the pressure.
Pipe and Bar Clamp
For longer reaches, pipe or bar clamps work best. Pipe clamps feature interchangeable fittings that thread onto standard plumbing pipe. Bar clamps have permanent bars of rectangular steel or aluminum. One jaw operates via a threaded spindle at the clamp head, the other slides along the pipe or bar.

Pipe clamp
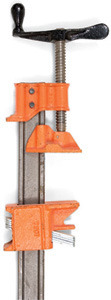
Bar clamp
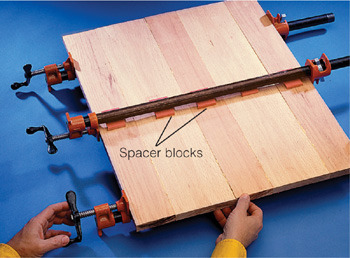
Gluing up wide wood panels is a typical job for pipe clamps. Alternate the clamps along both sides to equalize clamping pressure, and use spacer blocks to keep panel flat.
Hand Screws
Used mostly for making furniture, hand screws are a traditional joiner’s clamp. The large hardwood jaws help prevent dents in the workpiece. “Floating” spindles let you adjust the clamping angle and the jaw offset if the shape of the assembly requires it. Opening capacities are fairly limited, with spindle lengths from a few inches (centimeters) to about 1 ft. (30 cm) for larger sizes.
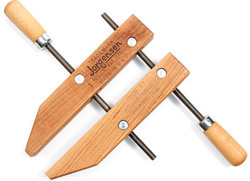
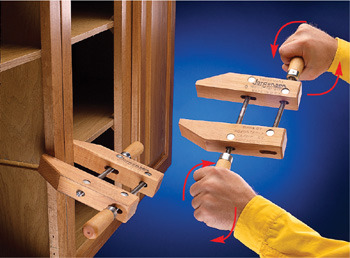
Hand screws are kinder to wood surfaces than metal clamps. To close or open the clamp quickly, grasp both handles as shown and rotate the jaws end for end, like pedaling a bicycle.
Squeeze Clamps
Traditional clamps have always required one hand to hold the clamp and one to tighten it, leaving no hands to steady or align the items you’re clamping. Some newer designs feature trigger grips that let you hold and tighten the clamp single-handedly, freeing your other set of digits.
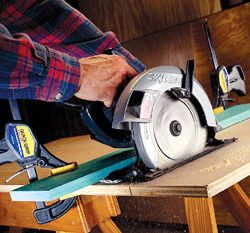
On-site carpentry presents no end of opportunities for squeeze clamps. Here, a straightedge is secured in place to guide a saw cut.
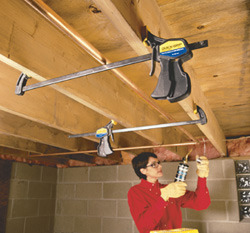
Lighter loads, like this copper pipe being soldered in place, can be supported by the clamp bar if the jaws have a firm hold on a solid base—in this case, a pair of floor joists.
Spring Clamps
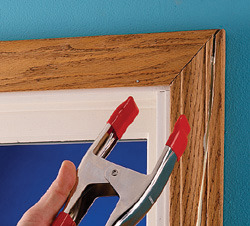
Spring clamps are compact, fast and easy on wood surfaces. They are the original one-handed clamp. They’re inexpensive and convenient but tend to creep when you first set them.
Specialty Clamps
Sometimes an item’s shape, size or placement relative to another part defies the limits of a standard clamp. For those situations, an entire class of specialty clamps exists. Some are too exotic or expensive for the typical home workshop, but several types prove useful on a regular basis.
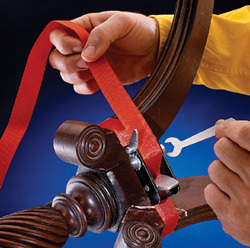
Band clamp. No chair restorer worthy of the title could live without band clamps. Consisting of a sturdy web strap as long as 25 ft. (7.6 m) and a ratcheting or tightening mechanism, band clamps are ideal for cinching around large or irregularly shaped objects.
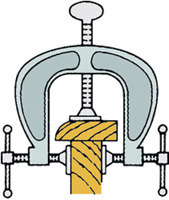
Edging clamp. Fitting decorative trim or molding to the edge of a plywood or wood composite panel is a common technique in cabinetmaking. If you don’t want to use finish nails or screws to hold the trim, these three-way edging clamps apply pressure directly where you need it.
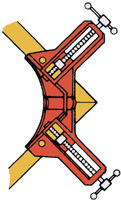
Miter or corner clamps. Precise 90° alignment of corners is much easier to achieve with a miter, or corner, clamp. Sometimes called a framer’s clamp because of its usefulness in assembling art frames, this type also helps ensure square drawer and box assemblies.

In a Squeeze
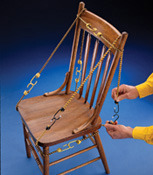
Bungee cords. For light to moderate pressure on large or irregular-shape assemblies, try stretching bungee cords to hold everything together. Check the parts’ alignment as you work.
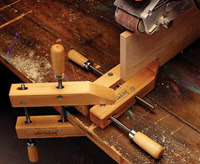
Quick vise. Don’t have a bench vise handy? A pair of hand-screw clamps can substitute. Secure the workpiece in one hand screw, and then use the other to secure everything to a stable work surface.
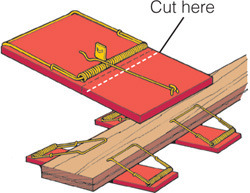
Mousetrap clamp. Small assemblies can be clamped with light pressure, the perfect application for a spring-type mousetrap.
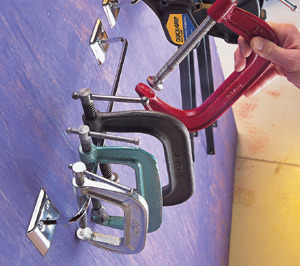
Clamp storage. Small clamps tend to be indistinguishable and hard to find when they’re heaped together on a shelf. To avoid the pileup, mount an ordinary towel bar to the wall and hang the clamps there.
Wood Chisels
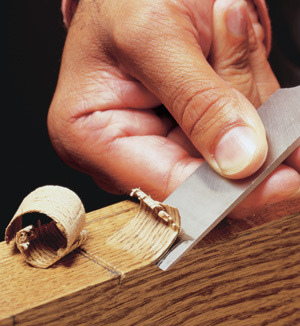
Made of hardened tool steel and shaped with a cutting bevel at the tip, a sharp chisel will sever wood fibers cleanly to cut shallow notches or deep mortises into a wood surface. For general use, start with a small set of three sizes, such as 1/2, 3/4 and 1 in. (12, 19 and 25 mm). Choose some with plastic handles that have a steel striking cap at the end. Keep them sharp by periodically honing them on an oilstone or waterstone; regrind the bevel only when necessary, and with care.

Keep Control
Like any cutting tool, chisels should be handled with respect. Work with the blade traveling away from your body and let the edge take small bites. If brute force is required, whether from the palm of your hand or a mallet, you’re cutting too deeply or working with a dull edge. The likely result is an abrupt breakaway from the workpiece—and a serious wound.
The Basics
Even a sharp chisel will sometimes wander with the wood grain rather than cut a straight line. For accurate mortises and other cuts, always outline the cutting area by scoring the wood with a knife or the chisel itself. As a general rule, cut first across the grain, then follow with a cut along the grain. Repeat this sequence as you cut deeper; this reduces splitting.
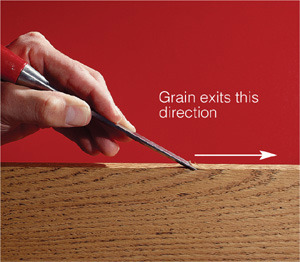
Grain direction. To prevent the edge from burrowing too deep, make paring cuts with the direction of the grain, not against it.
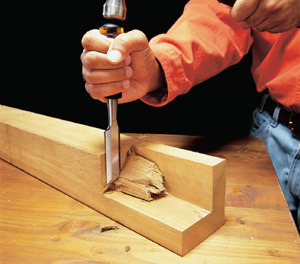
Chopping cut. Make small chopping cuts to sever the fibers across the grain. Follow with paring cuts to remove the waste chips and then repeat the process.
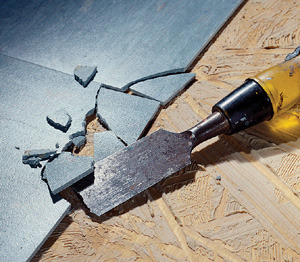
Demolition chisel. To keep your better chisels in good shape, designate an older chisel for tasks that don’t require a perfect edge.
Cutting a Hinge Mortise
Before electric router use became widespread, cutting a hinge mortise by hand was something every carpenter learned to do. The shallow depth of a hinge mortise involves less work than a furniture joint, but it does require precise control. The trick is to take small controlled bites and follow a sequence that helps ensure a uniform mortise depth.
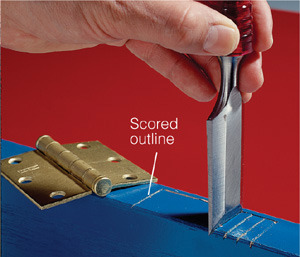
1 After scoring the hinge outline with a chisel or a utility knife, use a 1-in. (25-mm) chisel to make a series of vertical plunge cuts.
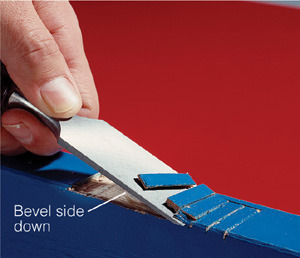
2 With the bevel side down to control the cutting depth, remove the small wood segments created by the plunge cuts.
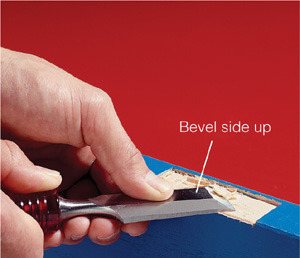
3 Turn the chisel bevel side up and use a circular or angled (skewed) motion to pare the mortise bed smooth and flat.
Demolition Tools
Demolition is the “paying your dues” phase of any major remodeling project. Before you get to the fun parts—installing new windows or cabinetry, picking out paint colors and flooring—you have to tear out old materials and clean up the mess. The process isn’t typically as painstaking or precise as building or installing new elements, but it does require planning and careful work. Haphazard demolition can undermine the structural integrity of a house, particularly if you don’t identify critical load-bearing supports correctly. Just as important, you have to stay safety-minded so the chaos and debris around you doesn’t result in an injury. As with all tasks, having the right tools is essential.
Cat’s Paw
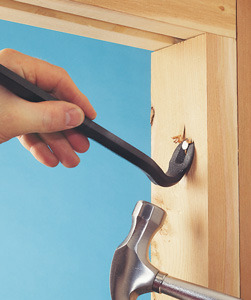
When embedded nails in framing can’t be cut away, you have to dig them out one at a time. Use a hammer to drive the curved “claws” of a cat’s paw under the nail head; then pry out the nail.
Sledgehammer
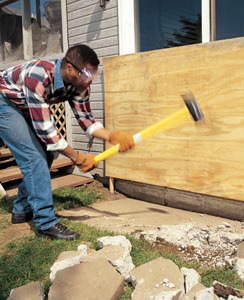
With head weights ranging from 8 to 20 lbs. (3.5 to 9 kg), full-size sledgehammers can break up concrete slabs and footings. For most interior work, though, try a smaller version; a heavyweight like this is overkill.
Flat Bar
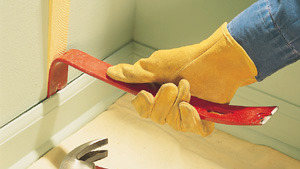
A versatile demolition tool, the flat bar can be used to remove molding, pry apart framing lumber and pull nails.
Cold Chisel
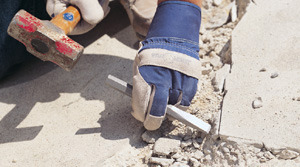
Use a smaller mallet and a cold chisel to create controlled breaks where the brute force of a sledgehammer would be too much.
Containing Dust
If it isn’t contained at the source, fine gypsum and plaster dust from demolition work will quickly migrate throughout an entire house. To keep the dust under control, cover floors and seal off ventilation registers and ducts with plastic sheeting. Set an exhaust fan in an open window to pull the dust outside.
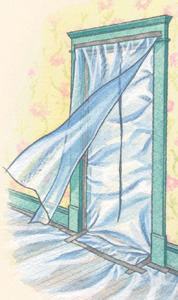
Doorway dust curtain. To keep access doorways from becoming escape routes for airborne dust, use clear plastic sheeting to create a two-layer dust curtain. Tape the first layer around the entire doorway and cut a center slit that stops about 6 in. (15 cm) short of the top and bottom ends. Then tape a second cover sheet along the top of the doorway; it will hang closed but allow passage when necessary.

Don’t Wreck Your Health
As crude and simple as demolition techniques are, the work can still be dangerous. Take basic precautions by shutting off potential hazards, such as electrical circuits or water and gas lines, and never cut blindly into a wall without knowing what’s inside. Keep the area well lit and ventilated, and always wear eye protection, gloves and a dust mask.
Planes
Use a dull, poorly adjusted bench plane and you’ll wonder why anyone would bother with such an ineffective tool. Try a well-tuned version with a sharp iron in it, and you’ll know why no woodworker would live without one. Before the advent of power machinery, hand planes were used to surface rough-sawn lumber until it was smooth and flat, to straighten crooked board edges, to cut furniture joints and to put decorative edge profiles on moldings.
Today’s jointers, thickness planers, routers and other power tools can perform most of these tasks more quickly and with less effort from you, but for the trimming and detail work that’s part of almost any woodworking project, a few good hand planes more than earn their keep in your workshop.
Planes are precision tools, but their anatomy is fairly simple. The cutting blade, called the iron, resembles a wide flat chisel blade without the handle. It’s held firmly at an angle in the body of the tool, which can be wood or even plastic but typically is made of cast iron. The body’s flat underside, called the sole, has a throat opening through which the iron protrudes to make precisely controlled cuts in the wood, typically just a thin shaving. Bench planes come in numbered sizes that vary in length from about 6 in. (15 cm) to more than 2 ft. (61 cm); a block plane and a midsize smooth or jack plane make a versatile pair.
Types
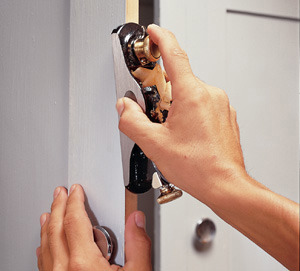
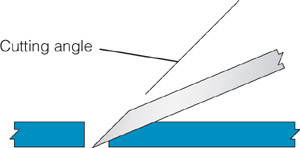
Standard block plane. Designed for one-handed use, a block plane works well for such light tasks as beveling a sharp corner or trimming a cabinet door’s edge. The iron is set at a relatively low angle (20° to 25°) with the bevel up.
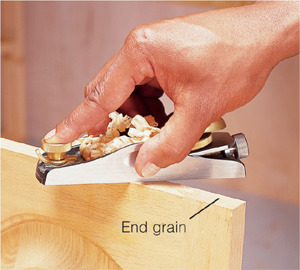
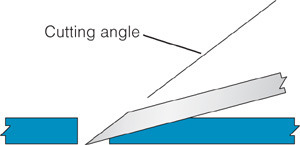
Low-angle block plane. Similar in size and shape to a standard block plane, the low-angle version has the iron bedded at about 12°. This produces a shearing cut that can cleanly trim end grain.
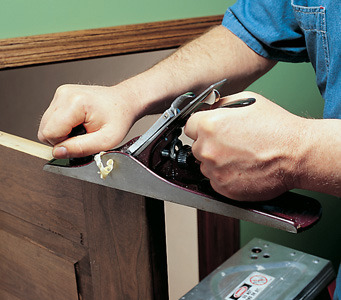
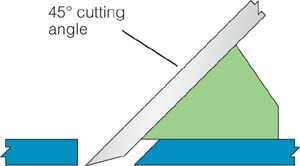
Jack plane. The jack plane is a midsize bench plane intended for general shop use, such as straightening edges or flattening the face of a board. The iron is set at 45° with the bevel down.
Adjustments
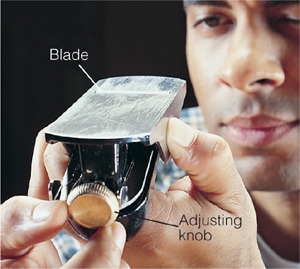
Even with a razor-sharp iron, a plane will perform well only if properly adjusted. This means having the iron set to the right depth of cut and parallel to the opening in the sole. If the sole seems warped or uneven, flatten it by backing off the iron and stroking the plane against wet/dry sandpaper taped to a thick piece of glass. Then turn the plane upside down, sight the sole and turn the adjustment knob until the iron just emerges through the throat.
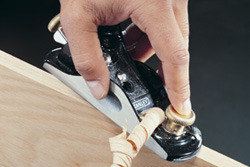
The right cut. Different woods and circumstances call for slight variations, but normally a sharp, well-tuned plane produces a thin, uniform shaving that curls up as it exits the throat.
Using a Block Plane
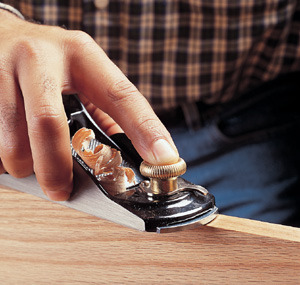
Grain direction. The cardinal rule for any hand plane, especially for a low-angle style, such as a block plane, is to work with the direction of the grain. With the plane body skewed at a slight angle to produce a shearing cut, the iron will sever the wood fibers cleanly and leave a smooth surface. Pushing against the grain will cause the iron to snag the fibers and break them off, leaving a rough surface condition called tear out.
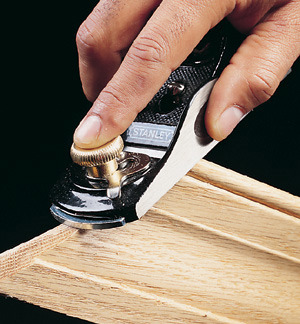
Back bevel. You can tighten up the fit of a mitered end cut by using a block plane to relieve the cut angle slightly. Plane from the short side toward the long side of the miter to avoid cutting against the grain. Applying slightly more pressure along the back side of the miter will allow the face of the joint to close tighter.
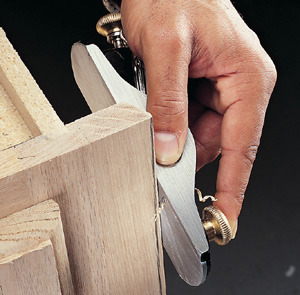
Angle plane. The length of a plane’s sole is designed to straighten board edges, but you can work around that trait when necessary. Holding the plane at a sharp angle to the board effectively shortens the body and lets it follow or create curved contours. Here, the plane is skewed to trim the edge of a cabinet face frame that’s been scribed to fit an irregular wall.
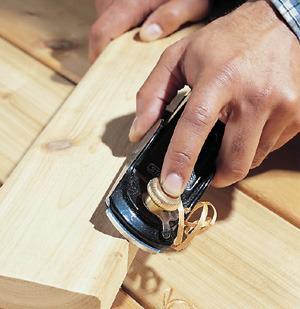
Ease edges. Jointers and table saws might leave board edges crisp looking and sharp, but a chamfered or rounded edge is much easier to the touch. Create a rounded edge easily with a block plane by making a few passes at a 45° angle to the edge for a chamfer, following up with several passes at 22.5° on either side of that bevel.
Other Planes
Although bench planes rank first in utility for general woodworking, specialty versions apply similar cutting principles in different packages. Some have shorter bodies and irons, some are designed to cut joinery or curved profiles rather than plane a smooth surface and some are all cutting blade and no body. Many were developed for now-obsolete tasks or have been supplanted by power tools, but each still fills its own niche.
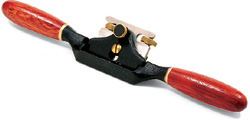
Spokeshave. As the name implies, this twin-handled tool was developed to shape wood spokes for wagon and carriage wheels. The short sole—offered in straight, convex and concave versions—and wing-shape handles allow the user to follow and shape abrupt contours.
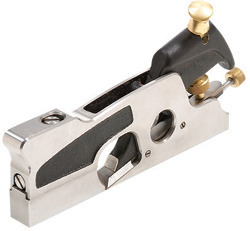
Rabbet plane. Several variations exist on this theme—some more versatile than others—but all of them will cut an L-shaped ledge, called a rabbet, on the end or edge of a board. Some will also cut grooves in the face of a board.
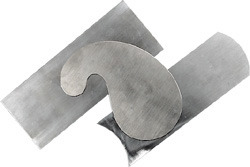
Scrapers. Scrapers—used solo or with a body to grip—feature a thin, flat blade that’s burnished on the edge to produce a small cutting burr or hook. They can produce a finer surface than most sandpapers can match and are great for smoothing wood with difficult or unruly surface grain.
Files and Rasps
Files are used primarily to sharpen or remove burrs from metal edges, but they also work on wood and plastics. They are classified by shape, cut (the arrangement of the teeth), length and sometimes coarseness. The most common shapes are flat, square, triangular, round and half-round, with either blunt or tapered ends. A file’s teeth are actually ridges cut into the faces and edges. A single-cut file has parallel diagonal ridges; a double-cut file has two sets of diagonal ridges that crisscross each other. Typically, both faces of the file feature the same cut; most files also have teeth cut on both their edges. For general shop use, files from 6 to 12 in. (15 to 30 cm) in length are common. The cut pattern grows proportionately larger with the length, so longer files typically have coarser teeth.

Single-cut file. A single-cut file produces a smooth surface and works well for sharpening steel edge tools.

Double-cut file. A double-cut file removes material more quickly and leaves a slightly rougher surface than a single-cut file.

Four-in-hand file. This is a combination tool—half double-cut file and half rasp. Typically, one side is flat and the other convex.
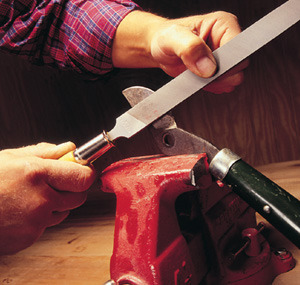
Sharpening. Files are indispensable for sharpening garden shears, mower blades, axes and other large edge tools. Use a double-cut file to dress the edge quickly, but finish with a single-cut file for sharpness.
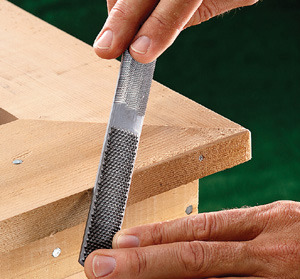
Shaping. The four-in-one is a great tool for general shop use since it is able to do coarse shaping of wood quickly and then follow up with a smoothing cut from the file end.
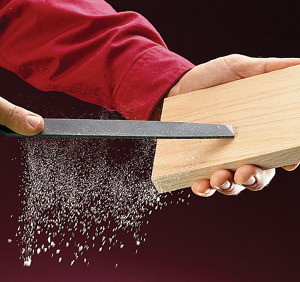
Cleaning. To clean a file, rap it on a hardwood block to dislodge loose debris. Follow up if necessary with a short-bristle wire brush called a file card.
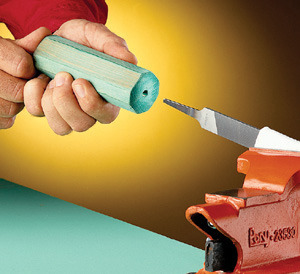
Handles. Files have sharp tangs that can easily puncture a palm. Make a simple handle by shaping a scrap wood block and drilling a hole in the end. Heat the tang; then press the handle on firmly.
Rasps

Similar to files in size, shape and purpose, rasps have individually cut teeth that are much coarser than a file’s ridges. They cut aggressively, remove material quickly and are used to shape wood, rigid foam, plastic and some nonferrous metals. Like files, they cut on the push stroke and feature two working faces. But on a rasp, one face typically is flat and the other a half-round profile. Because of the coarse surface they produce, rasps are used for rough shaping; for a smoother finish, switch to files, sandpaper or fine carving rasps called rifflers.
Rasp Planes
Shorthand for “surface-forming tool,” Stanley Tools’ Surform, or rasp plane, is a type of rasp that features rows of sharp open teeth punched into a thin steel “blade.” Unlike a conventional rasp, a Surform requires a body to support the cutting blade; small versions resemble block planes, but larger versions may have handles. Not only do the open teeth cut quickly, but they resist clogging; each “bite” of new material forces the previous one through the tooth gullet. This self-cleaning feature is especially welcome on wallboard, dense foams and other soft materials that tend to clog rasps.
Measuring Tapes
There’s hardly a home improvement or repair project that doesn’t require you to measure something. Years ago that meant brandishing a yardstick, a story pole or a folding carpenter’s rule—all useful tools but hardly convenient. Today, retractable measuring tapes put far more capacity into a pocket-size package. Choices range from 3-ft. (1-m) key-chain versions to reel-mounted 100-ft. (30-m) tapes. Stay in the neighborhood of 16- to 25-ft. (5- to 7.5-m) tapes to get the most versatility in a compact package. For features, look for a positive blade lock, a belt clip and an ergonomic case.
Basics
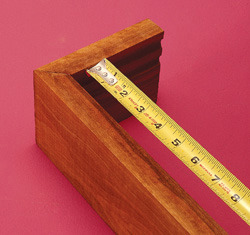
Inside-outside. The loose fit of the hook at the blade end is designed to compensate for the tip thickness, whether you’re taking an inside measurement, with the tip butted or pushed, or an outside measurement, with the tip hooked or pulled.
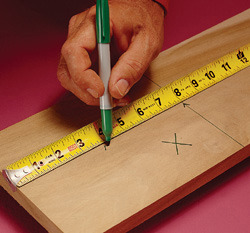
Marking. Mark accurately by tilting one edge of the blade flat against the work-piece. Indicate the exact measurement by marking it with the point of a V. An X designates the waste side of a line or sometimes where another piece will intersect.
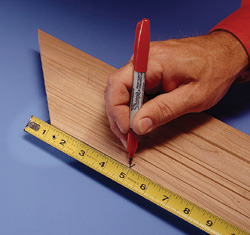
Burn an inch (or a centimeter). If there’s no reliable spot to hook the blade tip, shift the blade slightly to align the 1-in. (1-cm) mark with the starting point. Then compensate for the 1-in. (1-cm) offset when you mark.
Special Situations
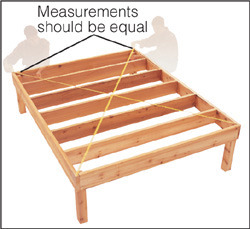
Diagonals. To see whether a square or rectangle is square, in other words, has four 90° corners, measure both diagonals. Adjust the corners until the measurements are equal.
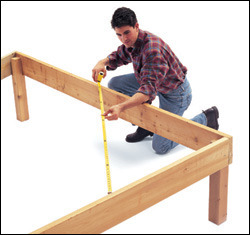
Squaring. To check for squareness in a single corner, measure and mark 3 ft. (90 cm) on one side and 4 ft. (120 cm) on the other side. The distance between the marks will be 5 ft. (150 cm) if the corner is square.
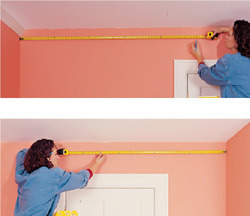
Long walls. Taking accurate inside measurements on a wall is difficult when you’re working solo. Butt the tape into the corners and take two readings, noting where they intersect. Then add the total.

Measuring Tricks

Dollar bill. Some common items, like a dollar bill, have consistent dimensions (in this case, 6-1/8 in./about 15.5 cm) you can use when a measuring tape isn’t available. Note the number of full lengths. Then fold the bill to mark the last partial segment.
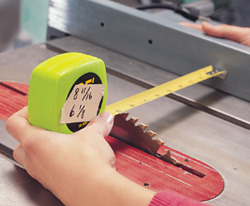
Masking tape reminder. Rather than struggle to remember multiple measurements, use masking tape as an impromptu note pad for jotting the numbers down.
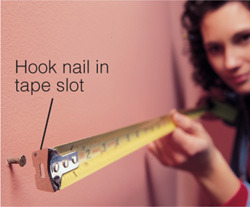
Use a nail. When you need a field reference point to measure from and don’t have anyone to hold the tape, drive a nail partway into the surface and hook the tape’s slotted tip over the nail head.
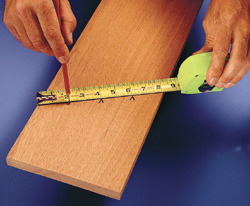
Dividing. Need to divide a distance into equal segments? Angle the blade until it reads a false distance that’s easily divisible by the number of segments you need; then mark the increments.
Marking and Scribing
Chalk Boxes
Familiar to any carpenter, a chalk box (sometimes called a chalk line) shares the simplicity common to most good tools. Inside the pear-shape case is a chamber that holds powdered chalk and a reel of string. As the string is pulled from the case, chalk clings to it until the line is stretched taut, then snapped on a surface, leaving a straight line.
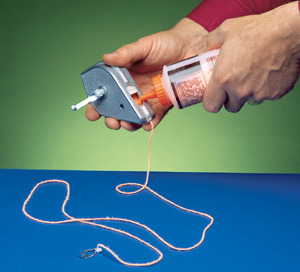
Load the box. A sliding cover or screw-on cap provides access for filling the box with chalk. Leave a few feet of string out, so when you reel it in, the chalk powder will be distributed throughout the box.
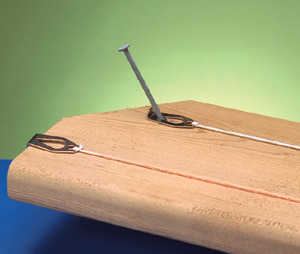
Secure the end. The metal end tab can be hooked on an edge or secured with a nail or screw. Note the different colored chalks: White, blue and red are most common, and high-visibility fluorescents help in low-light situations.
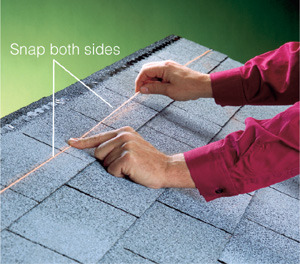
Long distance. Marking consistency can waver on long runs. To avoid problems, stretch the line tight, press down at the center point and snap the two segments separately.
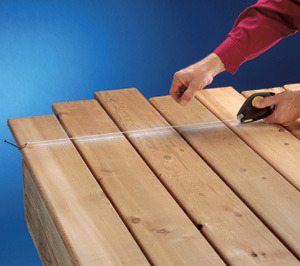
Straight cut. Deck builders save time and get clean results by letting decking boards run long during installation. Then they snap a chalk line and cut off the ends in one pass.
Scribing
Anyone who has remodeled a house knows square corners, plumb walls and flat surfaces are abstract notions that rarely exist in real life. Scribing is a technique for transferring the irregular contours of a surface onto a straight workpiece so it can be trimmed to fit exactly. Cabinet installation is a common application, but the technique can work anytime you need to create a custom fit.
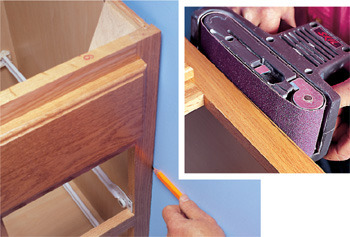
Fitting cabinets. For small gaps along cabinet edges, position and level the cabinet, then slide a pencil along the wall, so the point transfers any irregularities onto the face frame. If you don’t have much material to remove, a belt sander can offer gradual, controlled stock removal right up to the scribe line.
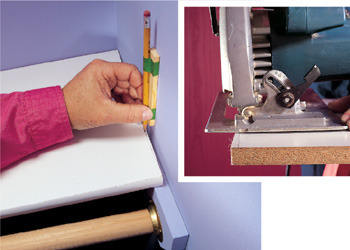
Fitting shelves. Built-up drywall compound or other irregularities can leave most inside corners out of square, requiring custom-cut shelves. With a spacer as thick as the largest gap taped to a pencil, scribe the end of the shelf. Then trim to the line using a circular saw.
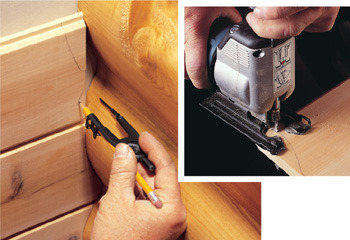
Irregular shapes. The minimum scribing offset always equals the largest gap in the surfaces, so highly irregular shapes, such as these log walls, require a compass or similar tool to transfer the contours. When there’s this much material to remove from your workpiece, cut close to the line with a jigsaw, test the fit and use sandpaper to fine-tune the final shape.
Angles and Curves
Framing Square
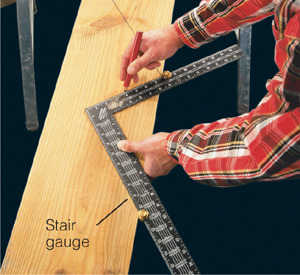
Also called a rafter square because of the rafter calculation tables embossed in its surface, this tool is useful for layout marking and for checking 90° corners. It consists of a 2- x 24-in. (5- x 61-cm) metal body, or blade, and a shorter, narrower perpendicular tongue. The clamp-on gauges shown are an accessory for marking consistent, accurate stair layouts.
Combination Square
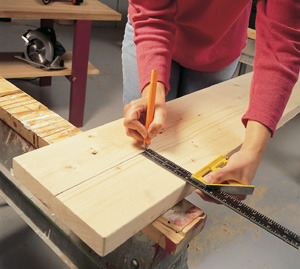
An essential general-purpose layout tool, the combination square can check 45° and 90° angles, function as a depth or marking gauge and, thanks to a bubble vial built into the body, take plumb and level readings. The most common version sports a sliding, locking blade, etched with double scales on each side.
Sliding T-bevel
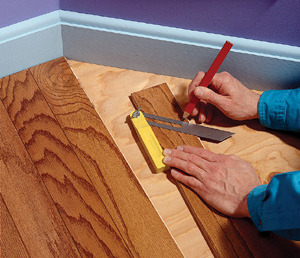
For situations that involve irregular angles, a sliding T-bevel lets you take the angle reading directly from one surface or corner and mark it on the workpiece. There is no scale on the blade to tell you the angle size, but with the direct transfer, there’s no loss of accuracy and less potential for error.
Circles and Curves
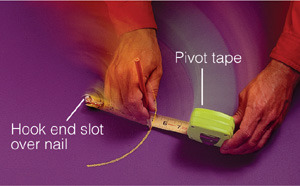
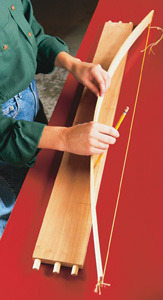
A tape measure becomes an improvised compass (see above, first image) when you hook the tip on a nail and pivot the blade in a circle. To lay out a large sweeping arc (above), tension a string on a thin slat of wood to create a bow.
Angle Squares
Prized by framing carpenters for their compact size and near indestructibility, angle squares make quick work of layout marking. Offered in pouch-size and larger versions and made of thick plastic or aluminum, they have angle scales etched into both faces for marking rafter end cuts. They’re plenty accurate, but not intended for precision work. Some versions, called protractor squares, feature a pivoting fence to lock variable angle settings at other than 90°.
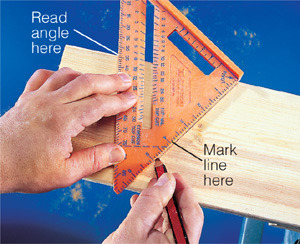
Marking angles. One side of an angle square features a double-lipped edge. By using the square corner as a pivot point, you can read the desired angle on the long edge, then mark the board.
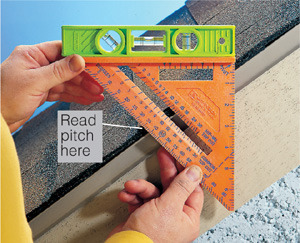
Finding roof slope. With the help of a torpedo level, an angle square can indicate a roof slope. With the pivot point on the roof edge, adjust to get a level reading. Then check the angle scale.
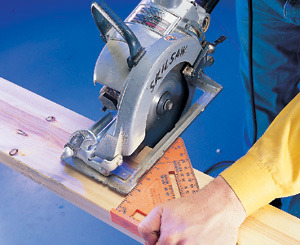
Cutting guide. With the lipped edge of the square pressed tight against the board’s edge, you can get accurate, square cuts by guiding the saw base along the body.
Level and Plumb
With the exception of mud huts and a certain Italian cathedral tower, buildings and other large structures rely on accurate engineering and layout to remain standing upright over time. No matter what the final size and shape is, that effort starts with a level foundation. Keeping other major elements level and plumb as you work is just as critical. During a project’s excavation and early rough stages, it’s tempting to settle for close enough and figure you’ll take care of the adjustments when you install the molding. This is a fool’s bargain that will make most of the project’s later work much more difficult.
It’s important to remember that level footings, square corners or plumb walls aren’t more technically difficult to build than shoddy work is; they just require a little more patience and a few more adjustments until you get them right. Even on projects that you deliberately want to miss the mark, such as a deck or patio slab that slopes away from the house for drainage, you still need accurate readings. Modern professional tools include high-tech laser transits and levels with digital readouts; but for the projects most homeowners will tackle, the tools are much simpler, more affordable and proven by decades, if not centuries, of use.
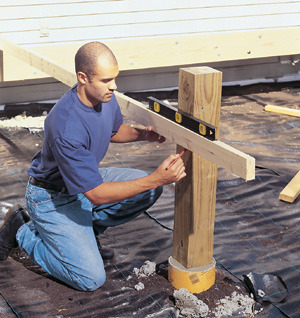
Long-distance leveling. To extend the reach of a short level, place it on the edge of a straight board. If necessary, be sure to compensate for the board width when marking. Here, that simply means marking at the bottom edge to match the height of the other end.
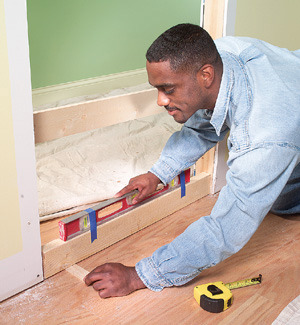
Finding the slope. For an accurate way to determine exact slope, use a long straight board as a base for a level. Shim underneath the level until you get a level vial reading. Here, the shim thickness indicates how much the end of the door threshold will have to be raised.
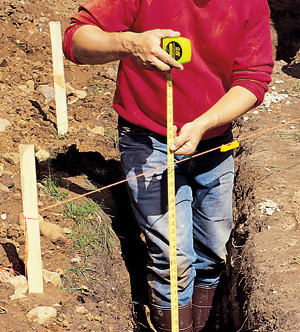
Line levels. Longer readings over uneven ground can be handled with taut string and a pocket-size line level. This is especially effective for taking coarse readings before or during excavation, but might require adjustments with more precise tools later.
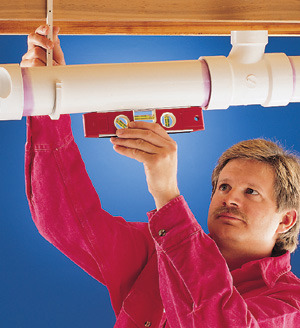
Torpedo levels. Named for their streamlined shape, torpedo levels are favored by plumbers for getting into tight spaces and checking drain pipes for proper slope. Most have a magnetic strip on one edge so they’ll stay put on metal pipes.
Leveling a Level
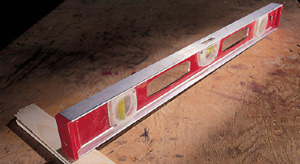
Levels with adjustable vials may need to be periodically recalibrated. Adjust one end until you get a dead-level reading. Rotate the level end for end. If the bubble stays centered, the vial setting is still good.

Which Level Is Right?
Sometimes a general-purpose tool is versatile enough to handle all your projects. A traditional 24-in. (61-cm) wood carpenter’s level would probably qualify, especially if you limit your do-it-yourself efforts to simple projects. If working on a larger scale suits you, a laser level offers the accuracy of a pinpoint beam projected for long distances. A digital-readout level indicates the angle of incline, useful for more complex structures. If you’re going to lay brick or block walls and want something simple that can get wet and take a beating, get a cast-aluminum version. Whichever you choose, set aside a few bucks for a torpedo level, too; they’re inexpensive and really handy around the house.

Wood-bodied level

Laser level
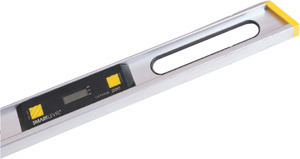
Digital level
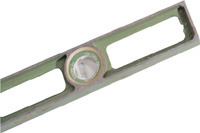
Cast-aluminum level
Transits
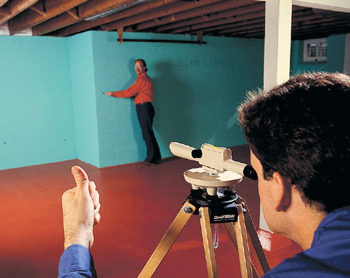
Transits are used mostly for foundation layout and other large-scale projects. Perched on a tripod, the transit body consists of an adjustable base and a rotating optical scope. A bubble vial lets you know when the scope is level. Then a helper can mark the level reference lines directly onto a surface or use a gauge rod.
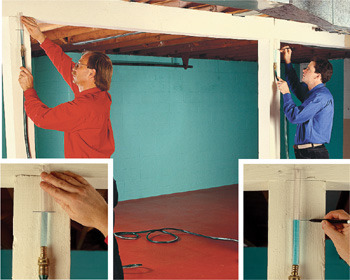
Water Levels
Simple, accurate and affordable, water levels consist of a length of clear, flexible tubing (or two short segments that attach to a garden hose). The water inside seeks its own level, reading the same height at both ends.
Laser Levels
Laser levels represent the newest technology in leveling tools and, predictably, they cost more than conventional levels. The simplest version resembles a standard level but has an internal laser diode that projects a beam that can be read at distances of 25 to about 100 ft. (8 to 30 m), depending on the model. You’ll also find self-leveling tripod-mount versions with multiple beams or a rotating head, some capable of providing accurate readings at distances as far as 200 ft. (60 m). The multiple-beam units feature perpendicular beams that make corner alignments easier and more accurate. Rotating beams spin continuously to cast a level line around a room or an excavation site. Consider renting rather than buying these tools.
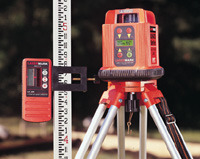
Rotating laser. Rotating lasers perch on a tripod and spin around to cast a beam. Most have an electronic sensor on the elevation rod, useful for bright daylight conditions. The sensor produces an audible signal when the beam hits the sensor.
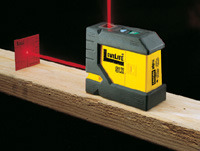
Fixed laser. Dual-beam fixed lasers make wall and floor alignment much easier. The unit shown here emits beams to indicate level and plumb.
Plumb
Establishing plumb simply means verifying that an edge or surface has a true vertical orientation, perpendicular to a level line. You can do this with a level, which typically has at least one vial positioned to read plumb, or with a plumb bob, a precisely machined weight suspended by a string.
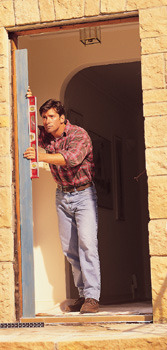
Checking a door opening. Door jambs have to be plumb and parallel to ensure a door aligns and opens properly. For a more accurate reading, extend the level’s range using a long, straight board. Never assume either door jamb is plumb without checking it.

Chalk-line plumb bob. Most chalk lines are designed with locking reels so they can double as plumb bobs. Give the chalk line a minute for gravity to stop the pendulum swing before you take your reading.
Sharpening
Sharpening techniques are often among the last workshop skills people learn, yet among the most used and appreciated once they’re mastered. Buyers often assume chisels, knives, plane irons and scissors are sharp when they come out of their packages, but those edges are typically far from precise. Mass-production manufacturing doesn’t allow for the sometimes painstaking process of producing a fine cutting edge. Fortunately, honing edge tools involves simple skills and mostly inexpensive accessories. A bench grinder removes material quickly and can ruin a blade’s ability to maintain a sharp edge, so limit it to occasional use. A couple of oil- or water-lubricated whetstones, or even fine sandpaper on a piece of glass, can quickly restore a tired or poorly prepared tool edge.

Watch Your Fingers!
Sharpening safety is mostly common sense: Don’t use dull chisels and other tools, as they require more force and are more likely to jump erratically out of a cut. Watch your fingers as you sharpen and (although it’s tempting) never run your finger lengthwise along a cutting edge to assess its sharpness. Instead, make a test cut.
Chisels
With their many uses, chisels need sharpening regularly. If the edge is maintained periodically by honing, regrinding the bevel should be an infrequent chore. When it is necessary, remove material slowly to avoid ruining the temper.
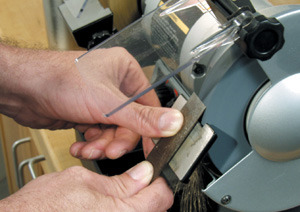
1 Adjust the tool rest of a bench grinder to the required angle (typically 25° to 30°). Slide the chisel side to side as you work. Quench the tool in water periodically.
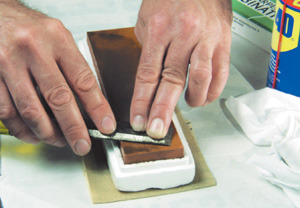
2 Use a whetstone to flatten the back of the chisel, a technique called “lapping.” This is essential for a precise cutting edge.
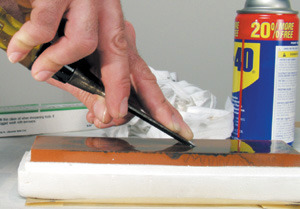
3 Turn the chisel over and use a circular motion on the stone to hone just the bevel. Keep the surface lubricated to float metal particles away.
Knives and Scissors
Knives and scissors might come from the store in better shape than a chisel or plane iron would, but they’ll eventually need resharpening. For a very dull or beat-up edge, start with a coarse whetstone and work to a finer grade.
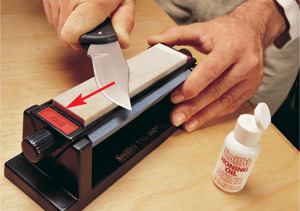
1 Adjust your grip until the knife edge’s angle seems aligned to the stone. Then lock your wrist and push forward with a firm stroke.
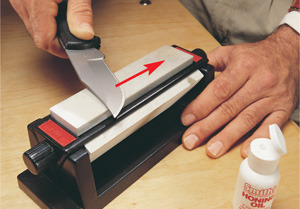
2 For the return stroke, reverse the knife blade and apply light pressure as before. Keep lubricant on the stone throughout.
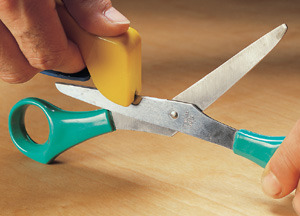
Scissors. Specialized sharpeners for scissors have a V-shape stone that simultaneously hones and straightens the edge. The offset handle keeps knuckles at a safe distance.
Block Plane
The small size and low cutting angle of a block plane demand a sharp blade. End-grain trimming, especially, requires a fine edge. Plan on a two-step process to flatten, or lap, the back of the iron and hone the bevel.
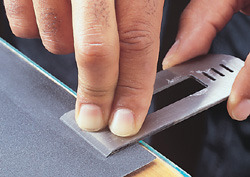
1 Starting with 220-grit silicon-carbide sandpaper applied to a thick piece of plate glass, lap the back face of the plane iron to ensure a flat surface.
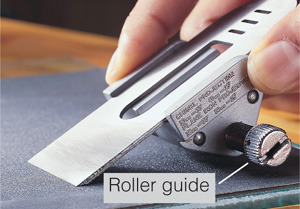
2 Use a roller guide to set the correct bevel angle. Sharpen the bevel on successively finer grits of silicon-carbide sandpaper, working up to 600 grit.

Double bevel. Some users hone a double bevel on a plane iron to strengthen the edge or change the cutting angle.
Lawn Mower Blade
A dull blade makes your mower’s engine work harder and tears the grass rather than cutting it cleanly, leaving it ragged looking and susceptible to disease. To keep the blade cutting like new, pop it off the mower shaft and follow this simple regimen:
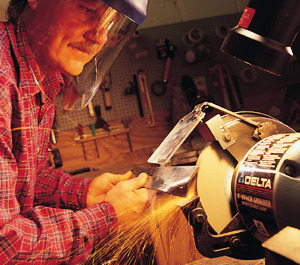
1 Use a bench grinder to clean up the cutting-edge portion and remove any large nicks. Grind off only what’s necessary to get a clean edge.
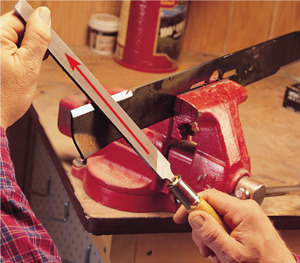
2 File the ground edge with a 10-in. (25-cm) single-cut mill file. Keep the angle consistent and use long, broad strokes away from you.
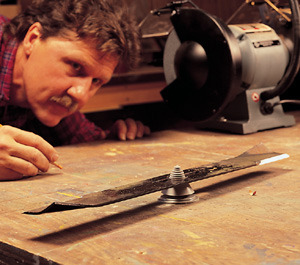
3 Balance the blade with a special plastic balancer available at hardware stores. Mark the heavy end and grind away material from the very end of the blade.
Garden Tools
Dirt is abrasive and unfriendly to tool edges, so it’s not surprising that garden tools take a beating with regular use. Most don’t require precision sharpening the way a wood chisel or knife does, so files and coarse whetstones will suffice.
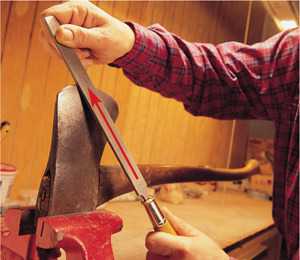
File an axe. Clamp the axe head firmly in a machinist’s vise. Use a double-cut file to shape the edge and remove any large nicks. Stroke from the back of the head toward the edge.
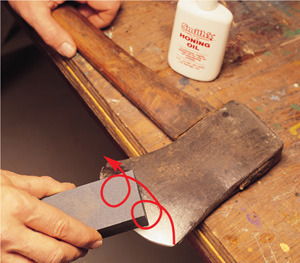
Fine-tune an axe. After the edge has been restored and reshaped, fine-tune the edge with a coarse oilstone to hone it sharp. Use a circular motion and plenty of sharpening oil.
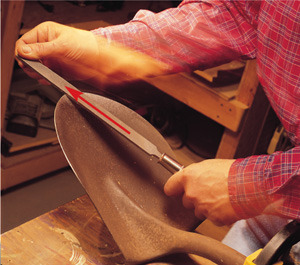
Sharpen a shovel. Even shovels and spades need reasonably sharp edges to cut through clay or packed soil and to sever small roots. File on the top face, stroking toward the tip.
Drill Bits
Whether boring in wood or metal, a dull drill bit will overheat and also cause tear out at the edge of the hole. Some specialty bits have to be sent out for professional sharpening, but simpler cutting profiles can be done at home.
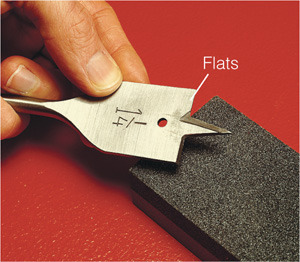
Spade bits. Use a file to reestablish all four cutting edges of a spade bit: the point and the flats on both sides. Remove the burrs by stroking the bit on a whetstone.
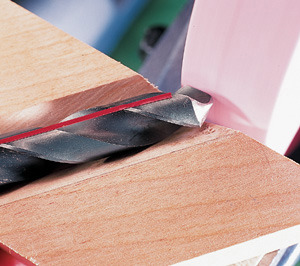
Twist bits. A simple angle jig can hold a twist bit at a precise angle for sharpening with a fine-grit wheel and bench grinder. Rotate the bit in the V-shape groove to sharpen the entire tip.
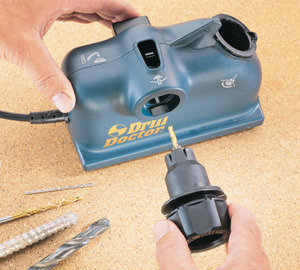
Twist-bit sharpening machines. Specialized sharpening machines offer precision control for renewing a drill bit with a two-step factory-style grind.
Sanding
Hand-sanding is a simple but important skill. The rules are few, but when you ignore them, everyone can see the glaring error. Stains and finishes look blotchy or scratched and an exceptional wood figure takes on a muddied look. Stick with the basics shown below for best results.
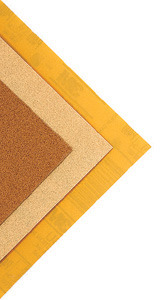
Standard papers. The two most common abrasives intended for dry use (without water or solvents) are: garnet, a reddish orange natural stone, and aluminum oxide, a manufactured compound. Garnet cuts and wears more quickly; aluminum oxide holds up better in power sanders. Common grits range from very coarse, about 36 grit, to very fine, about 320 grit.
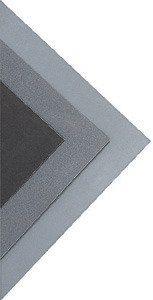
Wet-dry papers. Capable of sanding wood, metals and some plastics, wet-dry sandpapers typically feature a black silicon-carbide abrasive. The binder and paper are designed for use with water and ordinary solvents, so these abrasives can be used for wet-sanding finishes. Grits run as fine as 600 for general shop use.
The Basics
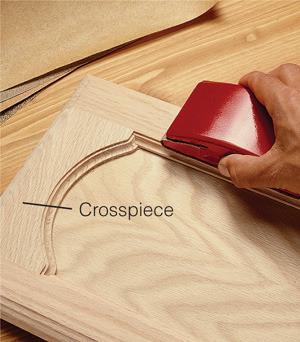
Sand with the grain. Working across wood grain leaves deep scratches, so always sand in the direction of the grain. Where two pieces intersect in a frame, as shown, sand the cross-piece first.
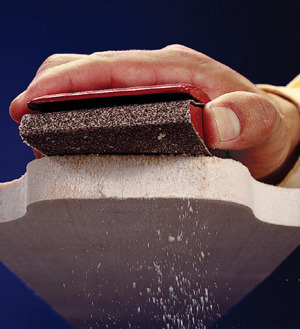
Use a sanding block. The contours of your palm or fingers will exert spot pressure on sandpaper, which can result in an uneven surface. Use a sanding block to ensure flatness.
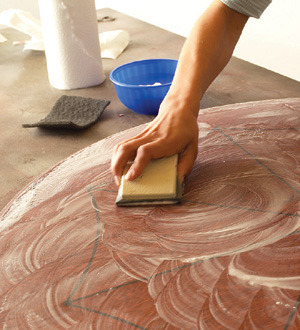
Use progressively finer papers. Making big jumps between grits is a slow and unreliable way to remove scratches from the previous grits. For best results, work in a reasonably close sequence, especially on finishes.
Special Situations
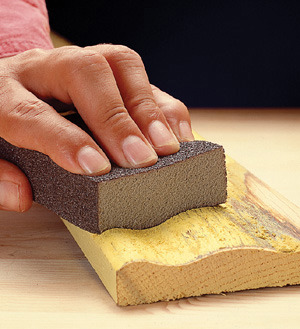
Sanding sponge. Unlike the hit-and-miss pressure of loose sandpaper in your hand, sanding sponges conform to slightly irregular shapes, ensuring uniform abrasion on an entire surface.
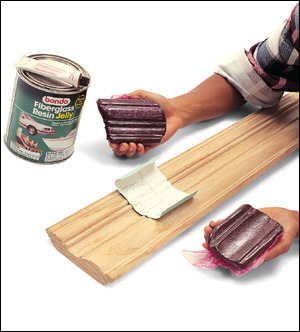
Custom sanding blocks. Automotive filler compounds can be used to create custom sanding blocks for complex shapes. Press the compound onto plastic wrap on the molding or object and let it harden.
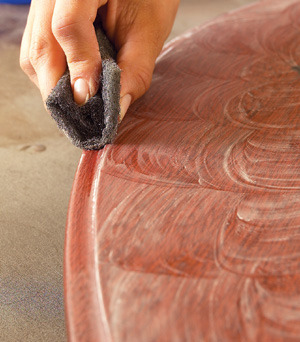
Sanding pads. Abrasive pads work well to sand burrs and dust out of layers of finish. They conform to irregular shapes and don’t leave residue, the way steel wool does.


