The Basics
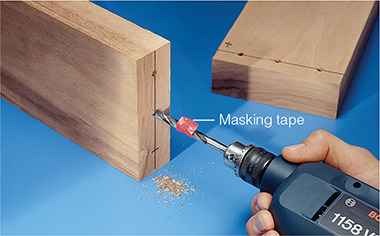
Depth guide. Many projects require a stopped hole. You can buy metal depth-stop collars for this purpose, but a piece of tape on the bit can substitute in a pinch. Check the tape’s position periodically to make sure it hasn’t shifted.
A portable electric drill is probably the power tool most homeowners buy first, for good reason. No other tool lets you tackle as many repairs or do-it-yourself projects simply by installing different low-cost accessories. Aside from drilling holes in wood, metal, masonry or plastics, a drill can spin a sanding disc or wire brush, stir paint, churn a drain-cleaning auger or drive screws for hours at a pace you could never match with a manual screwdriver.
Its anatomy is simple. The motor, drive gears and trigger switch are contained in a plastic housing or handle. On the business end is the chuck, a geared sleeve with adjustable metal jaws that close to grip the shank of a drill bit or other accessory. Drills are classified by the maximum capacity of their chucks (typically 3/8 in. for standard-duty drills, 1/2 in. for heavy-duty versions), but the motor amperage (power rating), bearing type and speed range can vary among drills of the same size.

Depth guide. Many projects require a stopped hole. You can buy metal depth-stop collars for this purpose, but a piece of tape on the bit can substitute in a pinch. Check the tape’s position periodically to make sure it hasn’t shifted.
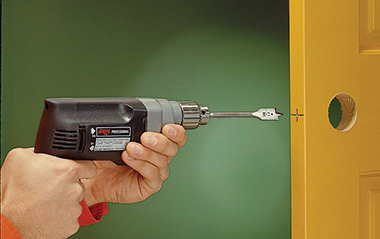
Center mark. Most drilling situations, such as boring for a lockset latch on this door edge, require precise placement of the hole. Mark and punch a center point to start the bit accurately.
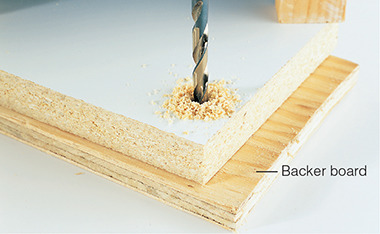
Backer board. Even if a drill bit cuts cleanly entering a workpiece, it often splinters the exit side as it pushes through, resulting in a ragged hole edge. Called blowout, this defect can be prevented by using a scrap piece as a backer board.
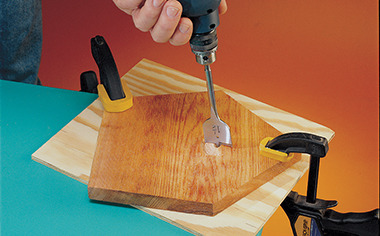
Clamp it. The drill’s rotary action can cause a workpiece to spin, especially with larger bits if the bit edge grabs the piece faster than it can drill through it. For the sake of both safety and accuracy, use clamps to secure the work.
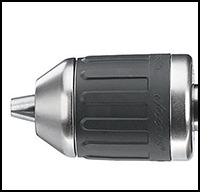
Chuck. Keyless chucks, like the one shown, feature a rubberized grip sleeve, allowing hand pressure to open or close the jaws. On traditional drills, the chuck has a toothed ring that requires a special key for opening and closing.
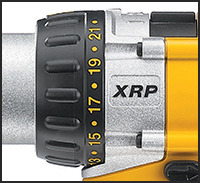
Clutch. For driving screws, it often helps to control the drill’s power so the screw doesn’t break off or strip the hole. Most cordless drills feature an adjustable clutch that disengages the drive gear when a certain level of resistance is met.
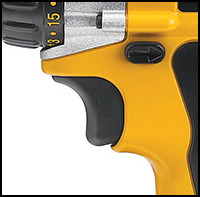
Variable speed and reverse. Dubbed VSR for short, this feature comes standard on any good, all-purpose drill. A typical speed range is 0 to 1,200 revolutions per minute (rpm); slower speeds provide greater control. The reversing feature lets you back screws out or free stuck bits.
Drilling holes in concrete, brick, plaster or stucco requires special carbide-tipped bits that can withstand these abrasive materials. Concrete is typically harder and thicker than the others, and it contains large rocks, called aggregate, that can stop a drill bit in its tracks.
Two things will improve your odds. First, a hammer drill (first photo, below) combines the rotary motion of a standard drill with a hammering action, so it pounds away at stubborn rocks until they break apart. This type of hammering can destroy common masonry bits, however, so special hardened percussion bits are usually paired with this type of drill. If the concrete is still uncured or “green,” or you are drilling in a softer masonry material, a standard drill and masonry bit (second photo, below) will often suffice.
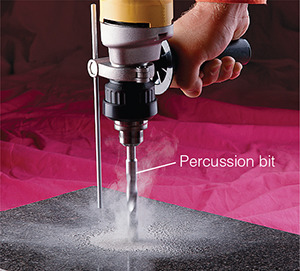
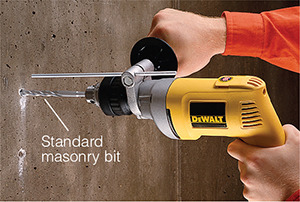
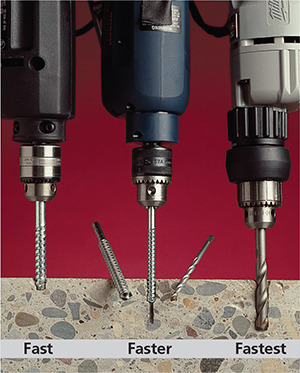
Drills, bits and speed. You can take three basic approaches when drilling concrete: patience, brute force or strategy. This sample drilling test demonstrates the difference.
On the left is the patient approach: a masonry bit chucked into a standard drill. It makes for slow going, but you don’t have to spend money on specialized tools.
On the right is the brute-force option: an industrial-duty hammer drill fitted with a percussion bit. You’ll work faster, but both the drill and the special bits cost more.
In the center is the strategic approach. A standard drill is fitted first with a small masonry bit. After drilling that hole, you switch to an intermediate-size bit, and then repeat with the large bit. This approach is reasonably quick, easier on your drill motor and requires only inexpensive masonry bits.
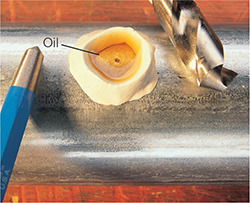
Lubrication reduces the friction and heat that can prematurely dull a drill bit or ruin the temper of its cutting edge. Here, a steel pipe was dimpled with a center punch; then glazing putty was used to create a small oil reservoir.
Ceramic tile, another tough material, should be immersed in water for cooling and lubrication. Large holes require carbide-grit hole saws, like the one shown.
Caution: Use a cordless drill to avoid a dangerous electrical shock.
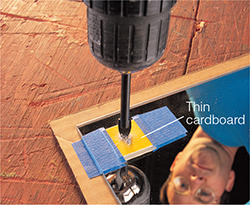
Drill bits tend to skate on this smooth, brittle surface. Use a spear-point carbide bit, and start in a piece of dense cardboard taped to the glass. After you dimple the glass, remove the cardboard to finish drilling.
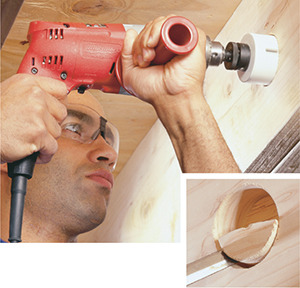
If you don’t have large specialty bits, drilling deep holes may require a few steps. A hole saw will cut the outline of the plug, which can be removed with a chisel. Then the hole can be deepened by drilling and chiseling again.
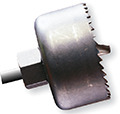
Even ordinary do-it-yourself projects can exceed the limits of some tools. That 10-piece twist drill set you have might be fine for hanging pictures or installing cabinet hardware, but how about routing drain pipe through a stud or drilling for a lockset in a new door? That’s when you need large specialty bits, such as a Forstner or a multi-spur bit; hole saws also fit these applications and can cut metal and plastics.
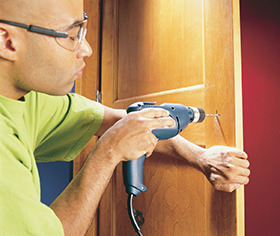
1 To install a new lockset, use the lock template to mark the center of the lock body; then drill a small hole through the door. For best results, mark both sides and drill from each, meeting in the center.
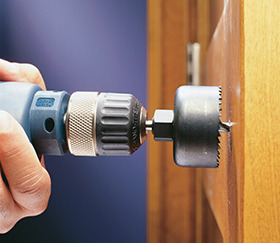
2 Use a hole saw (2-1/8 in. is the standard size for locksets) with a pilot bit to continue. Drive the saw slowly until the cutting rim starts to touch evenly on the door’s surface.
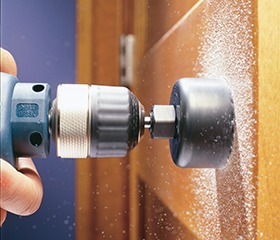
3 Increase the drill speed and apply moderate pressure to keep the saw cutting. Back out periodically to clear the sawdust and give the cutting teeth a chance to cool.
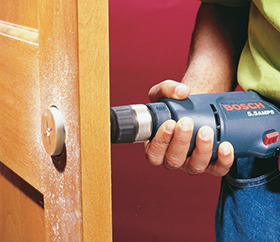
4 After cutting halfway into the first face of the door, switch to the other side and finish drilling from there. The plug will break free and come out with the hole saw.
The renowned versatility of the portable drill doesn’t come from the drill itself but from the dozens of accessories you can use with it. Some allow you to drill deep or curved holes, some create customized pockets where fastener heads can nest while others let you drive specialized fasteners. You could fill an entire toolbox if you had them all, but here are four of the most popular ones.
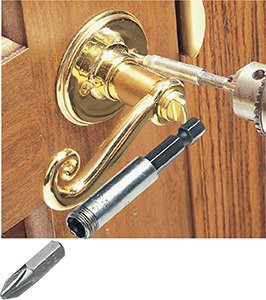
Magnetic bit holder. These simple tools feature a hex shank that fits into the chuck and a magnetized hex pocket that accepts driver bits. Steel screws stay put without help.
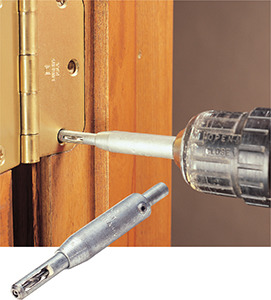
Self-centering bit. The spring-loaded nosepiece on this bit centers itself in hinge and other hardware holes, then retracts as you plunge the drill bit in for the pilot hole.
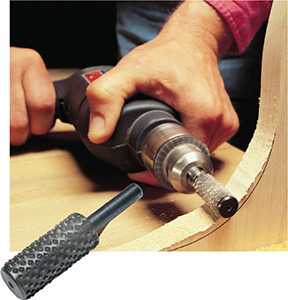
Rotary rasp. For efficient but controlled removal of wood along curved contours, a rotary rasp lets you rough out the shape quickly. Files or sandpaper finish the job.
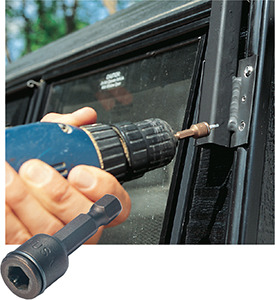
Hex driver bit. Many sheet-metal screws—especially appliance fasteners—feature hexagonal heads. Hex driver bits come in several sizes for these screws.
To use a portable drill, you bring the tool to the workpiece. For some projects, like furniture or toys, it’s faster or more accurate to bring the workpiece to the tool. For these situations, a drill press offers a lot of advantages.
A drill press is a stationary machine, typically either a full-height floor model or a shorter bench-top version. Power comes from an induction motor mounted to the rear of the head; this type of motor is designed to run quietly and continuously, unlike the noisier universal motors found on portable power tools.

Floor
Drill presses are classified by their throat size, which is the distance from the support column to the drill center; you double this dimension to get the model rating. Drill presses feature adjustable tables that raise, lower, and sometimes tilt to support a workpiece. Some versions also have a rack-and-pinion system that adjusts the table position via a hand crank. Typical chuck capacity is 1/2 in., though industrial versions are larger.
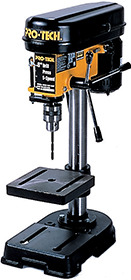
Benchtop
Aside from convenience, drill presses provide greater accuracy because the standard table position ensures a 90° drilling angle. They also offer greater safety with large-diameter bits and much faster operation for repetitive drilling. You can set a depth stop to limit the drill’s travel and use jigs to position workpieces accurately.
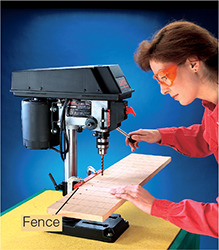
Fence. A fence helps position stock for consistent, accurate drilling. When fitted with adjustable stops, a fence can index both the edge and the ends of the workpiece so you won’t have to mark each hole location—a time-saving feature for creating identical pieces.
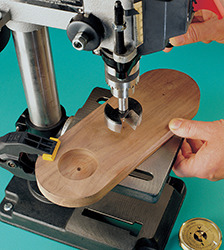
Flat-bottom holes. The accurate 90° table alignment and the adjustable depth stop make it easier to drill flat-bottom holes with large Forstner or multispur bits. When using these large-diameter bits, always clamp the workpiece firmly to the table to prevent it from spinning.
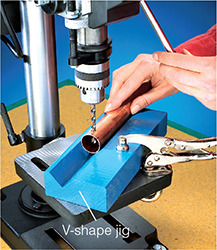
Dowel and pipe jigs. Pipe and other round stock tends to roll or shift when the drill bit first contacts the curved surface. Centering and clamping a simple V-shape jig to the table provides a stable base that helps restrain the workpiece to keep the bit drilling on center.
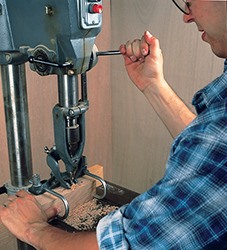
Mortising attachment. Though not as efficient or heavy-duty as a dedicated hollow-chisel mortiser, a drill press fitted with a mortising bit and attachment can cut square mortises in wood. The drill bit turns inside a square four-edged chisel, which is forced into the cut by spindle pressure.
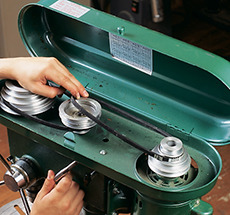
Speed. Unlike a variable-speed portable drill, most drill presses have a single-speed motor. At the drill head, the machine will feature either a step-pulley-and-belt drive or a variable-speed dial to adjust the rpm. The slowest speeds (about 300 to 400 rpm) are safest for large bits.
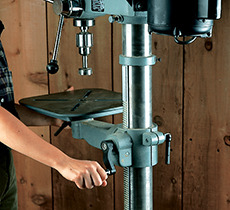
Height. Many older drill presses require you to adjust the table height by loosening the clamp on the column and moving the table manually. Newer versions typically feature a rack-and-pinion system that you adjust using a hand crank.
Jigsaws rank among the most versatile, user-friendly power tools you can own. This tool, which cuts by the up-and-down reciprocating stroke action of a thin steel blade, can rip and crosscut wood, but it’s especially useful for cutting curves. Many saws have an orbital action feature that speeds the cutting rate. A variety of blades lets you choose the tooth size and type for different situations and materials, such as rough cuts in framing lumber, notches in ceramic tile or intricate shapes in metal.
Though the slight blade drift that’s normal with jigsaws doesn’t always yield the crisp, square edges a circular saw blade would provide, a jigsaw will deliver accurate cuts without the risk of dangerous kickback or other surprises to intimidate the user. For stopped cuts or controlled contours, the jigsaw excels.
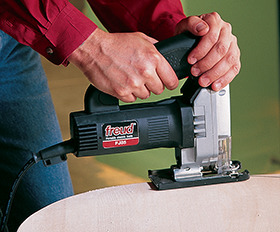
Curves. No other portable power saw offers the same control in cutting curves. The top-handle version shown is the most popular type, but many manufacturers offer barrel-grip models and even in-line jigsaws.
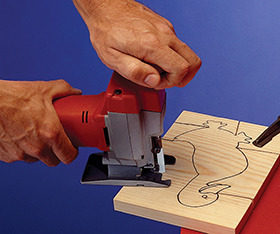
Relief cuts. For tight curves, make a series of relief cuts in the workpiece’s waste portions. Cut from the board edges to the outline so scrap sections will fall away as the pattern is cut. This helps prevent blade binding.
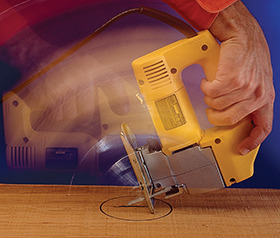
Plunge cuts. If you can’t drill a pilot hole for the blade, you can often make a plunge cut in thin materials by resting the tool on the front edge of its baseplate, or shoe, then slowly and carefully tilt the saw back as the blade cuts its way into the surface.
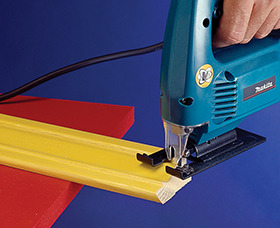
Coping. Narrow, fine-tooth blades can cut tight contours for coped molding joints. Clamp the stock to a bench or sawhorse and make relief cuts in the miter face, if necessary.
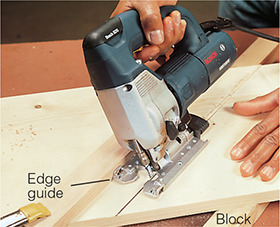
Bevel cuts. Most jigsaws feature a tilting base that lets you adjust the bevel angle all the way to 45°. Clamp an edge guide in place and block the workpiece up off the bench to allow clearance underneath for the blade.
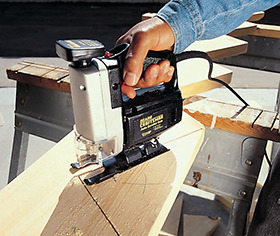
Finish cuts. Where perpendicular cuts meet, as on this staircase stringer, a circular saw can’t make a stopped cut at the corner. For these situations, finish the cut with a jigsaw to avoid overcutting the material.
Jigsaws are ideal for woodworking projects but, with special blades installed, they can easily cut other materials as well.
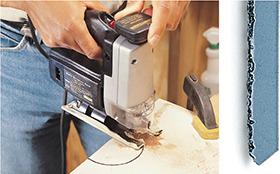
Tile. Blades edged with carbide grit are used to cut this hard, abrasive material. Cut slowly to avoid blade breakage and overheating.
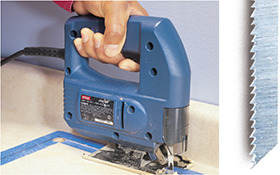
Laminate. Laminate blades have teeth that cut on the down stroke. This orientation helps prevent chipping of brittle plastic surfaces.
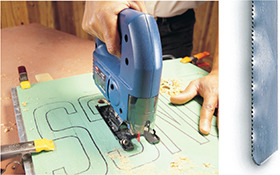
Metal. Metal-cutting jigsaw blades resemble hacksaw blades, with fine teeth and a slightly wavy edge that helps prevent binding.
With an adjustable-angle turntable base and a saw head that pivots down or slides forward to make the cut, miter saws specialize in precise cuts for molding, picture frames, other trim stock, framing lumber, decking and even fence posts.
The locking turntable offers precise repeatability for angled cuts from square (90°) to a steep miter (at least 45°, sometimes as much as 60°).
Most saws have positive stops, called detents, at 0°, 15°, 22.5°, 30° (or 31.6° for crown molding) and 45°. Most models also have a locking override feature to bypass the detents and cut at intermediate angles. Blade diameters of 10 or 12 in. offer the most versatility and capacity at a reasonable cost.
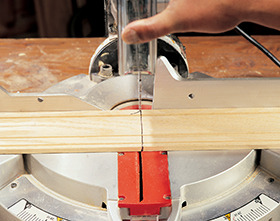
Align the cut. Lift the blade guard and sight down the edge of your blade to align the cut—allowing for the blade thickness—on the waste side of the line.
Caution: Your fingers should be off the trigger switch as you do this.
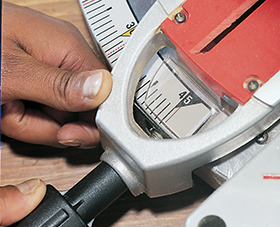
Fine-tune. Angle settings required for trim carpentry often vary from a perfect 45° or 90°. If the detent stop isn’t at the exact angle you need, loosen the locking knob and shift the turntable slightly. Then lock the knob to hold the setting.
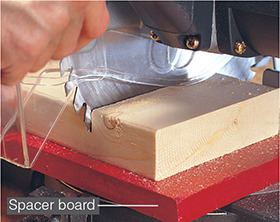
Increase cutting depth. To cheat the cutting limitations of a miter saw, set a flat spacer board on the turntable. This raises the workpiece toward the center portion of the blade, closer to its full cutting diameter.
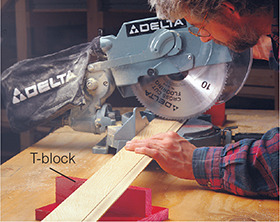
Support. Portability requirements keep miter saw bases compact, so long stock tends to dangle loosely and then drop harshly when the cut is made, compromising accuracy. For support, fashion a simple T-block to match the base height and support the stock end.
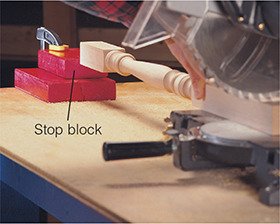
Repetitive cuts. Even with its narrow base, a miter saw can handle precise repetitive cuts on longer stock. Set up the saw on a flat, stable surface and clamp a stop block firmly in place to establish a consistent cutting length.
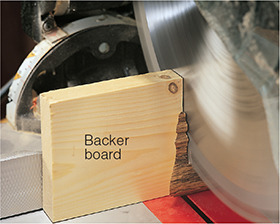
Small pieces. Small cutoffs tend to slip past the saw fence and will often get launched through the air like a missile. Prevent this by using a sacrificial backer board behind the workpiece. Properly supported, the cutoff will typically drop harmlessly.

Blade sizes—from 8 in. to 15 in. dia.—are only one factor to consider. Miter saws also come in three styles:
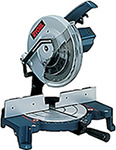
Standard miter saw. The least expensive type, these pivot-style saws have a nontilting head to cut simple miters up to 45°.
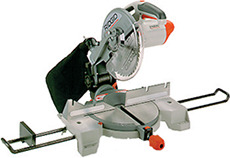
Compound miter saw. These pivot-style saws have a tilting head for angled or bevel cuts. With the turntable also adjusted to an angle, they will cut compound miters.
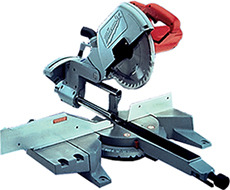
Sliding miter saw. The sliding-carriage feature on these tilting-head miter saws allows them to cut wider stock than a standard saw.
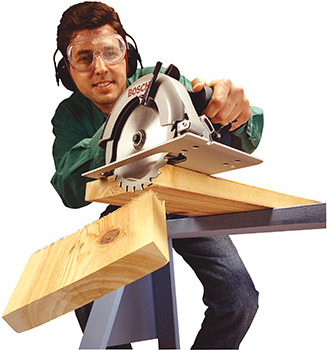
For the better part of a century, the portable circular saw has been the primary job-site tool for most carpenters. Properly adjusted and fitted with the right blade, this is a compact, lightweight machine that can do anything from rough framing work to cutting up plywood sheets. When fitted with specialized blades, a circular saw can cut materials ranging from sheet metal to concrete. For most do-it-yourself use, though, woodworking is its number-one role.
Start shopping for a circular saw and you’ll quickly find common standards amidst a few significant design differences. Most models for the North American market have a round 5/8-in. arbor shaft that accepts a 7-1/4-in.-dia. blade, and will run on standard household current.
Pricier models have quality differences you don’t necessarily see—better bearings, heavier motor windings and a heavy-duty trigger switch—and benchmark features, including a 15-amp motor rating, precision-machined aluminum baseplate, smooth blade-depth adjustment, and a magnesium housing for light weight. The most common configuration, sometimes called a sidewinder, fits the motor on one side of the tool and mounts the blade directly to an in-line arbor on the other side. (The blade can be on the left or right side.)
On commercial job sites, you’re more likely to see worm-drive circular saws. These long-bodied tools feature oil-bath gears, transverse arbors and heavy-duty motors to give them plenty of cutting power. Most worm-drive circular saws have rear-mounted handles for better ergonomics. The increased cost and added weight—typically about 40-percent higher than a sidewinder in each cost and weight category—make this type primarily a professional’s tool. Whatever the type you choose, always wear hearing and eye protection when using the saw.
Caution: Always unplug saw when making adjustments.
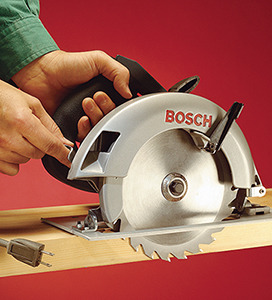
Set depth. The saw’s base, or shoe, has a front mount that pivots to adjust the blade’s cutting depth. For most situations, set the blade depth so the teeth fully clear the underside of the workpiece. Unplug saw before making adjustments.
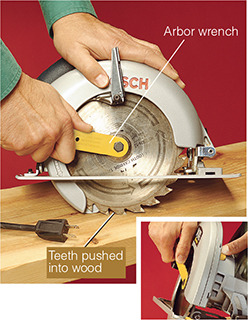
Change blades. On older saws, removing the arbor nut requires pushing the blade into a soft board to prevent rotation. On newer versions (see inset photo), you press an arbor lock button.
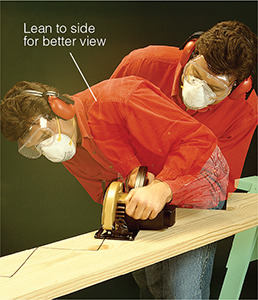
Straight cut. When cutting freehand along a layout line, try sighting the cut from the side of the blade, not from behind. You’ll be able to make slight corrections as you proceed, resulting in a straighter cut.
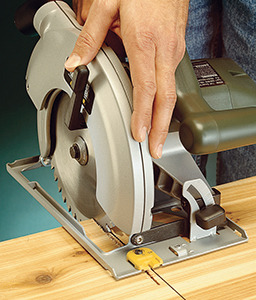
Mistakes. If your cut goes off the line, stop the saw, lift the saw out of the cut and start over. You can’t twist a circular saw back into line the way you can a jigsaw.
Just because you’re working with portable tools doesn’t mean you can’t get top-notch results. Using the correct blade, keeping it sharp and oriented correctly toward your material, and using guides or accessories when appropriate can mean the difference between craftsmanship and chaos. If a procedure seems unsafe, find an alternate tool or technique.
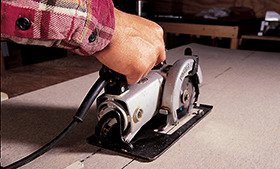
Good-side down. To avoid a splintered edge on finish surfaces, place the material good-side down; any tear-out will occur on the side facing you.
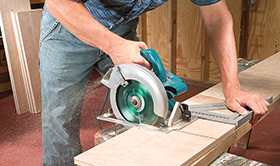
Guided. For precise straight or square cuts, use edge guides rather than relying on freehand skill.
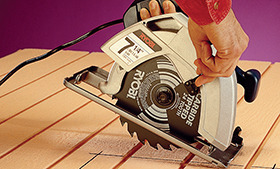
Plunge cuts. Tilt the saw onto its nose, then retract the blade guard and lower the spinning blade slowly as you push the saw forward.
Caution: Saw can kick back toward you.
Wide grooves, called dadoes, or notches can be cut efficiently with multiple passes of a single blade. Set the blade to the depth required and make a test cut to check the depth before proceeding with the cut.
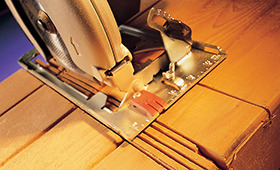
1 After making the two guided outermost cuts to define the dado width, make closely spaced freehand cuts inside the area.
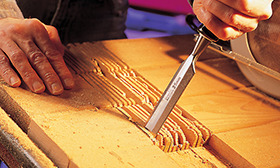
2 Use a sharp wood chisel to break the waste material out of the dado and then to pare the bottom surface flat.

Get all the power and fancy accessories you want, but the wrong blade for the job will negate those features by overburdening the saw’s motor, leaving a poorly cut edge or even ruining both the blade and material. Whatever you’re cutting, there’s a blade designed with just that application in mind, so resist the temptation to make do with the blade that happens to be mounted on the saw. Blade changes take only a few minutes.
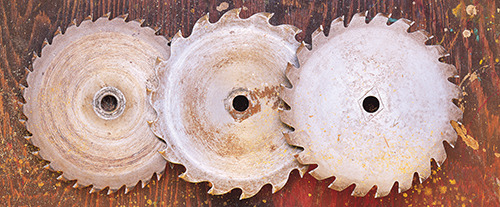
Finish blade. (left) Blades with more teeth leave a smoother finish cut on plywood, paneling and other sheet goods.
Framing blade. (center) With fewer, more sharply angled teeth, a framing blade leaves a rougher edge but cuts quickly.
Combination blade. (right) Designed for general-purpose use, combination blades offer a compromise for making rip and cross-grain cuts.
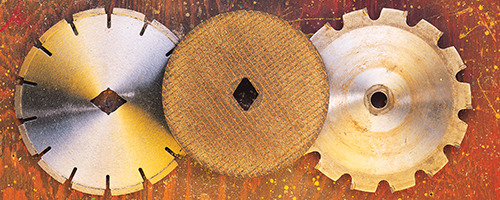
Diamond blade. (left) Studded on its edge with small diamond spurs, this blade will cut concrete, stone and ceramic tiles.
Abrasive blade. (center) Abrasive blades—in versions for masonry or metal—cut by grinding away the material.
Remodeling blade. (right) This carbide-tipped blade is for demolition work and cutting nail-embedded wood.
Guided by a straightedge, a circular saw can make cuts nearly as precisely as most tablesaws, but it can’t do it as expeditiously. There’s a whole routine involved: You have to mark the cutline, allow for the saw-base edge’s offset from the blade, position the straightedge accurately and clamp it down. Even then, it often takes a couple of test cuts before you have the guide precisely where you need it. This simple shop jig fixes that problem by letting you align the jig right on the cutline, with no need to calculate an offset dimension.
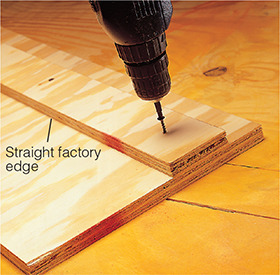
1 Start with a 3-in. (8-cm)-wide piece of 3/4-in. plywood with one factory edge. Fasten it to a 12-in. (30-cm)-wide plywood base as shown. The narrow offset on the outboard edge provides a clamping ledge.
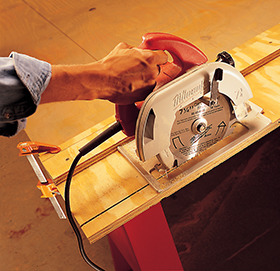
2 Clamp the jig to a stable surface; then trim the excess material from the base’s wide part. Allow enough overhang so that you cut only the jig base and not the support surface underneath.
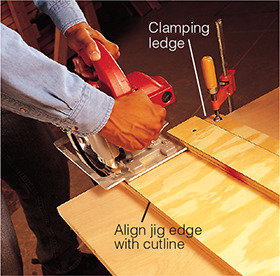
3 To use the jig, align the cut edge of the base with the layout marks on your workpiece. Adjust the cutting depth so the blade makes it completely through. Note: The clamping ledge provides clearance for the saw motor.
This jig also controls the saw’s position and cutting path but is suited best for square-cutting the ends of boards. The base is made of two layers of 3/4-in. plywood, glued and screwed together and then cut to finish size (12 in. / 30 cm or wider). Next, fasten a pair of sides (1x4 poplar is a good choice here) to the long edges of the plywood base. Cut another pair of hardwood strips for the runners, and rout or cut a rabbeted or grooved ledge along one edge. Fasten the first runner to the jig, perpendicular to the sides, as shown. Then set your saw base in the rabbet to align and attach the second runner.
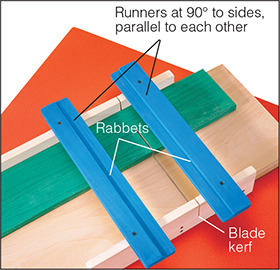
1 Careful assembly is critical to building an accurate crosscut jig. Make sure the sides are parallel and at the same height, and that the runners are exactly perpendicular to the sides and parallel to each other with rabbeted edges to the inside.
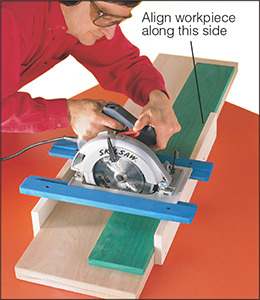
2 To use the jig, adjust the blade depth for a shallow cut in the plywood base. Then align the workpiece against the back side.

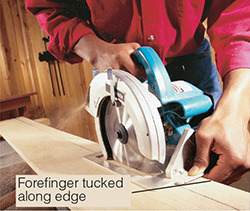
You can get surprisingly accurate results with narrow cuts by using your hand as a guide. Mark the cutline, pinch the saw base with your fingers and let your forefinger glide along the board’s edge. Use extreme caution.
Most power tools help you build things. Think of a reciprocating saw as a tool designed to help you unbuild things. Named for its blade’s back-and-forth cutting action, a reciprocating saw excels at demolition work. It accepts blades from 2-1/2 to 12 in. long with varying tooth configurations to cut wood, plaster, metal, nails and other materials. The longer blade sizes allow you to cut deep into walls, sometimes through them, at a much faster rate and with better access than using other tools.
“Recip” saws, once used primarily by remodeling contractors and tradespeople, are now a worthwhile investment for homeowners involved in large-scale projects. Base models have 10- to 12-amp motors and straight-line cutting action. Better versions feature 15-amp motors, variable-speed control and orbital-cutting action. If purchasing a reciprocating saw doesn’t make sense, don’t worry; they’re widely available at rental centers.
Caution: Always brace yourself well when using this saw; if the blade tip hits a solid surface, it can push the saw and you backward with a violent jolt.
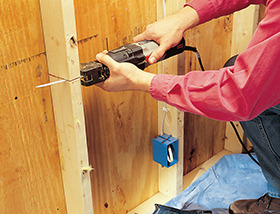
Demolition. The in-line model shown here can sometimes get in tighter spaces than most rear-handle reciprocating saws—a useful feature when cutting away framing.
Caution: Use care around wiring!

Rough cuts. Reciprocating saws are ideal for jobs where speed is more important than beauty. Here, the blade self-guides along the window framing to cut the plywood flush.
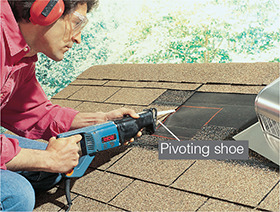
Plunge cuts. For plunge cuts, start the blade at a very low angle and at a relatively slow speed. As it enters the material, increase the cutting speed and tilt the saw blade down until the pivoting shoe rests flat.

Metal. Cutting away steel pipe or conduit with a reciprocating saw is quicker than trying to dismantle old fittings.
Caution: Always shut off the water or electrical circuit beforehand.
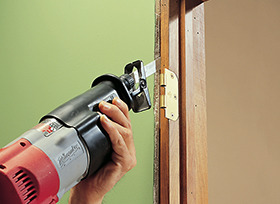
Nails. Nail-embedded wood is an unavoidable hazard of remodeling. The hardened teeth and rapid cutting action of the saw’s thin blade make it well-suited for this task.
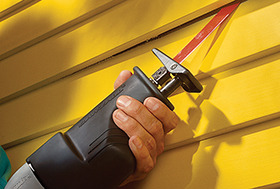
Reverse blade. For cuts where clearance is especially tight, such as replacing damaged siding, reverse the blade to get the body of the saw closer to the surface.

Variable-speed and orbital action are two features that offer better control and more efficient cutting. For that reason, you’ll find them on most professional-quality reciprocating saws, but convenience features are now showing up just as often on consumer models. Battery power and tool-free blade changes rank at the top. An adjustable, articulating head comes in handy in awkward situations, too.
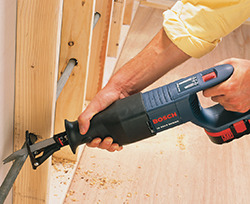
Cordless. Used on the roof, around the backyard and other places where running extension cords can be a hassle, reciprocating saws are ideal candidates for cordless design. Most are 18- or 24-volt models.
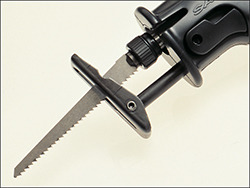
Wrenchless. Early generations of reciprocating saws had you fumbling with a hex key wrench to change the blades. Now most models have spring-loaded blade clamps that require no tools.
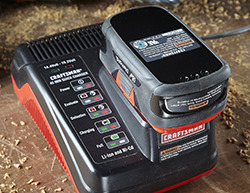
Lithium-ion batteries beat older battery technology in almost every way. They’re small and lightweight, they run at top power longer, they’re good for two to three times more charge cycles and they can sit for months without losing a charge.
The voltage rating on a cordless tool is like the horsepower rating of your vehicle; it’s a measure of raw power. The amp-hour rating on the battery (Ah) is like the capacity of your gas tank, indicating how long you can go before running out of power. The batteries shown here, for example, are the same voltage and work with the same tools. But the larger one (3-Ah) holds about twice as much power as the smaller one (1.5-Ah).
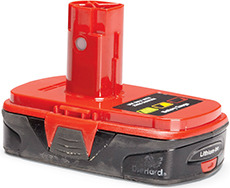
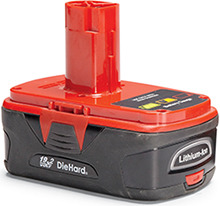
You may be drawn to a drill, but think about future tools before you choose. If the batteries and charger from your first tool can power other tools, you can buy “bare” tools in the future and save a lot of money. Most manufacturers offer a wide variety of tools that accommodate the same battery type. Eighteen-volt tools in particular have a broad range of options.
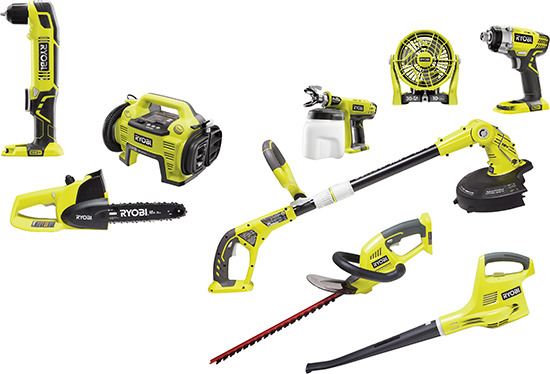
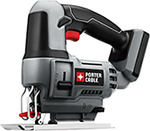
Several manufacturers offer bare tools (the tool only), at low prices. So if you already have a battery, you can save big.
1. Don’t discharge it completely
Running a lithium-ion battery until it’s fully discharged can lead to an early death. Try not to discharge it lower than 20 percent before recharging it.
2. Charge it frequently
You might have heard that it’s best to charge batteries only when they need it. Not true. Frequent charging is good for batteries.
3. Charge it at the right temperature
Charging at extreme temperatures (below 32 degrees F and above 105 degrees F) can result in a permanent loss of run-time. Keep your charger indoors or in the shade.
4. Store it right
Store batteries in a cool place, like your basement or refrigerator, at about 40 percent charge. This partial charge keeps the protection circuit operating during storage.
5. Buy fresh batteries
Lithium-ion batteries start to slowly degrade right after they’re manufactured, so check the date code on the battery or packaging to make sure it’s fresh (and hasn’t been sitting on a shelf for a year).
6. Use batteries frequently
The battery will degrade more rapidly if it’s not used at least every couple of months.
Bandsaws derive their name from the type of blade they drive—a thin steel band with cutting teeth along one edge. The blade, which is tensioned between an upper idler wheel and a lower drive wheel, passes through guides and a table where the workpiece is cut. Bandsaws are quieter and safer to use than many saws; with their downward cutting force, there’s no kickback.
These machines are classified by their throat sizes—the distance from the frame to the blade—which is roughly equivalent to the wheel diameter. Home-shop versions are typically 10- to 14-in. models. The flexible thin blade allows a bandsaw to make curved cuts that aren’t possible with a tablesaw, circular saw or radial-arm saw. Bandsaws will make straight cuts, but at a slow pace and can be used for cutting joinery.
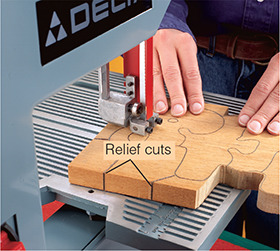
Relief cuts. To keep the blade from binding in tight curves, make a series of relief cuts beforehand. Cut from the board edges to the outline so the scrap sections will fall away as the pattern is cut.
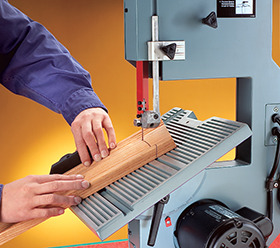
Angle cuts. Normally set for a square or perpendicular cut, a bandsaw table can tilt as much as 45° to make an angled cut. You can cut freehand or use a fence or miter gauge as a guide.
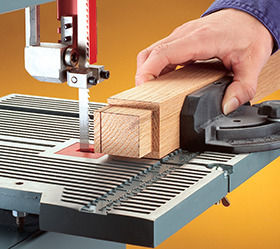
Miter gauge. Although it’s usually safe to make freehand cuts on a bandsaw, using a miter gauge offers more precision for joinery. Many bandsaws also come with a fence for making rip cuts.
Besides cutting curves, bandsaws excel at other tasks, and resawing is one of them. With this technique, the blade enters the board’s edge rather than its face, allowing you to make the board thinner or to cut multiple layers or veneers from a single board. The upper blade guides can be adjusted to create clearance for wide boards. Most home-shop bandsaws can resaw stock up to 4 in. (10 cm) and sometimes 6 in. (15 cm) wide; professional-duty models typically have the extra horsepower required to cut materials at least 12 in. (30 cm) wide.
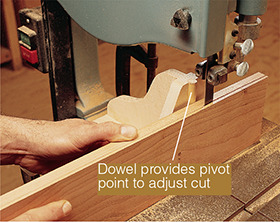
Resaw jig. Accurate resawing requires precise alignment of the board’s vertical face but a flexible feed angle to compensate for normal blade drift. This shop-built jig allows both.
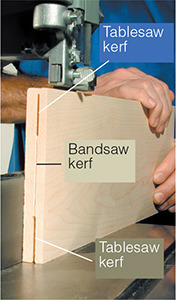
Combination cut. If wide resawing cuts tax your bandsaw’s motor, use a tablesaw to make partial cuts in both edges first. This requires more machining, or surface planing, afterward, resulting in slightly more material being lost to the blade kerf.
A scrollsaw is a tool specializing in one task—cutting intricate designs and curves. The blades are very narrow, about 1/16 in. (1.5 mm), so they can make sharp turns without binding. The saw’s wide throat allows the workpiece to be constantly repositioned as needed. Although used primarily for woodworking, scrollsaws can also cut leather, plastics and nonferrous metals.
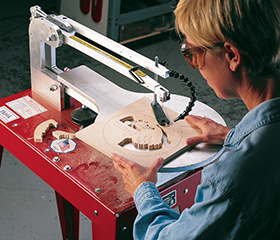
Scrollsaws’ detail-cutting capabilities make them ideal for fretwork, veneer marquetry and puzzle making. Better-quality models have quick-change blade systems and anti-vibration features to ensure smooth cutting.
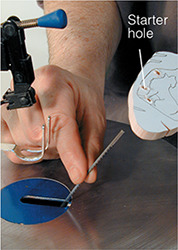
Threading. To make enclosed cutouts, you have to disconnect the upper end of the blade, feed it through a starter hole in the workpiece and then reattach it to the upper blade clamp.
As the name suggests, these machines feature a flat table with a perpendicular blade that adjusts for height and angle. Portable bench-top versions, made of aluminum and lightweight plastic composites, usually have a direct-drive motor and arbor assembly mounted to the underside of the table. Larger stationary models sport cast-iron tables and are usually belt-driven, with the motor suspended behind or inside the saw base. Classified by blade diameter, sizes can vary from a 4-in. modelmaker’s saw to a 16-in. industrial heavyweight, but 10-in. saws are the most popular for home use.
Tablesaws are versatile, but their most basic function is to make cuts with the lumber’s grain, called rip cuts. An adjustable guide, called a rip fence, lets you find and lock a setting quickly, then slide the board alongside to make the cut. Aside from ripping, though, these indispensable tools can crosscut lumber, cut plywood and other sheet goods down into manageable parts, machine precise joinery in furniture parts and even make decorative moldings.
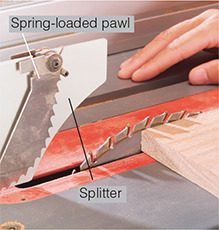
Blade height. To avoid unnecessary exposure to the blade, adjust the cutting height so the tooth gullets just clear the top of the workpiece. This helps the blade run more coolly and clears sawdust from the cut. Above are a splitter and a spring-loaded pawl, which help prevent kickback.
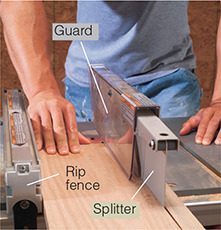
Basic rip. Safe technique for ripping involves using a blade guard, observing a minimum width of 6 in. (15 cm) for hand-feeding, using your thumb to push forward on the end of the board and keeping your little finger in contact with the rip fence.
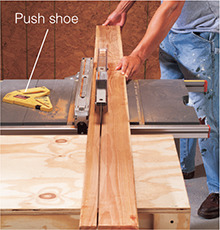
Narrow rip. To rip narrow boards safely, start with the basic ripping technique, but as your pushing approaches the saw table, switch to a push shoe to feed the board past the blade. Stand to the side of the cutting line to avoid injury from unexpected kickback.
All of the precision inherent in a tablesaw is just wasted potential if the machine isn’t set up properly. Most factory settings are reasonably accurate and can be tuned with help from the owner’s manual. The crucial adjustment is having the blade parallel to the miter-gauge slots in the table. For the settings that you change on a regular basis, however, you should make periodic checks, adjusting as needed.

Blade angle. The angle scale relies on an accurate original setting of the blade in its normal position—perpendicular to the top. Check this with a square and adjust the stop or pointer, if necessary. Make a test cut and check it with a square to ensure your adjustment is accurate.
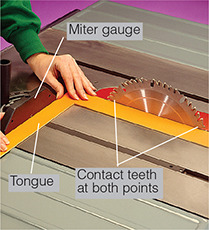
Miter gauge. To tune the miter gauge, rest the body of a framing square against the blade so teeth contact the edge in two places. Then nest the square’s tongue against the miter-gauge face. The cursor arrow on the gauge should point to zero; adjust if it doesn’t.
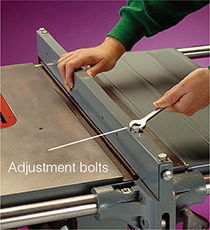
Rip fence. The rip fence must have an accurate width readout on the guide scale and be parallel to the blade. Adjustment mechanisms vary depending on the manufacturer, but if tuning is required, align the fence parallel to the miter-gauge slot in the table.
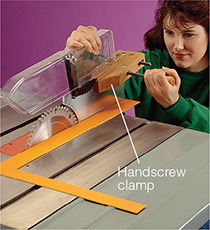
Blade guard. To align the guard and splitter, place a framing square or a straightedge alongside the blade. If they are not exactly in line, make minor adjustments by bending the splitter with a hand-screw clamp. For larger adjustments, shim the guard mount with washers.
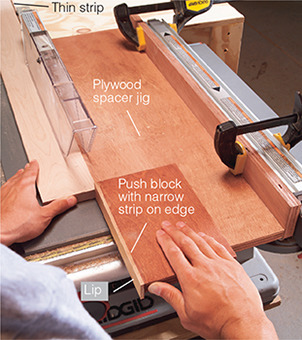
When ripping thin pieces, the guard and rip fence compete for the same turf leaving little space for a push stick. Make room by clamping a 10-in.-wide (25-cm-wide) plywood spacing jig to the fence. Add the jig’s and strip’s widths to determine the fence setting. Then make a push block with an L-shaped lip to feed the stock safely.
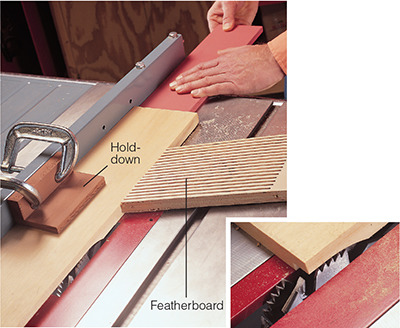
Special dado blade sets cut grooves, (called dadoes), and grooved edges (called rabbets), in one pass. To ensure uniform depth and width, use a hold-down and a featherboard to keep the workpiece tight against the table and fence.
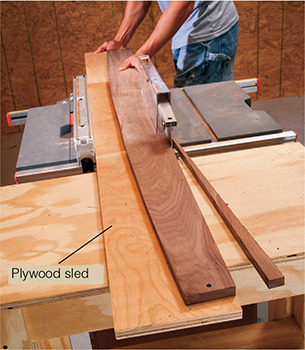
If you don’t have a jointer, you can use the tablesaw to straighten board edges. Use screws (positioned to avoid the blade) to fasten the board to a straight piece of plywood; it functions like a sled to guide the cut. With the first edge straight, remove the board from the jig, flip it over and align it directly against the fence for the second cut.
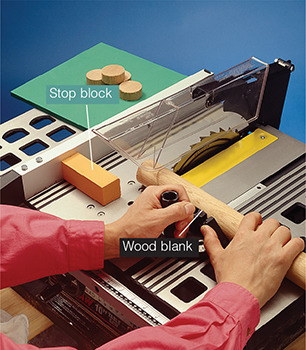
Making batches of identical small parts, such as blocks or round plugs, is difficult when the sections are too small to fit securely in a jig. The technique shown here remedies that with a stop block screwed to the rip fence. Nest a long wood blank against the miter gauge and butt the end against the stop block; push forward and the part will be cut safely and accurately.

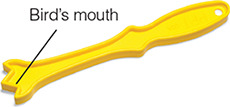
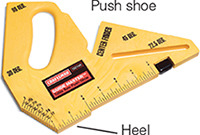
In woodworking, the expression “rule of thumb” ought to refer to safety rules that help you keep your thumbs, and your other digits as well. First on that list would be to never use a technique that puts your hands near a spinning saw blade. A simple way to observe this rule is to use push shoes or sticks to feed workpieces. Both accomplish the same goal, but push shoes are larger and have a saw-type handle. Manufactured versions are plastic and have some handy features that let you check angles or find the center point of a dowel. A heel on the lower edge catches the workpiece to push it forward while the forward part keeps the wood pressed firmly against the table. Push sticks are long, narrow tools that have a contoured handle on one end and a single or double bird’s-mouth jaw on the other. You can make either tool out of scrap plywood—a good idea as they often get damaged in use.
Impact drivers have one overwhelming advantage over standard drills and drivers: enormous torque. Basically, that means you can drive a big screw (or bore a big hole) with a small driver.
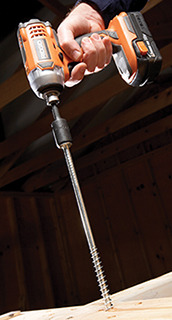
An impact driver can bring a heavy-metal drummer to tears. Wear muffs or earplugs—or get fitted for a hearing aid. Your call.

The difference is how they transfer torque from the motor to the chuck. On a standard drill or driver, the motor and chuck are locked together through gears; as the workload increases, the motor strains. An impact driver behaves the same under light loads. But when resistance increases, a clutch-like mechanism disengages the motor from the chuck for a split second. The motor continues to turn and builds momentum. Then the clutch re-engages with a slam, transferring momentum to the chuck. All of this happens about 50 times per second, and the result is three or four times as much torque from a similar-size tool.
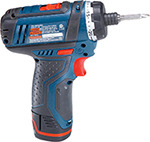
Standard driver
Torque: 265 in.-lbs.
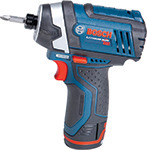
Impact driver
Torque: 930 in.-lbs.
The chuck on an impact driver makes for quick changes; just slide the collar forward and slip in the bit. But you’ll have to buy hex-shaft drill bits. Regular bits won’t work.
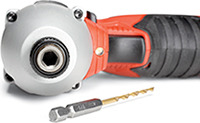
Impact drivers make great drills. With small bits (up to 1/4 in. or so), they act like a drill—but at nearly twice the rpm of most cordless drills. With bigger bits, they kick into high-torque impact mode so you can bore a big hole with a small driver.
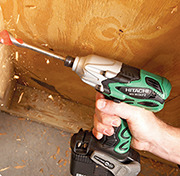
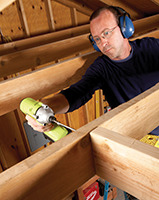
With a standard driver, you have to get your weight behind the screw and push hard. Otherwise, the bit will “cam out” and chew up the screw head. Not so with an impact driver. The hammer mechanism that produces torque also creates some forward pressure. That means you don’t have to push so hard to avoid cam-out. Great for one-handed, stretch-and-drive situations.
Fitted with the right accessory, an oscillating tool (or “multitool”) can handle a huge variety of tasks. It’s often the very best tool for removing grout or undercutting door trim before flooring installation. It’s also handy for scraping, sanding and cutting wood or metal.
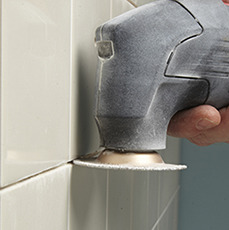
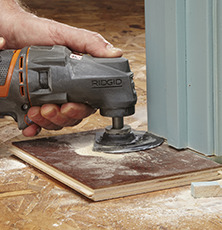
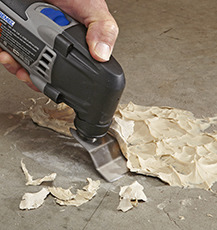
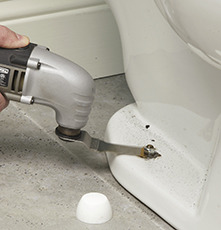
An oscillating tool works with a side-to-side movement. The oscillation is very slight (about 3 degrees) and very fast (about 20,000 strokes per minute), so it feels more like vibration.
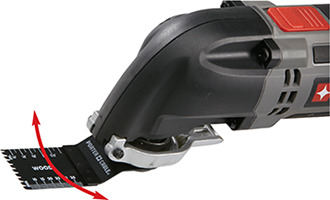
The wood lathe is an exception to just about every rule of woodworking equipment. Most machines noisily spin a cutter at high speed, most of them trying to make or keep a workpiece straight and square. A lathe quietly spins the workpiece itself against the cutting tool and produces cylindrical objects. The anatomy is simple—a narrow body, called a bed, supports a motor-driven headstock at one end and a sliding tailstock at the other. Lathes can make such parts as chair or stair rail spindles, called “between centers turning,” or bowls and other objects when secured to just the headstock, often referred to as outboard turning.
Lathes are classified by their maximum turning diameter, called the swing, and by the maximum distance between the headstock and tailstock centers.
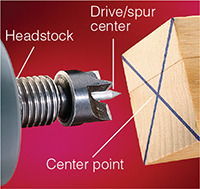
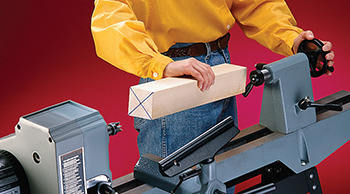
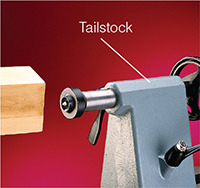
Aspiring woodturners should always get hands-on instruction, but the basics of mounting a workpiece are easy to grasp. First, mark the center point on each end of the blank. Press one end onto the spurs of the drive center, slide the tailstock against the other end and tighten and lock the tailstock.
Different turning tools produce different textures and details. Better-grade tools feature blades made of high-speed steel so they can withstand friction and heat without losing their ability to hold an edge.
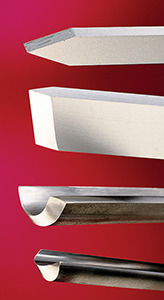
Parting tool. (top) This narrow double-bevel tool cuts directly into the wood, creating a narrow groove. It cuts very quickly, so use light pressure.
Skew. (second from top) This chisel has a slightly angled double-bevel edge that makes fine cuts to smooth a roughed-out blank or to shape a bead.
Roughing gouge. (second from bottom) With a heavy body and a thick curved edge, this gouge removes wood rapidly to get the rough blank close to its finished size or shape.
Small gouge. (bottom) This is a narrower, more delicate gouge typically used for making inside curves and for bowl turning.
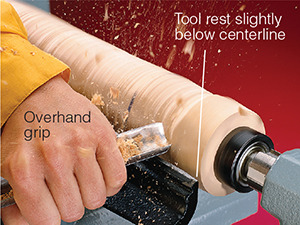
Rough rounding. You can precut square corners or knock them off with a roughing gouge. Hold gouge firmly and glide it along tool rest, shaving the blank as you go.
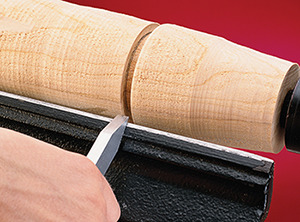
Parting. Use the parting tool to cut into the blank to specific diameters, creating a built-in index you can follow as you remove surrounding material.
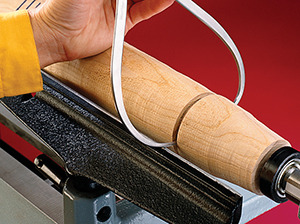
Measuring. Set a caliper from a full-scale drawing or a prototype piece and use it to check diameters along the blank as you work.
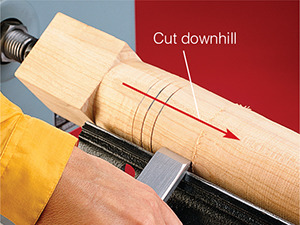
Shaping. Skew chisels can make scraping cuts to smooth and shape the blank. For tapered shapes, work downhill with the grain, from fat end to thin.
No portable tool offers more versatility for detail work and for applying finishing touches than a router. These simple tools—basically just a height-adjustable motor, a base with handles and a collet to hold the bit—can cut all kinds of joinery, including dadoes and dovetails, and they can mill decorative details on the face or edge of a board. Routers can also cut complex shapes repeatedly and precisely with help from a pattern template.
Actually, the bits or cutters provide the versatility; the router itself simply spins them at 20,000 or more rpm and lets you control the depth and direction of cut. Start with a lightweight, easy-to-control router that accommodates 1/4-in. shank bits, then move up to a larger model.
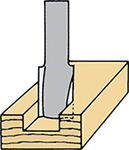
Straight. These bits cut flat grooves, dadoes, rabbets and other joinery details.
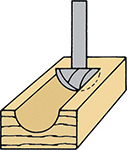
Grooving. Grooving bits cut flutes and other decorative shapes into the face of a board.
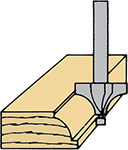
Edging. Edging bits are for machining a rounded, beveled or decorative profile on a board’s edge.
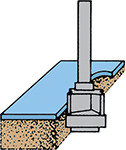
Trimming. Use these on trimming surfaces or edges flush with a substrate or template.
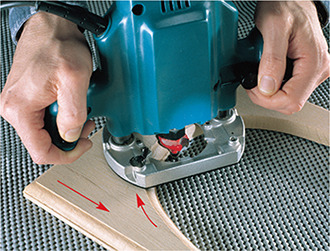
Direction of cut. Like most rotary-type cutting tools, routers are designed to cut against the direction of feed. That is, the bit should rotate against the workpiece edge in a direction opposite the movement of the router itself. For an edge facing you, this means moving the tool from left to right. For routing around the entire outside edge of a workpiece, the router should travel counterclockwise. For routing inside edges, as on the frame shown here, move the tool in a clockwise direction.
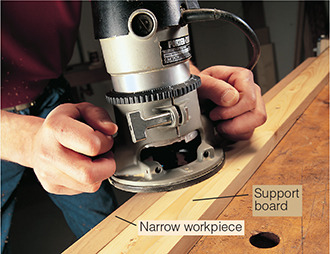
Narrow stock. Stable support of the router base is essential for accurate cuts. This isn’t a problem when you’re routing the face or edge of a wide board, but with narrow workpieces the small area of contact can easily allow the base to tilt or wobble, perhaps ruining the cut. You can improve your odds by fastening a scrap board of the same thickness behind the workpiece, as shown here. For improved safety and accuracy, fasten stop blocks at the ends to keep the workpiece from shifting.
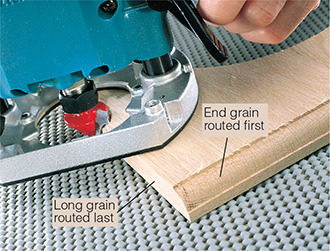
End grain. When edge-routing the perimeter of a piece of solid wood, two edges will feature long grain and two will have end grain. The bit is most likely to splinter the wood at the corner where end grain transitions to long grain. To prevent this, rout end-grain edges first; minor tear-out at corners will be removed as you rout the long-grain edges.
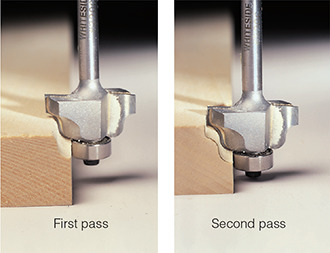
Deep cuts. Whether due to an underpowered router, a hard workpiece or a large-diameter cutter, some routing situations call for making cuts in stages. Because any taper in a router bit typically goes from narrow at the tip to wider near the shank (dovetail bits are a notable exception), you can work your way down, using a shallow cut to make the first pass or two, then resetting the cutting depth to make a final pass. Not only is this easier on your router motor, but it tends to leave a smoother finish on the cut.
With the wide variety of edge-forming bits available, you can use a router to make your own moldings. Most shaping bits have a guide bearing that rides along the edge of the workpiece creating a consistent profile.
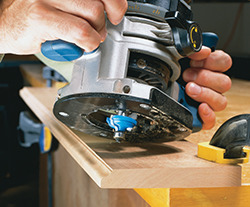
1 Start by clamping a wide workpiece to your workbench and routing the profile along one edge. It’s likely the finished molding will be narrower, but leaving the board wide for now helps support the router base.
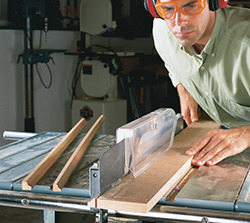
2 After you rout the edge profile, use the tablesaw and a push stick to rip the narrow molding from the board. Repeat the process to make as many moldings as the board can safely yield.
For dadoes and other cuts that require a router guide, the setup often takes longer than the actual routing. This simple T-shaped jig guarantees a 90° angle and lets you quickly align its precut dado with layout marks on the workpiece.
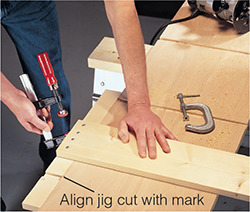
1 Glue and screw the crossbar perpendicular to the body of the jig, make a test cut at the correct routing depth, then align the jig’s dado with the marks on your workpiece and clamp it in place.
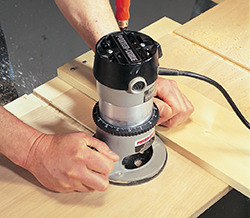
2 Start the cut at the top of the jig, at the crossbar, and proceed into the workpiece. Keep firm, uniform pressure against the guide edge so the router doesn’t stray.

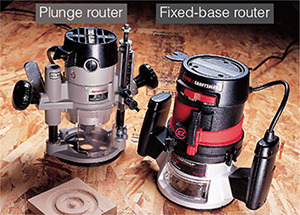
Apart from horsepower ratings, the most significant difference you’ll find in router designs is the type of base that holds the motor. The traditional fixed-base router (far right in photo) offers adjustment of the cutting depth, but once you have the desired setting, you keep the motor position locked during use. A plunge router (left in photo) supports the motor on a pair of spring-loaded steel rods that allow you to start the motor, then lower, or plunge, the bit straight down to a preset depth. This feature is useful for routing furniture mortises and other joinery details, but isn’t used much for general routing work. Some manufacturers offer router kits that contain a motor and one of each base.
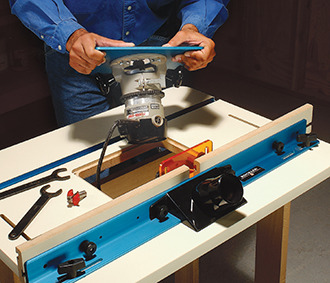
By suspending a router upside down from a table-top, you create a mini-shaper that can add efficiency and precision to your projects and can let you work with larger cutters that you can’t use freehand. A simple homemade version can be nothing more than a piece of plywood with a hole in it, but fancier varieties, either store-bought or built in your shop, feature insert plates, adjustable fences and dust collection.
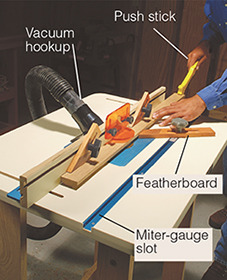
Router tables are ideal for machining narrow stock or other material that would be difficult or time-consuming to rout freehand. An array of basic safety devices—cutter guard, hold-downs and feather-boards—keep your hands safe and the material tracking straight. This version also features a miter-gauge slot and a vacuum hookup.
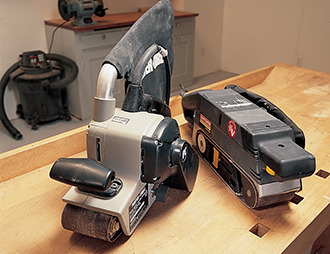
A belt sander is the fastest portable sander around. It’s ideal for removing stock quickly, flattening large panels and leveling glue joints. However, the aggressive action requires care to avoid gouging the workpiece or sanding through veneer. They create a lot of dust, and most newer versions have dust collection bags or ports that you can hook up to a shop vacuum. A variable-speed unit with a 3 x 21-in. belt size is a good choice for a home workshop.
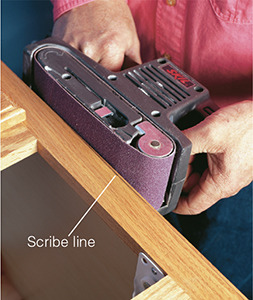
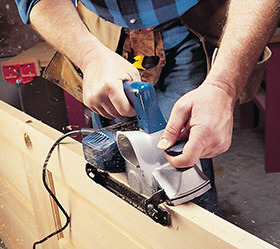
Reshaping cabinet frames to fit tightly against irregular walls is a perfect application for a belt sander. After scribing the line onto the frame, turn the cabinet on its back and shape the edge with the sander.
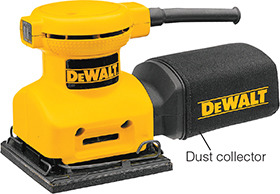
Finishing sanders use either a circular or straight-line pad motion to sand surfaces. They provide slower, more controllable stock removal than a belt sander, with far less cross-grain scratching. This is especially important for sanding veneered surfaces or hardwood plywood, and also helps prepare surfaces for finishing. Various models accept a quarter-sheet or a half-sheet of sandpaper.

When you’re building a woodworking project and can sand parts before assembly, standard finishing sanders work fine, but refinishing an existing piece of furniture often means getting into corners and other tight spaces. For those situations, a detail sander can access areas no other sander can reach and provide faster results than hand sanding. Most detail sanders have a triangular-shaped head that accepts interchangeable precut sandpaper. Some manufacturers offer accessories that let you adapt the sander for scraping or cutting tasks. A few versions feature assorted contoured pads for sanding moldings and curved edges.
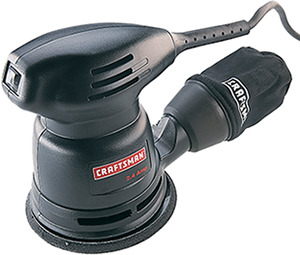
The random-orbit sander is the closest thing to a do-it-all sanding tool. This versatile machine combines a spinning disc with an orbital action, allowing it to remove material quickly with coarse abrasive discs but provide a smooth, swirl-free finish with fine abrasives. Other welcome features include quick-change sanding discs (with either hook-and-loop fastening or a pressure-sensitive adhesive backing) and dust pickup directly through ports in the sanding pad. Two-handed versions tend to have larger 6-in.-dia. sanding pads and more powerful motors; a palm-grip style (shown above) features a 5-in.-dia. pad and is designed for one-handed use.
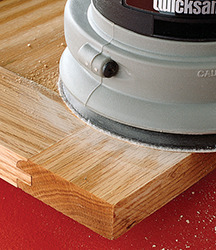
Random-orbit sanders excel at eliminating cross-grain scratches, an essential feature when you’re working with assembled cabinets or furniture. Glue joints on cabinet face frames can be leveled quickly without leaving unsightly marks.
As versatile as portable sanders are, they aren’t very user-friendly or efficient for sanding very large or small parts or for precisely shaping workpieces. In those situations, it’s easier to bring the part to the tool than vice versa, which means using a stationary sanding machine designed for home shop use.
These machines combine a large belt sander with a large disc sander, both driven simultaneously by the same motor. Each has a cast-iron table to support the workpiece, and the belt sander adjusts from a vertical to horizontal orientation to suit the work you’re doing. Use with a shop vacuum or dust collector; you’ll need it.
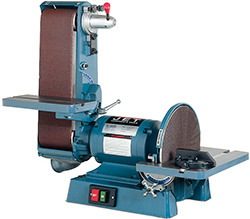
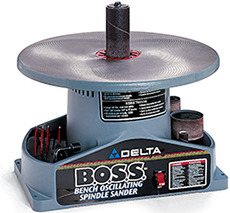
Curved contours are often cut with a bandsaw or a jigsaw, both of which leave workpiece edges a little rough. Getting good results by hand sanding is difficult and time consuming, but a spindle sander offers good sanding control and much faster cleanup. To reduce visible scratches, the spindle oscillates up and down while rotating.
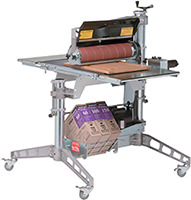
Gluing up wide panels of solid boards typically creates a slightly uneven surface with prominent glue joints and maybe even a slight cup or wave. A drum sander features a power-feed conveyor that guides the panel under a metal drum lined with a wide abrasive strip, rendering it smooth and flat. Dust collection is a must with these sanders.
As the name implies, power hand planers do what hand planes do, but with the help of a motor and high-speed rotating cutterhead. Using either straight jointer-type knives or a spiral cutter, a power planer can take off as much as 1/8 in. (3 mm) of material in a single pass. These tools are indispensable for trimming large doors.
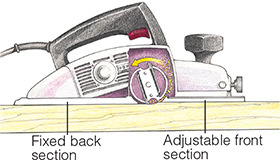
How they work. Like a hand plane, a power planer rides on a shoe or sole plate, but in this case, the shoe is split into a fixed rear section and a movable front section. An adjustment knob changes the front shoe’s elevation, creating an offset from the rear shoe (and the cutterhead) to control the depth of cut.
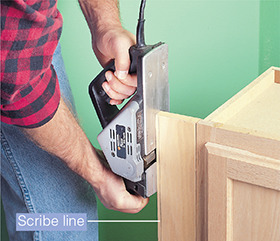
Scribing. Though it can’t follow the curved contours possible with a belt sander, a power planer will quickly trim excess material from a cabinet frame so it fits properly against a wall.
Beveling. An adjustable fence lets you tilt the plane for cutting beveled edges. This is commonly done on entry doors to provide the necessary clearance for the door to close against the jamb.
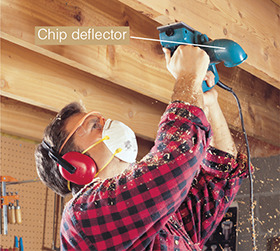
Leveling. A power planer can quickly and accurately trim unevenly aligned joists to create a flat base for installing ceiling or flooring materials.
Caution: Use ear, eye and respiratory protection.
As a rule, power tools have three virtues—muscle, precision and speed. Most rotary tools can lay claim to only the last, but speed is enough to make these compact tools compensate for their shortcomings. Shaped like a fat-handled screwdriver with a collet at one end, rotary tools are like routers in that they get their versatility mostly from the cutters and bits they spin. Some actually have attachable bases that let them function like a router, but for most tasks they are used freehand or in a base that holds them with the business end up. The collet accepts rotary files, grinding wheels, sanding drums, cutoff wheels and other accessories. Their small scale lets them get in places that are off-limits to most power tools. Some drive flex-shaft accessories that can get into even tighter spaces.
Rotary tools do come in variable-speed versions, but most of their work gets done at very high speeds—around 30,000 rpm is typical. It’s the high-speed rotation, not horsepower, that gets the job done, so don’t force the tool with heavy pressure.
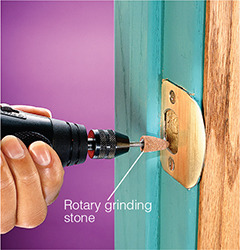
Grind. Grinding wheels and stones remove metal quickly in situations where a hand file might fit but its progress would be slow. Here the opening in a strike plate is enlarged so the latch will align properly.
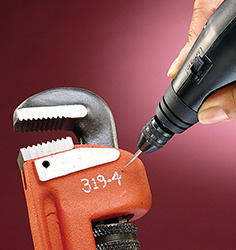
Engrave. Marking items for identification is easily done with an engraving bit. Different engraving tips are available for different materials, such as metal, plastic and wood.
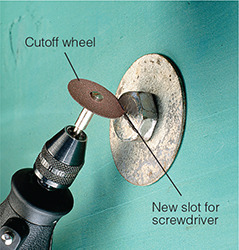
Cut. A stripped bolt head, its corners rounded off, can be salvaged by cutting a slot for a screwdriver. If necessary, the wheel could cut all the way through the bolt.
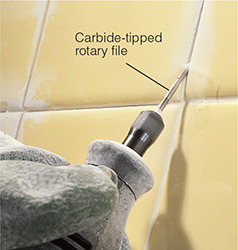
Remove. Removing old tile grout is a tedious chore done by hand, but a rotary tool with a carbide-tipped file does it quickly. Keep the bit at a low angle to the surface and work downward.
The spiral saw is a close cousin to the rotary tool. The collet size and high-speed rotation are similar, but spiral saws tend to have larger motors and a built-in base. They’re designed to be used more like a router—with the base pressed or supported against a flat work surface. With fewer bit types available, this tool isn’t designed to have the versatility of a rotary tool. In fact, they are often called cutout tools because of the task they excel most at—making cutouts in drywall, cement backer board, tile and other materials used to cover walls and ceilings.
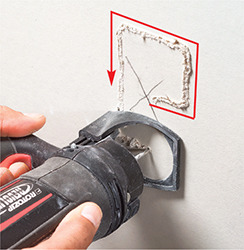
Drywall. Cutouts for electrical boxes don’t have to be marked precisely. Just use an X to designate the box location, set the drywall loosely in place and drive a few screws to hold it. Find the outer box edge and rout counterclockwise around it.
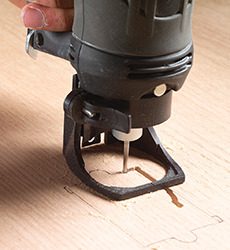
Paneling. For freehand cutting in paneling, mark the outline of the cutout and make a plunge cut to start. Then follow the outline, making a full stop at each turn to keep the corners crisp.
Spend a few years tackling home-improvement projects and your assortment of chisels, planes and other cutting tools is likely to include a few battered edges. Those that are just slightly dull can be sharpened with a few strokes on a whetstone, but if any are severely worn, you’ll want to renew them with a bench grinder. Bench grinders are compact, affordable and nearly indispensable when it comes to keeping a sharp edge on tools. They’ll sharpen chisels, plane irons, scissors—just about any hand tool that cuts—plus mower blades, drill bits and other accessories.
Most bench grinders work at speeds exceeding 3,000 rpm, faster than the ideal speed for regrinding tools. At that high speed, the biggest risk is overheating the tool edge to the point that it loses its ability to hold a sharp edge. Unless it’s heat-treated again (not a task for beginners), the tool’s steel will soften and never hold its edge as well again. But if you exercise care, you can learn to use the grinder quickly and efficiently without damaging any tools. Practice on expendable tools until you get the hang of it.
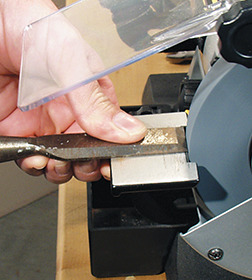
Tool rest position. Begin by setting the tool rest close to the grinding wheel and as squarely as possible to the wheel edge. Apply light pressure to grind off nicks and leave a square, blunt edge on the tool.
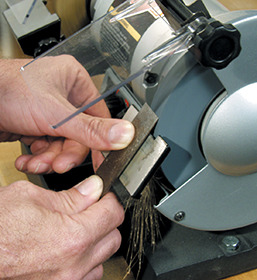
Tool rest angle. Reset the tool rest to match the tool’s bevel angle (typically 25° to 30° for chisels) and make light passes, moving the tool from side to side. Check often to ensure a square edge.
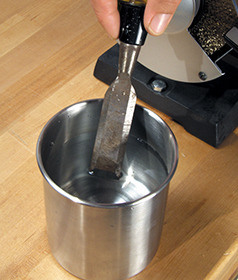
Quenching. Dunk the blade in water every two passes to prevent heat buildup near the edge. A straw- or bluish-colored area on the bevel means you’ve overheated the chisel and ruined its ability to hold an edge.

They may not have sharp teeth, but bench grinders should be used with respect. Here are a few rules to observe:
• Always wear safety glasses. There will be sparks (hot fragments of metal) flying, and the wheel itself can shatter and disintegrate.
• Don’t wear loose clothing, unrestrained long hair, gloves or anything else that might catch on the wheel.
• To reduce risk of wheel failure, never install a grinding wheel that isn’t rated for the speed of your grinder or has been dropped.
• Inspect the wheels before each use and stand to the side when starting the machine.
• Never grind on the side of the wheel, only the edge.
• Unplug the tool when it’s not in use.
Chances are any bench grinder you buy will come equipped with gray aluminum-oxide grinding wheels, probably medium and coarse. A coarse wheel (about 36 grit) will grind very aggressively but also will run slightly cooler. A medium- or fine-grit wheel will remove material more slowly and leave a smoother surface on the tool, but will run slightly hotter. Fine-grit wheels clog with metal particles sooner, a condition known as glazing, that increases the risk of burning tool edges. A 100-grit wheel is a good compromise for sharpening woodworking tools; you’ll get a reasonably fine surface but a lower risk of edge-burning than a finer wheel would produce.
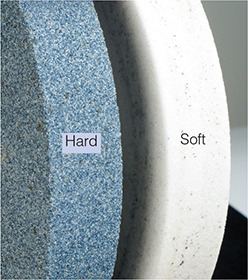
Types. Apart from the hard (gray) variety of aluminum-oxide grinding wheels, a softer grade (white, or vitrified) offers an advantage for tool sharpening. These wheels have an edge that breaks away faster, exposing fresh cutting grains, and they run cooler.
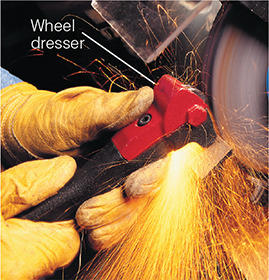
Dressing. While grinding wheels are reshaping other materials, they are being deformed themselves and becoming loaded with metal particles. A wheel dresser has a hardened steel head that cleans and reshapes the wheel edge so it can perform at its best.
For most woodworking projects, accurate work starts with having lumber that’s flat, straight and milled exactly to the correct size. Of course, wood rarely comes from the lumberyard in such pristine shape. Those crooked edges and warped boards have to be remilled to straighten them, and a jointer is the first tool in that process.
The jointer bed is actually two separate tables supported on a common base, with the cutterhead nesting between them. Except for periodic adjustments when new knives are installed, the out-feed table stays at a fixed height, flush with the top of the cutterhead, while the infeed table travels up and down to change the depth of cut. The tables remain parallel but offset in height. As the board travels past the cutterhead, its newly milled edge is supported by the outfeed table.
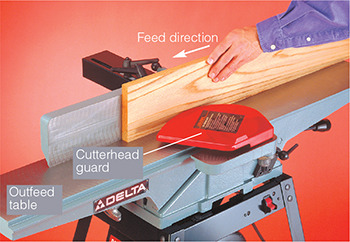
The basics. Precision from the jointer depends on having accurate settings and applying firm pressure to keep the workpiece pressed against the tables and the fence. As the board passes over the cutterhead, gradually shift the pressure to the outfeed table to ensure a consistent cut. The machine shown here has a 6-in.-wide (15-cm-wide) cutterhead, a good size for most home workshops.
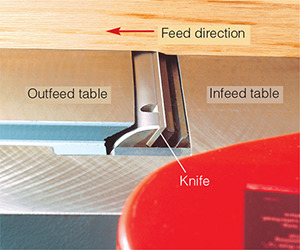
Set infeed table. Set the infeed table height according to the material and conditions. Edge-jointing, shown here, allows deeper cuts because the material is relatively narrow, but stay within a range of 1/32 to 1/16 in. (0.75 to 1.5 mm) for best results. Heavier cuts tend to produce more tear-out and a rougher surface. When jointing the wide face of a board, you may have to make shallower cuts (1/32 in./0.75 mm or less) to avoid overloading the motor. Whenever possible, try to feed the board with the edge’s grain direction pointing back toward the infeed table.
The thickness planer is partner to the jointer in producing flat, uniform boards for your projects, but it works a little differently. The table is much shorter and sits underneath the cutterhead, so material is removed from the top surface of the board. When a board is fed into the machine, feed rollers propel it slowly forward and under the cutterhead. In the process, the board is milled smooth and thinner, with the faces exactly parallel.
Until a few decades ago, thickness planers were expensive, heavy industrial machines that seldom found their way into a home workshop. Since then, smaller versions and even portable models have become widely available and affordable. Most portable units feature cutterhead widths of about 12 in. (30 cm) and can accept material up to 6 in. thick (15 cm). They also have fixed cutterheads and height-adjustable tables.
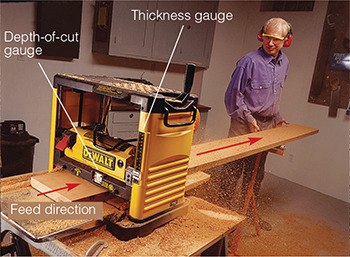
The basics. Thickness planers are noisy and produce a lot of chips, but they are simple to use. Typically, a hand crank adjusts the thickness by moving the cutterhead assembly on portable models or the table on larger stationary planers. When the scale indicates the correct setting, you feed the board into the machine’s power rollers, which are concealed alongside the cutterhead.
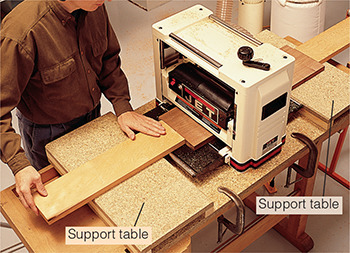
Snipe. Snipe is a dip or shallow trough that gets cut across the ends of a board as it travels through a thickness planer. On portable models, snipe is caused by a slight tilt in the cutterhead when only one of the feed rollers is contacting the workpiece, which is why it occurs only at the board’s ends. Some snipe is unavoidable, but you can reduce it by feeding boards through the planer in a continuous “train,” with the ends butted together. This helps keep the cutterhead assembly stable and level.
It’s not uncommon for some woodworkers to buy a dozen tools that generate dust before they ever think about buying one to collect it, but those who make dust management a priority will find their shops cleaner and themselves breathing easier.
For reasons involving workers’ health, fire safety and insurance coverage, dust management has long been an essential part of nearly every commercial woodworking facility. Home-shop woodworkers often employ makeshift or even no solutions, even though they face the same risks as their professional counterparts. Accumulated dust and shavings not only constitute a fire hazard, but create slippery floors that make workshop falls and other accidents more likely. Worse still, the fine dust that lingers airborne in a shop has been reliably identified as a factor in nasal cancer. Even without those severe health risks, however, wood dust is a nuisance that can meander into a ventilation system and settle throughout an entire home.
It doesn’t take a complicated or expensive system to manage woodshop dust, but it does require a diversified strategy. That’s because there isn’t just one kind of wood dust. Planers and jointers create mostly large shavings that quickly pile up if they aren’t collected. Tablesaws and routers generate a mix of small shavings and coarse dust, while sanders can send up plumes of fine dust that will stay airborne for hours, or until you breathe them in. Plan your dust control around the amount and type of woodworking you do.
Shop vacuums provide an affordable and reasonably effective means of capturing limited amounts of wood dust. They can be moved around the shop to where you’re working, but the loud operating noise can be bothersome.
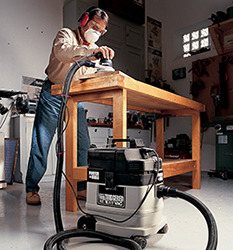
Direct connect. Many portable power tools now come with built-in dust collection ports. Pair one up with a tool-activated shop vacuum and the dust collection starts automatically when you turn on the tool. This is an ideal setup for belt and finishing sanders.
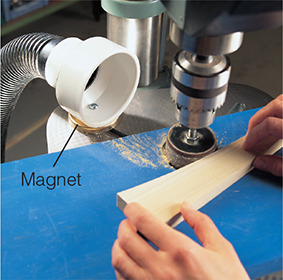
Open port. A quick-adapt feature lets a shop vacuum cover an entire shop. Here a common plastic reducer plumbing coupling is fitted with a magnet and connected to a vacuum hose. It will mount instantly to any machine with a steel or cast-iron table.
Air scrubbers target the fine dust that tends to stay afloat. Flow is rated in cubic feet per minute (cfm). The blower should be able to recirculate the air in the shop at least every 10 minutes.

Bench-top scrubbers. For projects that involve working in one spot for an extended period, bench-top air cleaners filter dust from the air before it circulates into the shop. If the dust generation is not localized, use ceiling-mounted air cleaners instead.
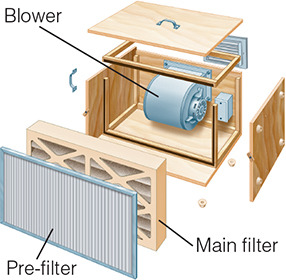
How they’re made. Whether manufactured or shop-built, air scrubbers typically feature an airtight housing that encloses a blower fan and motor. On the intake face, an inexpensive pre-filter and a finer main filter scrub the incoming air, which is then exhausted through the blower.
Also called source capture systems because they are ducted directly to machines, these large built-in vacuum systems use a network of branch ducts to convey dust-laden air to a central fan and filter.
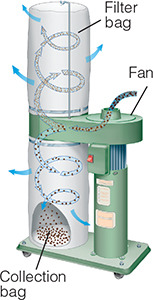
Single-stage collectors. This is the simplest form of ducted dust collector. It can be hooked temporarily to just one machine at a time or permanently to a fixed central duct that branches off to several machines, each controlled by a separate blast gate. The airstream and its entire contents travel through the impeller fan and into a collection bag, where the heavier particles drop to the bottom.
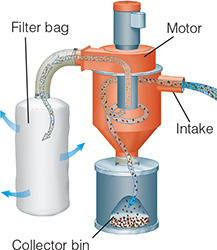
Cyclonic collectors. Also called a two-stage system, a cyclonic collector pulls the contaminated airstream into a conical drum, where it slows to allow large particles to drop into a bin. The air flow then continues through the fan and a filter.
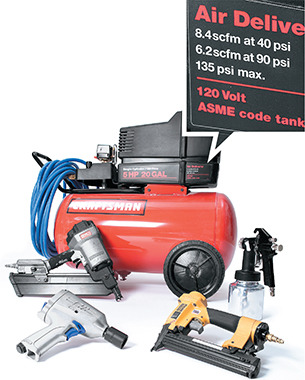
If all they did was blow dust off of a project before you applied the finish, air compressors would still be worth the cost. Fortunately, these machines offer far more versatility than that. They drive pneumatic staplers and nailers of every variety, spray finishes, power vacuum veneering systems and even drive tools, such as drills, sanders and impact wrenches.
Although pump types vary, the basic anatomy and function of an air compressor is fairly consistent from model to model. A power source—either an electric motor or a gasoline engine—drives a pump that compresses air into a holding tank. The maximum pressure for standard units is about 125 pounds per square inch (psi). Most compressors have a pressure-activated switch that turns the motor on as soon as the pressure drops to a prescribed level. The pump will run until the upper threshold is reached again, then automatically shut off or divert the air out through a relief valve. Electric-powered air compressors are more convenient for shop and home use. Tank sizes may range from portable 2-gal. (7.5 l) units to 60-gal. (225 l) floor models.
Unless you spray a lot of finishes or have multiple air tools running simultaneously, you can probably get by with a portable compressor. The unit should be light enough to hand-carry or be fitted with wheels.
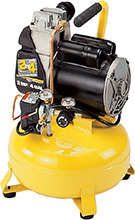
Oil-less. A relatively recent development, oil-less compressors have pumps that feature low-friction coating on the moving parts. They are subject to faster wear than oil-lubricated pumps, but for home workshop use, that only means a simple rebuild must be done every few years.
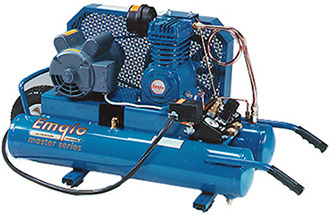
Oil lubricated. Oil lubrication lets these pumps last longer between rebuilds, but they do require oil changes and other regular maintenance. If you want to spray finishes, install an in-line filter to prevent oil contamination.
Pneumatic fastening tools only recently became a staple (no pun intended) in the home workshop, but the speed and holding power they provide quickly makes them indispensable to an avid do-it-yourselfer. Always use great caution.
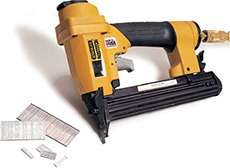
Brad and finish. These nailers shoot fine nails up to 2-1/2 in. long, making them ideal for installing door and window trim or for assembling woodworking projects. They’re often sold in kits with small compressors.
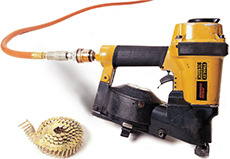
Roofing. The repetitive nature of fastening roof shingles makes that task an ideal application for a pneumatic nailer. The nails are collated in coils to fit in a compact magazine. Roofing staplers are also available.
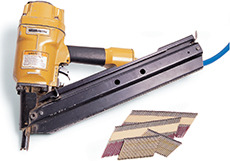
Framing. Worth renting if you’ve got a garage or addition project to frame, these large nailers have the power to drive nails up to 3-1/2 in. long. The nails are typically collated in strips.

Though labels on most air compressors clearly state the horsepower rating and tank size, a better indicator of a compressor’s capacity is its air delivery rate, expressed both in standard cubic feet per minute (scfm) and pressure (psi). Your requirements will vary with the uses you plan for the tool. For example, a small brad nailer’s intermittent bursts typically aren’t as taxing as the nonstop pressure you would need to run a spray gun or a sander. To be on the safe side, check the air requirements on the tools you’ll use most before you buy a compressor.
