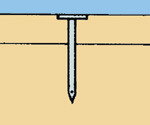
Thin to thick. Nail a thinner piece to a thicker one using a nail with a length three times the thickness of the thinner piece.
The most widely used nail types are common and sinker nails, for their holding power, and finish nails, for their ability to hide. Most other nails are either variants of these or special-purpose fasteners with enhanced holding or penetrating power.
The length of most nail types can be designated by penny size—a term abbreviated with a small letter “d.” Most nails come in a wide range of lengths and their shaft diameters increase with length. Common nails are available in lengths from 1 in. or 2d, to 6 in. or 60d (see illustration, below). The nail’s diameter increases four times over that range.
Many special-purpose nail types, such as roofing nails or drywall nails, have only one diameter and vary only in length. Small wire brads and wire nails are sized in inches and by wire-gauge number. The higher the gauge number, the thinner the nail.
The approximate number of common nails in a 1-lb. (.45-kg) box is given along the bottom of the illustration below left, under "Penny Nail Gauge." A box of finish nails of equivalent size will yield about 75 percent more nails.

Thin to thick. Nail a thinner piece to a thicker one using a nail with a length three times the thickness of the thinner piece.
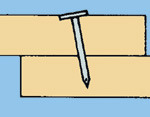
Equal thickness. If board thicknesses are the same, use a nail equal to the combined board thickness. Angle the nail to avoid piercing the other side.

Common nail. For use in heavy construction and rough framing. Large head won’t pull through.

Box nail. Lighter gauge version of the common nail. Used for general-purpose framing. May be galvanized.

Sinker. Coated to ease penetration and increase holding power. Used commonly for rough framing. Textured head reduces hammer slippage.

Finish nail. For trim and cabinet work where nailheads must be sunk and filled.

Casing nail. Heavier version of finish nail, with more holding power. Usually galvanized and used for door and exterior window trim.

Wire brad. For small, easily split moldings. Measured by gauge size and length.

Drywall nail. Tightly secures drywall panels with broad head and ringed or barbed shank. May be resin coated.

Ring-shank or annular-ring nail. Used for sheathing. Sharp-edged ridges on shank lock into wood, increasing holding power.

Spiral nail. Turns like a screw when driven. Harder to drive but has tremendous holding power.

Metal roofing nail. For corrugated metal and plastic roofing. Plastic or rubber washer under head seals hole.

Roofing nail. Extra-large head holds asphalt shingles and metal lathe in place. Galvanized.

Masonry nail. Made of hardened steel. Used for fastening to concrete and concrete block.

Double-headed or duplex nail. For temporary work, such as concrete forms. Upper head projects for easy removal.

Cut nail. A flat nail with blunt tip used for blind-nailing flooring and fastening to concrete.

Tacks. Made in cut or round form. Used to fasten carpet or fabric to wood or similar light fastening jobs.

Staples. Made in many forms for varied uses, including carpet and wire fencing installation. Those with insulated shoulders are used for low-voltage wires.

Corrugated fastener. For securing light-duty miter and butt joints, such as on screens or picture frames. Driven across joint.

Pointed fastener. For strengthening joints—sharp prongs spread apart in wood to provide gripping strength.
Penny or “d” are terms derived from the ancient coin called the denarious and are now used to indicate nail length.

Using a nail made from the right material is just as important as using a nail that’s the correct size.

Steel. Use steel nails for framing and interior work where corrosion will not be a factor.

Galvanized. For exterior work and use in damp interior areas. Electroplated versions are smoother and less corrosion-resistant than chunkier hot-dipped versions.

Stainless steel. Resists corrosion and staining of surrounding wood surfaces. Commonly used with cedar, redwood and treated wood.
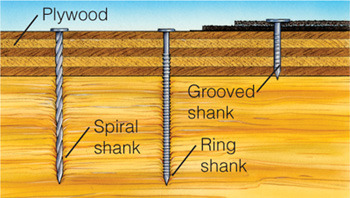
Nail shanks with indented rings, spirals and grooves give wood fiber a better grip and are less likely to loosen. Hot-dipped galvanized and cement-coated nails also have extra holding power.

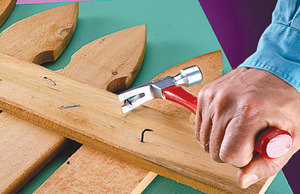
Clinched. For extra holding power, drive extra-long nails through the wood, bend the nail tip with the hammer claw, then pound the nail over so it bites into the wood again, forming a J-shape.
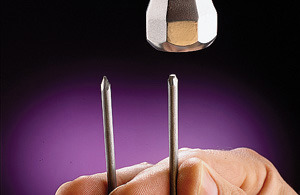
Blunted. Blunt nail tips crush their way through wood fibers, helping to avoid splitting lumber near the ends of boards. Tap the sharp point with a hammer to blunt the nail.
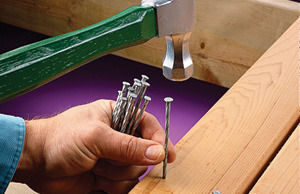
Driven. Arrange a fistful of nails, heads up, then use your pointer finger and thumb to roll them out and into position for nailing to increase your NPM (nails per minute).
Metal hangers are designed to solidly anchor framing members throughout your home, but are most commonly used to anchor joists in floors and decks. Properly installed, they make a joint far stronger than nails would alone.
Joist hangers come in many sizes to support different dimensional sizes of lumber and manufactured joists. Most hangers have a galvanized coating and will work indoors and out. Specialized hangers are available for unusual situations, such as building in a corrosive salt-air environment or joists that run at an angle.
When selecting and installing metal hangers, follow these rules:
■ Install the largest hanger that fits Never use a 2x6 hanger on a 2x10 joist.
■ Fill all holes in each hanger with the proper size joist-hanger nail.
■ Don’t reuse or modify joist hangers.
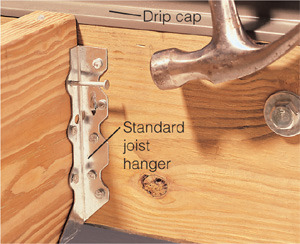
Standard. Secure standard joist hangers using 1-1/2-in.-galvanized joist-hanger nails. To protect fingers, hold nails with needle-nose pliers while starting them.
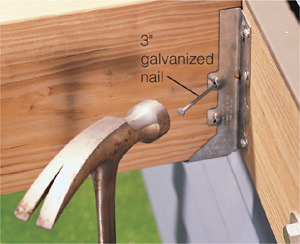
Double shear. For double-shear joist hangers, toenail 3-in. nails at a 45° angle through the hanger and joist, and into ledger board.
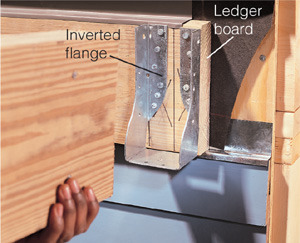
Inverted flanges. Use double or single versions to install joists at the end of the ledger board. Predrill holes to avoid splitting.
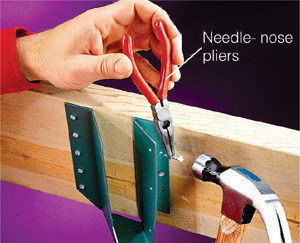
Angled. Specialized hangers, such as angled hangers, expand your options when designing the frame for your deck or floor.
Use screws when you need strong holding power and want to be able to take a joint apart without damaging it. Wood screws, which come in many sizes and head types, are traditional for joining wood. But many special-purpose screws (such as sheet-metal, drywall or deck screws) can also create sturdy wood joints. Screws with sharp points and threads are designed to be self-tapping—they pull themselves into the material— and seldom need a pilot hole when driven into softwood or sheet metal with a power drill or screw gun.
The square-drive (Robertson), Phillips, and star-drive screwheads are designed to help prevent bit slippage. Hex heads allow you to use nut drivers or sockets to drive small or large screws. One-way screw heads, once driven in, are not easily removed.
When purchasing screws, specify the length in inches and the diameter by a gauge number. Gauge numbers range from 2 (the smallest) to 16 (the largest). The exception is lag screws that are sold by diameter from 1/4 in. to 5/8 in.
Use an awl or nail to make a pilot hole for smaller screws. For larger screws, drill a pilot hole with a bit the same diameter as the threaded part of the shaft, minus the threads. Two-thirds of a screw’s length, or at least 1 in. (2.5 cm), should go into the second piece of wood. To lubricate screws for easier driving, coat the threads with soap or any kind of wax.

Slotted

Phillips

Square-drive (Robertson)

Star-drive

One-way

Hex-head

Flathead screw. A general-purpose wood screw driven flush with surface or countersunk below. Designated length refers to entire screw.

Oval-head screw. A protruding head offers a decorative appearance. Upper part of head is not counted in designated length.

Roundhead screw. Used for fastening a thin board or metal to thicker wood. Head is excluded in designated length.

Particleboard screw. Has wide, deep threads for extra holding power. A sharp point cuts through tough particleboard.

Drywall or all-purpose screw. Thin, sharp and hardened. A bugle-shaped head dents drywall surface and deep threads cut into studs.

Sheet-metal screw. Threaded along its entire length. May also have hex-shaped head. Self-tapping.

Lag bolt (or screw). A heavy-duty wood screw sold by diameter and length. Commonly used to attach a deck ledger board to the house frame.

Dowel screw. Joins leg to tabletop. Screw into top of leg using locking pliers, then screw leg into top.

Hanger bolt. One end has wood-screw threads and other end has machine-screw threads that will accept a nut.

Screw hook

Screw eye

L-hook

Flush for flathead screw

Countersunk for oval-head screw

Flat for roundhead screw

Gauge number, actual size of screw
Flathead screws are designed to be driven so the screwhead is flush with, or recessed below, the surface of the material. Some screws, like cement-board screws, have ridges underneath the head to help make them self-countersinking. Drywall screws have a gradual, bugle-shaped slope underneath the head that helps dimple, rather than tear, the drywall facing as it drives deeper. Wood screws, however, need the help of countersink bits (below).
Each screw type is designed for a specific purpose and is not necessarily interchangeable. Drywall screws are made of hardened, brittle steel, and the shaft will often snap during installation. Wood screws are thicker, more snap-resistant and designed for woodworking projects; drywall screws are not.
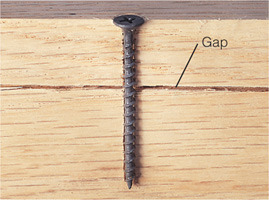
Boards held apart. When a fully threaded screw is used, the top threads can anchor into the top board and keep the boards apart rather than pull them together.
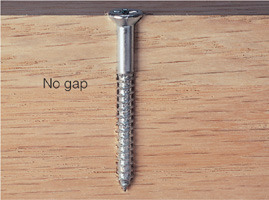
Boards held together. Wood screws have a smooth shank section that slides through the top layer of wood so the screwhead and the threads pull the two boards together.
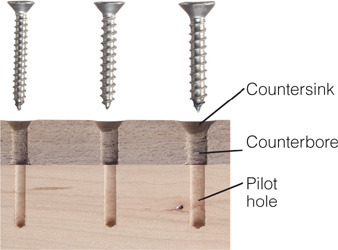
Hole sizes. A properly drilled hole for a wood screw has three elements: a pilot hole for the threads, a wider hole through the top board, and a countersink hole for the head.
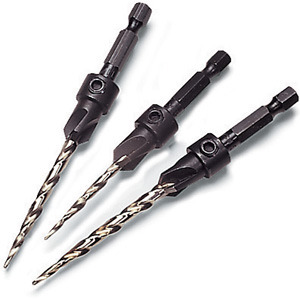
Countersink bits perform all three pre-drilling chores for wood screws at once. The primary bit is tapered like a screw shank. A set of three will handle most common screw sizes.
The best way to remove screws with stripped or broken-off heads is to use a screw extractor. To center the drill bit in the jagged face, start with a very small bit, then drill another hole large enough to hold the extractor. Extractors come in sizes small enough to remove even very small screws.
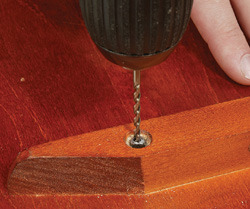
1 Drill a hole in the screw shank 1/8 to 1/4 in. (3-6 mm) deep. Oil the drill bit to improve cutting ability and preserve bit.
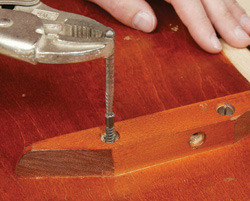
2 Remove broken screw by inserting extractor and turning counterclockwise. Extractor will lock into hole and twist out screw.

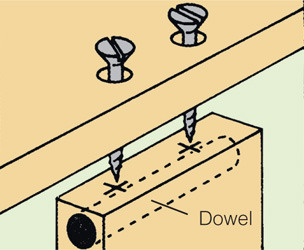
To strengthen a weak end-grain joint, drill a hole and insert a hardwood dowel. The same trick can be used when screwing into the edge of plywood.
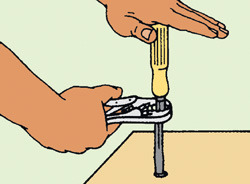
Loosen stubborn screws by inserting a square-shanked screwdriver, clamping a locking pliers onto the shank and pushing down hard while turning the screwdriver.
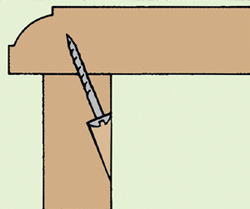
Use the pocket screw method when attaching a tabletop. First drill a long, angled hole for the screwhead, then drill a pilot hole in the pocket at the same angle.
Nuts and bolts act like very powerful mini-clamps that can be easily removed and offer more adjustability options than screws or adhesives. Select machine bolts or stove bolts (or machine screws) for metal and other thin materials. Select carriage bolts for woodworking applications where you don’t want a sharp, exposed head.
Specify a bolt’s size by its diameter, thread pitch, and length. For instance, for a bolt sized 1/4 in.-20 x 1-1/2 in.: 1/4 in. is the diameter, 20 is the number of threads per inch, and 1-1/2 in. is the length. Metric bolts are becoming increasingly common. Diameter and thread pitch combinations commonly range from 1/8 in.-40 to 1/2 in.-13. As a rule, the larger the bolt, the fewer threads per inch it has. The length of a bolt excludes any protruding part of the head. A machine screw is a stove bolt less than 1/2 in. in diameter and its diameter is given as a gauge number.
Always tighten or loosen a nut or bolt with the appropriate wrench or tool to avoid damage.

Machine bolts. Come with hex heads or square heads and accept hex or square nuts.

Carriage bolts. Have an unslotted oval head. Square shoulders sink into wood to prevent turning.

Stove bolts. General utility bolts with slotted heads.

Stove-bolt heads. Can be flat to sink flush, oval for easy removal, or round to accept a washer.
Common nuts. Include locknuts designed to lock themselves in place. Cap nuts are decorative and protective. Wing nuts are hand tightened. Castle nuts let a secured part move (a cotter pin holds nut in place).

Flat square nut

Square nut

Hex nut

Jam nut
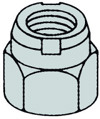
Locknut
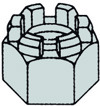
Castle nut

Cap nut

Wing nut
Common washers. Include a flat washer, which goes under a bolt head or nut to spread the load and protect the surface. Split-ring and toothed lock washers prevent a nut from working loose.

Flat washer

Split-ring lock washer

Toothed lock washer
Heat, oil and tapping will loosen most nuts and bolts in metal. After heating, tap the end of the bolt with a hammer to help release the threads and allow the oil to penetrate. Be very careful when combining oil and heat since penetrating oil is flammable.
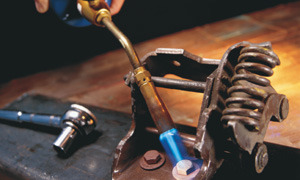
1 Apply only enough heat to expand the entire bolt—about a minute or so.
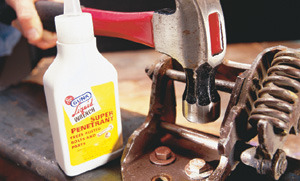
2 When bolt cools enough to touch, squirt penetrating oil on and around it.
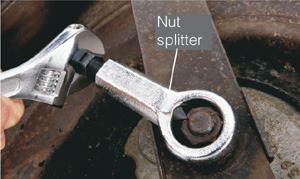
Nut splitter. If heat fails, a nut splitter will crack a nut without damaging bolt threads.
Wall studs are rarely conveniently located for wall-mounted accessories. To hang a towel rack, mirror or small shelf on any hollow wall or door, use one of these hollow-wall fasteners. Just be aware of the advantages and limitations of the fastener you choose.
Most wall surfaces are 1/2-in. drywall. If you have an older home with plaster and lath, the walls will be thicker. Knowing the wall thickness is critical when selecting most hollow-wall fasteners; they just won’t work in a wall that’s thicker or thinner than what they’re made for. The package, or the fastener itself, will tell you the required thickness.
Beyond accounting for wall thickness, there are some other basic rules to follow for hollow-wall fasteners. First, use the correct sized mounting screw. Too heavy a screw will break the fastener loose before it’s secured. Second, drill the hole size specified on the package. Third, don’t overtighten the mounting screw or the housing could break loose. Finally, don’t expect too much from a fastener. Some items, such as cabinets, stair rails and heavy shelves must be mounted to wall studs for safety reasons.
All weight ratings below are based on vertical weight in 1/2-in. drywall.
These bolts are heavy-duty anchors with spring-loaded wings that work in drywall, plaster or hollow-core doors. Fold wings together and measure across fold to determine hole size. Once installed, you can’t remove screw without losing the wings.
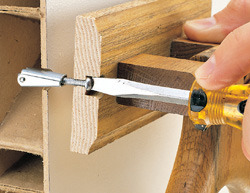
1 With wings folded together, expose enough screw shank for wings to pop open behind wall surface.
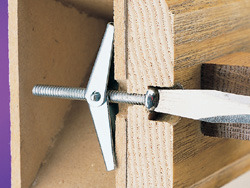
2 As wings begin to tighten, adjust position of object being attached. Supports up to 30 lbs. (13 kg).
These anchors hold by expanding within the drywall hole and use legs that spread out behind drywall. They require drilling a hole of precise diameter. Overtightening can ruin anchor’s effectiveness.
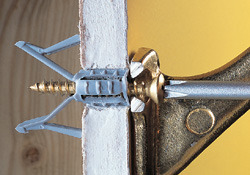
Expanding legs. Medium-duty anchor secured by spreading legs. Designed to hold 20 lbs. (9 kg).
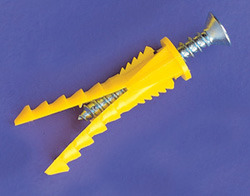
Expanding throat. Light-duty anchor secured by wedging action. Holds 15 lbs. (7 kg).
These anchors’ housings mushroom as screw is tightened to form securing arms. The short-shank version is designed for anchoring the thin skins of hollow-core doors.
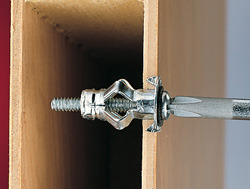
1 Drill hole, insert anchor making sure face points bite into surface to prevent spinning.
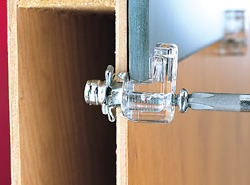
2 Remove screw, position object to be hung, and then reinstall screw. Supports about 25 lbs. (11 kg).
Inexpensive, quick and easy to use, toggles provide a sturdy bite. Toggles have wings that you squeeze together to insert into a hole. If wings haven’t opened after installation, poke them with a nail through the toggle hole. Supports about 25 lbs. (11 kg).
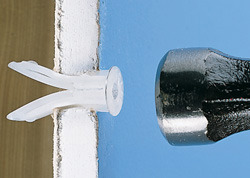
1 Drill hole to size specified and drive anchor into hole until face ring is flush with surface.
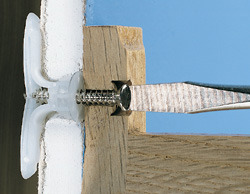
2 Before driving screw, be sure wings have popped fully open by trying to pull out toggle.
These anchors are intended exclusively for drywall. With a sharpened end, they drill their own mounting hole as you drive them with a large Phillips screwdriver. Coarse threads anchor the housing to the drywall.
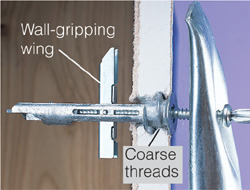
Wall-gripping wing. These anchors support 35 lbs. (15 kg). As you turn mounting screw, the wing pulls tight against back of drywall.
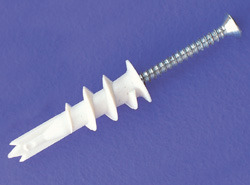
Light weight. In some versions, only threads hold anchor in drywall. These support about 20 lbs. (9 kg).
Concrete continues to harden for decades after it’s poured. Consequently, it provides a reliable foundation for a solidly mounted anchor. On the downside, it can create a great deal of frustration in making the hole for the anchor. The key to emphasizing the positives and dealing with the negatives is using the right tools and the best anchors for the project.
Most fasteners, including some masonry nails, require a pilot hole into which you slip the fastener or anchor. The fastest way to drill a hole in concrete, concrete block, mortar or brick is to use a hammer drill. If you don’t have a hammer drill, borrow, rent or buy one. Most hammer drills have a switch or collar so you can change from percussion drilling to regular drilling.
Masonry nails work best to attach furring strips, window frames, and other wood pieces to masonry block or concrete. Plugs and anchors provide more security when hanging hooks, shelves, and other heavy fixtures on masonry and concrete walls. Most work by expanding against the sides of a hole when you insert a screw, bolt or plug. In some cases, you can use a plastic toggle or anchor if you’re concerned about cracking brick.
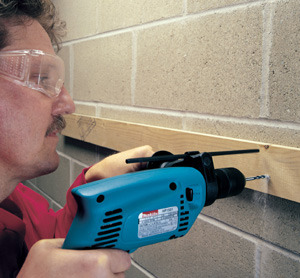
Hammer drills. When you need to make many holes in hard, cured concrete, a hammer drill and percussion bit can make the daunting task doable.
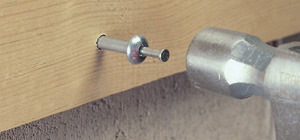
Masonry nails are made of steel, hardened to withstand being driven into concrete and masonry. These nails snap easily and can chip a cast-iron hammer, so always wear goggles and use a hardened-steel hammer. Use them in conjunction with construction adhesive for best results.
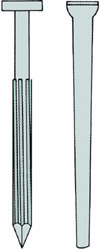
Installed by drilling holes and pounding them in place, these anchors work best to secure furring strips, light straps and brackets to sound concrete, concrete block, mortar and brick.
Plastic anchors are an excellent light-duty fastener for shelf brackets, towel bars, rake and shovel brackets, and hardware weighing less than 50 lbs. (23 kg). They require a pilot hole at least as deep as the screw will penetrate. Each package will give the hole size and the screw size that work best.
To use them, drill a pilot hole to the proper depth with a hammer drill and masonry bit. Tap the anchor into the hole with a hammer. If the concrete is soft or crumbly, the anchor may break free as you turn the screw. If this happens, try a bigger screw or wedge in a sliver of plastic from another anchor alongside the first.
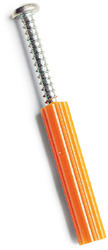
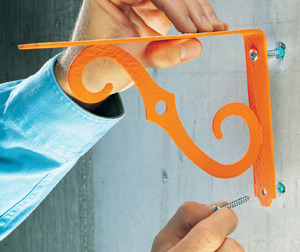
Plastic anchors are ideal for fastening many types of light-duty brackets to concrete, concrete block, mortar, brick or stone.
Soft metal shield anchors work especially well in softer materials like brick and mortar that can’t take the stress from heavy-duty anchors.
To use these anchors, drill the correct sized pilot hole (consult package instructions) with a masonry bit. To drill into softer brick and mortar, you may not need a hammer drill. The hole must be deep enough for the shield and the length of the bolt or screw that will protrude through it.
Soft metal anchors can strip out when overtightened. If the shield becomes loose, cut strips of wire solder and push them in along the outside of the shield.


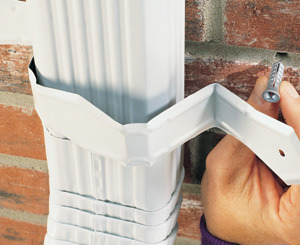
Soft metal shield anchors are perfect for securing downspout straps to brick and mortar.
Concrete screws offer a fast, relatively inexpensive method to attach furring strips, window and door frames, conduit clamps and electrical boxes to concrete and concrete block. The big advantage is that you hold the wood or object in place, drill right into the concrete, and drive the screw home. This saves the hassle of marking holes and trying to realign the work piece.
To use concrete screws, drill a pilot hole with the appropriate masonry bit and a hammer drill. Larger packages of concrete screws usually include a free bit. Drive the screw with a power screwdriver. Use 3/16-in.-dia. screws for light-duty tasks and 1/4-in.-dia. screws for heavier jobs.

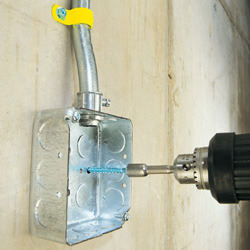
Concrete screws are ideal for attaching conduit and electrical boxes to concrete block. Available in hex-head and flathead types.
Sleeve anchors are available in several sizes and will hold up to 200 lbs. (90 kg), making them the best choice for heavy-duty applications. The sleeves pinch the sides of the predrilled hole as the tapered plug on the bottom is pulled into the sleeve when you tighten the bolt. They can be used in concrete, concrete block, or mortar and brick.
To use sleeve anchors, first drill the correct sized pilot hole through the wood or metal and into the concrete. Slip the sleeve into the hole and hold the object you’re fastening firmly to the surface because the anchor will only draw it slightly tighter as you tighten the screw or bolt.

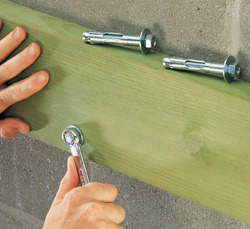
Heavy-duty sleeve anchors are ideal for attaching a deck ledger board to concrete or concrete block.
Powder-actuated tools (also called PATs or stud guns) offer the quickest, most efficient and cost-effective way to fire multiple fasteners into concrete slabs and concrete-block walls. PATs use gunpowder cartridges to drive hardened-steel nails through wood and into concrete. When it comes to finishing a basement, these heavy-duty tools quickly pay for themselves by saving hours of drilling and pounding. However, the fasteners won’t work well in very hard concrete or stone, so it’s usually best to test-fire a few fasteners into your concrete to see if you’ll get reliable results.
Always follow the recommended spacings for placing drive pins and for working near the edges of concrete slabs. Improve the fastener holding power by using construction adhesive on sill plates and behind furring strips. Avoid overdriving power fasteners by selecting the right size powder load. Overdriving will damage the gun and weaken the bond.

Keep powder-actuated tools and unspent powder loads locked up and away from kids. Injuries and deaths have occurred when ricocheting projectiles have struck bystanders or when common nails were used in stud guns. When the tool is dropped, check for damage to the barrel and other moving parts and don’t use it until it’s repaired. Always wear safety goggles and hearing protection.
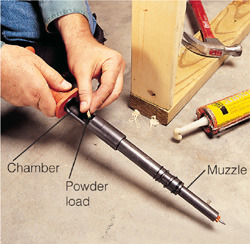
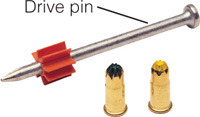
Loading. Carefully follow manufacturer’s instructions. For safety, insert the fastener (drive pin) into the muzzle first. Next, place a powder load into the chamber.
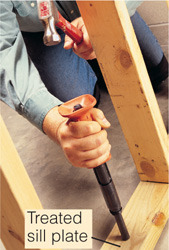
Floors. Quickly fasten sill plates to concrete slabs using a PAT. Firmly hold the tool at 90° angle, push down and hold to cock it, and then strike the firing mechanism with a strong hammer blow.
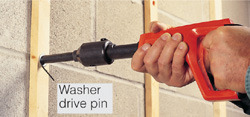
Walls. Attach furring strips to walls using 1-1/2-in. drive pins or drive pins equipped with washers if the wood splits.
When the right adhesive is used in the appropriate application on properly prepared surfaces, the adhesive can form a strong, permanent bond that’s often stronger than the material itself.
Most adhesives require clamping until they set. Setting time refers to the interval before the glue hardens. Curing time is the period it takes the bond to reach maximum strength. In most cases, an object shouldn’t be used until the adhesive has cured. For glass, china, and other items that are difficult to clamp, fast-setting glues are ideal.

Adhesive |
Typical Uses |
Application |
Characteristics |
Solvent |
Aliphatic (yellow carpenter's glue) |
General-purpose adhesive for furniture building and repair and cabinet work. |
Apply from squeeze bottle; clamp for at least 45 minutes. |
Sets within 1 hr.; cures overnight. Water soluble, not for outdoor use. Rigid, dries clear, easy sanding. |
Warm water |
Cyanoacrylate (super or instant glue) |
Liquid bonds most plastics, metals, vinyl, rubber and ceramics. Gel bonds wood and porous material. |
Apply in drops from tube. Short working time. Caution: Avoid contact with skin. |
Sets in seconds or minutes depending on product. Cures rapidly. Water-resistant and gap-filling. |
Acetone (nail polish remover) |
Hot-melt glue |
For quick repairs on leather and fabrics. Gap filler for loose joints on furniture. Temporary quick clamping for some sheet materials. |
Melt glue with hot-glue gun. Caution: Avoid contact with skin. |
Very fast setting to slower setting formulas available. Not ideal for permanent bonds or repairs. |
Acetone (nail polish remover) |
Polyvinyl acetate (white glue) |
General household repairs and craftwork. |
Use applicator for small jobs; apply with brush for large jobs. Sets in about 8 hrs. at room temperature. |
Cures in 24 hrs. Water soluble, dries clear, poor sanding. |
Soap, warm water |
Resorcinol |
Extra-strong wood repairs, boat building, outdoor furniture construction. |
Two parts: liquid and powder. |
Sets and cures slowly (up to 10 hrs. at room temperature). Waterproof, rigid, dries dark red. |
Cool water before hardening |
Water-resistant wood glue |
Outdoor woodwork and woodworking repairs. |
Apply from squeeze bottle; clamp for recommended time. |
Some have fast-tack qualities. Some of the no-drip/ no-run formulas have better gap-filling qualities. |
Warm water before hardening |

Always follow manufacturer’s instructions for storing adhesives. Many are sensitive to freezing or will quickly dry out if not properly capped or stored. If you use an after-market applicator bottle, don’t store the glue in it. Dried glue can quickly foul many of these applicator tips.
Many adhesives contain toxic, flammable solvents or resins that release noxious fumes. Always use these adhesives in a well-ventilated area and store away from fire sources.

Hang it. Use binder clips to keep the empty portion of tube glues and caulks rolled up. These same "handles" can be used to hang the tubes for neat, easy-to-see storage.
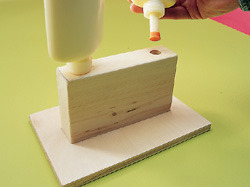
Ready to go. If you hate waiting for glue to come out, make this handy glue holster by drilling holes in a piece of 2x4. Make sure to put the cap on before inserting the bottle.
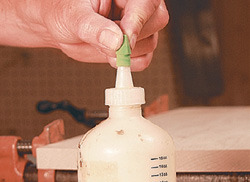
Cap it. Glue bottle caps have a tendency to disappear. If this happens, a rubber pencil eraser makes a nice substitute that’s airtight and readily available.
Specific materials often require special adhesives. In fact, manufacturers often specify the adhesive to use with their product in order for the warranty to be valid. Beyond manufacturer recommendations, choose an adhesive based on its characteristics. Water- or latex-based adhesives have the convenience of water cleanup and low odor, whereas others require noxious, flammable solvents for cleanup and good ventilation for application. Other characteristics to consider are gap-filling capability, flexibility, spreadability, ease of use, and ease of sanding. The most important characteristic, of course, is that it works.
Adhesive |
Typical Uses |
Application |
Characteristics |
Solvent |
Bolt-locking compound (anaerobic resin) |
For locking threads of bolts, screws and setscrews. |
Squeeze from tube or bottle. |
Hardens in absence of air between closely fitted metal parts. |
Soap and warm water before hardening |
Contact cement |
For bonding laminated plastic to countertops. Also for tasks where clamping is difficult. |
Coat both mating surfaces and let dry until tacky to touch, then join parts. |
Remains flexible. Parts cannot be moved once brought together. May be water-based or solvent-based. |
Acetone (nail polish remover) |
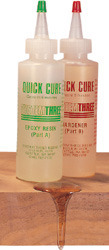
Epoxy |
For wood, metal, china, glass and most other materials. Especially good for rebuilding moldings and bonding dissimilar materials. |
A two-part formula, usually mixed in equal amounts. May be in liquid or putty form. |
Sets at room temperature in 5 min. to overnight depending on product. Waterproof; excellent gap-filling and sanding. Ventilate working area well. |
Acetone (nail polish remover) |
Hide glue |
Repairing furniture assembled with hide glue. As a base for creating a crackle-paint finish. |
May be ready to apply or in flake form that's mixed with warm water. |
Water soluble. Incompatible with aliphatic and polyvinyl acetate glues. |
Warm water |
Latex-based mastics |
For applying ceramic wall tile or other uses as recommended by manufacturer. |
Apply with recommended notched trowel. |
No-slip formulas available for installing wall tile. |
Warm water beore curing |
Polyurethane |
Multi-purpose applications. Especially good for wood-to to-wood bonding. |
Most formulas require dampening mating surfaces with water before application. |
Water resistant. Foams and expands as it sets. Good gap-filling and sandability. Limited shelf life. |
Mineral spirits when wet, scrape after drying |
Solvent-based mastics |
For ceiling, wall and floor tiles, engineered wood floors, cork and other uses as recommended by manufacturer. |
Apply with recommended notched trowel. |
Tends to be messy. Generally offers stronger bond than latex formulas. |
Mineral spirits or follow manufacturer’s recommendations |

Sometimes the best adhesive for a task isn’t really an adhesive per se. Expanding polyurethane foam, often used around doors and windows, has tremendous bonding strength. Pure silicone is one of the best building adhesives around. It adheres tenaciously to most surfaces, has excellent gap-filling qualities, doesn’t shrink and remains flexible. Contractors use it to install slab granite countertops and other materials such as solid-surface or cultured-marble shower surrounds.
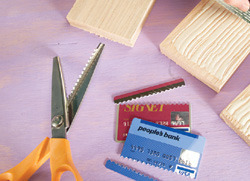
Mini trowel. When face-gluing boards, use a credit card snipped along its wide edge with pinking shears. The serrated edge spreads the glue like a notched trowel.

Dispensing. If you hold onto a glue bottle and swing it around a couple of times with the cap on, the centrifugal force concentrates the glue at the top of the bottle for easy dispensing.

Applying. Ordinary caulk guns are too big for working in tight spots such as behind a sink. For these places, try a 20 cc plastic syringe (without a needle) as a mini caulk gun.
While tape doesn’t usually have the holding power or permanence of glue or other adhesive, it does many jobs that a liquid can’t.
Electrical tape can insulate an outlet or switch from the sides of a metal electrical box and different colors can designate the purpose of a particular wire. Metal foil tape, the true duct tape, conveniently and effectively seals leaks in duct runs. Masking tape can be used as a temporary clamp for parts that are too awkward to clamp with other methods. Double-sided carpet tape can be used to hold a part in place while you drill pilot holes and drive the first screw.
Tape |
Description |
Typical Uses |
Anti-slip or Anti-skid |
Heavy weatherproof plastic with rough-textured surface and strong adhesive. |
For sure footing in tubs and showers, on steps, in entrances and on ladders. |
Carpet |
Plastic or cloth with moderately strong adhesive on two sides. Also made in waterproof form for outdoor use. |
Securing carpets and rugs to floor. Apply tape to floor, then peel off backing and press carpet against top side. |
Duct |
Strong, plastic-coated cloth with moderately strong adhesive. Resistant to moisture, heat and cold. |
A versatile tape with many uses indoors and out. Often used for temporary repairs and seals. Contrary to its name, it should not be used on heat ducts. |
Electrical |
Flame-retardant, stretchable vinyl with moderately strong adhesive. Comes in a variety of colors. |
Helps insulate electrical connections, switches and outlets against shorts and shocks. Can be used to mark wire's function. |
Foam mounting |
Flexible foam core with strong adhesive on both sides of core. |
Mounting lightweight items on rough-textured surfaces, such as brick or concrete. Apply like carpet tape. |
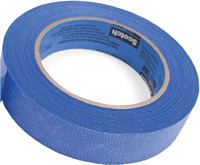
Masking |
Paper tape with minimal tacking adhesive. Residue becomes difficult to remove if left on for a long period. |
A wide variety of temporary uses such as defining paint lines or holding glued parts together. |
Mesh fiberglass |
Strong, thin fiberglass mesh with slightly tacky surface. |
For repairs and joints on drywall and cement board. Used in conjunction with joint compound or adhesive. |
Metal foil |
Heavyweight aluminum foil with strong adhesive. |
Sealing duct seams and joints. Temporarily repairing aluminum siding and gutters. |
Weather-sealing |
Heavyweight weatherproof tape with strong, permanent adhesive. |
Sealing gaps around protruding pipes, cables, windows and refrigeration lines. |

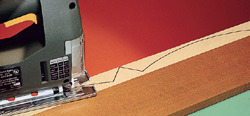
Marking. Make cutting lines easy to see and follow on dark surfaces by marking on masking tape applied to the surface.
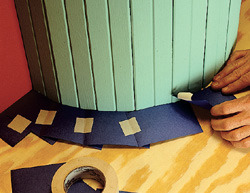
Patterns. Create patterns from cardboard and masking tape. The pattern can be transferred to vinyl or other flooring materials for cutting.
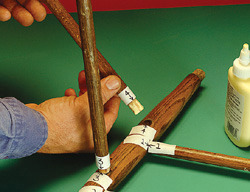
Labeling. Masking tape labels can help you remember the exact position and order of parts when disassembling and regluing furniture.
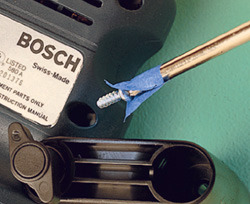
Holding. Use masking tape to hold onto and position screws located in awkward or hard-to-reach places.