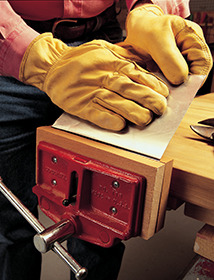
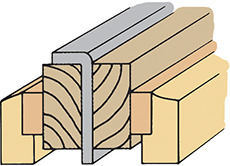
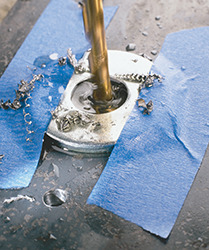
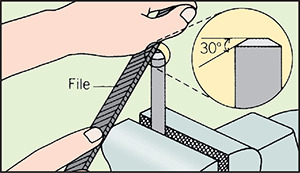
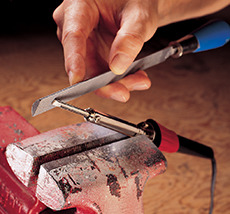
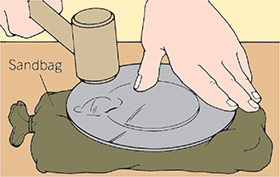
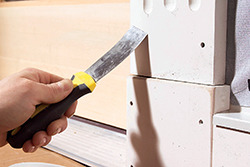
A vise, with protective wood blocks on each jaw, is ideal for bending small pieces of metal, like this step flashing. Draw a layout line to mark the location of the fold. Lightly scoring the line with an awl can help create an even crisper bend.
Whether you’re making flashing for your chimney or creating a drip cap for over your patio door, sometimes you need to put on your metal fabricator’s hat. You can buy most simple flashings, and complex ones may be best left to pros; it’s for those in-between projects that some basic metal-bending know-how comes in handy.
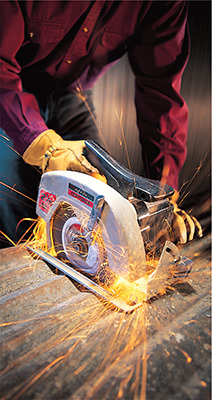
Four methods are shown below. Whichever one you choose, think “safety.” Firmly clamp or hold the metal you’re working on. Wear thick leather gloves when cutting, bending or installing sheet metal and discard scraps immediately to prevent accidents. Unfurl rolls of flashing carefully; some tend to uncoil like a rattlesnake. Round or bend over any exposed edges where people could cut themselves.
A vise, with protective wood blocks on each jaw, is ideal for bending small pieces of metal, like this step flashing. Draw a layout line to mark the location of the fold. Lightly scoring the line with an awl can help create an even crisper bend.
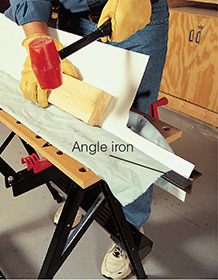
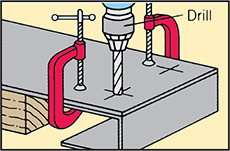
A portable workstand equipped with a pair of angle irons can deliver long, sharp creases with minimal setup time. Use a striking block and mallet to gradually make the bend. Fabricate longer flashings by using longer, wider angle irons in conjunction with a second workstand.
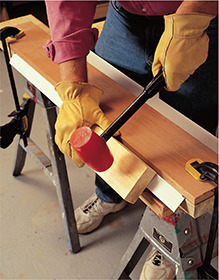
A simple metal bender can be created in 15 minutes using two wide boards and a pair of clamps. Draw layout marks on the metal and clamp it between the two boards. Gradually bend the metal by sliding a 2x4 block back and forth, striking it with a mallet until the proper angle is created.
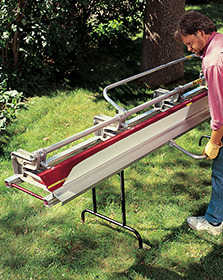
A sliding brake is worth renting if you have dozens of long flashings to fabricate. Position the workpiece in the clamping jaws and secure it with the locking handle. Lift the bending handle to fold the metal to any desired angle between 0° and 180°.
Scribe a line about 3/8 in. (10 mm) from the metal’s edge. Clamp the metal at the line between squared blocks of wood. Tap with a mallet to make a 90° bend.
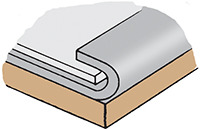
Bend edge to 180° over a piece of scrap sheet metal to keep a slight opening. Then remove the scrap and tap the edge down until it meets the sheet’s surface.
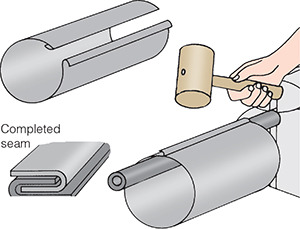
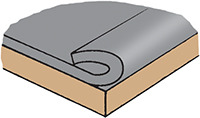
To join two edges, make a hem in each, just as you would for a safe edge, but hook the edges together just before you tap them down. Curved pieces can be supported on a pipe held in a vise while you tap.
Snips are the tool of choice for cutting ductwork, flashing and other thin metals. The basic scissorlike tin snips will handle most straight cuts, but for angles, curves and tight spaces, consider buying a set of aviation snips. They cut using a more powerful compound-lever action and are easy to control. The handles are color-coded: Straight-cutting are yellow, left-cutting are red and right-cutting are green. Wear gloves and protective eyewear when working with snips.
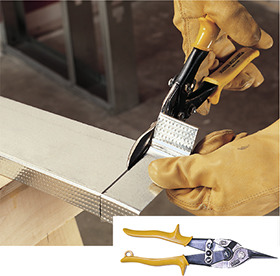
Straight-cutting snips have a compound-lever cutting action that makes them easier to operate and control. When cutting metal studs, snip both flanges, and then bend one flange up and cut across.
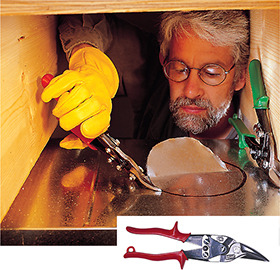
Left-cutting snips are designed to cut efficiently in a counterclockwise direction. Create a starting slit for the snips by using a hammer to rap the tip of a screwdriver into the metal.
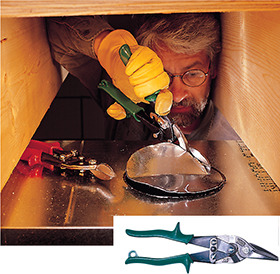
Right-cutting snips cut most efficiently in a clockwise direction. Here one is used in a confined space to finish a cut started by the left-cutting snips.
Abrasive metal cutting blades (shown below) basically wear the metal away. Toothed carbide blades cut more like their wood counterparts.
The toothed blades usually have 40 or more small teeth and are most often used on softer, nonferrous metals like aluminum, brass or copper.
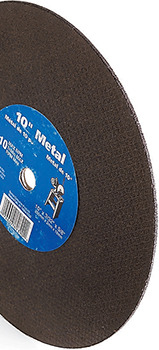
The abrasive blades sacrifice themselves as they work; the more you cut, the smaller they become.
Whichever type you use, set the cutting depth only slightly deeper than the thickness of the metal you’re cutting. Ease slowly into the cut and don’t force the blade. Wear protective long sleeves, gloves, hearing protection and eyewear.

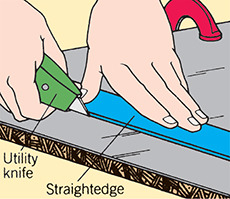
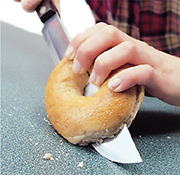
Utility knife. Use a utility knife to cut very thin metal sheets. Clamp metal over scrap wood and scribe a line. Position straightedge along cutline and score line with utility knife. Break the sheet apart with gloved hands. File the edge to remove sharp burrs.

Keyhole saw. To cut very thin sheet metal, clamp it between pieces of thin scrap wood and saw through both wood and metal. Use a coping saw with a metal-cutting blade for deep curves, and a keyhole saw for interior cuts.
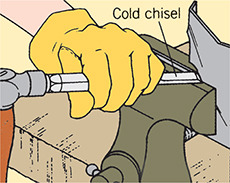
Cold chisel. Clamp the work in a vise with the cutline just above its jaws. Rest the chisel blade on the vise’s jaw and tilt it to about a 30° angle so its cutting edge is against the cutline. Strike chisel with a ball peen hammer to make the cut.
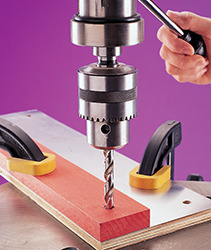
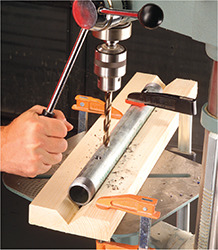
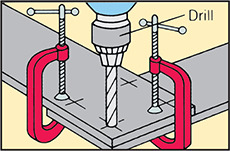
Any handheld drill can be used to bore a hole in metal, but a drill press offers the greatest accuracy and safety. Use regular twist bits (preferably with carbide tips) or high-speed steel bits.
Clamp the work securely so it doesn’t become a dangerous whirling helicopter blade. If you’re drilling all the way through the metal, back it up with scrap wood. Before drilling, make an indentation in the metal to keep the bit from wandering off center.
When drilling thick metal, lubricate the hole, back the bit out from time to time and brush away waste fragments. Otherwise the fragments may overheat and partially weld themselves to the bit.
Clamp the workpiece in a wood “sandwich.” The top and bottom wood layers will help keep the bit in line and ensure a clean-edged hole.
Lubricate the bit and hole with metal-cutting oil to prevent overheating. A washer taped around the area where the hole will be drilled helps confine the pool of oil.
Flashings and ductwork may be the metal items do-it-yourselfers most frequently encounter, but in the course of hanging a garage door or building a woodworking jig you may work with thicker or tubular stock. Use the same precautions and safety equipment you’d use for thinner metals.
Drill large holes in stages. First drill a 1/4-in. (6-mm) hole, and then increase its size with progressively larger bits. Lubricate the bit and hole as you work.
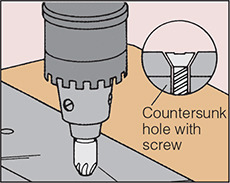
Countersink screwheads so they’re flush with the surface of the surrounding metal. Enlarge and taper the top of pilot hole just enough to contain the screwhead. Set the drill at lowest speed, and lubricate the hole liberally.
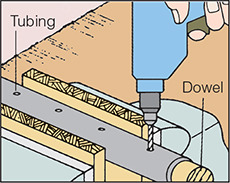
Tubing and pipe can be drilled without distortion by inserting a snug-fitting wood dowel to reinforce them.

Metal is relatively safe to work with, providing you take a little care:
• Clamp work securely. Never hold work with your hands.
• Wear safety goggles; tiny particles of metal or sparks may fly into your eyes if they’re not protected.
• Wear thick work gloves when working; edges can be sharp enough to cause serious cuts, and tiny burrs can do painful damage to unprotected fingers.
• Keep drill bits sharp and clean; never force a tool.
• File or grind cut edges of newly drilled holes as soon as possible to prevent cuts.
• Make use of all available safety shields and devices on your power tools.
If you want perfectly aligned holes when drilling pipe (or wood dowels, for that matter) try this trick: Saw a V-shaped channel along the center of a 2x6 block. Place the V-block on the drill press, align the bit with the bottom of the V-channel and clamp it to the table in that position. Clamp your pipe, tubing or dowel to this jig, and then drill your perfectly centered and aligned holes.

Threaded holes can be created by inserting a tap into a predrilled hole and turning it with a special wrench. The tap’s slightly tapered end helps ease it into the hole and start the cutting process.
Tapered taps and plug taps have the first three or more threads tapered, which makes starting easier but prevents threading close to the bottom of a blind hole. A bottoming tap cuts threads to the bottom of a blind hole, but threads must be started with a plug or tapered tap. Taps and dies (for cutting exterior threads) are available in kits along with the special wrenches. The size of a tap is stamped on its shank and is given in three parts: its diameter, the number of threads per inch and the type of threads. The tap should match the bolt for which it is cutting threads.

This section cuts full-sized threads

This section cuts full-sized threads

This section cuts full-sized threads

1 Drill hole slightly smaller than tap’s diameter. Lubricate threads with cutting fluid. Insert lubricated tap in hole. Check tap against a square to make sure it is straight.
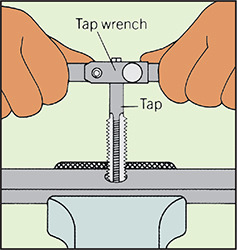
2 Turn tap clockwise, exerting moderate down-ward pressure. After each turn, back tap out, file burrs from edge, brush away filings and add more lubricant.
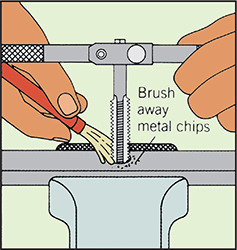
3 Continue turning tap, backing it out and adding lubricant. When threading a blind hole, as you near the bottom, remove tap after each turn or two, and clean out chips.
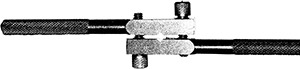
Bar-type tap wrench
Bolts and pipes can be threaded, or rethreaded, using a die. The procedure is similar to cutting an internal thread with a tap. A threading die, with sharp internal threads, is fitted over the metal rod or bolt and cuts threads as it’s turned. The threads in the die are ground away slightly on one side to make starting easier. Like taps, dies are sized the same as bolts and the size is marked on the die.
In most cases you’ll turn the die with a diestock. On some diestocks, the die is simply dropped in and secured by tightening a screw. Other diestocks have guide plates and guide fingers to ensure accuracy.

Diestock

An adjustable die has a recessed bolt that can be loosened or tightened to let you cut bolts slightly undersize or oversize.

A solid die, or button die, is the most common type. It can be used on rod or pipe up to 1/2 in. (13 mm) in diameter.
1 Clamp the rod, tubing or old bolt into a vise and mark the place you want the threads to stop. With a file, cut a 30° angle around the top of the stock. This will help get the die started cutting the threads.
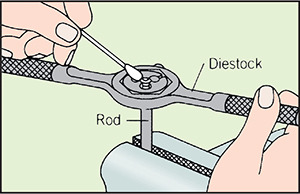
2 Fit the die into the diestock. Position the die over the rod, holding the diestock at a right angle to the rod. Lubricate the die by swabbing on semisolid vegetable shortening or adding cutting fluid.

3 Applying downward pressure, turn diestock clockwise one or two turns. Back off, check threads, brush away chips and add more lubricant. Repeat process as needed, but don’t apply pressure after first threads are formed.
Bolts are generally used by inserting them into slightly oversize holes in the metals being joined, and then securing them with washers and nuts. Taps and dies can be used to join thick metals; even epoxy glues and liquid solder can be used in certain situations.
1 Clamp work together firmly and mark positions of all bolts. Drill first hole just large enough to let bolt slip through.
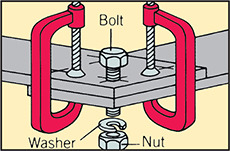
2 Slip bolt into hole, slide on a washer, thread on a nut and tighten. Check alignment of work and reclamp.
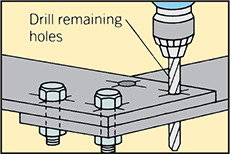
3 Drill second hole. Insert bolt. Add washer and nut to keep work from shifting. Drill remaining holes; add bolts, washers and nuts.
Self-tapping screws and sheet-metal screws are used to fasten sheets of metal together or attach metal to another material. They cut their own threads as they’re driven in. Generally, they pass through slightly oversize holes in the top piece of metal and into smaller pilot holes in the back material.
1 Clamp work securely and mark positions of screws. Drill pilot holes slightly smaller than screw shanks through both pieces of metal or through metal and into back material.
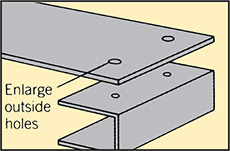
2 Unclamp work and enlarge holes in top piece of metal so screw shank will pass through it easily. Then reclamp work, making sure all holes align.
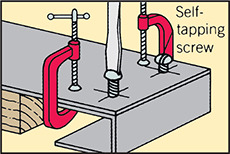
3 Drive in all screws most of the way, then go back and tighten one at a time. Screws will bite into walls of smaller holes in back piece.
Rivets are great for repairing everything from gutters to tool belts. There are two basic types: A solid rivet is placed through a predrilled hole, then mushroomed over with a hammer or other tool. A pop, blind or snap rivet (shown) is also inserted into a predrilled hole, but a special riveting tool mushrooms the end when the handle is squeezed. Select a rivet the right length and diameter, made of the same materials you’re joining to avoid a corrosive reaction. Wear eye protection while riveting.
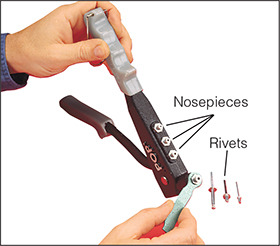
1 Select the correct size rivet and nosepiece for the job. Nosepieces are often stored on the riveter’s handle and are easily switched with the supplied wrench.
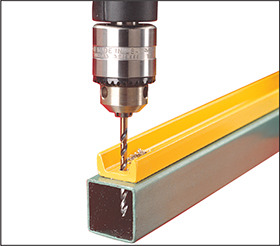
2 Drill a hole the same diameter as the rivet shank. Keep pieces aligned and tight to one another, using clamps or tape, if necessary.
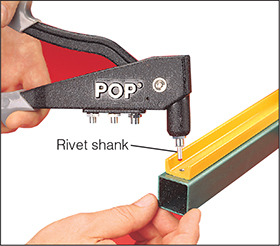
3 Insert rivet’s stem into the nosepiece and its shank into the hole. Squeeze handle so the tip is drawn up into the shank, expanding it. The stem will pop off.
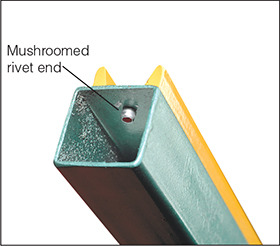
4 A secure connection is made as the two metal pieces are pinched between the rivet head and the expanded or mushroomed end.
When repairing electric appliances and electronic components, you’ll create stronger, longer-lasting connections when you solder the wires. The slip-on tabs many components use do a good job, but a well-soldered joint is a sure thing.
Making a solid connection involves four basic steps:
1. Clean the two surfaces that will be connected. The best way is to apply paste flux.
2. Make sure the tip of the iron is clean and coated with solder.
3. Heat the connector or tab, not the solder.
4. Touch the solder to the tab and wires and let it flow.
Choosing solder. Soft solder is used for the connections shown. It has a relatively low melting point, making it easy to use. Solder with a rosin core is best. It has flux in it to further help clean and bond the connections. Never use acid-core solder for electrical connections. It’s designed for plumbing and will corrode small wires.
Besides keeping an eye out for fire dangers, remember these tips:
• Allow the soldering iron sufficient time to heat up; 3 to 5 minutes is usually sufficient.
• Always heat with the tapered surface of the tip. Trying to heat with the point of the tip is useless.
• Securely wrap the wires through the hole in the connector.
• Place protective material, such as cardboard, under the working area to avoid damaging other components.
• Use a metal stand for the iron when it’s heating or not being used. Most tools come with some sort of stand.
For best results, you should tin new or pitted soldering irons or those with a dark coating. This allows even heat transfer and prevents oxides from forming on the heated connectors or wires.
1 With the iron unplugged, use a bastard file to dress the copper tip. Remove any old solder or coatings from the tapered surface. You need to get down to the bare copper.
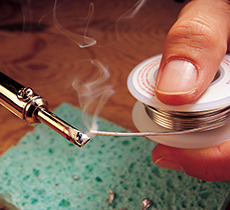
2 Heat the soldering iron and touch the solder to the tip to tin it. A hot iron will cause the solder to flow immediately. Coat the entire cleaned area of the tip. Wipe off any excess with a damp sponge.
Tinned stranded wires make a more solid connection because all of the individual wires will be bunched together under a connecting screw. Bend the wires into the shape needed beforehand; after wires are tinned, you can’t bend them without breaking the solder.
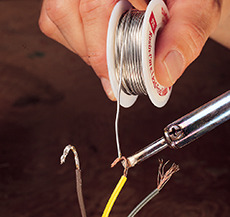
Tightly twist the stranded wires, heat them with the iron and touch the solder to the wires, not the tip. Sufficiently heated wires will melt the solder.
When soldering, remember to always heat the wires and connectors, not the solder. If the solder flows, the connection is hot enough. If not, keep heating. Note: Tabs without holes are designed for slip-on connectors.
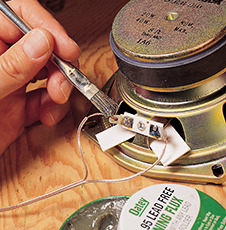
1 After slipping the wires through the hole and bending them around the tab, apply paste flux to the tab and wires.
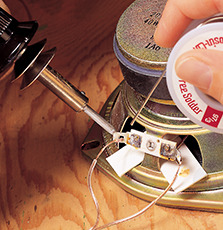
2 Touch the heated tip of the soldering iron against the tab and wires. Keep the flat surface of the tip against the tab, and then touch the connection with the solder.
3 Solid connections should be shiny, smooth and even. If there are any gaps in the joint, reheat it and apply a bit more solder.
A wire-feed welder is a portable tool suited for light-duty tasks, such as repairing metal fences, railings, tools and shop equipment. It uses an electric arc to melt both a special wire it feeds and the metals to be joined. The 115-volt units work off standard household electrical current.
For those doing only occasional repairs, rent rather than buy a unit. Note: If you have structural repairs, like the framework on a car or trailer, take the job to an experienced welder.
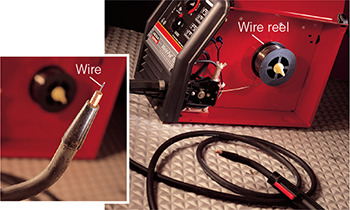
A roll of wire is housed inside the main unit and is fed through the rubber tube to the welding gun tip. Depressing the trigger feeds the wire and sends electrical current to the tip.
Be sure to read the manufacturer’s instructions before going to work, and remember these tips:
• Weld outdoors or in a well-ventilated area; the fumes can be dangerous.
• Keep flammable material away from the work area; never weld on a container that may have contained flammable material.
• Always use a face shield to protect your face from sparks and your eyes from the intense light. Wear heavy leather gloves and a long-sleeved shirt.
• Don’t touch the workpiece until it has cooled for 15 to 20 minutes.
Attach a magnet to the metal; if it sticks to the metal, and the metal isn’t cast iron, it can probably be welded. Aluminum can be welded but requires special materials. The area to be welded must be free of oil, dirt, paint and rust.
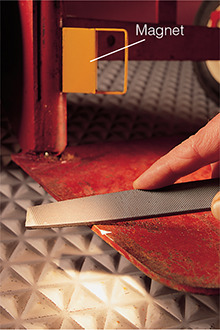
1 If the metal passes the magnet test and nicks easily with a metal file, it should be easy to weld.
2 Clean all paint, dirt, oil or other contaminants from the metal surface using a wire brush or other tool.
Most wire-feed welders have two setting knobs: one controls the wire-feed rate, the other, the voltage. The thicker the metal you’re welding, the faster the feed and higher the heat required. Heat is created when direct current completes a cycle from the main welding unit through the wire that exits the tip of the gun to the object being welded, then back to the unit via a wire that has been clamped to the workpiece.
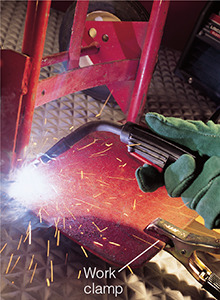
1 Secure the work clamp to the metal surface as close to the weld area as possible. Move the tip across the area to be welded while pressing the trigger. The tip should be raised slightly above the surface. There should be a snapping and crackling sound as you work. Don’t touch the electrode or the metal that you’re welding.
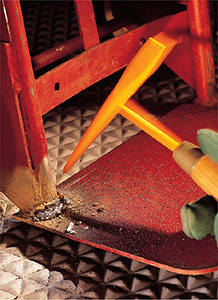
2 When the weld is complete, chip any excess metal, called slag, from the workpiece, using a welder’s hammer and wire brush.
Painting metal involves many of the same skills, tools and paints used with wood. The keys are properly preparing the surface and using the right primers and paints. Here are a few tips on painting outdoor metals:
Steel siding. Thoroughly power-wash it using a TSP additive (or TSP substitute). Rinse and let dry for two or three days. There’s no need to prime if original paint is firmly adhered. Paint using 100-percent acrylic latex.
Downspouts and gutters. Apply metal primer. Then paint the same way as you would siding.
New galvanized metals. Roof flashings or vents should weather for six months. Apply special galvanized metal primer, then two coats of latex paint.
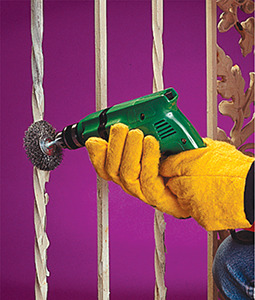
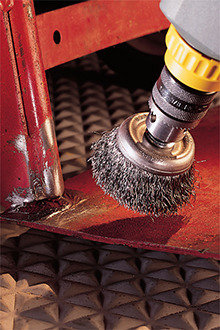
1 Remove flaking paint using a wire brush or wire brush accessory in a drill. Wear eye and breathing protection.

2 Apply a rust dissolver to intricate areas. Let the areas sit for 30 minutes, then spray off with a garden hose.
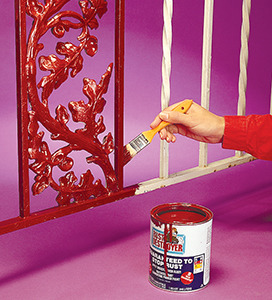
3 Coat entire railing with a primer. A direct-to-rust primer bonds with any remaining rust, solidifies it and prevents it from spreading. Spray or brush on the final topcoat.
Metal is strong, but not indestructible. If you have a dent in thin metal and can reach the opposite side, try pushing it out using the heel of your hand. If the back side is inaccessible, drill a small hole in the dented area, insert a screw, grasp the head with locking pliers and pull straight out. If the dent doesn’t come out, tap around the raised border of the dent with a hammer to release the pressure, and then pull again. For repairing large dents, follow these illustrations:
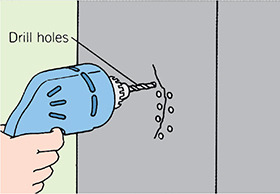
1 To repair a dent in thick metal, clean and sand the metal, and then drill a series of small holes to help anchor some filler.
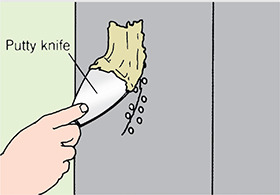
2 Prepare epoxy filler from a fiberglass repair kit. Use a putty knife to fill dent with epoxy, pressing it into holes, mounding it slightly above surface and overlapping the edges of the undented area.
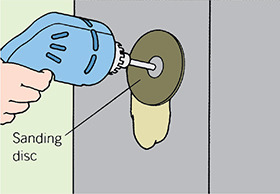
3 Let filler cure completely. Sand even with surrounding surface. Clean and paint the area.
To remove a small dent, push it out by hand from the opposite side. If that fails, hold dented area against a bag filled with sand, and tap it gently with a mallet until the area smooths out.
Plastic laminate has dozens of uses in the kitchen, in the bathroom, even in the workshop. You can use it to create countertops, tabletops, doors, assembly benches and other areas where a durable, easy-to-clean surface is needed. No sanding, staining or painting is required and you only need a few specialty tools.
Plastic laminate is made with layers of paper and resins pressed together under high temperature and pressure. The top layer of paper gives laminate its color. Since laminate is only about 1/16 in. (1.5 mm) thick, the surface it’s mounted to, called the substrate, must be solid. Both particleboard and the more expensive medium-density fiberboard (MDF) work well. Laminate adds significant strength to its substrate. For example, a particleboard shelf with a laminate top, bottom and edge can hold three times the weight of a raw particleboard shelf.
You may already own some of the basic tools and supplies required, but you may need to purchase a few specialty items.
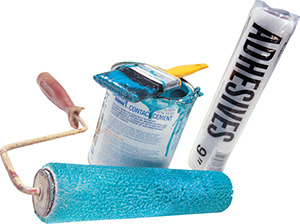
Contact cement is the best adhesive. It creates an instant bond and eliminates the need for clamps. A disposable brush and a 9-in. roller cover specially designed for spreading adhesives are all you need for applicators.
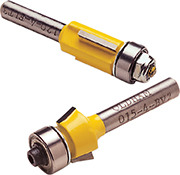
Router bits with roller bearings are the best tools for trimming, both where laminate meets particleboard and where laminate meets laminate along an edge.
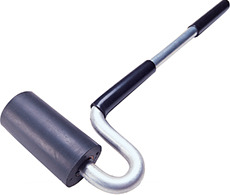
Rollers are used to roll the surface of the laminate to ensure a complete adhesive bond with the substrate.

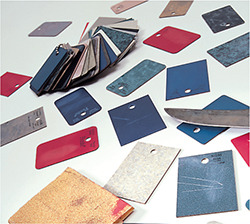
One of the simplest ways to check the durability of a laminate is to conduct your own torture test on a sample chip. In general you’ll find laminates with solid colors, especially dark colors, are the quickest to show wear and tear. Glossy finishes are also quick to show scratches. Those with mixed colors, matte finishes or slightly textured surfaces tend to show scratches less easily.
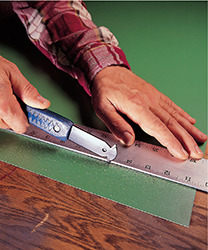
Scoring tool. Make at least four firm passes on the face of the laminate with this carbide-tipped tool to score a deep line. Gradually fold the laminate, pulling up from one end of the score, to make the break.
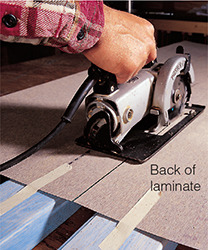
Circular saw. Cut the laminate, face down, with a high-tooth-count carbide blade set at 1/4 in. (6 mm) depth. Support the laminate well with 2x4s and tape it in place. Use a straightedge guide for best results.
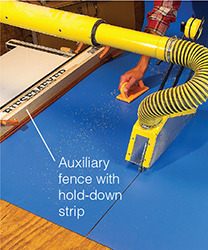
Tablesaw. Cut laminate, good side up, with a high-tooth-count carbide blade. For best results, build a subfence that fits tightly to the top of your tablesaw so the laminate can’t slide under the fence. The narrow acrylic strip holds the laminate down while allowing you to still see the fence.
You can order factory-made laminate tops in almost any size, shape and pattern; a few large home centers even stock ready-to-go tops. But if you’re the hands-on type, you can create your own custom top in less than a day. The huge variety of laminates available, including metallics, bright colors and faux-stone, opens up a world of possibilities for woodworkers and experienced do-it-yourselfers. Sheets of laminate, up to 5 x 12 ft. in size, can be special ordered through home centers and many lumberyards.
If you tackle this project, remember these tips:
■ Make certain your substrate is clean, flat and free of blemishes.
■ Contact adhesive, as its name implies, sticks (and sticks instantly) upon contact. Work carefully and use the slip sticks, as shown below in step 2, "Installing the Top".
■ For countertops, always install the vertical surfaces first. That way the horizontal top overlaps and protects the vertical edge from chipping.
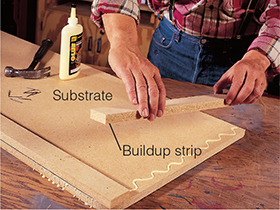
Glue and clamp buildup strips to substrate’s bottom edge. Apply glue, position the strips, tack them in place and clamp.
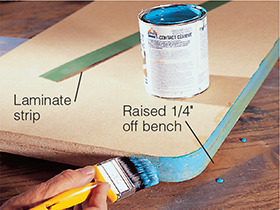
1 Brush on contact cement; porous particleboard edges may require a second coat after the first dries. Apply cement to laminate strips.
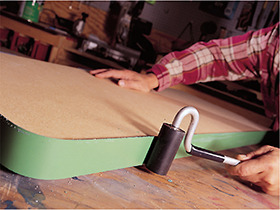
2 Roll the surface of the laminate to ensure a good bond. On curves, use a heat gun to soften the laminate as you press it into place.
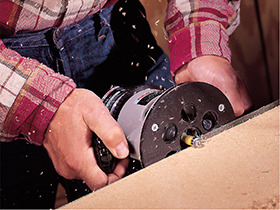
3 Trim the top and bottom edges flush using a laminate flush-trim bit. Keep the router perfectly perpendicular to avoid uneven edges.
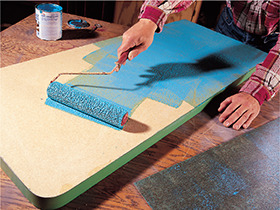
1 Roll contact cement onto the substrate and the back of the plastic laminate. Let it dry on both surfaces before assembly.
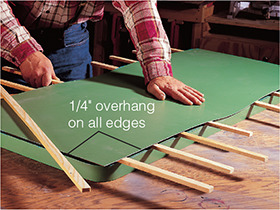
2 Use slip sticks to separate laminate from substrate. Start in middle and remove sticks, pushing down as you work toward edges.
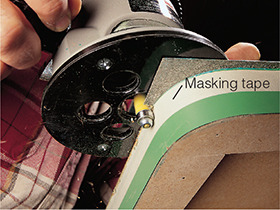
3 Trim laminate flush with substrate. Masking tape protects laminate from possible damage. Ease the edge using a bevel-trim bit.
A wood-edge top not only looks great but is easier to make and holds up better than laminate edges. Prepare the substrate, then cut and glue 3/4-in. x 1-1/2-in.-hardwood strips along the edges. Miter the corners and slightly round them if they are sharp.
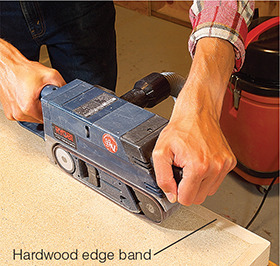
1 Sand the wood edge flush with the substrate. Clean the top and apply contact cement to top and laminate.
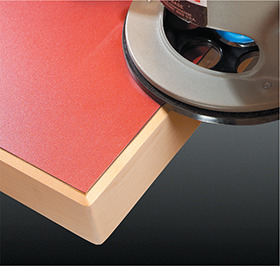
2 Apply laminate top, then use a chamfer bit to shape the top edge of the countertop. A 25° to 30° bevel looks best.
PVC is even easier to work with than wood. No knots, no bowing, no cupping or warping. You can nail and screw right next to the edge without splitting it. And once two boards are glue-welded together, they’re never coming apart! Sure, cutting PVC doesn’t smell as nice as cutting cedar, but you’ll never get a splinter, and you can all but forget about rotting.
Don’t worry—there aren’t any fancy tools or skills required to install it. If you’ve worked with wood trim before, you have the moxie to work with PVC. And if you install it correctly, it will still look perfect after decades.
PVC trim expands when it’s hot and contracts when it’s cold. As a general rule of thumb, if you’re installing trim in temps higher than 80 degrees F, go ahead and fit joints tightly. If it’s between 60 and 80 degrees, leave a 1/16-in. gap for every 18 ft. of length. Below 60 degrees, leave a 1/8-in. gap. Some products expand more than others, so follow the instructions with the specific product you’re working with to be sure you leave enough room. After installation, cover the gap with paintable acrylic or polyurethane caulk. Avoid silicone-based caulks—they don’t adhere well to vinyl.
You can cut PVC products with the same power tools that you use for wood. But use only carbide-tipped saw blades; plain steel ones dull quickly. In general, the more teeth a blade has, the smoother the cut edges will be. Combination saw blades work well. You can easily rout decorative edges or grooves with routers or shapers, but use carbide-edged bits.
Sawn edges won’t have the same shiny finish as factory edges, so if you can, plan your work so that cut edges will be hidden, and let the smoother factory edge show wherever possible.
Sanding isn’t always necessary, especially if you plan to paint, but if you have a rough-cut edge near a highly visible area, use a random orbital sander with 100-grit paper. Belt sanding doesn’t work well because the friction from the belt melts the plastic rather than smoothing it.
One advantage of PVC is that you can “weld” joints to keep them tight and prevent water from penetrating behind the trim. Manufacturers recommend a special type of PVC cement that has a longer “open time” than the type of cement that plumbers use on plastic pipes. You can buy this cement wherever you buy the trim.
You’ll have about five minutes of working time to clamp and fasten the joints before the cement sets. Smear a little cement on both surfaces and then clamp or screw the joint together. Wipe off any excess right away with a damp rag. Unlike PVC pipe cement, PVC trim cement is water soluble and won’t melt finished surfaces if you remove it immediately.
Fill small holes with an exterior filler and lightly sand it smooth after it dries. Or use a paintable caulk and smooth it with your finger. Fill larger holes or damaged areas with auto body filler, and again, sand it after it cures.
Where ends of trim meet, join them just like wood: Create “scarf joints,” that is, overlapping 45-degree joints. Cut the first piece of trim to fall just past the center of a stud so the second, overlapping trim piece can be fastened to the center of the stud. And don’t forget to apply cement to both pieces before securing them to the wall.
Although painting PVC trim isn’t necessary, you may want to consider it, especially if you have a bunch of cut ends showing (some brands of PVC are protected from UV sunlight only on the outside). Edges that have been cut or routed could turn yellow over time. Cut edges also collect dust and aren’t as easy to clean.
Before you paint, use mild detergent to clean off grime and oils left over from handling, and make sure the surfaces are dry. Until recently, you could only use lighter paint colors, because darker colors absorbed more of the sun’s heat and increased expansion of the PVC, causing the trim to warp and the paint to peel. Sherwin-Williams is one paint manufacturer that now offers a line of vinyl-safe paints. There are more than 100 color choices, light and dark.