
Your home may be your sanctuary, but you may be sharing it with a host of hazardous building materials. Keep an eye out for the products listed below. (Note: All dates are approximate.) When in doubt about a particular building material, call a pro. Check your Yellow Pages under “Home and Building Inspection” and “Inspection Services.”

Aluminum wiring is dull gray in color with “Aluminum” or “AL” stamped on the wire’s plastic jacket. Installed in homes between 1965 and 1973. Wire shrinks and swells, loosening splices, outlet and switch connections, which can lead to increased risk of fire. Repairs can be made using special products and techniques but should be performed only by a licensed electrician.
Asbestos ceiling and wall covering products. Asbestos was used in sprayed and troweled coatings (1935 to 1978), surface and joint compounds (1930 to 1978) and in some vinyl wallpapers (exact dates unknown). Fibers can be released through cutting, sanding, water damage, impact and deterioration causing lung damage.
Asbestos flooring materials. Asbestos was used in vinyl-type tiles (1950 to 1980), asphalt-based tile (1920 to 1980), resilient sheet flooring (1950 to 1980) and mastic adhesives (1945 to 1980). Fibers can be released through sanding, scraping or cutting. Often it’s best to leave material undisturbed and install new floor covering over it.
Asbestos pipe wrap was used extensively from about 1925 to 1975 and can be either corrugated or preformed. It contains a high percentage of asbestos. Fibers can be released through damage, cutting or deterioration.
Asbestos roofing and siding. Asbestos was used in roofing felts (1910 to recently), roofing and siding shingles (to present) and clapboards (1944 to 1945).
Formaldehyde, used in particleboard, plywood, some foam insulations and other products, can be an irritant to eyes, nose and throat. Some people are allergic to it and have strong reactions. It eventually dissipates, but the best solution in newer homes and projects is to use alternative products or ventilate well with outside air.
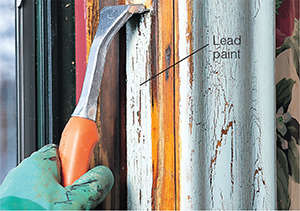
Lead paint is in most homes built before 1950; those built between 1950 and 1978 may or may not. Primary danger is posed by ingesting or inhaling dust or chips. The paint affects nerves and internal organs particularly in children, pregnant women and the unborn. Flawless paint can be encapsulated (painted over).
Vermiculite insulation, usually small, shiny and light brown in appearance, was installed in nearly one million homes. Much, but not all, of this type of insulation contains asbestos. If it’s sealed tightly in walls or isolated in an unfinished attic, it may be best simply to leave it alone. If renovations involve disturbing it, contact a certified professional.
A typical home contains 100 to 200 products and chemicals for cleaning, painting, lubricating, fertilizing and home improving. Listed below are recommended procedures for safely disposing of some of those products containing hazardous substances.

There are a few steps you can take to keep the disposal problem to a minimum in the first place: Look for less hazardous products, buy just enough of a product to do the job and keep leftover products in their original containers so you can refer to the directions for proper disposal.
Many communities have hazardous waste disposal centers or designated days when hazardous waste is collected curbside. Check with local officials for more details.
Car, boat and other wet-cell batteries contain sulfuric acid and lead. Most outlets that sell new batteries will recycle old ones.
Rechargeable batteries, including those found in cordless tools, laptops, digital cameras and cellular phones, can contain nickel cadmium, nickel metal hydride and other hazardous constituents. Many retailers including The Home Depot, Target, RadioShack, WalMart, Best Buy, Batteries Plus, Rona and Home Hardware have drop-off centers.
Fluorescent bulbs can contain mercury. Dispose of spent bulbs using your community’s hazardous-waste disposal facility.
Motor oil contains heavy metals which can cause nerve and kidney damage and hydrocarbons that may be carcinogenic. Never throw it in the trash or burn it. Take it to the used-motor-oil collection center found at most full-service oil change centers or service stations.
Paints, particularly those that are oil based, contain solvents that can be an irritant to you and the environment. When possible, use up the paint or give it away. If it’s totally dried in the can, place it in the household trash; if not, bring it to a hazardous-waste collection center.
Treated lumber should never be burned. Bury it, reuse it or dispose of it in a sanitary landfill.
Weed killers, paint strippers and other hazardous household chemicals should be disposed of using your community’s hazardous-waste disposal facility.
Most fires are unexpected because they’re caused by ordinary, everyday items and situations normally considered safe. What makes them dangerous are mental lapses, poor judgment, hurried actions and simple carelessness. Here’s a rundown of the seven most common causes of preventable fires and steps you can take to keep them from starting,
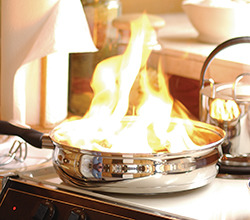
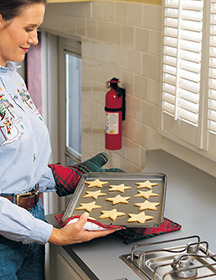
Cooking fires occur most commonly on the cooktop in the first 15 minutes of cooking. Keep curtains, packaging and other combustibles 3 ft. (1 m) away. If a pan catches fire, slip a lid over the top; carrying it outside can leave a trail of dripping, flaming grease.
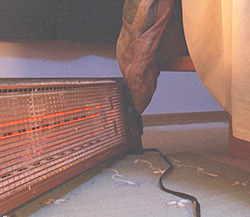
Heating equipment, particularly wood stoves and space heaters, can ignite nearby combustibles. Keep drapes, bedding and other flammables 3 ft. (1 m) away. Plug heaters directly into outlets, not extension cords.
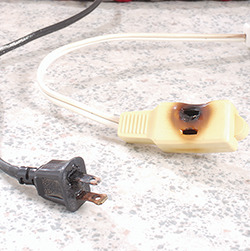
Electrical fires can be caused by overloaded extension cords, hidden electrical shorts, bad connections, and oversize bulbs in fixtures. Replace frayed and undersized cords and call an electrician to track down recurring problems.
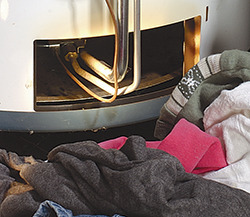
Appliances, more specifically lint in dryers and combustibles near gas water heaters, can spark a fire. Keep dryer and duct free of lint and keep combustibles at least 3 ft. (1 m) from water heaters.
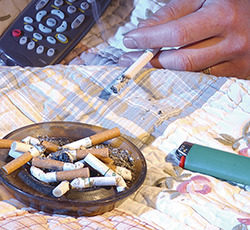
Smoking kills more people than any other cause because the fires usually start when occupants are asleep. Never smoke in bed and use large ashtrays on tables.
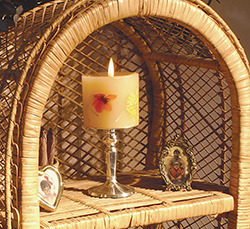
Candles, particularly unattended ones, can easily ignite nearby combustibles. Use tip-proof containers and keep combustibles 3 ft. (1 m) away.

Kids playing with fire start 5 percent of residential fires; children are also the most likely to die from those fires. Store matches and lighters up high, well out of reach.
Use a fire extinguisher only on a fire confined to a small area, after you’ve evacuated the house and called the fire department. Keep extinguishers away from possible fire sources and near exits so you can easily escape. Locate fire extinguishers in kitchens, garages and other rooms that present fire hazards.
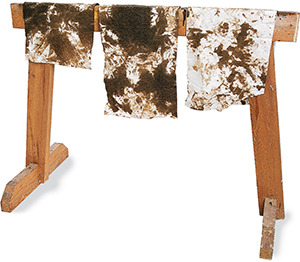
A pile of oil-soaked rags can generate enough heat as they dry to spontaneously catch on fire. For safety, spread out rags containing linseed, tung and other oils one layer thick so air can circulate around them and heat can dissipate.
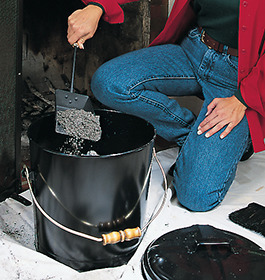
Ashes can smolder for up to two weeks. Empty them into a covered steel container and store it outside away from combustibles for several weeks. Have your chimney inspected and cleaned annually.
Most indoor pollutants are microscopic, which makes them hard to detect, but easily able to infiltrate our bodies. They can cause symptoms such as sore throats, headaches, infectious diseases and worse. Detailed information on controlling these pollutants can be obtained through your local public health department, Health Canada or regional EPA office.
Biologicals include the pollen, spores and dust mites shown below. Control the latter two by eliminating standing water and maintaining relative humidity between 40 and 60 percent.
Insecticide dust can easily drift, or be tracked, into a house. Minimize insecticide use and don’t store it in the house.
Lead in dust and fumes can enter lungs first, then the entire body. Test paint before removing it to see if it’s lead based. See here for more detailed information.
Asbestos fibers can lodge in lungs and cause scarring and cancer. Leave asbestos insulation alone. Have testing or removal done by professionals.
Tobacco smoke can contain any of 4,700 different compounds, gases and particles. Stop smoking and stay away from second-hand smoke.
Combustion particles from wood and refined fuels can cause irritations, diseases and cancers. Vent all combustion devices outside.
Organic compounds in household products, including paints and solvents, can be absorbed into your body. Limit your contact, work in a well-ventilated area and keep containers tightly closed.
Radon is a naturally-occurring radioactive gas that creates dangerous particles as it breaks down. Test your house for radon and take steps to reduce it, if necessary.
Formaldehyde is used in manufacturing particleboard, plywood and other building products, and is an irritant to some people. Ventilate well or use alternative products.
Carbon monoxide and nitrogen dioxide, which are odorless, colorless gases, can rob the body of oxygen leading to dizziness, headaches, even death. Make sure fumes from all appliances go up a chimney or out a vent.
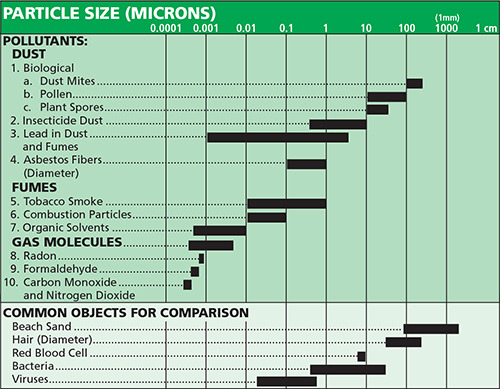
Note: The top scale of the chart indicates “microns,” one-thousandth of a millimeter. The letter “o” on this page is about one millimeter wide, so you’d need about 1,000 particles of insecticide dust to span its width. Each vertical line represents a particle size 10 times greater (or less) than the adjacent one. Pollens, for example, are 5 lines away from gas molecules, so pollen is about 100,000 times larger. This smallness makes gases hard to detect and they infiltrate our bodies easily.

Spores are tiny seeds released by the thousands by fungi and mold.

Pollen is released by flowering plants. This chickweed pollen is a common nose and throat irritant.

Asbestos fibers, about the width of a human hair, can fragment into even smaller fibers that can lodge in lungs.

Dust mites scrounge through bedding and carpets, consuming tiny flakes of dead skin. They’re the size of a fine grain of sand and live by the thousands in our homes.
Radon is a naturally occurring radioactive gas that, upon reaching high enough levels, can increase your risk of getting lung cancer. This colorless, odorless gas can seep into your home through cracks and gaps in the foundation or crawl space or in gaps around a sump pump.
Radon levels can be tested using either a home test kit or a professional testing service. If you discover very high levels of radon (4 picoCuries per liter or higher), it may be best to hire a certified professional radon mitigator. They’ll take steps including sealing holes and cracks in basements, placing gas-tight seals over sump-pump basins and pouring concrete over dirt floors and crawl spaces. These are tasks many homeowners can do, but bear in mind that some practices, if applied incorrectly, can actually increase radon levels. Conduct a second test after work is complete to check for sufficient reduction.
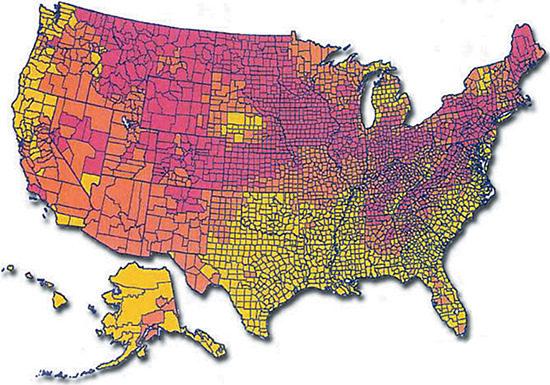
Legend
Zone 1 Potential exists for dangerous levels of radon
Zone 2 Potential for moderate levels of radon
Zone 3 Predicted low levels of radon

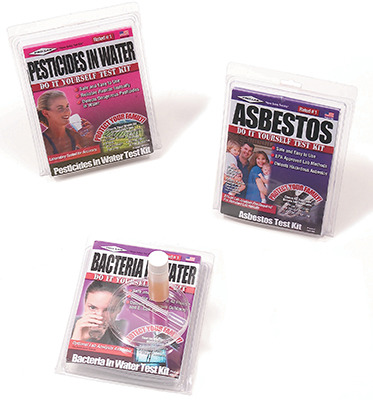
There is a wide array of in-home test kits homeowners can purchase for checking for the presence of harmful substances in and around the home. In some cases, swabs or samples are taken and sent to a laboratory for further analysis. In other cases the presence of the substance is revealed by a change, usually in color, of some indicator.
There are kits available that will test for the presence of mold, asbestos, lead paint, pesticides in water, lead in water, radon and more.
Bear in mind that test kits can produce false negatives (the hazard is present but the test doesn’t indicate so) and false positives (the test indicates the hazard is present, but, in reality, it isn’t).
The best approach is to use the results of these test kits as a preliminary step to more thorough investigation and testing.
When insects invade a house, they also invade your peace of mind. Some physically damage a house and its contents, while others are simply unwanted pests.
Some solutions involve the use of insecticides. Be sure you use them carefully and in the right doses—what’s toxic for bugs can also be toxic for humans. Always follow the guidelines on the container and avoid using insecticides near children and pregnant women. Try to avoid using products with the warning “Danger.” And if you use an insecticide indoors, make sure it’s labeled for indoor use.
The best way to control ants is to kill them in their nest. Look for a trail or pattern in their appearance. If you locate the nest outdoors, apply an ant insecticide directly to it. If it’s inside a wall, you can drill small holes and squirt an insecticide or boric acid dust into the cavities. If you can’t find the nest, use one of the ant baits on the market.
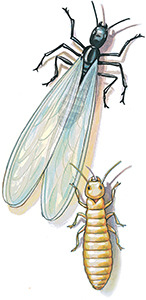
It’s estimated that termites cause more than one billion dollars a year in structural damage. If you suspect you have termites, don’t fool around—call a state-certified pest management professional to inspect your home. Signs of termite activity include mud tubes (image below) leading from the soil to wood parts of the house closest to the ground, swarms of flying termites and hollowed wood near the ground in which you can poke a screwdriver.
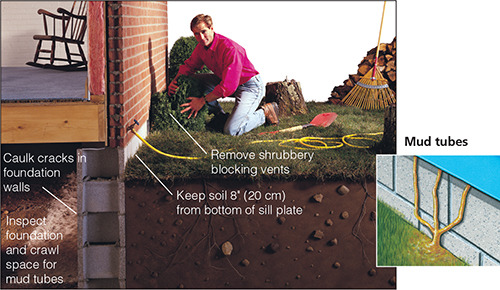
Reduce the risk of termites by eliminating all wood-to-soil contact around the house, removing any shrubbery or firewood stacked against the house and repairing leaky gutters, leaky outdoor faucets and other sources of moisture.
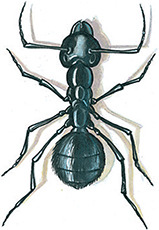
Carpenter ants are attracted by wet wood, so correcting moisture problems in the home is part of the long-term solution. Cut back tree branches contacting the house and remove wet piles of wood near the foundation. If you locate the working ants—they’re large and black with a pronounced waist—find the nest and apply insecticide directly. Severe infestations may require professional help.
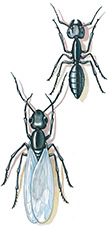
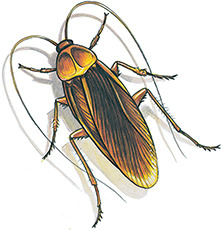
Begin by cleaning up every speck of food from shelves, drawers, under appliances and under the sink. Store any accessible food in plastic containers. Fix leaky sinks and drains to remove the roaches’ water supply. Then place sealed bait containers or boric acid pesticide powder (read the instructions carefully) around active areas. Avoid using spray insecticides, especially in kitchen areas.
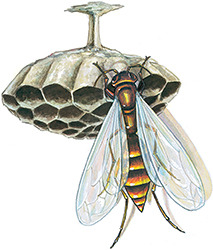
Watch the wasps to see where they go—it will be to either a nest or a hole in the ground. Spray the nest or hole with an aerosol wasp and hornet killer. Most shoot a stream of quick-acting insecticide up to 30 ft. (10 m).
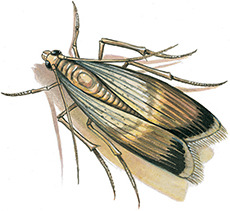
Meal moths get into dry food like flour, cornmeal, beans, birdseed and dog food. You can toss out the affected stuff, freeze it for four days or heat it in a 130° F (55° C) oven for 30 minutes. In the future, store food in glass or sturdy plastic containers with lids.
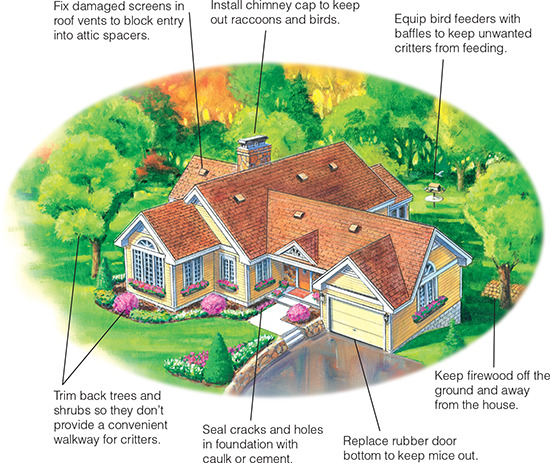
Mice, squirrels, raccoons and bats are the most common fur-covered pests that invade our homes. They really don’t mean any harm; they’re just looking for food, water and shelter. Some evictions, such as removing a raccoon from a chimney or dealing with skunks, are best handled by the pros. Other tasks, like getting a bat out of your house, can be as simple as opening a window until it finds its way out. (It wants out as badly as you want it out!)
The illustration above gives more specific ideas for keeping critters out.
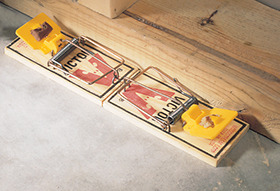
Mousetraps work best when set in pairs—side-to-side or back-to-back. Use chocolate or nut meat as bait. If you catch a mouse, dispose of it and reuse the trap; the scent of the first mouse will attract others.
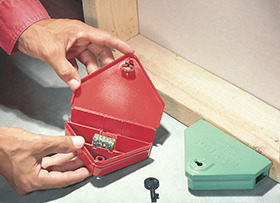
Bait stations are effective, but the poisoned animals crawl off and die somewhere, usually in your house. Use bait stations that lock and keep them away from kids and pets.
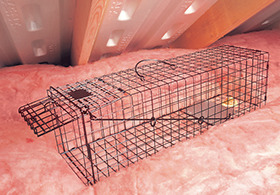
Live traps are ideal for capturing squirrels in the attic. Release any captives outside immediately and wear heavy gloves to avoid being scratched or bitten.
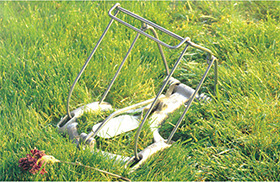
Moles thrive on the grubs, worms and insects that lie just below the surface of your lawn. Methods of eradication range from placing poisonous bait and smoke bombs in their tunnels to eliminating them with choke-type or spear-type traps (below). Other techniques include compacting the soil, installing vibration devices or applying chemicals to drive moles away.
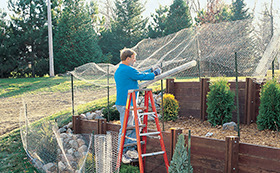
Deer can be incredibly persistent. You can try using sprays and other repellents or planting plants, like spirea and potentilla, which deer don’t like. The surest solution is to build a fence 8 ft. (2.5 m) tall (yes, they can jump that high) or to put a screen over a lower fence. Home remedies range from hanging bars of scented soap around the yard to sprinkling dog hair around the garden.
Mold and mildew need only a damp, moist environment and organic material to establish themselves and thrive. Roof and foundation leaks, high interior humidity, leaky plumbing and flooding are common sources of moisture. Fix the moisture problem before attacking the mold. The organic materials mold and mildew commonly attack are drywall backing, wallpaper, carpet backing, household dust and wood products. A few types of mold are highly toxic. If you have an allergic reaction or a heavy infestation, call your local health department and ask for mold-testing advice. Wear proper safety equipment as you work.
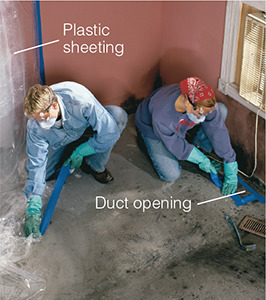
1 Seal room and duct openings with tape and plastic sheeting. Remove carpet by first wetting it with a pump sprayer to control the spread of spores. Cut carpet and pad into small sections, roll them, wrap them in 6-mil plastic and dispose of them.
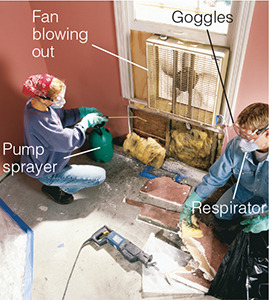
2 Increase ventilation by using a fan in a window. Remove baseboard and trim from contaminated areas. Remove heavily stained drywall, plaster and insulation. Mist drywall and insulation with pump sprayer. Double bag moldy material.
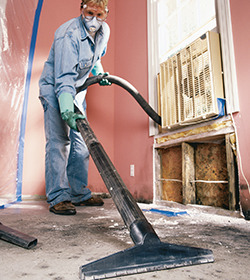
3 Vacuum up moldy debris with wet/dry vacuum. Keep vacuum outside to avoid spore spread. If necessary, buy an extra length of hose for the vacuum. When done, clean the vacuum with a mildew-cleaning mixture.
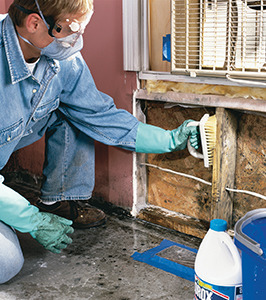
4 Scrub surface mold stains from wall cavities and floor with mildew-cleaning mixture. Use a soft brush and work until signs of mold disappear. Wipe, but do not rinse these surfaces. Replace any rotted wood.
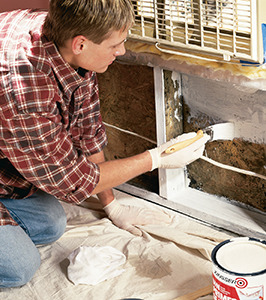
5 Allow surfaces to dry completely. Then seal all previously infested areas with pigmented shellac, oil-based primer or latex primer containing mildewcide. Install new insulation, vapor barrier and drywall.
Surface mold grows in any damp location, such as bathroom walls and corners of a tiled shower. Scrub away surface mold with mildew cleaner. Standard detergent, like dish soap, is also effective. Even for simple cleaning, protect yourself from contact with mold and cleaning products by wearing a long-sleeved shirt, long pants, rubber gloves and goggles.
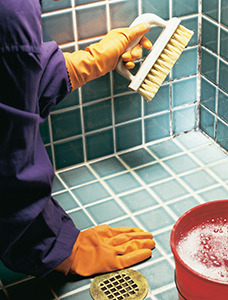
Scrub surface mold with mildew cleaner or standard detergent. If mold is still visible, reapply mixture and let sit; then lightly scrub again. Seal clean, dry surfaces with grout sealer or paint containing mildewcide.

Paint cleaned areas with paint containing mildewcide to help control surface mold.
Problem Area 1
Leaky duct joints, especially noninsulated ones running through attics, create a moist environment for mildew.
Solution
Seal these joints with flexible mastic or metal tape and insulate the ductwork.
Problem Area 2
In warm environments, impermeable vinyl wall coverings can trap moist air in walls as the air moves from the warm exterior to the cool interior, degrading the drywall and the adhesive behind the wall covering.
Solution
Remove the vinyl wall covering and apply paint or wall coverings that have permeable paper backings.
Problem Area 3
When a washing machine overflows, a water heater leaks or hoses burst and no functioning floor drain is nearby, water soaks into carpet, drywall and insulation.
Solution
Always provide a functioning floor drain near washing machines and water heaters. Install an overflow pan underneath the washing machine and make sure the washer has no-burst supply lines instead of rubber hoses.
Problem Area 4
Drywall used as a tile backer quickly degrades when subjected to moisture.
Solution
For tile backer in moist areas or floors, use cement board or a similar product.
Problem Area 5
Poorly ventilated bathrooms allow surface mold to grow.
Solution
Remove the surface mildew and seal the surfaces (see previous steps, above). Then install and use a bathroom fan.
Problem Area 6
Crawl spaces with bare earth floors transmit huge amounts of moisture (and occasionally radon gas).
Solution
Cover bare earth with 6-mil plastic sheeting and, if necessary, heat, cool and humidify the crawl space as you do the house.
Problem Area 7
Humidifiers, especially reservoir units, provide both a growth medium and a distribution system for mold and mildew.
Solution
Clean and treat the reservoir often with an antimicrobial solution.
Problem Area 8
The condensation pan under the coil of your refrigerated air conditioner can harbor mold, and the drain system can plug up, causing leaks.
Solution
Before each cooling season, clean the pan with a 1/2 percent bleach solution and make sure the pump and drain are clear.
Problem Area 9
Finished concrete basements that aren’t thoroughly waterproofed from the outside can let moisture through; it’s then trapped behind vapor barriers, carpet, layers of insulation and drywall.
Solution
Before finishing a basement, conduct moisture tests and perform any waterproofing measures necessary to ensure the basement remains dry after finishing.
Problem Area 10
Yards that slope toward foundations invite water to enter basements and crawl spaces.
Solution
Regrade the yard surrounding the house so it slopes away from the foundation.
Problem Area 11
Improperly flashed or caulked windows (and those with large amounts of surface condensation), doors and deck ledger boards let moisture seep into the surrounding wood, drywall and insulation.
Solution
Properly flash and seal these critical areas during installation or when installing new siding. Minimize window condensation with good ventilation and airflow.
Problem Area 12
Leaky roofs, especially poorly flashed areas, allow rain to infiltrate attics, insulation, eaves and other difficult-to-inspect areas.
Solution
Keep your roof in good repair by performing yearly inspections, using binoculars from the ground, and solving problems quickly.
From the day the carpenters drive the last nail, your home is under continuous threat from decay. Rot, essentially the breakdown of wood fiber, is almost always caused by fungi that invade wood and live off the fiber. Spores—fungi’s microscopic offspring—float in the air and spread everywhere; you really can’t keep them out of your house. However, to become established, these spores need three things: temperatures between 40° and 105° F (5° to 40° C), oxygen and moisture. You can’t control the temperature or oxygen level, but you can control the moisture conditions.
The best way to keep your house decay-free is to maintain its “armor.” Inspect the siding, shingles, paint and gutters seasonally and keep them in good repair.
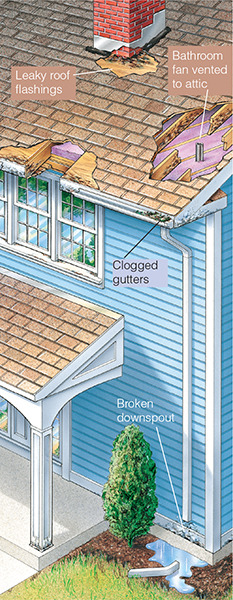
Rot on your home is likely to begin wherever water frequently dampens the wood and is slow to dry out again. Leaky roof flashings, worn shingles, wet areas around the foundation and clogged gutters are all weak points that can lead to decay. Peeling paint usually indicates damp wood.
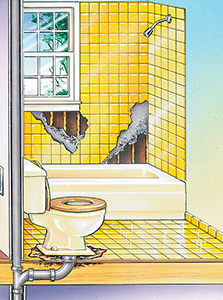
The floor under a toilet can rot when the wax seal between the toilet and toilet flange breaks and water leaks when you flush. If your toilet rocks, the seal is most likely broken and should be replaced. The walls around showers—especially ones that contain windows—can also rot when water and condensation penetrate around sills and uncaulked joints.
To minimize rot in laundry rooms located on wood floors, install a watertight pan under the washer to catch overflows.
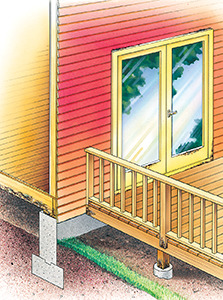
Poor drainage around the house leads to damp foundations, crawl spaces and rotting wood members and deck posts. Make certain the soil around the house slopes away from the foundation. Clogged or leaky gutters and worn-out shingles allow water to soak into the roof edge and rafter tails. Keep an eye out for peeling paint in soffit and fascia areas and maintain good attic ventilation to minimize the chance of harmful ice dams.
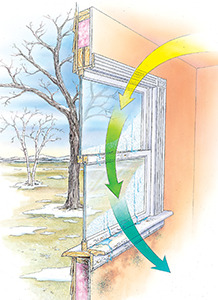
Decay around windowsills and doors can be especially bad on the south side where warmth from the sun can drive moisture deeper into the wood. Once decay begins, problems compound because decaying wood soaks up water faster than solid wood. Scrape off flaking paint, apply a wood preservative, then repaint and caulk.
Condensation on the inside of windows and doors can soak through sills, saturate wallboard and also cause wall framing to rot. Running a dehumidifier is a short-term solution; installing an air-to-air heat exchanger or more efficient windows are two long-term, though expensive, solutions.
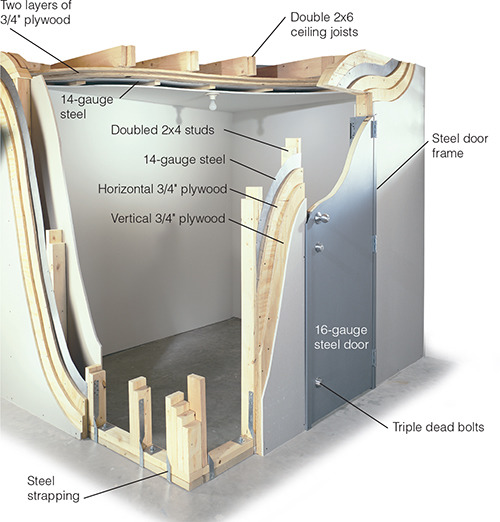
Force 5 tornadoes and C5 hurricanes—the two most serious storms—can pack winds of more than 200 mph (320 kmh) and drive even a well-built house right off its foundation. An inside storm shelter or “safe room” can buy both safety and peace of mind. Safe rooms are completely independent of the house structure and secured to a concrete slab. They can be created using wood and steel, like the example shown, or poured reinforced concrete, welded steel and other materials.
The Federal Emergency Management Agency offers free booklets and complete information on constructing a variety of safe rooms.
A back-up generator linked directly to your electrical service panel can provide enough power to keep your furnace, well pump, refrigerator and basic lights operating during a power failure. The system, which should be installed by a licensed electrician, includes:
A transfer switch, mounted next to your service panel, which allows you to selectively operate essential equipment. It also serves as an automatic disconnect switch to protect electrical utility line workers from electrocution by preventing the generator from supplying power back into the utility supply system.
A generator. Purchase a model that will provide enough power to run essential items on an intermittent basis. Never operate it inside any type of enclosure.
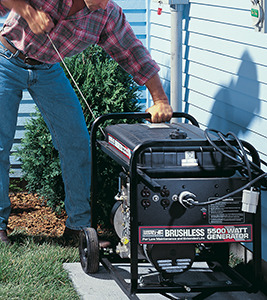
Generator. A 5,000- to 6,000-watt unit is usually large enough to provide power for essential items during a long power outage.
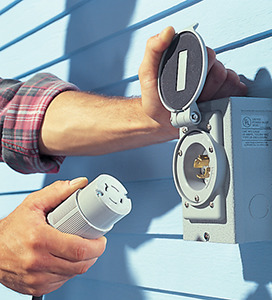
Weatherproof outdoor inlet. This allows you to connect the generator to your electrical system without having to run a cord through an open window.
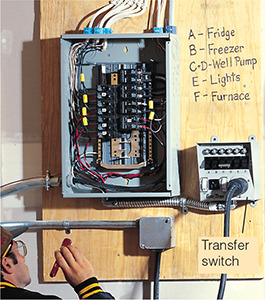
Transfer switch. The transfer switch allows you to run essential equipment as needed and serves as an automatic disconnect switch to protect utility line workers.
Natural disasters can affect anyone, any place, any day of the year. Severe weather, floods, tornados, hurricanes, earthquakes, national emergencies, and the utility outages that can accompany them, are conditions worth being prepared for. And it takes surprisingly little time and resources to be ready.
Here are six ways you can be prepared:
Water. Fresh water supplies can be cut off or become contaminated. Store a minimum of one gallon (4.5 liters) of water per person per day—and store enough for three days. Use clean plastic containers and replace the water every six months to ensure it’s safe.
Food. Again try to store a minimum three-day supply of food. Canned foods such as meats, fruits and soups, and dried foods such as crackers or cereals keep well. Rotate your food supply every six months to maintain freshness.
Basic tools and supplies. Keep a battery-operated radio, flashlight and fresh batteries in a convenient location. “Crank-operated” radios and flashlights are also readily available, inexpensive and require no outside power source beyond your arm. A can opener, candles, matches and basic personal hygiene items should also be stored. A folding all-purpose tool containing knife, screwdriver, pliers and other implements can also prove invaluable. And don’t forget the duct tape, a cell phone and charger.
Emergency medical supplies. In addition to a prepackaged first aid kit containing bandages and other basics, keep non-prescription medicines (aspirin, antacids, etc.), antiseptic, towelettes and latex gloves on hand. Consult your pharmacist about storing prescription drugs.
Clothing. Keep an extra set of clothes on hand as well as sturdy shoes, rainwear, hats, gloves and rescue blankets.
Documents. Keep passports, birth certificates, insurance policies, medical records and emergency numbers in a waterproof, fireproof container. If you keep these items in a bank safe deposit box, keep copies of them at home in your safe box. Consider keeping some cash on hand, too.
Note: For information on shutting off your electricity, water and gas in emergency situations, see here.
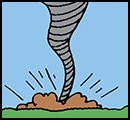
Before tornado season find a low, windowless, structurally strong place where you can take shelter—in the basement, under stairs, in a safe room or in an inside hall or closet on the lowest floor. Conduct drills with family members.
After a tornado, enter a building only after authorities or an inspector have checked the foundation for shifting or cracking and the walls and ceilings for structural soundness.
If you smell gas, shut off the main gas valve immediately.
Shut off the electricity. Have an electrician check for short circuits.

Take in outdoor equipment, furniture and any other loose items. Tie down objects too large to move. Take in awnings.
Shutter windows or cover them with plywood or boards.
Store candles and flashlights in case of power failure.
Cut dead branches from trees on your property and any branches that are dangerously close to the house.
Lock all doors and windows to reduce vibration. Close draperies and blinds to contain flying glass.
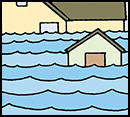
Move valued belongings to the highest spot in the house if time permits, or to a neighbor’s house if it is on higher land.
Raise heavy appliances and furniture by putting concrete blocks, bricks, or layers of boards under the corners.
Open basement windows in severe cases to allow water in and avoid a cave-in due to unequal pressure between the inside and the outside.
If you’re told to evacuate, turn off the gas, electricity, and water, lock the house, and leave immediately.

Protect water pipes with heat tape and insulating jackets, or let water trickle from faucets to prevent freeze up.
Clean out gutters and downspouts ahead of time to prevent ice blockage and aid runoff.
Tightly shut windows and storm windows. Plug window drafts.
Be prepared for a power failure and loss of heat.
Store food and water to last several days. Buy extra fuel for fireplace. Keep flashlights, candles and a battery-powered radio at hand.

Add extra bracing and foundation bolts and have the chimney and hot-water tank strapped in place in earthquake zones.
Position yourself under a strong doorway, against an inside wall, in a safe room or under stable, heavy furniture, such as a desk or bed.
After an earthquake be wary of flooding and tidal waves. If you’re in a low-lying area near a large body of water, head for high ground. Enter a damaged building carefully, as described for tornado, above, and shut off the utilities.