IN THIS CHAPTER
 Shooting at different times of the day
Handling different weather
Working inside
Dealing with other situations
The light the sun gives off is tremendous in so many ways. It’s exceptionally strong, naturally white, and freely available. And yet, you won’t capture the same photos at noon as you would during the morning or evening golden hours. Recognizing this is important. My skills as a photographer took tremendous leaps and bounds the day I realized that light from the sun changes based on the time of day, and different times were better than others.
I invite you to learn this lesson with me as you read about photos I’ve taken at different times of the day, in different weather, inside and out. Finish off by examining photos shot during different conditions, including indirect light, hazy days, and high-contrast scenes.
Working in Natural Light
The time you choose to go out and photograph people and other scenes plays a very important role in how the photos turn out. Light changes during the day, and it’s not all equally good. For example, morning light isn’t the same as the light you see at noon or in the evening. Knowing this, you can plan your trips more effectively and capture the photos you want.
Shooting in the early morning
I don’t go out in the morning to take many photos. However, I drive by this bridge on the way to church enough Sunday mornings that I know how beautiful it is at that time of the day. The light from the rising sun kisses it on the side. Think about that for a minute. Objects that are normally lit from above during the day and shaded on one side or another are often beautifully and unconventionally lit during the morning or evening. I eventually decided that I had to take some shots of it, so I grabbed my camera the next Sunday morning and we stopped on the way so that I could take the photo in Figure 1-1.
 Mornings are often clear and calm. The day is just starting and the light feels fresh. The hour or so after sunrise and before sunset is called the golden hour because of the great light.
Notice the still water of the river. It’s so quiet that the bridge, sky, and foliage cast amazing reflections. You get two scenes for the price of one. Not all mornings are like this, of course. Some will be blustery, wintery, stormy, hot, muggy, or rainy. However, on a good day like this, it’s a joy to take photos early in the morning.
One note of caution when shooting in the morning. Once the sun starts to come up, pay attention to the contrast levels in the scene. You may struggle to preserve details in areas of deep shadow without blowing out highlights. If you need to, choose a middle ground by using exposure compensation or manual shooting mode, and then work to bring out details in software. In this case, I had to work hard to tame the highlights in Adobe Lightroom.
Fighting with the light at noon
As I looked through my catalog of photos, I realized I don’t have that great a selection of photos taken around noon. The reason is that it’s the worst time of day to photograph people, nature, and buildings.
The sun is the most intense during this time and casts very harsh shadows. Because of this, I won’t even take photos of people at noon. They squint and the photos look horrible because half their faces are in deep shadows while the other half of their faces look too bright.
You’re not a bad photographer if you can’t take perfect shots at noon. That’s just the way it is. Unless you work with a tremendous amount of portable diffusers and other gear to soften the light, it’s just not worth it.
So what I have for you is a nice shot overlooking the lake at our favorite summer camp shown in Figure 1-2. The reason this photo is even close to passable is that it’s a bit past noon and the sun is off to the right a bit. There are enough clouds in the sky that I took this shot while the sun was briefly obscured. Although the clouds acted as a giant diffuser, it’s still very bright.
Going out in the early evening
Early evening is a good time to photograph things. The harsh afternoon sun has passed and been replaced by more forgiving light. It’s still bright, but not normally overpowering unless you look right at it.
While you’re waiting for the golden hour (visit www.golden-hour.com to find when golden hours starts and ends each day; there’s also an app), look for interesting subjects and scenes. Many will be large and scenic, but don’t overlook the small things. The petunias in Figure 1-3 are a great example. I shot this photo at a park near where we live while testing a new camera.
You can see that the flowers are well lit and the colors in the scene are nice and vibrant. This isn’t just me or about my skill, it’s the time of day I chose to photograph it. That makes a huge difference in how your photos look.
Prizing the golden hour
The best time to photograph landscapes and many other outdoor subjects is during the evening golden hour. This is the hour or so before sunset. There is a corresponding golden hour in the morning too, right after sunrise.
 If the weather is decent, go out tonight before the sun sets and look at the sky. Take note of how the light softens and everything is lit from the side, not the top. If there are clouds, they will be beautifully colored and lit. On special days, the entire sky glows a gorgeous golden color, which deepens and may appear red or purple as the sun sets. It really is magical without the magic.
I took the photo in Figure 1-4 looking southwest as the sun was close to setting. It’s off to the right of the photo. The Oklahoma pasture is well lit, but not blindingly bright. The clouds are bright overhead and more colorful in the distance. It’s a great example of how the light appears during this time of the day.
Photographing the sunset
Sunsets are a special treat. If you’ve been shooting during the golden hour, don’t pack up and leave until you’ve photographed the setting sun. The challenge is finding the right location. I particularly enjoy photographing rivers that run east-west because they form a natural avenue that points toward the setting sun, as shown in Figure 1-5.
In this case, I set up my tripod on some rocks in the river. I used a Sony APS-C dSLR using an ultra wide-angle zoom lens set to 10mm to capture as much of the surrounding scenery as possible.
I also included the sun in the shot. That point is debatable. I love the flares and the interaction between the sun and the lens, but you may not. When shooting toward the sun, you may wish to use an ND grad or graduated filter to dim the light a bit. I stopped down to f/22 for this shot, which kept the shutter speed to a leisurely 1/80 second.
Capturing twilight
The time after the sun sets and before it gets completely dark is called twilight, or sometimes dusk (technically the darkest part of twilight). You would not think this would be that interesting of a time to be out, but you can capture some amazing shots.
Figure 1-6 shows a scene I took looking west about a half hour after the sun set. If you’re interested in these things, the time was a minute into the phase called nautical twilight. Clearly, the light is very dim. The light from the setting sun has faded, and it’s hard to distinguish any details in the trees nearby as well as across the lake.
This photo features the last little bit of glow on the distant horizon. The lake doubles the effect of the golden light and the cloudless deep blue sky. I shot this using a tripod and had the shutter speed set to 1/5 second.
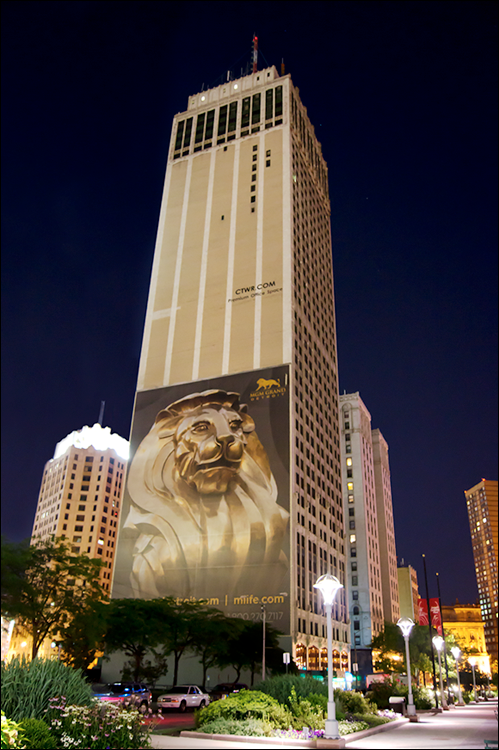
Shooting at night
Shooting at night is sort of a ridiculous concept. There is no light to see with. Why would you take a photo at night? Well, for stuff that is actually lit.
I took the photo in Figure 1-7 in Detroit. It’s the 40-story tall Cadillac tower downtown right by Campus Martius Park. This area is filled with sights and attractions like Woodward Fountain, lots of cool buildings, restaurants, and much more.
Despite the darkness, the building and street are well lit. I took this handheld shot using the camera’s Night View scene mode. The camera chose an aperture of f/3.5 and ISO 1600. The mode recommends using a tripod because the shutter speed is lower than normal. In this case, it was a paltry 1/4 second shutter speed. That’s on the super-low side and hard to keep steady. However, I didn’t have a tripod with me so I just held the camera as steady as possible.
Dealing with Weather
While sunny days with cloudless blue skies are great to be shooting in, they are not guaranteed. What’s more, they offer little variety. Different weather conditions can spice up your photography. I’ve put together this small section to highlight a particular type of weather that isn’t impossible to shoot in but affects the light you have available.
Capturing clouds
Clear skies are normally pretty boring. As a rule, I try to go out on cloudy days when photographing landscapes. It’s not always possible, of course. And yet, clouds are amazing. They liven up the sky with interesting details. At sunset, they turn into the most beautiful things you’ve ever seen. Light reflects off their sides and, as the sun sets, it shines up to illuminate them from below.
Figure 1-8 was one of those times when everything seemed to work out just right. I was at a place that offered a scenic look toward the setting sun. Rivers and lakes seem made for photos like this. I had my tripod set up and was ready for this exact moment. The clouds were stunning and the light was profound.
Do yourself a favor. When clouds are out, get your camera ready.
Working in the snow
Shooting in the snow is completely different than running around in shorts and a t-shirt in the summer taking pictures of the lake. It’s cold, windy, possibly wet, and can be hard to walk around in. Depending on the conditions, it can even be dangerous. Make sure to bundle up with the appropriate protective gear for yourself and your camera. See Book 1, Chapter 2 for some pointers on dealing with bad weather. If you’re alone, tell people where you’re going and when you expect to be back. Be careful not to get hurt or lost, and make sure your phone is charged and you have service if you need to make an emergency call. Can you tell I’m a dad with four kids?
And yet, snow is magical. You’ll get stunning photos in the winter that aren’t possible to capture at any other time of the year. The scene in Figure 1-9 is of a rather mundane path leading off into the trees. There is a fenced-in area to the left. In the summer, this particular location doesn’t seem all that special. In the winter, with the trees and fence covered in snow, it’s marvelous. The cool thing about being in a snowstorm, as I was, is that everything looks different.
At times you need to be careful when processing these scenes so that you don’t let contrast get too high. I toned it down a bit so that the dark areas of the trees didn’t make the photo look too aggressive.
Using fog
Fog is wonderful to shoot in, the same way snowy days and some cloudy conditions are. Fog blocks direct sunlight, and replaces it with a diffuse glow of its own. It’s a chance for you to enjoy shooting in low contrast conditions.
Figure 1-10 is a case in point. I don’t normally go out with my camera in the morning. It was the fog on this particular day that got me moving. I drove to a river fairly close to our house and literally got in it to shoot this ultra wide-angle shot. I was facing west, but you can’t really tell that from the photo. It was just past 9:00 in the morning, but you can’t tell that either. The fog blankets the entire scene. It’s lovely.
Shooting Inside
When inside, don’t immediately pop the built-in flash on your dSLR. Give natural light a try. It’s not just available outside. Although much dimmer inside, you can use it to assist you as you photograph people and spaces indoors.
Working in large spaces
Large interior spaces are a challenge to shoot in because they require a lot of light to look good. Depending on the design, you may be in a space with large windows. That is ideal, but you can’t count on it.
I took the photo in Figure 1-11 using a tripod, which I set up very low. The camera is about shoulder-level to a person sitting down. I set the aperture to f/8 to have a good depth of field. I wanted a noise-free photo, so I left the ISO on 100. That meant I needed a full second to take this shot.
There are windows to either side of me. They provide much of the ambient light in the room. The chandeliers add more, with sconces on the wall giving some mood lighting. Spotlights on the stage complete the setup. All-in-all, that’s a decent amount of light in the right places for a room like this.
It’s best to shoot scenes like this one using a tripod, but you won’t be able to comfortably include people if you have to use long exposures. If necessary, raise the ISO.
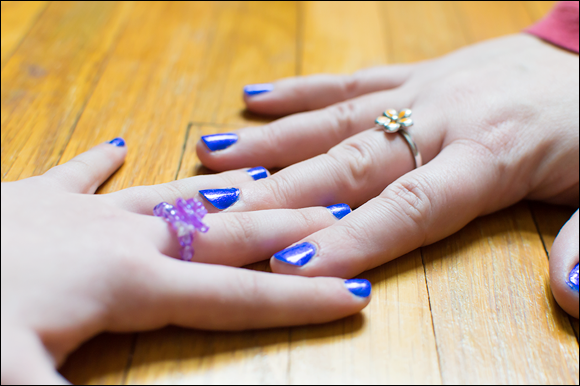
Photographing in living spaces
Shooting inside using natural light is rewarding, but demanding. Unlike large commercial or public spaces, most living spaces have windows close at hand. Open the blinds and let as much natural light in as possible. Unless you use a flash, you often have to raise the ISO. If your lens is fast enough, open the aperture, but not so wide that you have a microscopic depth of field.
I took the whimsical close-up photo shown in Figure 1-12 of my wife’s and daughter’s hands one day after they painted their nails together. Their hands are on the floor and the windows are open. No flash, just the natural light. I had the aperture set at f/4 and used a shutter speed of 1/60 second. That’s slow, but not impossible. I made sure vibration reduction was enabled on the lens. The ISO did rise to 560. Overall, this is a nice, natural shot.
Depending on the color of the room and furnishings, you may need to tweak white balance to render colors as they should look. Use the same techniques when shooting portraits inside. You should be ready to switch to shutter-priority mode and use faster shutter speeds if you want to photograph people more casually.
Using stage lighting
This is the one section where I’m going to break the rules a bit. The rest of this chapter is about natural, ambient lighting from the sun. I want to cover a different type of interior scene briefly; one that relies on artificial light.
Photographing performers on stage is fun, but can be quite challenging. Normally, the auditorium or venue is dark. The performers are lit by stage lighting, which can vary quite a bit. If they are under bright spotlights, it’s easy to shoot nice, crisp photos with fast shutter speeds and low ISOs.
If the lighting isn’t cooperating, the dark conditions push your camera to the limit. I took the photo in Figure 1-13 with a decidedly average zoom lens. It was not ideal. As a result, I could only open the aperture to f/5.6. While I set the shutter speed to 1/125 second (I wish it were faster), the ISO rose to 1600, which is getting into noisy territory for the camera I was using. In the end, this photo is balanced on a knife edge. A bit slower or a bit noisier and it would not work.
Processing shots like this can be tricky. You can’t always rely on automatic routines. Adobe Lightroom, for example, thinks this photo is seriously underexposed. It wants to brighten the background, which ruins the photo.
Coping with Different Situations
Not all light is alike. Depending on the scene, even shots taken during the same time of day can be different. Use this section to give you some ideas of how to take advantage of (or deal with) certain lighting situations. Seek out conditions that are to your advantage and avoid, or prepare for, those that aren’t.
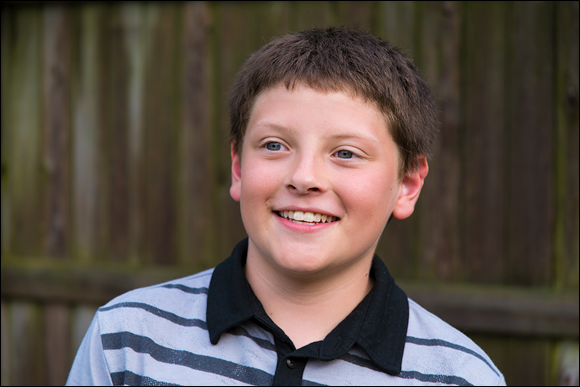
Working with indirect light
Indirect light is a pleasure to work with. This light is available on cloudy or overcast days and often in the morning and evening. It’s ideal for portraits, actually, because the light evenly illuminates faces and does not cause harsh shadows.
Figure 1-14 is a photo of my son, Jacob. He’s smiling as he looks off in the distance, undoubtedly happy that he was not being blinded by the light. Your subjects will thank you for this. It’s hard for them to constantly try to keep their eyes open while being blinded by the sun. In addition, even lighting on faces makes processing the photo much easier. Shadows are essentially impossible to remove without making a person look worse than when you started. You may be able to alleviate some of the harsh contrast, but not all.
Capturing reflections
Reflections make for great artistic possibilities. When possible, capture them in water or on other reflective surfaces. I’ve noted them throughout this chapter, but the photo in Figure 1-15 is a special one.
Except for the plants in the foreground and the leaves on the surface of the water, the photo is entirely reflections. The clouds and trees on the far bank are reflections on the water. The clouds are shining with beautiful light from the sun, but they are not uniform. Some have bright areas while some are much darker.
I took this in October during the golden hour of evening sunlight. The time was 6:39 p.m., which sounds too early for the golden hour. However, sunset was less than an hour away! Remember, unless you live close to the equator, these times and their durations change throughout the year. Search using the term sunset and Google reliably tells you when it’s scheduled to occur at your location. There are many other apps and services like www.golden-hour.com that also provide this information. Weather.com is great because you can check the weather after looking at the times for sunrise and sunset.
Rather than try to take a wide-angle photo of the river, I purposefully took this photo to feature the reflections. I zoomed in to 29mm on my Canon APS-C dSLR, which put the lens close to the middle of the normal focal length range.
Dealing with glare and haze
While I love photographing water, it’s prone to glare through the afternoon and into the early evening. When photographing objects in the distance, you also have to combat haze.
Figure 1-16 shows the problem glare and haze present. I took this photo of Detroit from Belle Isle, which sits in the middle of Detroit River just to the east of the downtown area. I had to face west to capture this photo, toward the direction of the sun, which is just above the frame. It was late afternoon, so the sun was still pretty high.
From a technical perspective, you can try to combat glare by using a circular polarizing filter on your lens. Dial it to cut out unwanted reflections off the water and make your skies and clouds look better. You can try using a UV or Haze filter to cut through the haze. The UV filters themselves do work, but your results may not be discernable. This is because digital SLRs and coated lenses are already pretty resistant to UV light. For what it’s worth, I did have a Sigma DG UV filter on the lens.
You can also try to process the haze out of the photo using Adobe Lightroom or another application. Lightroom, as well as Adobe Camera Raw, has a Dehaze setting that is promising.
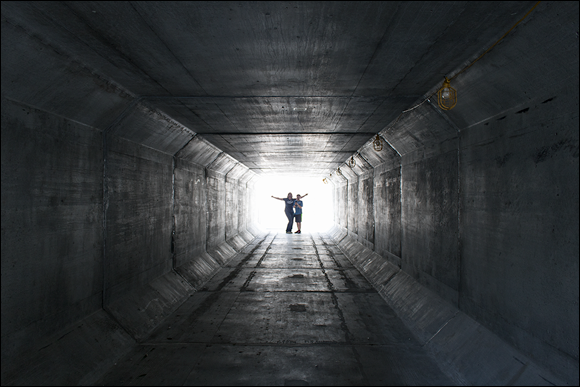
Shooting high contrast scenes
High contrast scenes are normally an anathema to digital cameras. It’s exceedingly hard if not impossible to capture a scene’s deepest darks and the brightest brights in one photo if the contrast ratio (how far apart the darks and brights are from each other) is out of control. This is why HDR (High Dynamic Range; see Book 5, Chapter 6) photography has taken off the last several years.
Rather than fight it, you can sometimes take advantage of a scene with too much contrast artistically. I took the photo in Figure 1-17 at one end of a tunnel that allows people to go from one side of camp to the other without having to cross the road (this is really helpful when you’re dealing with a lot of kids). My wife and one of my sons are at the other end. I thought it would make a great photo, and it does. In this case, high contrast between the dark sides and the light at the end of the tunnel (yes, I actually got to say it!) makes the scene.
If you’re after a creative shot like this, you may have to switch metering modes from multi-zone or pattern to spot or center-weighted to get the camera to meter the scene the way you want it.
Photographing low contrast scenes
By contrast, scenes with low contrast ratios (the distance between the darks and lights) are relatively easy to photograph. I took the photo in Figure 1-18 during a snowstorm. The sky is overcast and gray. As a whole, the contrast in the scene is between the dark surface of the lake and the white snow on the beach. The wood and snow on the floating platform in the water also contrast with each other. It can help to have something of contrast to keep the scene from looking too desolate.
When processing photos like this, you can leave the contrast where it is, reduce it even further, or try to accentuate it. Which approach works best depends on the scene and your sensibilities. I think we have a modern tendency to over-emphasize contrast.
Using shadows
Use shadows in scenes when possible. They add detail and can make some photos more interesting. Use your judgment, of course. Shadows can also distract and take attention away from where you want it.
Figure 1-19 shows a scene where they work but don’t dominate. I took this photo inside a pedestrian bridge that connects the main campus at a local university to a student housing area, which is located on the other side of a busy road. I used my digital Holga lens.
The walkway surface is a fairly dull-looking concrete. The shadows cast by the supports in the bridge tie in with the structure itself, making the scene of students walking to and fro even more interesting.