Chapter 2
Exploring Basic Flash Photography
IN THIS CHAPTER
 Introducing the built-in flash
Using the flash in automatic modes
Popping the flash manually
Tips, tricks, and techniques
Exploring advanced flash settings
This chapter is devoted to demystifying the built-in flash that most digital SLRs have on top of the camera. Photography gets much more enjoyable if you know when and how to control your camera's flash. You’ll be able to take photos in many more situations than without it. For example, flash comes to the rescue when the lighting is dim and your camera is struggling with the exposure. It’s also a great way to make sure people’s faces are well lit, even in good lighting.
I show you how to use the flash, how to tweak the settings, and how to prevent it from firing when the camera is in an automatic shooting mode. You’ll also learn how and when to activate it yourself when you’re using an advanced shooting mode. I also cover tips on how to effectively use the built-in flash and introduce you to more advanced flash technique.
Finding the Flash
All but the most expensive digital SLRs have a built-in flash on top of the camera. Professional-level cameras rarely have a built-in flash, as these photographers almost always rely on other lighting techniques. They use external flash units (see the next chapter) quite often, or shoot in a studio with remote strobes and other bright continuous lighting units.
The built-in flash is normally locked in place and hidden, as you’ve seen in most of the photos of dSLRs in this book. When called upon, it unlocks and flips up a few inches above the camera, as shown in Figure 2-1.
If you have the camera set to an automatic shooting mode, the flash pops up automatically. If you’re using an advanced shooting mode, you’ll press a flash button to raise it (annotated in the figure). You can read more on the specifics of how this happens next.
I have two important points to make before continuing.
- Whether you activate the flash automatically or manually, the strength of the flash is determined automatically. The only time it isn’t is when you specifically change the flash mode from automatic to manual strength. In other words, don’t confuse manually activating the flash with manually setting the strength.
- Using the pop-up flash limits the maximum shutter speed your camera can use. This speed is called the sync speed or flash sync speed. It’s related to how camera shutters work. Only at speeds at and below the flash sync speed is the entire image sensor uncovered at some point during the exposure. This can be a real inconvenience.
Using the Flash Automatically
Using a digital SLR’s built-in flash doesn’t have to be complicated or hard. If you like, you can set it to pop up and flash whenever the camera needs more light to expose the scene. The key to automatic flash is selecting the right shooting mode.
Setting a flash-friendly shooting mode
Most automatic shooting modes sense when the camera needs more light and automatically raises (pops up) and fires the built-in flash. It can be a bit of a surprise if you’re not expecting it.
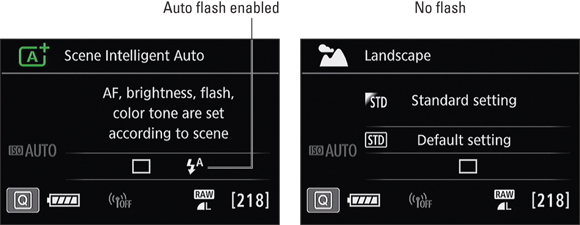
Most automatic modes and scenes fire the flash automatically. The left image in Figure 2-2 shows a Canon camera in Scene Intelligent Auto mode. Note the automatic flash symbol. It shows that the flash is available in this mode. The key is to find the exceptions. The right image in Figure 2-2 shows the Landscape scene in the same camera. There is no flash icon, and flash is unavailable in this mode. Check your camera’s manual for specific modes, but in general, here are the types of scenes that won’t fire the flash: landscapes, some sports and action modes, night scenes, many HDR scenes, and some of the more esoteric scenes like candlelight and food.
If in doubt, set the camera to the mode you want to shoot and look for an indication that the flash is available from your camera’s shooting display.
 When you’re finished shooting, remember to press the built-in flash back into place.
Preventing the built-in flash from firing
Some automatic shooting modes give you the ability to turn off the flash if you don’t want it. Look for details related to the shooting mode you’ve set in your camera’s manual or shooting information display.
Some automatic modes don’t let you disable the flash. If the camera thinks you need it but you don't want it, choose a shooting mode where you can disable the flash.
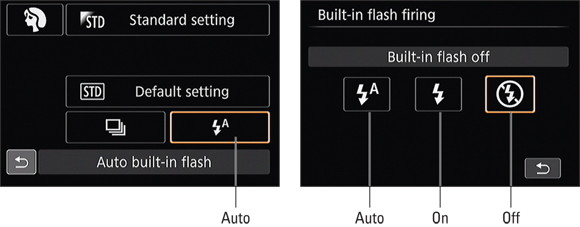
If necessary, choose your camera’s Flash Off mode, shown in Figure 2-3, which is simply the Auto mode, but without the flash.
Customizing automatic flash settings
Many automatic shooting modes allow you to control whether the flash fires automatically, is forced to fire, or prevented from firing. Figure 2-4 shows how to change the automatic flash setting in the Portrait scene using a Canon dSLR. I’ve activated the setting in the left image and have chosen to turn off the built-in flash in the right image. The other two options are Auto Built-In Flash and Built-In Flash On.
Canon users can make changes through the Quick Control screen. Nikon users can use the Information display. You can leave the flash on Auto, set it to Auto plus Red-Eye Reduction, or turn it off. Sony users push the Function button to see shooting functions. Check your camera manual for specifics.
Manually Activating the Built-in Flash
When you’re in an advanced shooting mode, it’s up to you to pop the flash when you need it. This section gives you some pointers on knowing how, and when to do so.
Knowing how to use flash
Using your camera’s pop-up flash is technically quite easy. Follow these steps:
-
Choose a shooting mode that allows manual flash control.
Most often this includes programmed autoexposure, aperture-priority, shutter-priority, and manual shooting modes. Cameras tend to disable the flash button if you’re in an automatic mode.
-
Enable the flash.
Check your camera’s menu to make sure flash is enabled (see Figure 2-5). If not, do so.
-
 Clear the flash.
Remove anything attached to the camera's hot shoe. Make sure there’s enough space for the flash to pop up without hitting anything.
-
Press the flash button to raise it.
The flash button is on the left side of the built-in flash on most cameras (refer to Figure 2-1).
-
Press the shutter button halfway to meter and confirm flash is ready.
 The camera may fire off a few pre-shot pulses to help set the exposure. This is part of TTL (through the lens) flash metering. Makers tend to call their latest version of TTL flash by different names. Canon uses E-TTL and E-TTL II. Nikon uses i-TTL. Sony uses ADI (Advanced Distance Integration). Pentax use P-TTL.
Wait for the sign that the flash is ready. Figure 2-6 shows one through a Canon viewfinder. Yours may be different. In this case a small flash symbol appears next to the battery status.
-
Take and review your photos.
Your flash should fire and light up your subject or the scene.
- If necessary, adjust the strength of the flash for follow-up shots using flash compensation, as explained later.
-
Lower the built-in flash when done.
This saves power and protects it from accidentally getting banged around.
Knowing when to use flash
If you don’t know whether to pop the flash, consider these scenarios:
- You need more light. Most of the time this happens indoors, where the lighting rarely compares to the natural light of the sun. Figure 2-7 shows a photo I took of my son Ben as he sat on the couch watching his sister open her presents. I was some distance away using a near-telephoto lens and flash. The flash performed perfectly, providing just the right amount of light.
- The subject is backlit. Backlighting refers to the situation when your subject is standing in front of something bright. Strong light in the background fools the camera's sensor into thinking the exposure is fine, when it isn't. The camera wants to not overexpose the sky, which leaves your subject dark. To correct this problem, use the flash, as I did for the photo in Figure 2-8. Even a low-powered burst can light your subject and save the photo. (You could switch to spot metering, but that won't add any light to the scene.)
-
The subject is in shadow. Often, the lighting in the scene is decent, but from the wrong direction. I lit the scene in Figure 2-9 primarily from the window to the back right. Without the flash, the pie as well as the mug would have been too dark. This technique is called fill flash.
 Try flash outdoors, even when your subject is not backlit. It seems strange, but fill flash brings faces out of shadow. Watch your exposure, though. You may have to use high-speed sync (covered in the next chapter) to limit the exposure.
- You want better light. The flash is a nice, clean, pure burst of light that can look very good compared to some interior lighting. If you’re in a room with strong yellows or reds (see Figure 2-10), your photos may have strong color casts if you don't use a flash. A flash can clear all that up. In this case, the strong color of the wood paneling behind my wife threatens to overpower the scene. Using the flash kept her from looking too warm.
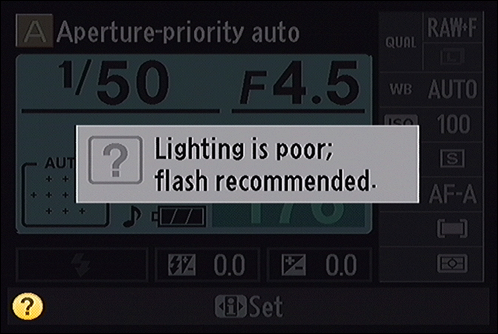
You are only one part of the photographer-camera team. At times, the camera might suggest using flash when low light levels are sensed, as shown in Figure 2-11. Pay attention to the cues in your viewfinder or on the back of the camera. Depending on the model you’re using, the shutter speed, aperture, or ISO may flash, indicating the camera is having trouble with the current exposure settings. Ultimately, you’re in charge, but the camera may keep you out of trouble.
Disabling the built-in flash
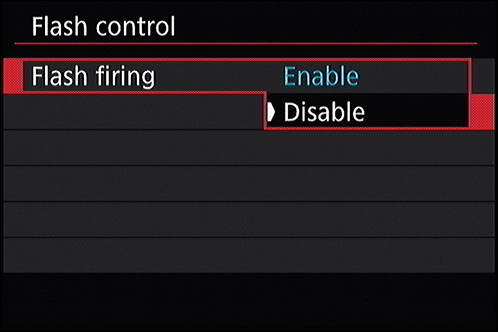
You can disable your camera’s flash from the menu when in an advanced exposure mode. Look for your camera’s built-in flash options and set it to Disable, as shown in Figure 2-12. While this might seem odd, you may want to pop the flash to help the camera focus using the AF-assist beam, but not want it to fire for the exposure. Disabling it will do that.
Tips on Using the Built-in Flash
Here's a list of things that will help make your flash photos better:
- Don't get too close. Using a flash can mean harsh lighting and stark shadows if you're too close to your subject. Don't get right up into someone’s business, like I did for the photo in Figure 2-13. Back off a bit.
- Separate subjects from background. A flash is a powerful burst of light. If your subject is standing too close to a wall (or a fancy photography background), he’ll cast unflattering shadows. Figure 2-14 shows an example. To correct it, move your subjects away from the background, use a light diffuser (softens the light like a lampshade does; see Book 4, Chapter 3), or use an off-camera flash and angle it so that the shadow is hidden.
- Use slow sync to brighten a dark background. When the flash lights someone, often the camera thinks the overall exposure is bright. It compensates by underexposing the background, which leaves it dark. If you don’t mind the effect, it can work — and even hide a messy or unappealing background. However, to reduce the effect, dial in negative flash compensation or use slow sync (an advanced option discussed later).
- Work with your subjects. At a certain age, all my kids became experts at flash blocking. Whenever I approached them with my camera and flash, they would throw an arm over their eyes. Work with your subjects to try and prevent this.
- Avoid lens shadows. Pop-up flashes aren't tall enough to shoot over large or long lenses and lens hoods. The lens casts an ugly shadow that ruins the photo. Know which lenses you can use with your pop-up flash, or which focal lengths are safe to use with your zoom lens.
- Use flash compensation. This simple solution is effective for solving many flash problems.
- Consider an external (hot shoe) flash. Buying an external flash unit (Canon calls them Speedlites and Nikon has Speedlights) that mounts in your camera’s hot shoe is the next step into the larger world of flash photography and lighting. It opens a number of creative possibilities, such as off-camera and wireless flash. It's also easier to direct, diffuse, and bounce light from external units. Most camera makers offer two or three external flash units in a range of prices and capabilities. External flash is covered in Book 4, Chapter 3.
-
Practice. Knowledge, combined with practical experience, is an unbeatable combination. Keep working with your flash to become an expert in using it.
You don’t have to become the end-all, be-all Master of Flash. You just have to know how to work your gear to create the photos you want. Start practicing in the situations you shoot most often.
Getting Fancy with the Flash
Using the built-in flash isn’t that hard, but there are some techniques and settings that go beyond leaving everything on Auto. This section covers a few additional techniques and lists some more advanced options.
Enabling red-eye reduction
When using the flash, it’s not uncommon to take photos of people who end up looking like they have red, glowing eyes. Red-eye is caused by the pupils in the eye not closing fast enough in response to the flash. This allows light to reflect off the back of the interior surface of the eye. It’s a problem mostly among people with light-colored eyes.
The effect can be very distracting, and takes away from an otherwise good shot. Although you can try to remove red eyes in software, it is faster and easier to prevent it from happening.
Red-eye reduction causes the camera to emit a series of pulses from the built-in flash or Red-Eye Reduction Lamp, should it have one. This causes the pupil to contract before you take the photo. Enable red-eye reduction from the camera's menu system (see Book 1, Chapter 4) or in the camera’s flash settings, as shown in Figure 2-15.
Canon dSLRs have a scale that appears in the viewfinder when the red-eye reduction feature is enabled, the flash is up, and you press the shutter button halfway to meter and focus. As you hold the shutter button halfway down, the scale shrinks and soon disappears. Red-eye reduction is most effective if you wait until this countdown process completes before taking the photo.
There is one caveat (it’s sort of a big one) I should mention before leaving red-eye reduction. The pre-flashes delay the whole process of taking the photo, sometimes by several seconds. Don’t count on being able to capture fast-paced action or catching people in natural unposed shots when using this feature. If your subjects aren’t aware of what’s happening, they will often think that you’ve taken the photo when the pre-flashes fire, then start talking or blinking when you take the actual photo.
Using flash compensation
Flash compensation is a quick and easy way to adjust the strength of the flash without controlling it manually. In fact, it's the only way you can adjust the flash when your camera doesn't have a manual flash mode.
Knowing how to manage flash compensation will help you take better flash photos reliably.
When you take a flash photo, review it before taking more shots. Note whether your subject is too dark or too bright. Compensate based on these factors:
- Dark subject: Raise flash compensation or move closer.
- Bright subject: Lower flash compensation or move farther away.
Check your camera manual for precise flash compensation details. You may be able to press a button or rotate a command dial to set it. Compensation is measured in stops of EV. With Canon cameras, you can also use the Quick Control screen. Press the Quick Control button and highlight Flash Exposure Compensation. After you press Set, the Flash Exposure Compensation screen appears, as shown in the left image in Figure 2-16. After you set it, you should see an indicator on your LCD monitor, as shown on the right in Figure 2-16, or in the viewfinder.
Always look for telltale signs like the indicator shown in Figure 2-16 to remind you that you've made exposure adjustments. When you move on to another subject or different lighting, reset it.
Using FE Lock
Use Flash Exposure Lock (FE lock, sometimes called FV Lock) as you would Autoexposure Lock (AE Lock). Meter the subject centered in the viewfinder, press the FE Lock button, and then recompose. The flash strength and overall exposure is locked until you release the button — even after taking multiple shots.
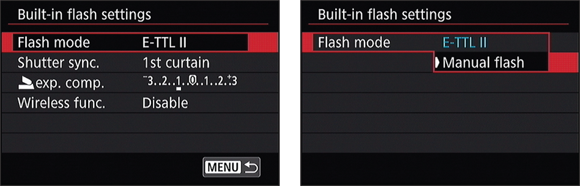
Controlling the flash strength manually
Setting the flash to manual mode lets you control the flash intensity yourself. Through the lens (TTL) metering (and variations thereof) that takes the flash into account is disabled. In other words, you’ve switched off the targeting computer and are relying exclusively on the Force. Here’s a quick guide:
-
Switch to flash mode.
To set the flash strength yourself, you must switch the flash from its normal, through-the-lens mode of operation to manual using the camera’s menu, as shown in Figure 2-17. Depending on the camera, look for this feature in the built-in flash settings or in the shooting menu.
-
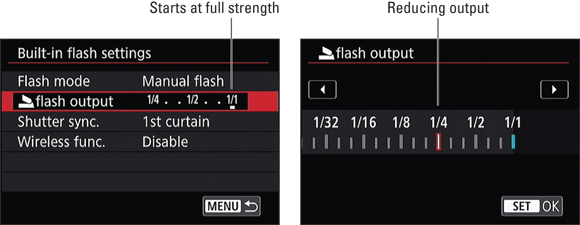
Set the flash strength.
Flash strength works in reverse. Full power is considered normal (see the left image in Figure 2-18), and you reduce it to the level you desire (see the right image in Figure 2-18). Reduced flash strength is measured as a fraction of full power, and you reduce the power in steps.
If you’re not comfortable using the flash manually, stay in automated TTL flash metering mode and use distance and flash compensation to tweak the flash.
Unlocking more advanced features
Depending on your camera, the built-in flash may have many more features available to it. You may hardly ever need them, but here is a list of more advanced flash options worth knowing about:
- TTL Metering meters through the lens. You may be able to change the TTL metering method. For example, Canon cameras have two settings: Evaluative and Average (see Figure 2-19). Evaluative tries to get the closest object exposure correct, even if that means the background is underexposed. Average accounts for the entire scene and generally fires a stronger flash.
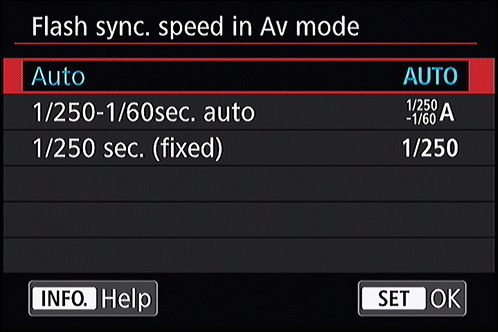
- Flash sync in AV mode is a feature on Canon dSLRs. It gives you some control over the flash sync speed when you have the camera set to aperture-priority mode. As shown in Figure 2-20, you can leave it on Auto, which is the default. This allows the camera to set any shutter speed. It can be really slow, or up to the flash sync speed of 1/250 second (which is the flash sync speed for this camera). The second option enables you to limit the shutter speed to moderate speeds, useful for keeping the blur out of handheld photographs. You can also fix the shutter speed when using the flash in aperture-priority mode to 1/250 second.
-
Slow-sync flash (see Figure 2-21) slows the shutter speed so that the flash fires and ends the exposure. The result is a brighter background. Slow-sync flash works well indoors if you’re shooting casual shots or portraits with still subjects. You can also take some great shots with movement in the background and a clear subject.
Try this tip for indoor photography: Pay attention to shutter speed and blur. If you don’t want blur, try switching out of slow-sync flash or use a tripod.
-
Rear-curtain sync (or second curtain) flashes just before the exposure ends, as opposed to when it begins (normal, front curtain, or first curtain). You can shoot some creative scenes using rear-curtain flash and moving vehicles or people with lights. The lights move through the scene and the flash freezes things to finish the shot. I’m setting this option in Figure 2-22.
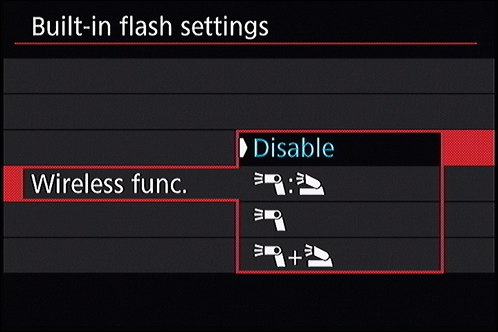
- Wireless (or Commander) lets you take flash photos with external flash units that don’t have to be hard-wired to the camera (see Book 4, Chapter 3). The wireless setting uses infrared or radio signals to activate one or more external flashes. When acting as the commander, the camera's internal flash fires a low-powered pulse to set off one or more external flashes. Figure 2-23 shows several options available on a mid-range Canon camera that enable the built-in flash to control one or more external Speedlite flashes. Not all cameras can be a wireless master.