9 |
A Sequence for |
There are many ways to build a home. Builders have learned from experience that in some cases certain things must be done before others. Construction frequently goes much more smoothly if you do one thing first and then another. If you build more than one home you may develop some sequencing ideas of your own. But when building your first home it will help to draw on the experience of others. The method we present here is not the only way to build a home, but it has been developed by a number of experienced people, including our colleague Peter Hotz, who is an architect and has designed and built many custom homes.
It is important that you establish a satisfactory draw schedule at the time you negotiate your construction loan (see Chapter 5), because the draw schedule will determine the sequence of your construction work. Most lenders have had much experience with residential loans and their draw schedule will be properly sequenced. Nevertheless, it’s a good idea to know how many draws you want and what you want to accomplish with each draw even though the lender may propose a different schedule. It is possible that your lender may be willing to work with your schedule instead. This chapter is based on the draw schedule in Chapter 5.
The schedule is divided into five segments or phases, and you will be able to see how they relate to the draw schedule. With slight modifications our sequencing can also be used with other schedules with more segments.
It is necessary to know which subcontractors and suppliers you will need to complete your house. We have provided a list of subcontractors you will probably need to hire and a description of the work they do. Following that is another list of contractors, with space for you to insert the name of the successful bidder you have selected to do the work. You may not need all of them on your project or you may need to add some specialty trades or suppliers. Also included is a detailed construction schedule which is based on the experience of the construction industry. They have a logical sequence and suggest the activities you will be dealing with in the preliminary phases—surveying, portable toilets, trash removal; move on through concrete masonry and metals for the foundation; then into woods (carpentry), insulation and moisture protection (roofing) for the shell; and on into the finish trades.
• Surveyor: stakes the house foundation, sets the building’s corners (or “points”) in the footings and prepares the wall check and final survey.
• Excavator: digs the foundation and footings, installs the sub-drainage system and backfills and rough grades the site.
• Paver: installs the asphalt driveway.
• Landscaper: installs retaining walls, finishes the grading, seeding or sodding and planting.
• Concrete Supplier: delivers ready-mixed concrete to the construction site.
• Mason: installs the foundation wall and brick or stone veneer (if any). He also constructs masonry fireplace and masonry landscape items such as walls, barbecues, and terraces. If natural stone is used in masonry work, it will need to be obtained from a quarry. If the mason does not supply his own materials, such things as structural steel beams, angles, and decorative iron railings must be ordered from various suppliers.
• Carpenter: erects the wood frame of the house, installs the interior partition framing, sheathing and wood siding, exterior windows and trims, all doors, cabinetry and countertops, builds fixed bookcases, installs closet shelves and poles, stairs, railings and other miscellaneous millwork.
• Lumber supplier: furnishes all material installed by the carpenter and frequently can furnish other products, such as metal fireplaces, insulation, drywall, electrical and plumbing fixtures, kitchen cabinets, and bathroom vanities. Stairs may sometimes be obtained from the lumber supplier or from a separate millwork company.
• Waterproofer: supplies and installs the liquid asphalt material for the below-ground foundation walls.
• Insulation: supplies and installs batt insulation in the floors (if needed) and blanket or blown insulation in the attic. Rigid insulation on the exterior walls is normally supplied by the lumber subcontractor and installed by the carpenter.
• Roofer: supplies and installs the shingles or other roofing material and any rigid insulation used in the roof.
• Weatherstripper: insulates doors, although this is often done by the carpenter.
• Sheet metal: supplier will cut and form flashing to desired shapes.
• Glazer: furnishes and installs special shapes of fixed glass not available from window suppliers—such as triangles, trapezoids, and half-round fixed windows.
• Windows: can be obtained from window manufacturers or the lumber supplier. Usually the same supplier will also stock a line of sliding glass doors.
• Doors: exterior and interior doors are usually obtained from the lumber supplier, but special wood doors can be ordered from door manufacturers or millwork shops. The hardware is obtained from a locksmith or lumber supplier.
• Drywall: this subcontractor furnishes, installs, and finishes gypsum drywall on the interior walls and ceilings. Although it is rarely done today, plaster is still an alternative to drywall if you can find and afford the skilled subcontractor.
• Flooring: material for floors include ceramic tile, vinyl, carpeting and hardwood, although the carpeting and wood flooring is usually installed by separate contractors. It is, however, possible to find one subcontractor who will install any kind of flooring.
• Painting and Wallpapering: These subcontractors may or may not furnish their own material. The quality of paint and wallpaper varies considerably, so it is often preferable to select material from a supplier and have it installed by a separate subcontractor.
• Bathroom Accessories: can be supplied by a specialty company or by the lumber company and installed by the carpenter.
• Kitchen Cabinets: kitchen cabinets as well as bathroom vanities can be obtained from specialty suppliers or from the lumber supplier; countertops can be supplied by the same supplier or specialty company. All cabinets are installed by the carpenter.
• Appliances: are available from various retail and discount outlets or from a cabinet supplier. They are installed by the supplier, a plumber, or an electrician.
• Plumbing: one subcontractor normally installs all the pipe and fixtures. The plumbing fixtures can be obtained from a special supplier or the lumber company.
• Heating—Ventilating—Air-conditioning (HVAC): one subcontractor supplies and installs all the equipment and ductwork necessary to heat, ventilate, and cool the house. If the heating system uses hot water, the plumber may supply and install the system.
• Electrician: supplies and installs all electrical wiring, power panel, outlets, and switches. Lighting fixtures are obtained from an electrical supplier and installed by the electrician.
1. General Requirements:
Surveying:
Temporary Facilities:
Trash Removal:
2. Site Work
Excavating Sub:
Paving Sub:
Landscape Sub:
3. Concrete
Concrete Sub:
Concrete:
4. Masonry
Masonry Sub:
5. Metals
Metals:
6. Wood & Plastics
Carpentry Sub:
Lumber:
Stairs:
7. Thermal & Moisture Protection
Waterproofing Sub:
Insulation Sub:
Roofing Sub:
Weatherstripping Sub:
Flashing:
8. Doors & Windows
Garage Door Sub:
Fixed Glass & Glazing: Windows:
Sliding Glass Doors &
Interior Doors:
Entrance Doors:
Door Hardware:
9. Finishes
Drywall Sub:
Flooring Sub:
Hardwood Sub:
Painting & Wallpaper Sub:
Paint & Wallpaper:
Bath Accessories:
11. Casework
Cabinets:
Countertops:
Appliances:
12. Mechanical
Plumbing Sub:
HVAC Sub:
13. Electrical
Electrical Sub:
Electrical Fixtures:
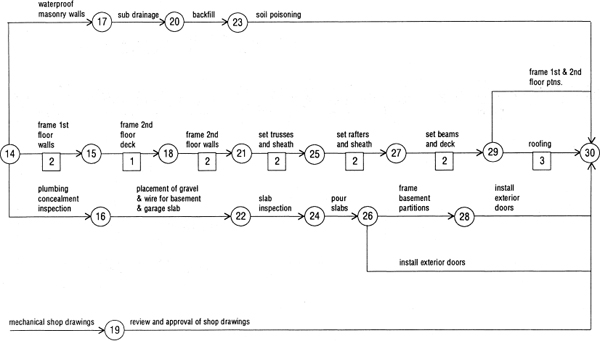
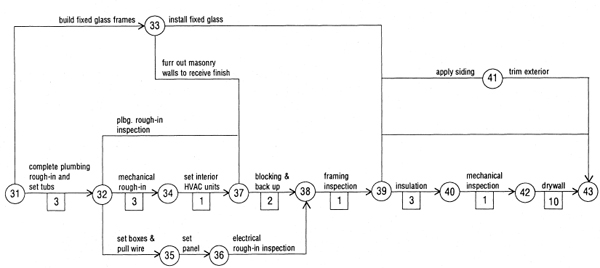
There are many ways to chart the sequence in the building a house. Most builders eventually develop a method of their own, based on experience and what seems to work best for them. One of the methods we recommend is called the critical path method (CPM) schedule. The schedule presented in this book was adapted to the construction of a single-family residence by Peter Hotz.
The CPM schedule, originally developed between 1956 and 1975 for planning construction, is a graphic model of a construction project. Our CPM schedule is divided into five phases. To see how it works, look at Phase 1. This corresponds to the first schedule, for the first 20% of the house. It starts at number 1 with staking the corners (physically locating the house on the site) and ends with framing the first floor deck at number 13. The CPM schedule continues through the next four phases of construction corresponding to the draw schedule. The CPM schedule can be used as the only sequencing aid to building your home. However, through our use of it we have found that another method of scheduling based on the CPM but with certain differences was better.
One of the problems in relying solely on the CPM schedule is that it does not take into account lead time—the amount of time it takes to get certain trades or materials to the job site. Therefore, we developed a checklist that will keep you on the critical path, but that will also alert you to items that could take more than a week to get to the job. It can be very disconcerting when you realize that you should have ordered some material a month ago, and that it is not in stock when you need it.
We recommend that you work closely with the Construction Schedule Checklist presented here. It is an effective, easy way of scheduling your work and following through on it. Although this is a good comprehensive list of the activities that have to be done and the correct sequence in which they are done, there may be some things that are unique to your construction project which you have to add to your checklist.
A |
|
|
|
|
|
B |
|
|
|
|
|
|
|
|
|
C |
|
|
|
|
|
|
|
|
|
|
|
|
|
|
|
|
|
Our checklist does not include site preparation—such things as the survey, well or septic system, lot clearing, or access to the property. These are done before construction begins on the house. Our checklist pertains strictly to the house construction.
The items in the checklist are identified by a number corresponding to the draw schedule or phase and a letter which suggests a one-week time frame. If you stay on this entire schedule, accomplishing each week as outlined, you will deserve a presidential citation, for you will have mastered the most difficult job of the construction manager—bringing all the materials and tradesmen to the job exactly when they are needed.
Realistically, our schedule is a target at which to aim. You will find that what is planned as a week’s worth of work on the schedule may take two weeks. Time is important, and the schedule will constantly challenge you to keep your job moving toward completion.
When we use the word schedule in the checklist, we mean two or three telephone calls made to the contractor to make sure that he will be there when you want him. One of these calls should be made the night before he is scheduled to be present. Most contractors are hard to reach by telephone during the day, and often they do not come home until 6:00 or 7:00 P.M., so that’s when you have to catch them. Be considerate and don’t call them too late in the evening. They usually go to bed early because they get up early.
The preliminary phase, the first page of our checklist, does not correspond to the draw schedule. These are lead-time items that need to be accomplished before construction begins. They are divided into groups A, B, and C, each representing a week.
If your house has a masonry or poured concrete basement with windows, the windows need to be ordered three weeks before construction will start. Also, obviously you will need a building permit which (depending upon where your house is to be built) may take a couple of weeks or even a couple of months.
It is a good idea to visit the county building department a month or two before you are ready to start construction and familiarize yourself with their requirements. If you have your construction drawings (building departments usually require two sets for permits) you can apply for a permit while you are there—provided that you are confident about building in the near future. In this way you are sure to obtain your permit about three weeks before the start of construction.
Two weeks before construction is to begin, schedule your surveyor to locate the house with offset stakes. These are usually placed ten feet away from each corner of the house, so they will not be disturbed during excavation. You or your carpentry contractor should have a complete list of all lumber and related building supplies so that it can be bid on by several local lumber yards. Select the best lumber supplier before construction begins. The excavator who will dig your basement and your footings will need a two-week advance notice.
The week before construction starts, there are four things you should schedule: excavating, rough grading, digging the footings, and putting in temporary power and water. Water is used primarily by the mason, and electricity is needed by the carpenter. Both trades can bring their own supply, but neither will want to. If there is electricity at your lot, the power company can provide temporary service. You will have either municipal water or a well, and the plumber can provide a temporary tap. Sometimes it is more convenient to make arrangements with a neighbor and pay him for power and water during the early stages of construction.
The second group of items in the third week of the preliminary phase are lead-time items: ordering the structural steel and the rest of the windows, contracting with the mason (or concrete contractor) who will be doing the foundation walls in two weeks, and ordering roof trusses if you will be using them.
Although not on our checklist, this is an appropriate time to consider security. Usually the construction materials on the site are not pilfered during the early stages of construction. Nevertheless, it is a good idea to notify your local police that you have a house under construction and that you will appreciate it if they could send a patrol car by there on a regular basis. If you have neighbors who can see your construction site, you might encourage them to call you or the police if they observe any unusual activity at your house. If you are keeping any tools or small building supplies at the job, lock them in a tool bin or shed. As soon as possible (week 2C) lock the house whenever there are no workmen on the job, and keep it secure for the balance of the construction process.
In phase one, our construction schedule checklist is subdivided into three groups within each week or time period. The first group (starting with “house location staked” in 1A) is the physical work that needs to be accomplished during that time period. The second group (starting with “schedule mason” in 1A) is the administrative work you need to get the work accomplished in the next week or time period. The third group (starting with “contract with carpenter” in 1A) consists of the lead-time items that need to be accomplished in order to stay on schedule. These three groups are present in all phases of the schedule.
During the first week (1A) of phase one, the surveyor sets the offset stakes for the house, the site is cleared, and footings are dug and poured. The first inspection is usually the footing inspection, and it is normally done by your county building department that issued your building permit. However, most jurisdictions will permit a registered architect, engineer, or surveyor to inspect the footings. This can be important, because timing is critical. You do not want to open up the ground for the footings and then let it sit for a day or two (or even half a day) waiting for the county inspector. Rain, children, or dogs can collapse the earth sidewalls and force you to redig the footings. You want a minimum amount of time to elapse between digging the footings and pouring the concrete. So if there is any doubt about the county’s responsiveness, it may be better to schedule your own surveyor (if the county will accept him), a registered architect, or an engineer to inspect the footings the minute they are dug and certify them to the county.
The first inspection is important, because it insures that the house will have a solid foundation. The footings provide a hard, level surface that spreads the weight of the house over the amount of surface area on the ground. The ground, of course, must have enough strength to hold the house. When you dig the footings, it is important that they be on what is called undisturbed soil, which is virgin earth with no evidence of fill, loose or soft rock strata, or other conditions that appear unstable. If any unstable conditions are in evidence when the footings are dug, consult an architect or engineer to provide an acceptable footing design.
We also recommend the installation of a temporary toilet, for obvious sanitary reasons, unless it is a very remote job site with no reasonably priced services available. And we recommend a temporary telephone, if it is available. This is more for your convenience than your contractors, and it may be well to install the telephone in a locked box to prevent misuse. You will encounter many situations that require immediate telephone communications, and if a telephone is not available in your car it should be there at the job site.
Plan for trash removal. An incredible amount of trash will be accumulated in the construction of a house. A small dumpster placed on the job will be sufficient, although in some suburban areas other people may begin using your dumpster to avoid going to the dump. You can also use large trash cans, barrels, or old oil drums, but you will have to get rid of the trash on a regular basis.
The mason or concrete contractor will need to be contacted to confirm his presence on the job the following week to install the foundation walls.
If you’re using a steel girder in the basement, check on the steel delivery ordered in the preliminary phase. You don’t have to use steel; you could use wood. But steel will span longer distances than wood, resulting in fewer columns, and fewer columns will mean more usable space in the basement.
If you have not yet selected a carpenter and a plumbing contractor, you’ll need to make that decision and sign agreements with them. Groundwork is the pipe that goes underneath the basement slab, and it must be installed and inspected before the slab is poured. It’s a good idea to have it done as soon as possible after the first floor deck is complete.
Bathtubs and showers are large and need to be installed early. If you want a special bathtub such as a Jacuzzi, you or your plumber will need to place the order now, because usually it will not be in stock. If you are going to use a metal instead of a masonry fireplace, it needs to be ordered now, to insure availability in four weeks. (The heating efficiency of the two types of fireplaces is about the same, but the masonry fireplace will retain the heat better and continue to warm the house after the fire is out.) A metal fireplace is also considerably less expensive and easier to install. If your house has skylights, order them now.
The second week (1B) is basically a masonry (or concrete) week. Although not on our schedule, we recommend that after the footings are poured and before the mason starts his work, you have the surveyor come back and set points (nails) in the footings at all the corners of the house. We have found him to be more accurate than the mason, and most masons would prefer to have the surveyor set the points.
The mason usually sets the steel, although the carpenters also can do it. We like the mason to install the steel beams, because he is the one who puts in the beam pockets (or holes in the wall) for the steel. In some cases, however, the mason or the concrete contractor will not set the steel, and it must then be made part of the carpenter’s contract.
In the second week, you (or your carpenter) should order lumber, and you schedule the plumber.
There is a long lead-time for special hardware. If you saw something in a home magazine that you liked (a nice, darkened-brass front-door handle for instance) you need to check with the company that supplies them, and find out how long it will take to get them. Usually they are not in stock and must be ordered.
In four weeks we hope you will be ready to have the roof installed. It is a good idea to start talking with your roofer now, telling him that you want him there in four weeks with the shingles. Or, if you are ordering them, check to make sure they are available. Usually contractors prefer to buy the material themselves, and they generally will get a better price, which they may pass on to you. Most of the supply houses want to keep the good contractors coming back, so they give them discounts. They don’t expect a homeowner to come back. How many houses is he going to be building in a lifetime? The contractors who have a good credit rating with their supply houses are usually the best tradesmen.
Usually the lender will want the wall check survey before he will release the first construction draw. Most first draw schedules end with the first floor deck—the floor joists and the plywood subfloor firmly attached to the foundation walls. This is important to the structure of the foundation and must be completed before any dirt is placed against the foundation walls (backfilling). We have already discussed the plumbing groundwork; if not required by the draw schedule, it can be postponed until the next week.
The last work item in phase one is to ask the lender for your first draw. Usually a phone call is all that is required, and he will have his inspector come out and check the construction. Assuming all the required work is in place, the lender will release the money to you. Sometimes, depending on how your construction contract reads, the check will go to you and your primary contractor. Usually the contractors who have done work up to this point will wait for the draw payment to be paid. However, the excavator and/or the mason will sometimes want to be paid as soon as their work is complete. Payment terms should always be a part of any contractual agreement, and your contractors need to know when they will be paid before they accept the agreement.
If you’re ordering the lumber, it is time to order the framing lumber for the exterior walls of the house, the second floor (if you have one), and the roof framing. Waterproofing of the basement walls and installing the sub-drainage material is discussed in phase two and needs to be scheduled now.
We recommend that you contract with an exterminator to treat the soil to keep termites away from your home. In considering the threat of termites, find out what the county recommends. If your building site is in a low and moist wooded area, you will have a greater problem than if it were out in a high, dry field with no trees. Geographically the northern states have a slight hazard of termite infestation, middle states a moderate hazard, and the southeast the heaviest hazard. Alaska is entirely free of termites.
The basement and garage slabs are normally poured after the roof is complete. If you have not reached an agreement with a subcontractor to supply the concrete and to pour and finish your concrete slabs, now is the time to do it.
The term “casework” refers to cabinets and countertops for the kitchen, bathrooms, and any other custom cabinetry to be built into your home. Unless you are purchasing stock cabinets and have confirmed that they are always available, you should allow approximately three months to get the cabinets you want. If you are having a cabinet shop custom-build your casework, it may take longer—especially if the shop is busy.
Phase two could also be called “under roof.” Most second draws are released after the roof is on, and some will have an intermediate stage after the second floor deck is complete. Our schedule does not allow extra time for the second floor, and will need to be expanded by the time required to frame the house if you are planning an extensive second or even third floor. Technically the first floor deck is part of the shell. If you have one contractor building the shell his work will begin in phase one and may not be finished until phase three.
In the first week of phase two (2A) the exterior walls are framed, waterproofing and sub-drainage is installed and inspected prior to backfill, and the underground plumbing is inspected. Framing the interior non-load-bearing partitions on the first floor is optional at this time. Some carpenters do not want to do that until the house is under roof; others will be willing to do it along with the exterior walls.
The surface of the masonry or concrete foundation needs to be waterproofed (most of the time this is actually dampproofing) to prevent water in the ground from coming into your house. There are several requirements for a dry basement, and waterproofing or dampproofing is just one of them. The difference between waterproofing and dampproofing is in the degree of protection. Both systems start with a smooth surface—either the concrete surface of a poured basement or a coating of mortar called “pargeting” (pronounced parge-ing) which is troweled on over the concrete block. If you are dampproofing (which for most basements is adequate), a coating of asphalt is spray-applied to the foundation. However, if you are faced with a severe subsurface water problem and need to waterproof, a membrane of polyethylene or several layers of asphalt-impregnated roofing felt are imbedded in asphalt to further inhibit water penetration.
In addition to dampproofing, it is important to provide an easy escape route for water to follow away from the foundation. This is accomplished by diverting surface water away from the house (discussed in phase four) and drawing subsurface water below slab level and out to “daylight” by means of subdrainage. At the base of the foundation wall, above the footing and below the level of the concrete slab, a perforated drain pipe is installed in a bed of gravel, with more gravel placed on top and covered with building paper to prevent dirt from clogging the holes in the pipe. This underground gutter will collect any subsurface water that accumulates against the foundation wall. After the basement walls have been surrounded, the drain pipe needs to be discharged to the ground surface at a point lower than the pipe around the footing (daylight). With a walk-out basement this is easily accomplished, but if your basement is totally subterranean, with no lower land close to the foundation, you may have to place the drain pipe inside the house (still below the slab) and discharge it into a sump in the basement floor, with a pump to eject the water outside your house.
You need an inspection prior to backfill. The county will want to see that you have adequate waterproofing and sub-drainage.
You also need to have the underground plumbing inspected before the slab is poured. This inspection is usually requested by your plumber.
If you want a roof ventilator fan, now is the time to order it or make sure that your roofing contractor does. Call your excavating contractor and schedule him for the next week. You or your concrete contractor need to order the material for your basement and garage slabs—the polyethylene and gravel that go underneath the slab, and the reinforcing or temperature steel that goes in the slab to prevent cracking.
The contractor who is placing and finishing the concrete slabs needs to be scheduled for the following week, as does the exterminator.
Lead-time items include ordering the exterior doors and the garage door. If you are having any unusually shaped windows that you cannot order from a window manufacturer, you need to contact a glass company to measure, assemble, and install this glass.
If you have selected a really nice front door and lockset for your house, order it (it will take more than two weeks to be delivered) but do not put it in now. Instead, buy the least expensive exterior door and lockset you can find, and install it now. Then, when you are nearing the end of the construction, have your expensive carved wood door delivered, and your carpenter set it for you. As discussed previously, delaying installation will avoid any damage to your expensive door during construction, while at the same time giving you the security of a door you can lock.
If you are going to be using a brick or stone veneer on the exterior of your house, select and order it for delivery in three weeks.
During the second week of phase two (2B), the carpenter should finish framing the house and the roof. If you’re building a large two- or three-story house, the time required to complete the framing will probably exceed the one week provided in the schedule. A large, complicated contemporary home can sometimes take four to six weeks to frame and sheathe.
After you have installed the sub-drainage and had it inspected (if required), the backfill can be placed carefully and in compacted layers into the excavation. All the basement and garage slab preparation work can now be accomplished, and the slab poured. Again, an inspection may be required to assure the county that the slab will be structurally sound. This is particularly critical if any portion of the slab is being constructed on fill dirt.
Schedule your roofing contractor for next week, and check the availability of the shingles or other roofing material. If you are going to put framing in your basement, you will need to order more lumber. All exterior doors should be available next week, and the garage door contractor should be scheduled.
Lead-time items include completing your agreement with the mechanical contractor for your heating and air-conditioning system. If you find some really attractive electrical fixtures—a chandelier, a front entrance light, or a lantern for your front walk—your local supplier will probably need two or three months to order it for you. All recessed lighting fixtures and exhaust fans have housings that are installed in the framing at rough-in, and should be ordered now. Your electrical contractor may be ordering them for you, but make sure they will be available in four weeks.
In the third week of phase two (2C), your roof will be completed, and any basement partitions can be framed, all exterior doors can be installed, and the house can be locked. This will provide some security during the balance of the construction period.
If this schedule corresponds to your draw schedule, you can now request that your lender inspect the work and release the next portion of your construction loan.
For next week’s work, you need to schedule the plumbing contractor and order the material for the exterior siding and any fixed-glass frames. If the exterior has a brick or stone veneer, you need to schedule the mason.
Progress during phase two will be very obvious to the observer, whether a neighbor or someone who drives by every day, because the shell goes up very fast. During the next phase, however, most of the work goes on inside the house, so that sometimes it will seem that nothing is happening during phase three, which can take six weeks or longer. In the first half of phase three, you will be working mostly with the mechanical trades—plumbing, heating and air conditioning, and electrical.
As always, your biggest problem will be getting the tradespeople on the job to work in the proper sequence. Rarely will they be able to be on your job the day that you want them there, but they will show up the day following, or the day following that, or. . . . However, your diligence at keeping after them will pay off as the rough, empty interior shell becomes a house, with rooms, doors, and cabinetry.
The plumbing work is the least flexible of the mechanical trades as to location and size, and therefore must come in the first week of phase three. At the completion of his work the plumber will call for an inspection. Meanwhile, carpentry work can continue on the exterior of the house, with the framing of any fixed-glass openings and the installation of exterior siding. The glass company will need to be scheduled for the next week to install the fixed glass, and will probably want to measure the opening(s) during the week in order to have it ready for next week. The HVAC (heating, ventilating, air conditioning) contractor needs to be scheduled for the following week. If the masonry walls in the basement are to be finished you need to order furring for the carpenter to install. Complete your agreement with the electrical contractor if you have not already done so, and notify him of his starting date in two weeks.
The second week of phase three (3B) belongs primarily to the HVAC contractor, with the carpenter or mason doing some exterior work and/or furring out the basement walls. Note that the HVAC work is not inspected until after the insulation is complete, since the latter is equally important to the successful heating or cooling of your house. Check with your electrician to confirm that he will be on your job next week.
After the plumber, HVAC contractor, and the electrician have finished their rough-in work, there will be some framing members that have been cut or eliminated, and there will be plumbing, duct work, and wiring that may have to be boxed in. The extra framing work necessitated by these conditions is referred to as back-up. Cabinetry, recessed bath accessories, and some partition framing will require blocking. This material will need to be ordered by you or your carpenter for installation after the rough-ins are complete.
By the end of the second week of phase three you should have agreements with both your insulation and drywall contractors, who will be working for you during the fourth, fifth, and sixth weeks of this phase.
The third week of phase three (3C) starts with the electrician doing his rough-in work, including the installation of the recessed light-fixture housings we mentioned earlier, and getting his work inspected. As soon as the electrician is done, the carpenter will need to install the blocking and back-up work and make sure everything is ready for the framing inspection. Depending on how exacting your inspector is in enforcing the county’s building code or his interpretation of it, you may pass the framing inspection the first time or be given a list of corrections he wants before accepting the framing. This is usually the most difficult inspection to get through and rightly so; the city or county is doing its best to protect you and any future occupants from unsafe construction.
If your carpenter or mason has not finished the exterior siding or veneer, he still has this week in which to do it. Schedule the insulation contractor for the following week, with the expectation of passing the framing inspection. You or your carpenter will need to order the exterior trim material—the fascia and soffit, and any decorative window and door trim, cornice and/or corner trim.
Concluding your work in the third week is the ordering of your finished stairs and the fixtures and fittings for the baths, powder rooms, and kitchen, especially if there are any special colors or unique items that are not kept in stock. Using the same principle we applied to the front door, have your carpenter build temporary rough stairs during Phase Two, and then replace them with the permanent stairs during Phase Four. There will be a lot of construction traffic between all levels of the house, and you do not want your good hardwood stairs to be damaged. Place the order and make arrangements with the stair company to measure for the stairs before they build them.
The fourth week of phase three (3D) begins with the installation of the insulation, followed by the HVAC inspection. The next item on your checklist deserves special attention. We have included a concealment checklist in four parts that must be completed before going any further with the construction of your house. At this point, you become the primary inspector of your house, and you should require your four principal contractors to go through their part of this checklist with you. This is the last chance you will have to make sure that all the work that will be covered by drywall and/or other finishes is installed correctly and, where necessary, identified for future reference. If you learn nothing else from this book except to use this checklist, you will have gotten your money’s worth. Many people contributed to this checklist, and time and time again it has proved to be of inestimable value. Some of the items may not apply, but it is extremely important that all of them be considered, and if applicable, done. The framing carpenter, the plumber, the HVAC contractor, and the electrician each has a section. If you are not sure what an item on the checklist means, ask them. Go through it with them before you proceed any further.

 All walls and openings per dimensions on plans.
All studs plumb within tolerance—especially at cabinets, vanities and countertops.
Kitchen and bath soffits (bulkheads) stable, level, of proper dimension and with adequate nailing.
Nailing provided for wall-mounted cabinets, wall-hung fixtures and for any special conditions.
Nailing provided for drywall ceiling installation.
Nailing provided for drywall corners and stop beads.
Nailing provided for all special or unusual conditions.
Tub access framed to receive panel and finish trim.
Attic access framed to receive panel or stairs and finish trim.
Mirror cabinet roughed-in to correct size, location, and not in conflict with light or switches.
Recessed bath accessories roughed-in or location clear of interference.
Door rough openings correct for size and type of head/jamb—extra height provided at carpeted areas to avoid undercutting.
Frame provided for electrical panel if in finished area.
Changes to framing for rough-ins properly corrected—sound, plumb and level.
Window-jamb extensions to proper dimension to be flush with drywall.
Window head, jamb, and sill plumb or level to receive proper trim thickness.
Vertical chases properly firestopped.
Under-slab stub-ups in correct locations
Floor drain roughed-in at furnace, HWH, and laundry.
Ice-maker supply line roughed-in with coil.
Exterior hose-bibs and interior shut-off valves in accessible location.
Sufficient space for HWH, clothes washer, and clothes dryer.
Accessible location for meter yoke.
Remote water meter roughed-in.
Water closet tank supply line 8” above finish floor line.
Tubs protected.
Bath exhaust fan roughed-in with duct to outside.
Range exhaust duct in proper place.
Clothes dryer exhaust duct in proper place.
Supply and return openings installed per plan or located within acceptable practice.
Ductwork brought to proper location for air handler.
Ductwork properly insulated.
Thermostats roughed-in.
Wiring to range, disposal, HWH, all air handlers, and all condensors or heat pumps, garage door opener.
Lighting junction boxes roughed-in per plan, properly centered, level or on axis.
Boxes do not project beyond studs, joists, or rafters more than finish thickness, preferably less.
Boxes installed plumb or level.
Multiple switches in correct order for convenient operation per plan.
Switches at latch side of door and not in conflict with trim or cabinetry.
Telephone wiring and rings in proper place per plan.
Kitchen wall phone not in conflict with wall cabinets or window trim.
TV cable and/or antenna wiring and rings in proper place per plan.
Returning to the construction schedule checklist, we see that during the installation of the insulation inside the house, the carpenter can be working on the exterior trim. You need to schedule your drywall contractor and make sure the drywall material has been ordered. If you are building in winter, you or your drywall contractor must arrange for temporary heating, and make sure the house is reasonably airtight. The spackling compound used with the drywall needs to be kept at a minimum of fifty-five degrees for proper drying.
During this week, you also need to contract for ceramic tile (if applicable), and order the balance of the finish hardware, including the interior door latches and closet door pulls.
In the fifth week of phase three (3E), while the drywall contractor is installing his work, you need to order electrical fixtures and hardwood flooring for future deliveries, and arrange for the drywall finishing if you have split the drywall work into two contracts. (Although you may save a little money with two separate contracts, unless you know a good finisher it is probably better to have a reputable drywall contractor do the entire job.)
The same principle is true for the hardwood and other floor finishes. You can save money by contracting separately with each tradesman, but your management time increases significantly. There are good flooring contractors who will do hardwood, ceramic, vinyl, and carpet. You will still need to select your finishes and schedule the installation of each product in accordance with the checklist. At this time it is important to select the carpet (and the carpeting contractor if applicable) and make sure it is ordered so that it will be available when needed.
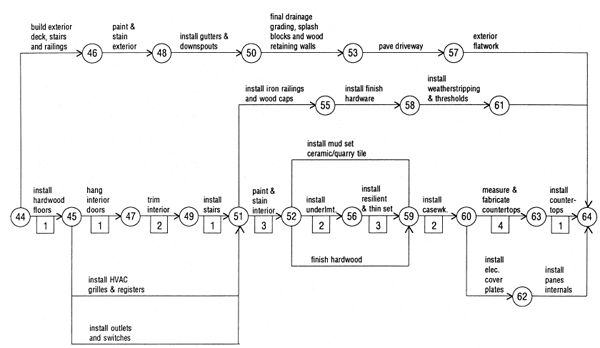
In the sixth and final week of phase three (3F), the drywall is taped, spackled, and sanded. The exterior trim should be completed this week if it hasn’t been done in previous weeks. And, if appropriate, request your next draw from your lender.
The first flooring material to go in your home is unfinished hardwood, and should be scheduled for installation next week. Interior trim lumber (doors, base molding, window trim, and other required items need to be ordered, and the finish stairs should be completed and ready for delivery.
Schedule your HVAC contractor to come back to set the grilles and registers, and your electrician to install outlets and switches.
Three contracts need to be completed during this week. Gutters and downspouts are usually done by a separate contractor, and should be installed in about two weeks. Paving may be stone, asphalt, or concrete, and will need to be installed in about three weeks. If your resilient flooring (vinyl sheet or vinyl tile) is being done by a separate contractor, you will need an agreement for installation in about three weeks.
The first week of phase four (4A) begins with hardwood flooring. The installation of the unfinished floors precedes the installation of the doors and interior trim, because the doors and base are set on top of the hardwood. If you are using prefinished hardwood strip or parquet flooring, that should be installed but carefully protected. The other floor finishes (vinyl and carpeting) are fitted to the door frames and base trim and installed later.
In addition to hanging the interior doors and installing the trim, the finish carpenter will also install your finished stairs. The stairs should be protected during the final construction phases. The HVAC contractor will install the grilles and registers, and the electrician will install the outlets and switches. Although most tradesmen will prefer to work separately, the HVAC contractor and the electrician can work together at this point in the construction without being in each other’s way. Many of the remaining weeks will have more than one trade working simultaneously.
Schedule the painting and order the paint if you are supplying it. Also schedule the installation of gutters and downspouts. If your house has exterior wood decks, the material needs to be ordered. Also, order material for stair and interior balcony railings and handrails, and underlayment for all vinyl and ceramic (master set) floors. Check with your hardware supplier to make sure all of your hardware is available to be installed next week.
If you are having a separate contractor sand and finish the hardwood flooring, he needs to be under contract and ready to start in two weeks. Bath accessories will be needed in about four weeks.
When the interior trim is finished—ideally near the beginning of the second week of phase four (4B)—the interior painting can begin. No other interior work can be done during the painting, but outside the house the decks, stairs and railings can be constructed, and any exterior trim not already in place can be completed. When that is done, the painting and staining work can move from inside the house to outside.
Then, inside the house, the stair and balcony railings and handrails, the finish hardware, and the underlayment can be installed by the carpenters.
After the exterior painting is complete, have your gutters and downspouts installed. Many counties will permit you to eliminate the gutters if your roof overhang is at least two feet. However, water running off the roof will soon create a gully in the ground under your roof overhang, and mud will splash against your house. One way to control this is to dig a trench on the ground under the roof and fill it with gravel or rocks. Even then, however, some water and dirt will splash on the side of your house, and there is no guarantee that the water will not find its way back to the foundation and into the basement. So gutters and downspouts, properly installed and with splashblocks (or preferably undergound piping that leads the water at least five feet away from the house) are the best way to maintain clean siding, and one of the important factors in achieving a dry basement.
If you need retaining walls around your house, walks and/or driveway, and you are going to have them constructed with railroad ties or a similar treated wood product, order that material this week, or contract with a landscaping contractor or your grading contractor to do the work.
The scheduling this week for work to be done next week includes the contractor who will pave your driveway, the tradesman who will install the ceramic tile, the tradesman who will install your resilient flooring, and another who will finish your hardwood floor. You should also schedule the delivery of the vanities and kitchen cabinetry (referred to in the schedule as casework) that you ordered eleven weeks ago.
If you have purchased a special wood front door and want it properly weatherstripped, contract with a company that specializes in installing spring bronze weatherstripping and a compressible-gasket threshold. If you have purchased pre-hung doors you may not need this service. After your casework is installed you will need countertops, and these should be ordered for delivery in two weeks. The company supplying plastic laminated countertops will want to take exact measurements before fabrication. They may want to wait until the cabinets are installed, so schedule the measuring for next week. Finally, order your kitchen and laundry appliances for delivery in four weeks. Most good distributors should be able to meet that deadline.
In the third week of phase four (4C), the exterior work includes finishing the grading and installing the splashblocks of drain pipe for the downspouts and paving the driveway. Interior work includes the installation of ceramic tile floor and tub surround (if applicable) in your bathrooms, installation of the resilient flooring, finishing the hardwood floors, and installing the cabinetry in that order. At the same time you need to schedule the concrete finisher for your exterior flatwork—patios, walks, and possibly the driveway, the installation of weatherstripping and thresholds, the delivery of your kitchen countertops, and the installation of the electrical cover plates and the internal wiring and circuit breakers in the panel box.
The minimum landscaping requirement in most counties is for some form of ground cover over all areas of exposed dirt. A growing ground cover such as grass (as opposed to bark mulch) is highly recommended around the house in order to retain ground water and keep the foundation walls dry. Foundation planting is also desirable for the same reason. Keeping the grade around the house sloping away from the house and having living roots in the soil are also very important factors in achieving a dry basement. We hope that your budget will allow for some nice plantings on your property in addition to the minimum required ground cover. Contract for this work to be installed in two weeks.
By this time, you should certainly have a feeling for the construction of a house. Each week, while the tradesmen are doing their job, you have been looking over their shoulder, while at the same time ordering material, contracting, and scheduling.
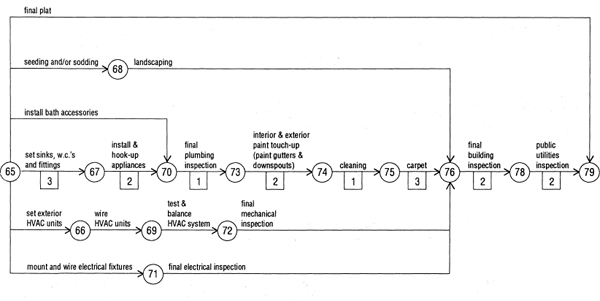
By the fourth week of phase four (4D), your house looks as if it were nearing completion—as indeed it is! During this week the patios and walks are finished and the weatherstripping, thresholds, kitchen counter tops, electrical cover plates, and panel internals are installed. After this work is complete, and if appropriate, request your next draw from your lender. Scheduling includes the seeding, sod and/or mulch, the installation of sinks, water closets and fittings, the exterior heating and air-conditioning equipment, and the electrical fixtures. Check to be sure that the bathroom accessories and fixtures are available for delivery next week.
This is the beginning of the final month of construction and the end is in sight. Contact your surveyor and have him prepare the final plat, which will include everything you have added since the wall check survey—the driveway, the walks, patios, the decks and the retaining walls. The final plat is usually required by your lender for final payment or by the county for occupancy, but if neither requires one you can skip this item. Exterior work includes seeding, sodding, and planting, and installing and wiring the HVAC condensing unit and any outside light fixtures. Interior work includes installing the bathroom sinks, water closets and fittings, and the electrical fixtures. During this first week of phase five (5A), to schedule the delivery of your appliances, schedule the final hook-up testing, and balancing of the HVAC system, and request the final plumbing, electrical, and HVAC inspections.
Throughout this chapter, we have discussed the various construction techniques that contribute to keeping your basement dry. They fall into two categories: providing an easy escape route for water to follow away from the foundation both on the surface of the ground and below it, and protecting the foundation walls and slab from any remaining water. Only when all of these components are in place (at the end of this week of construction) can you expect your basement to be dry.
The last request you make of the painting contractor is for him to return in two weeks to do interior and exterior touch-up, and to paint the gutters and downspouts if necessary. You also may want to consider hiring a cleaning service to do the final clean-up, which will be a formidable task. Cleaning a newly constructed house is very different from cleaning the house that you live in all the time. There are companies that specialize in this work. Not only do they vacuum, dust, and mop, but they also remove all the dirt, paint splatters, labels, and stickers from the countertops, the sinks, the water closet, the tub, the glass, the vinyl flooring, and the ceramic tile.
In the second week of phase five (5B), the major appliances will be installed. Usually the county has a sequence for the final inspections, starting with the final plumbing inspection. Before the final HVAC inspection, have your contractor balance the system—that is, make sure that the airflow is adequate to all registers and that the dampers in the ductwork are adjusted properly (assuming you have a forced-air system). Walk around the house with your contractor and check the amount of air coming out of the registers, and make sure that all rooms are getting their share of conditioned air (check especially any remove rooms or rooms over a nonheated space like the garage). After the final HVAC inspection, the next final inspection is electrical.
Schedule the touch-up painting and the painting of the gutters and downspouts, schedule the cleaning contractor, and schedule the carpet installation.
In the third week of phase five (5C), after the paint touch-up work has been done, the entire house cleaned, and the carpeting installed, and after you have checked all work for completion, schedule the final building inspection and request the final plat from your surveyor.
In the fourth and final week of phase five (5D)—ideally, but most unlikely, twenty weeks after you began construction you have a house that you can live in. After the final building and public utilities inspection, your county should issue your occupancy certificate. And, of course, you can request your last draw from your lender.
By way of concluding this chapter, we want to alert you to some things that may occur during the first year you occupy your newly constructed home. All the material that you have incorporated into the construction of your home has come to the site with a high moisture content. This is particularly true of the lumber products because of their molecular structure. But it is also true of inorganic material like drywall. During the first year these materials lose most of their “excess” moisture, especially during the heating season when the relative humidity inside your house can get down into single-digit numbers.
As these building products lose moisture most of them will shrink. Sometimes exposed wood products like beams, columns, wood decking, and even trim will twist or develop small cracks along the grain called “checks.” These are not structural failures but characteristic action of wood as it drys. Concrete slabs and concrete masonry may also develop small hairline cracks as the material dries. Again, these are not structural failures. Drywall will usually show “nail pops” within the first year (due primarily to the wood studs drying and shrinking) and these simply require spackling and touch-up painting. If the drywall seems loose and not adequately fastened to the wood studs you should add a nail or screw as required, spackle, and touch up.
All of the above are normal occurrences and should not be a cause for concern. However, if you find large or long cracks in concrete masonry walls or any finish material and/or doors or windows that bind in their openings when they had originally worked properly, these may indicate a structural problem or a differential settlement in the foundation. It is probably best to have a professional engineer, architect, or home inspector check these conditions. Usually they will stabilize after the first year and will need only cosmetic repair.