Chapter 2: Creating a Social Media Listening Hub
In This Chapter
![]() Understanding why you need to monitor your brand
Understanding why you need to monitor your brand
![]() Finding out which monitoring tools are right for you
Finding out which monitoring tools are right for you
![]() Cleaning and aggregating your monitoring data
Cleaning and aggregating your monitoring data
![]() Turning your WordPress Dashboard into a listening post
Turning your WordPress Dashboard into a listening post
This chapter focuses on the importance of listening to social media, the free monitoring services available for you to use, and how to integrate these sources into your WordPress installation so that you can turn your run-of-the-mill WordPress installation into a social media listening hub.
A social media listening hub is a collection of information from several sources, including mentions of your blog, keywords, or topics that you write about, and even information about competitors. You can sign up for services that monitor these topics, such as Salesforce Marketing Cloud (www.salesforcemarketingcloud.com), Sysomos (www.sysomos.com), and hundreds of others. But most of these services cost money and give you another place to log in to — and you may not use this kind of service to its full capability. For a small business or an independent blogger, the investment (both time and financial) doesn't always make sense. By leveraging the power of the WordPress platform, you can easily cut down on both the time and financial commitment of monitoring platforms.
In this chapter, I walk you through determining what sources you should pull your data from, how to determine and search for the keywords you deem important, and how to integrate your search results into your WordPress Dashboard. Additionally, I look at some other tools that can help expand your monitoring practices.
Exploring Reasons for a Social Media Listening Hub
When you begin to engage in the world of social media, one of the most important things you can do is monitor what Internet users are saying about your company, your blog, you, or your products. By investigating what Internet users are saying, you can find and participate in discussions about your blog or company and come to an understanding about the way your community views your blog (or company). With this information, you can participate by responding to comments on other blogs, Twitter, or message boards or by creating targeted content on your own blog.
The conversations happening about your area of interest or niche amount to really great intelligence. For a business, regardless of whether you participate in social media, social media users are talking about your company, so you need to be aware what they’re saying. If you’re blogging about a particular topic, you can evolve your content by tracking what members of your niche are discussing about it.
Eavesdropping on yourself
By monitoring your niche, you essentially can eavesdrop on thousands of conversations daily and then pick and choose the ones in which you want to participate. The social media listening hub you create allows you to follow various conversations going on through microblogging services such as Twitter, Facebook, blogs, news sites, message boards, and even comments on YouTube. If someone says something negative about you, you can respond quickly to fix the situation. You could make attempts to step in and make sure that people are informed about what you’re doing.
Keeping tabs on your brand
Think about what keywords or phrases you want to monitor. Of course, you want to monitor your name, your blog/company name, and other keywords that are directly associated with you.
 Monitor common misspellings and permutations of the name of your brand. The Bing Ads Intelligence tool (
http://advertise.bingads.microsoft.com/en-us/bingads-downloads/bingads-intelligence) can help you determine all the common spellings and usages of the keywords you're monitoring. You can also find common misspellings for your brand by examining some of the terms people used to find your page with Google Analytics (www.google.com/analytics) or a paid tool such as Trellian Keyword Discovery Tool (www.keyworddiscovery.com/search.html).
For example, if Aaron Rodgers wanted to set up a monitoring service, he might use the following keywords: Aaron Rodgers, Arron Rodgers, Aaron Rogers, Green Bay Packers Quarterback, and perhaps even his touchdown celebration phrase: discount double check. If he wanted to expand this service past direct mentions of him or his team, he could also include more general terms such as NFL Football or even NFC Teams. The general term NFL Football may be too general, though, producing too many results to monitor.
Additionally, you may want to view your blog or company through the lens of your customers: What terms do they associate with your company? Looking at your blog from other points of view can provide you with good ideas for keywords, but not always. Although you don’t always want your company known for these terms and may not see yourself that way, getting the perspective of other people can open your eyes on how users view your blog or website.
Don’t think of this process as just pulling in keywords, either. You can pull in multiple feeds, just like you do with an RSS reader, which allows you to monitor specific sites. So, if you concentrate on an industry, and a website deals specifically with your industry and has an active news flow pushed through an RSS feed, you might want to consider adding specific websites into the mix of feeds you run through WordPress.
The setup in WordPress that I describe in this chapter gives you the convenience of having everything in one place and can help you monitor your brand, company, or blog. The limitations of the WordPress platform means that you can monitor only five different groupings, so you can't use this method as a replacement for an enterprise-monitoring tool for a large company. Additionally, if you own a restaurant, hotel, or bar and want to pick up review sites such as Yelp and Trip Advisor, these tools can't do it. Most social media monitoring tools don't count review sites as social media. Tools such as Reputation Ranger (http://reputationranger.com) can monitor ratings sites for a nominal monthly fee if you want to pay attention to those types of sites.
 When your content changes, change what you’re monitoring to match the evolution of what you’re blogging about.
Exploring Different Listening Tools
You can find tons of different types of monitoring or listening tools that oversee the social media space. If you work for a large company, you can use large, paid tools such as Salesforce Marketing Cloud (www.salesforcemarketingcloud.com), Sysomos (www.sysomos.com), Alterian (www.alterian.com), Lithium (www.lithium.com), or others. Pricing for these tools runs from a few hundred dollars to the tens of thousands per month. Most individuals and small businesses can't make that investment. If you're one of the smaller guys, you can create your own monitoring service right in WordPress by importing free monitoring tools into your Dashboard to create a social media listening hub.
Some monitoring tools pick up blog coverage, Twitter remarks, and message board comments. Others pick up content created around video and pictures. Try the different monitoring services mentioned in the following sections and determine which give you the best results and which make you feel the most comfortable. Then choose the best tools to create a good monitoring mix. One solution probably can’t cover everything, so experiment with different combinations of tools.
Most, but not all, of these tools use Boolean search methods, so you need to understand how to narrow down your searches. If you want to combine terms, put an AND between two items (for example, cake AND pie). If you use OR, you can broaden your search — for example, to track common misspellings (MacDonalds OR McDonalds). Finally, if you want to exclude terms, you can use the NOT operator to exclude items from your search. Use NOT if you want to search for a term that could have an alternative meaning that’s irrelevant to what you’re actually looking for (for example, Afghan NOT blanket, if you’re blogging about Afghanistan).
Although some of the monitoring tools in the following sections don’t apply to every type of website, I would include these tools in most monitoring setups.
For each search that you do on a monitoring service, you need to log the feed address. To make recording these addresses easy, open a spreadsheet or a document into which you can paste the various feeds. You can collect them in one place before you begin to splice them together (which you do in the “Creating Your Own Personal Monitoring Mix” section later in this chapter). Think of it as a holding area.
Monitoring with Google Alerts
Most social media experts widely consider Google Alerts (www.google.com/alerts) a must-use monitoring source for anyone dabbling in social media. Google Alerts allows you to set up monitoring on news sites, blogs, pictures, videos, and groups. You can toggle the amount of results you see from 20 to 50; and you can choose how often they come in, either in real time, daily, or weekly. You can have Google deliver your alerts to your e-mail or via RSS.
Google Alerts isn’t perfect, but it doesn’t have many drawbacks. Some of the specialized searches (such as Boardreader, which targets message boards) pick up more around their areas of expertise than Google Alerts does, but in general, and compared with other tools, Google Alerts covers the widest range of content.
You can easily set up Google Alerts by following these steps:
1. Navigate to www.google.com/alerts in your web browser.
The Alerts page loads, welcoming you to the Google Alerts website.
2. In the Search query text box, type the keyword or phrase that you want to monitor.
If you enter a phrase in which the words have to go together in that particular order, put the phrase in quotes.
3. From the Result Type drop-down list, select the type of monitoring that you want to use.
The options send you different kinds of alerts:
• Everything: All types of Internet content available
• News: Only news sources
• Blogs: Blog sources
• Video: Video sources, such as YouTube
• Discussions: Discussion sources, such as social media
• Books: Mentions in the text of books
Select the Everything option so that you receive alerts in all areas of Internet content available on the web. This gives you wider coverage in regards to your tool.
4. Select the frequency of updates from the How Often drop-down list.
Because you’ll receive the updates via RSS and not e-mail (which you set up in Step 6), you want the highest frequency possible. So, select the As-It-Happens option. (Other options include a daily, weekly, and monthly digest.)
5. From the How Many drop-down list, select the amount of items you want to appear in each update.
If you selected As-It-Happens in Step 4, you receive items in real time, so you don’t need to specify the amount of items — select either Only the Best Results or All Results.
6. Select your delivery type from the Deliver To drop-down list.
To make the delivery source an RSS feed, as opposed to an e-mail, select Feed.
7. Click the Create Alert button.
Your Google Alert Management screen, where you can get the RSS feeds for all your Google Alerts, appears.
8. To get the URL of the RSS feed, right-click the Feed hyperlink next to the orange RSS icon and choose Copy Link Location from the pop-up menu that appears.
9. Paste the copied link location into a document in which you list all the feeds that you plan to aggregate later.
10. Repeat Steps 2 through 9 for all the terms you want to monitor.
Before you start importing the feed into your WordPress Dashboard, you might want to receive the update via e-mail for a few days to test the quality of the results you’re getting; if your results aren’t quite right, you can always narrow your search criteria. Doing this saves you the time of parsing all your RSS feeds, blending them all together, and then having to go back and edit everything because it’s set up wrong. Using the e-mail as a test is a massive timesaver.
Tracking conversations on Twitter with RSS
Tracking mentions on Twitter via RSS is relatively simple: You just need to know what you’re looking for and how to build the RSS links so you can monitor them. You can look for several items on Twitter to monitor your brand and reputation via the Twitter social network, including the following:
 Username: Monitor when your Twitter name is mentioned and by who.
Hashtags: Monitor specific Twitter hashtags (for example, #wordpress).
Keywords: Monitor Twitter for a specific word.
Twitter does not make it very easy to locate the native RSS feed URL on its website; however the feeds do exist and can be found using a URL such as this example: http://search.twitter.com/search.atom?q=XXX — where XXX is the keyword, hashtag, or username you'd like to monitor. The following examples can help you build various RSS links for Twitter:
Twitter RSS URL for a username: http://search.twitter.com/search.atom?q=LisaSabinWilson
Twitter RSS URL for a keyword: http://search.twitter.com/search.atom?q=wordpress
Twitter RSS URL for a hashtag: http://search.twitter.com/search.atom?q=#wordpress
Build the Twitter RSS URLs that you want to monitor and include them in the document where you’re listing all the RSS Feeds you want to aggregate later.
Listening to blogs with Google Blog Search
Google Blog Search (www.google.com/blogsearch) is a blog search service created by Google. It often catches blogs that other services don't.
Google Blog Search monitors blogs only. It can’t give you results from message boards or other social media sites.
You can set up monitoring via RSS with Google Blog Search by following these steps:
1. Navigate to www.google.com/blogsearch.
The Google Blogs website loads in your browser window.
2. Type your search term in the Search text box.
This text box appears in the center of the page.
3. Click Enter.
After Google does the search, it takes you to a results page.
4. Copy the RSS feed link of the blog search results page.
The RSS link appears at the very bottom of the blog search results page.
5. Paste this link location into a document in which you list all the feeds that you plan to aggregate later.
6. Repeat Steps 2 through 5 to add as many Google Blog monitoring terms as you want.
Searching communities with Boardreader
Boardreader (http://boardreader.com) is a must-add tool because its niche focuses on groups and message boards, where conversations have been happening much longer than on just Facebook and Twitter. Many other monitoring tools often overlook these areas when talking about monitoring the web, but you can find so many vibrant communities that are worth being a part of, in addition to monitoring what is being said about your blog or company.
To set up your Boardreader tracking, follow these steps:
1. Navigate to http://boardreader.com.
2. In the text box, type the search term that you want to monitor; then click the Search button.
3. When the results appear, click the Show Tools link below the Search text box.
The RSS Feed link appears.
4. Right-click the RSS Feed link next to the orange RSS icon and choose Copy Link Location from the pop-up menu that appears.
5. Paste this link location into a document in which you list all the feeds that you plan to aggregate later.
6. Repeat Steps 1 through 5 to search for and monitor as many different search terms as you want.
Microblog searching with Twingly
Twingly Microblog Search (www.twingly.com/microblogsearch) deals with real-time search microblogging and traditional blog search. Their microblog service monitors conversations on Twitter only.
Compare the results you get from Twingly with Twitter Search, just to make sure that Twingly is picking up everything on Twitter.
To monitor conversations by using Twingly, follow these steps:
1. Navigate to www.twingly.com/microblogsearch.
2. In the text box, type the search term that you want to monitor; then click the Microblog Search button.
All the relevant search results appear, as shown in Figure 2-1.
3. On the right sidebar, right-click the Subscribe to RSS link next to the orange RSS icon and choose Copy Link Location from the pop-up menu that appears.
4. Paste this link location into a document in which you list all the feeds that you plan to aggregate later.
5. Repeat Steps 1 through 4 for all the terms you want to monitor.

Figure 2-1: Searching for WordPress For Dummies on Twingly.
Creating Your Own Personal Monitoring Mix
After trying out the various monitoring services, you can create a mix of services to import into your WordPress Dashboard. You import the results of these monitoring services with the help of RSS (Really Simple Syndication). You can combine different single RSS feeds into one RSS feed and create an organized setup for all the information you have to manage. For example, if you have various RSS feeds from different sources around the keyword cookies, you can combine them all into one RSS feed. Or if you want to combine various feeds based off sources, like all your Twitter RSS feeds, you can do that as well.
Look for the orange RSS icon that’s usually found on the URL bar of your browser. Additionally, some sites offer an RSS export on the right sidebar or in the search bar for the site. Grab the address of all these feeds by clicking the feed name and copying the feed URL from the browser.
Grouping your monitoring results
After you copy the locations for all your RSS feeds in one document, you need to group those RSS feeds together. Grouping your RSS feeds keeps your monitoring system nice and tidy and allows you to more easily set up the WordPress Dashboard. After you group these feeds, you splice them together to make one master feed per grouping (see the following section). If you’re tracking a variety of keywords, you may want to put your feeds into groups. For example, Wendy’s Restaurants could make these keyword groupings:
Grouping 1: Your brand, products, and other information around your company
• Wendy’s (the company name)
• Frosties (a prominent product name)
• Dave Thomas (a prominent person in the company)
Grouping 2: Competitors
• McDonald’s
• Burger King
• In-N-Out
Grouping 3: Keyword-based searches (Burgers)
• Hamburgers
• Cheeseburgers
Grouping 4: Keyword-based searches (Fast Food)
• Fast food
• Drive thru
Grouping 5: Keyword-based searches (Chicken)
• Chicken sandwiches
• Chicken salad
• Chicken nuggets
In each of these groups, you place your Google Alerts feed, Twingly feed, and whatever other feeds you feel will provide information about that subject area. You can blend each group of feeds together into one master feed for that group and bring them into WordPress.
WordPress limits you to five groups total. Any more than five groups slows down the Dashboard and is more than WordPress really can handle.
Grouping all your various feeds together gives you the most complete monitoring solution by covering multiple monitoring tools and blending them together. You get more coverage of your brand or blog than you would by just using Google Alerts. On the downside, you may see some duplicates because of overlaps between the different services.
If you feel overwhelmed by duplicate search results, you can blend one feed that covers only your brand, or you can simplify setting up your monitoring even more and avoid blending the feeds by keeping one feed for each item. For example:
General overview: Google Alerts or Social Mention
Message boards: Boardreader
Microblogging: Twitter Search
Editing the Dashboard to Create a Listening Post
After you choose your data sources, clean up your feeds, and put them all in individual RSS feeds, you can finally bring them into WordPress and set up your social media listening hub.
You can bring these RSS feeds onto your Dashboard through the use of a plugin called Dashboard-Last-News, which you can find in the WordPress Plugin Repository at the following page:
http://wordpress.org/extend/plugins/dashboard-last-news
Follow these steps to set up the Dashboard Last News plugin and configure it to create a social-listening Dashboard in WordPress:
1. From the Plugins menu on the left side of your WordPress installation, choose Add New.
This step takes you to the form where you can search for new plugins.
2. In the Search text box, type dashboard-last-news and click the Search Plugins button.
The search results page appears.
3. Search for the Dashboard-Last-News plugin and click the Install Now link, which installs the plugin on your site.
4. After the installation is complete, activate the plugin by clicking the Activate Plugin link on the Installed Plugin menu that appears below the Plugin menu.
5. Click the Last News link on the Settings menu on the Dashboard.
A new menu appears, and you can use it to select how many Dashboard widgets you want for your RSS.
6. Select the number of Last News Dashboard widgets you want (up to five) from the drop-down list on the Dashboard-Last-News page. Then click Update.
7. Click the Dashboard link on the menu on the left to go back to your Dashboard.
A Last News section that contains the widgets you created in Step 6 appears on your Dashboard.
8. To configure a widget, hover your pointer over the menu bar for that widget and, when the word Configure appears, click it.
The screen reloads, and you can now completely configure the widget.
9. Enter a name for the widget in the Widget Title text box.
You may want to name it according to the subject area it covers. The example dashboard has data coming in around Social Media and Design to go along with the terms we are monitoring.
10. (Optional) Select the Image (Y/N) check box to add an image next to the individual search results in the widget.
You may not want to include images, because most of the images that are automatically pulled are voting option buttons or other feed image buttons, which don’t add anything by having. Also, images slow down the load time.
11. Select a number from the Lines to Display drop-down list, which specifies how many online entries that the monitoring tools have found that you want to appear in the widget.
You can choose between 1 and 40.
12. Paste the URL for your selected RSS Feed into the Fill the RSS or Atom URL Here text box and click Submit. (See Figure 2-2.)
13. Repeat Steps 8 through 12 for the other widgets on your Dashboard by using your other selected feeds.
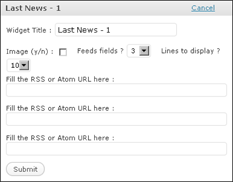
Figure 2-2: Configuring the Last News widget.
After you have your feeds set up, you can configure the appearance of your WordPress Dashboard.
14. Drag and drop the new widget boxes where you want them on your Dashboard.
15. (Optional) Expand the number of columns and remove current widgets by clicking the Screen Options link in the upper-right corner of the Dashboard and then selecting or deselecting the check boxes for the widgets in the drop-down list that appears.