Chapter 2: Installing and Managing Plugins
In This Chapter
![]() Installing WordPress plugins via the Dashboard
Installing WordPress plugins via the Dashboard
![]() Manually installing WordPress plugins
Manually installing WordPress plugins
![]() Updating plugins
Updating plugins
![]() Activating and deactivating plugins
Activating and deactivating plugins
![]() Deleting plugins
Deleting plugins
With more than 20,000 plugins available, you have a huge number of options for customizing your site. Chapter 1 of this minibook detailed what types of plugins are available and where they can be found. In this chapter, you start putting these plugins to use. This chapter is dedicated to helping you install, activate, deactivate, update, and delete plugins.
Installing Plugins within the WordPress Dashboard
When you’ve found a plugin in the Plugin Directory (see Chapter 1 of this minibook) that you want to install, you can install it directly from the Dashboard. (If you found a plugin that isn’t in the Directory, you have to manually install it. See the later section “Manually Installing Plugins.”)
To install plugins from the Dashboard, follow these steps:
1. Log in to your site’s WordPress Dashboard.
2. Click the Add New link in the Plugins menu in your Dashboard.
The Install Plugins page opens where you can search for plugins, as shown in Figure 2-1.
 When searching for, and finding, plugins on the Dashboard, you use the same method you used at the WordPress website in the Plugin Directory. Ever since WordPress provided the plugin search on the Dashboard, most users don’t use the WordPress website anymore.
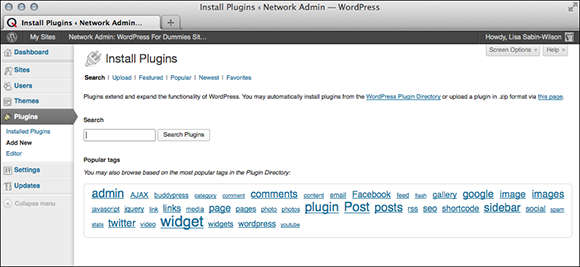
Figure 2-1: Search for your plugin in the Plugin Directory.
3. Find the plugin you want to install.
Every plugin in the official WordPress Plugin Directory (http://wordpress.org/extend/plugins) is searchable from the Install Plugins page. Plugins are also listed by Featured, Popular, Newest, and Recently Updated categories. Popular Tags gives you shortcuts to the most-used tags for particular plugins with just a click of the links that are displayed at the top of the page.
4. When you find a plugin you’re looking for, click the details link to view its description.
A description of the plugin appears in a pop-up window with a number of tabs at the top. These tabs can vary with each plugin and could include Installation, FAQ (Frequently Asked Questions), Screenshots, Stats, and Notes. Each tab provides important information about the plugin, as shown in Figure 2-2.

Figure 2-2: The plugin Description page with tabs within the WordPress Plugin Directory.
The FYI box on the right provides useful information, such as the version of the plugin, when the plugin was updated, what versions of WordPress are compatible with the plugin, and links to the author’s website, as shown in Figure 2-3.
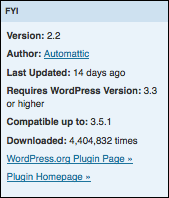
Figure 2-3: The FYI box on the plugin page within the WordPress Plugin Directory.
The rating section below the FYI box displays the average rating the plugin has received from its users, as shown in Figure 2-4.
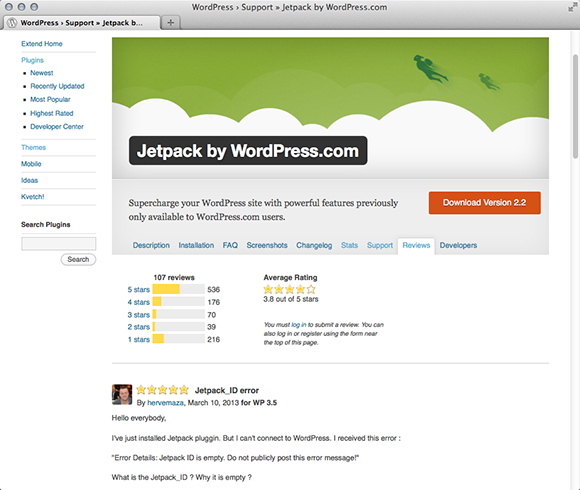
Figure 2-4: The Reviews section on the right side of the plugin page in the directory.
5. If the plugin looks like a good fit for your site and your needs, click the Install Now link on the search results listing in your Dashboard.
6. Confirm the prompt that asks for confirmation on the installation results.
WordPress downloads the plugin, unpacks it, and has the files moved to the plugin’s directory.
After the plugin is installed, you can activate the plugin or return to the Plugin Installer. (See Figure 2-5.)
7. Click the Activate Plugin link.
The plugin is activated and becomes available for use.
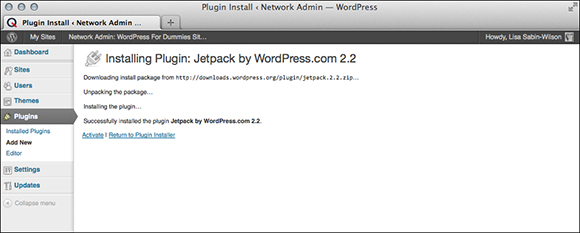
Figure 2-5: Information about the installation of the Jetpack plugin.
 If the Dashboard screen displays any kind of error message after installing the plugin, copy the message and paste into a support ticket on the WordPress.org support forum (
http://wordpress.org/support) to elicit help from other WordPress users on what the source of the problem is and how to solve it. When posting about the issue, provide as many details about the issue as possible, including the screenshot or pasted details.
Manually Installing Plugins
Installing plugins from the Dashboard is so easy that you probably never need to know how to install a plugin manually via FTP. (Book II, Chapter 2 explains how to use FTP.) But the technique is still helpful to know in case the WordPress Plugin Directory is down or unavailable.
The following steps take you through how to install a plugin using FTP, using the Gallery plugin as the example:
1. Go to the plugin page from the WordPress Plugin Directory website: http://wordpress.org/extend/plugins/gallery-plugin.
2. Click the red download button to transfer the plugin Zip file to your computer.
3. Unzip the plugin files.
All plugins downloaded from the Plugin Directory are in the Zip format. Most operating systems (Windows, Mac, and so on) have built-in tools to open Zip files. After opening the Zip file, extract the directory contained inside the Zip file and put it in a directory on your computer that is easily accessible.
4. Connect to your site’s server using FTP.
Details on how to use FTP are covered in Book II, Chapter 2. If you have any difficulty connecting to your server, contact your hosting provider and ask for assistance in connecting to your server via FTP.
5. Navigate to the wp-content folder within the WordPress installation for your website or blog.
 The location of your WordPress installation can differ with every hosting provider. Make sure that you know the location before you proceed. Check out Book II, Chapters 2 and 4 for information on where the WordPress installation is located on your web server.
6. Navigate to the /wp-content/plugins directory.
First, navigate to wp-content. Inside this directory are the plugins and themes directories along with a few others. Navigate to the plugins directory. It is inside this directory that all plugins reside.
7. Upload the plugin folder to the /wp-content/plugins directory on your web server.
The plugin folder, named for the plugin (for example, if you're uploading the Gallery plugin, the folder is /gallery) contains all the files for that plugin.
Go to the Dashboard’s Plugins page and you see the new plugin listed. If a mistake is made, delete all the newly uploaded files and begin again.
Upgrading Plugins
Plugins receive updates that fix bugs, add new features, and update existing features. Some plugins are updated multiple times a week. Other plugins may never be updated. Fortunately, WordPress makes it easy to know when a new plugin version is available and also makes it very easy to update your local plugin directory from the Dashboard.
One of the easiest ways to know that plugin updates are available is by the version number displayed on the Plugins page on your Dashboard, directly underneath the plugin description. Figure 2-6 shows that the Akismet plugin has an available update, evidenced by the phrase underneath the Akismet description that says There is a new version of Akismet available. Figure 2-6 also shows how the Dashboard page provides alerts about upgrades with the small dark circle shown next to the word Plugins in the left navigation menu.

Figure 2-6: A WordPress plugin with an available update.
There are three ways to update a plugin: from the Plugins page, from the Updates submenu accessible under the Dashboard menu, and by manually updating the files via FTP.
Updating on the Plugins page
Updating a plugin on the Plugins page is very easily done. There are two different ways to update a plugin on this page: You can update plugins one at a time or update all the plugins that need it in one fell swoop.
To update individual plugins, click the Update Now link at the bottom of the plugin’s row; refer to Figure 2-6. WordPress automatically updates the plugin with the files from the new release. See Figure 2-7. Pay attention to the messages to ensure that the update was successful.
If an error is indicated, take a screenshot or copy the error details and create a support request on the WordPress.org community support forum (http://wordpress.org/support). The helpful people there can help you figure out the source of your issue and what the solution is.

Figure 2-7: The results of updating a single plugin from the Plugins page.
If updates inside the Dashboard continuously fail, contact your hosting provider to see whether there are any server-specific issues preventing WordPress from updating its plugins.
Although clicking the Update Now link is very simple and quick, it can get tedious if you have a large number of plugins.
To update all your plugins at once, click the checkmark next to each plugin, select Update from the Bulk Actions drop-down list, and click the Apply button. All your plugins are now updated. Figure 2-8 shows both Akismet and Hello Dolly updated at the same time.

Figure 2-8: The results of updating multiple plugins from the Plugins page.
Updating on the Updates page
The Updates page, accessible as a submenu of the Dashboard menu, provides quick access to update WordPress, plugins, and themes in one place. As shown in Figure 2-9, the Updates page is a one-stop shop for all the updates across your site.

Figure 2-9: The WordPress Updates page.
To update all of the plugins, simply click a checkbox next to one of the Select All headers (as shown in Figure 2-9) and click the Update Plugins button. All your selected plugins are updated. (Refer to Figure 2-8.)
Updating manually
The process of manually updating a plugin is nearly identical to the steps for manually installing the plugin as detailed earlier in this chapter. The only change is to delete the plugin’s directory before uploading the new files. Follow these steps:
1. Download the latest version of the plugin from the WordPress Plugin Directory or the plugin developer’s website.
2. Connect to your server via an FTP application and go to the plugins directory in the wp-content directory.
You should see a folder with the same name as the plugin you want to upgrade.
3. Rename this folder so that you have a backup if you need it.
Any memorable name, such as plugin-old should suffice.
4. Upload the new version of your plugin via FTP to your server so that it's in the wp-content/plugins folder.
5. Log in to the WordPress Dashboard and activate your upgraded plugin.
If you made any changes to the configuration files of your plugin before your upgrade, make those changes again after the upgrade. If you need to back out of the upgrade, you can just delete the new plugin directory and rename the folder from plugin-old to plugin.
Activating and Deactivating Plugins
After a plugin is on your site, activating it is extremely simple. To activate a plugin, do the following:
1. Log in to the WordPress Dashboard.
2. Navigate to the Plugins page by clicking the Plugins menu link.
3. Find the plugin you want to activate on the Plugins page.
4. Click the Activate link just below the plugin’s name in the listing.
If everything goes well, you get a notice that states Plugin activated, and the plugin has been activated successfully. (See Figure 2-10.) If a long error message is shown in the activation notice, the plugin has an issue that is preventing it from activating. Copy the message that appears in the notice and send the details to the plugin author for help on fixing the issue.
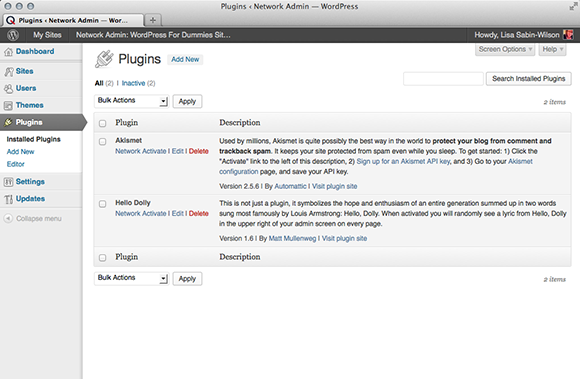
Figure 2-10: The Plugins page after activating a plugin.
Deactivating a plugin is the same process as activating a plugin. Simply follow the same steps but click the Deactivate link for the plugin that should be deactivated. You get a message at the top of your Dashboard telling you the plugin has been successfully deactivated.
Deleting Plugins
Sometimes it is simply time to let go of a plugin and remove it from the site. You could have many reasons for deleting a plugin:
 You no longer need the feature offered by the plugin.
You want to replace the plugin with a different one.
You’re retiring the plugin due to its functionality being replaced with features built into a new version of WordPress.
You’re removing it due to performance issues because the plugin simply required too many resources to run.
It may be tempting to simply deactivate undesired plugins and leave them sitting in your plugins directory, but take the extra step to delete plugins that you no longer need. The PHP files of the plugin can still be run manually if someone, or some automated computer program, directly requests that PHP file. If the plugin had a security flaw that could allow such direct execution of the code to compromise the security of the server, having old code lying around is simply a problem waiting to happen.
If you accidentally delete a plugin, you can always reinstall it.
Deleting via the Dashboard
Deleting plugins can be handled from the Plugins page. To delete a plugin, it first must be deactivated. (See the earlier section “Activating and Deactivating Plugins.”)
Ready to delete the plugin? Click the Delete link listed just below the plugin’s name. As shown in Figure 2-11, you first have to confirm that you want to delete a plugin before that action will take place.
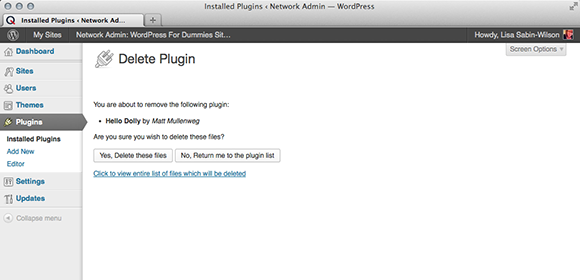
Figure 2-11: The confirmation message for deleting a plugin.
After confirming the deletion of a plugin, you’re returned to the Plugins page with a notice confirming that the plugin was deleted, as shown in Figure 2-12.
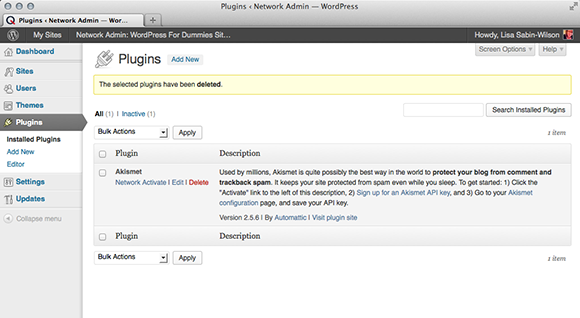
Figure 2-12: A notice confirming the deletion of a plugin.
Deleting manually
You can manually delete a plugin by simply removing the plugin's directory from the wp-content/plugins directory. Because the files no longer exist, the plugin simply stops running. It may be helpful to deactivate the plugin first, but doing so isn't required.
Manually deleting a plugin can be very helpful when a plugin has a fatal error that causes the site to crash. If you can’t gain control of the site again, manually deleting the plugin’s directory could quickly return control of your site.
Because this process involves using FTP, like manually upgrading a plugin, this process is very similar to manually installing a plugin. The main difference is that, rather than uploading the plugin’s directory, you’re deleting it.
Before deleting a plugin, download the directory to a local system first, just so you don’t lose any data that would be difficult to get back later. If the goal is to force the plugin to deactivate, you can rename the plugin’s directory rather than deleting it, which prevents WordPress from being able to locate the plugin, thus disabling it.
The process works as follows:
1. Connect to your site’s server using FTP.
2. Navigate to the site’s directory.
3. Navigate to the wp-content/plugins directory.
4. Delete the plugin’s directory.
The Plugins page shows a message that confirms the plugin is now deactivated due to the missing files. See Figure 2-13. Note that this message is shown only when you go to the Plugins page after manually deleting the plugin, and it is shown only once.

Figure 2-13: The error message shown after an active plugin is manually deleted.