Chapter 6: Exploring Plugin Development Best Practices
In This Chapter
![]() Exploring best practices
Exploring best practices
![]() Naming, filing, and locating your plugin
Naming, filing, and locating your plugin
![]() Internationalizing your plugin
Internationalizing your plugin
Starting to develop WordPress plugins is relatively easy. It’s much more difficult to develop WordPress plugins well.
The key to doing development well is to stick with a set of standards that ensures that your plugin is well designed and implemented. A set of standards that many people can agree upon are typically referred to as best practices. By adopting best practices as your own personal development standard, you ensure that other developers can easily understand your plugin’s structure and code. Doing so makes collaboration much smoother. In other words, if all WordPress plugin developers followed best practices, the WordPress development world would be a happier and more productive place.
This chapter delves deeper into best practices and is dedicated to taking your plugin quality to the next level.
Adding a File Header
The most fundamental best practice when creating WordPress plugins is to ensure that your plugin has a file header at the top of the main plugin file. As discussed in Chapter 5 of this minibook, the file header is the part of a plugin file that identifies the file as a plugin. Without the file header, the plugin isn’t actually a plugin and cannot be enabled on the WordPress Dashboard.
 Even if you don't distribute your plugin in the WordPress Plugin Directory (
http://wordpress.org/extend/plugins), take the time to fill in the file header with the name, description, author, version, and license. This info is helpful to all your plugin users.
Use the following header names to supply information about your plugin:
 Plugin Name: The value for this entry is listed as the name of the plugin on the Dashboard’s Plugins page. The Plugin Name is the only required entry in a plugin’s file header. If this isn’t present, WordPress ignores the plugin.
When giving your plugin a name, make sure that you choose a name that is
• Unique: WordPress uses the name to check for plugin updates. So, if you name the plugin Akismet, WordPress could offer to let the user automatically upgrade the plugin, resulting in your plugin code being replaced with the actual Akismet plugin. Starting all your plugin names with your name is a good way to achieve unique names. For example, these are some unique plugin names: Lisa’s Twitter Widget, Lisa’s Amazon Affiliate Shortcodes, and Lisa’s Really Cool Plugin.
• Descriptive: Use a name that describes its purpose. Lisa’s Twitter Widget and Lisa’s Amazon Affiliate Shortcodes both describe what the plugin offers quite well, but Lisa’s Really Cool Plugin doesn’t help identify its purpose.
 Even if you use the plugin only on your own site, by using a nondescriptive name, you may end up having to look at the plugin’s code just to remember what the plugin is actually doing.
Description: This entry is meant to be a brief explanation of what features the plugin offers. The description entry is shown next to each plugin listed on the Dashboard’s Plugins page. Because the plugin’s listing shares space with other plugins, don’t add too large of a description. Limit the description to one to three sentences.
It is possible to put HTML into the description. You can add links for plugin documentation and other resources.
 Don’t abuse this feature to make your plugin stand out among all the others. If your plugin is installed, you already won over the user and got him to install the plugin. Don’t lose a user by spamming up his plugin listing.
Version: If you share the code for your plugin, the version entry of the plugin could be one of the most important entries in the plugin’s file header. If the version number is properly updated, when a user reports an issue, you can quickly know exactly what code the user is running, whether the plugin is outdated, and whether the current code has a bug. It’s a simple thing, but it is very powerful.
The topic of versions is detailed in more depth later in this chapter. For now, know that properly using and updating the version is important.
Plugin URI: Enter the web address where you talk in depth about the plugin. At a minimum, information about what the plugin is and any necessary instructions on using the plugin should be provided. It is a good idea to allow comments so that people can provide feedback, both good and bad. This works as a simple support system for your plugin.
Author: List the name or names of the plugin authors. Sometimes the name of the company behind the plugin is used instead of the name of a specific developer.
Author URI: The web address of the plugin author’s website.
License: The name of the license under which your plugin is released. For most plugins, this should be GPLv2 because it matches the license that WordPress is released under. When submitting a plugin to the Plugin Directory, the plugin must be licensed under GPL version 2 or above. For more information on GPL licensing, including how it pertains to your plugin development practices, see Book I, Chapter 2.
Text Domain: This entry is part of allowing the Plugin Name, Description, Version, Plugin URI, Author, and Author URI entries to be translatable. The value for this entry is used as the domain for translating the other entries and should match the domain used in the load_plugin_textdomain function. For details about translating, see the "Internationalizing or Localizing Your Plugin" section later in this chapter.
This entry is rarely used in plugins, but it is available to allow for translators to supply translations for the details in the file header.
Domain Path: This entry is used together with the Text Domain entry to offer the file header translations. The value for this entry is the name of the directory inside the plugin's directory (such as /language/ or /translations/) where the translation files are located. The directory must begin with a forward slash for the translation files to be found. If this entry is not used, the plugin's directory is searched for the translation files.
As with the Text Domain entry, the Domain Path entry is rarely used.
Network: When WordPress is running as a network (discussed in Book VIII), this entry allows plugins to indicate that they must be active for the entire network rather than just a single site. The only accepted value for this entry is true; any other value is treated the same as having this entry blank or missing. If WordPress isn't running as a network, this entry is ignored.
Using this entry is helpful if your plugin provides very low-level features, such as advanced caching. Because such a feature could create problems if only some sites on the network had it active, this entry forces an all-or-nothing activation of the plugin. Either all of the sites on the network run the plugin, or none of the sites do.
Site Wide Only: This is a deprecated entry that is superseded by the Network entry and is supported only for backward compatibility. If the Network entry is supplied, this entry is ignored. As with Network, the only recognized value is true. This entry should not be used as support, because it may be removed in future versions.
Although you may not need all of the entry options, a file header that makes use of all the options looks like the following. (The Site Wide Only option is left out because it is replaced by the Network option.)
<?php
/*
Plugin Name: Lisa's Twitter Widget
Description: Display Twitter feeds in any sidebar on your site.
Version: 1.0.0
Plugin URI: http://example.com/twitter-widget
Author: Lisa Sabin-Wilson
Author URI: http://example.com
License: GPLv2
Text Domain: lsw-twitter-widget
Domain Path: /language/
Network: true
*/
?>
It is customary to include a licensing statement in the header of your plugin to indicate adherence to the GPLv2 license. This statement is easy to include and is formatted as follows:
<?php
/*
This program is free software; you can redistribute it and/or
modify it under the terms of the GNU General Public License
as published by the Free Software Foundation; either version 2
of the License, or (at your option) any later version.
This program is distributed in the hope that it will be useful,
but WITHOUT ANY WARRANTY; without even the implied warranty of
MERCHANTABILITY or FITNESS FOR A PARTICULAR PURPOSE. See the
GNU General Public License for more details.
You should have received a copy of the GNU General Public License
along with this program; if not, write to the Free Software
Foundation, Inc., 51 Franklin Street, Fifth Floor, Boston, MA 02110-1301, USA.
*/
?>
Figure 6-1 shows the Plugins page displaying information pulled from each plugin’s file header.

Figure 6-1: The WordPress Plugins page on the Dashboard.
Creating a readme.txt File
To submit a plugin to the WordPress Plugin Directory, your plugin must also include a readme.txt file. The plugin won't be accepted without it. The readme.txt file is included with the rest of your plugin's files when a user downloads it. It should contain the information the user needs to know to properly use the plugin.
The information contained in the readme.txt file is much more elaborate than the information in the file header. All the plugin pages found in the Plugin Directory are generated using information from the readme.txt file of each plugin. Thus, this information is very important if you want people to take your plugin seriously.
 The file is formatted in a slightly modified version of the Markdown format. Markdown is a simple syntax for formatting content to contain headings, text styling (such as underline and bold), links, and so on. The main difference between the format used for WordPress plugin
 readme.txt files and regular Markdown is that the readme.txt files use a different format for headings (as you can see in the example), and there is a WordPress-specific section similar to the file header of the main plugin file at the top of readme.txt files.
Before digging into the details, look through the following example readme.txt file contents:
=== Lisa's Twitter Widget ===
Contributors: lisasabinwilson
Stable tag: 1.0.0
Tags: twitter, widget, social media
Requires at least: 3.3
Tested up to: 3.5
Display Twitter feeds in any sidebar on your site.
== Description ==
Lisa's Twitter Widget users the power of WordPress's widget system to allow you to quickly and easily add a Twitter feed to your site. After adding the Twitter Widget to one of your sidebars, enter the desired Twitter username in the widget's options, save the changes, and the Twitter feed will show up on your site.
== Installation ==
Extract the zip file and just drop the contents in the wp-content/plugins/ directory of your WordPress installation and then activate the Plugin from the Plugins page in your WordPress Dashboard.
Notice how the lines with the equal signs separate the file into different sections. When the plugin’s page is generated, the text at the topmost line with the three equal signs on each side (which I refer to as the header section) is used as the plugin’s name, and the text after the Description and Installation sections is used to populate the Description and Installation tabs on the plugin’s page.
Much more can be done with a readme.txt file than what is shown in this example. This is a very small and simplified version of what you can see in active plugins with well-crafted readme.txt files.
If you're concerned about whether your plugin's readme.txt file adheres to the expectations of the WordPress Plugin Directory, use the WordPress validator tool (http://wordpress.org/extend/plugins/about/validator) to validate the file. This tool tells you whether your readme.txt file contains all the necessary components and information. If you're still having problems, there is a very handy readme.txt file generator located at http://sudarmuthu.com/wordpress/wp-readme that helps you generate a valid readme.txt file for your plugin by making sure that the basic requirements are met.
Setting up the header section
The header section at the top of the file is very similar to the file header in the actual plugin file. This similarity is because, like the file header, the header section is parsed by code in order to format the data in specific ways. The format of the header section is as follows:
=== Plugin Name ===
entry: value
entry: value
entry: value
Brief description of the plugin.
The plugin name and short description are required and should be unique to the plugin and description. As with the description in the file header, this description should be brief and kept to one to three sentences.
You can add a number of entries to the header section. Table 6-1 lists the available entries for the header section. Unless otherwise noted, each entry should be considered to be required and should be included in the header section.
Table 6-1 Entries for the readme.txt File Header Section
|
Component |
Description |
|
Contributors |
Comma-separated list of contributors’ wordpress.org usernames. If valid usernames are not used, the plugin page will not properly link to each contributor’s other plugins. |
|
Donation Link |
Web address for a page that accepts donations for the plugin. This entry is optional. |
|
License |
How the plugin is licensed. This is typically GPLv2. |
|
License URI |
The web address that contains the full details of the license. This is typically http://www.gnu.org/licenses/gpl-2.0.html. |
|
Requires at least |
This is the lowest version of WordPress that your plugin is known to be compatible with. If you haven’t tested the plugin with older versions of WordPress or don’t test updated versions of the plugin with older versions of WordPress, set this to be the latest version of WordPress to ensure that you don’t indicate compatibility that may not be there. |
|
Stable tag |
Indicates the sub-version tag of the latest stable version of your plugin. If no stable tag is provided, it is assumed trunk is stable. |
|
Tags |
A comma-separated list of descriptive tags that relate to the plugin. You can find a listing of existing tags at http://wordpress.org/extend/plugins/tags. |
|
Tested up to |
The highest WordPress version number you’ve successfully tested your plugin on. Prerelease versions of WordPress (such as 3.5-beta3) can be used if the plugin is compatible with the development version. |
Adding other sections
After the header section, the rest of the readme.txt file is dedicated to providing information used to create the plugin's Plugin Directory page. This information is divided into a number of sections that neatly display on the plugin's page as tabs. The following lists each of the tabs, what they are meant to be used for, and any special details to know about each of them:
Description: This tab is shown by default, so put the information that you want people to see when they first visit the plugin’s page in this section. Focus on providing information about what features the plugin offers, what makes the plugin different from other plugins that may have similar features, and any requirements that may prevent people from successfully using the plugin.
Installation: Any special instructions on how to properly install and configure the plugin should be included in this section.
Frequently Asked Questions: Are users asking you the same questions over and over again? Do you expect certain questions? This is the place for you to answer your users’ questions in one place.
Changelog: This section is helpful for listing the changes in each version. Be sure to include details about new features, enhancements, and bug fixes so that current users that are curious about the reason for the new release can easily find what to expect after the upgrade. It is common to remove older listings because this section gets long. The number of listings to keep is up to you.
Screenshots: This section is for listing pictures and videos that show the plugin in action. The screenshots follow a specific format:
• Add them to the plugin's sub-version repository in the /assets directory.
• Name them screenshot-1.png, screenshot-2.png, screenshot-3.png, and so on.
• The supported formats are PNG, JPEG, and GIF.
Add a description for each screenshot by using a numbered list. The description is displayed below the image with the matching number.
Other Notes: The Other Notes tab is special in that it is created by merging all other sections. So, you can create as many custom sections as you like and have each of the custom sections appear inside the Other Notes tab.
The following example shows a readme.txt with each of these sections:
=== Lisa's Twitter Widget ===
Contributors: lisasabinwilson
Stable tag: 1.0.0
Donation link: http://example.com
Tags: twitter, widget, social media
Requires at least: 3.3
Tested up to: 3.5
License: GPLv2
License URI: http://www.gnu.org/licenses/gpl-2.0.html
Display Twitter feeds in any sidebar on your site.
== Description ==
Lisa's Twitter Widget users the power of WordPress's widget system to allow you to quickly and easily add a Twitter feed to your site. After adding the Twitter Widget to one of your sidebars, enter the desired Twitter username in the widget's options, save the changes, and the Twitter feed will show up on your site.
== Installation ==
Extract the zip file and just drop the contents in the wp-content/plugins/ directory of your WordPress installation and then activate the Plugin from the Plugins page in your WordPress Dashboard.
== Frequently Asked Questions ==
= Can the widget combine the feeds from more than one username? =
Not at this time. Such a feature may be added in a future version. For now, you will simply have to use more than one widget.
= Can I load a feed for a hashtag? =
Yes. Rather than supplying a username, a hashtag can be used (ensure that you add the # before the hashtag) to show the latest feed for that hashtag.
== Changelog ==
= 1.0.0 =
* Release-ready version
* Fixed issue with feed caching not working properly, causing site slowdowns.
= 0.0.1 =
* Development version. It still has some bugs.
== Screenshots ==
1. Configuration options for the Twitter Widget.
2. The Twitter Widget showing a feed on the site.
== Thanks ==
My thanks to Twitter and its fantastic API. If it wasn't for the API, this plugin would not be possible.
The Markdown format has many options for formatting the content. Go to http://daringfireball.net/projects/markdown/syntax for full details on what options are available with Markdown.
Besides setting up plugin pages in the Plugin Directory, the readme.txt file serves two other very important purposes: controlling the released version of the plugin and offering content to the search function in the Plugin Directory.
The readme.txt file found in your plugin's SVN trunk controls the released version of the plugin. After updating the plugin with a new version number, the stable version value in the /trunk/readme.txt file needs to be updated to reflect this new version number. If you don't update this value, the new version won't be released.
Internationalizing or Localizing Your Plugin
WordPress users exist across the United States, Russia, Japan, Germany, and all points in between. Therefore, the next person to download and use your plugin may not speak the same language you do. So if you wrote and distributed your plugin in English, it may be useless to the next person if he speaks only German. However, the WordPress software has internationalization built into it, which means it can be localized, or translated, into different languages.
You aren't translating the file into different languages (unless you want to). Rather, you're providing a mechanism of support for people who will want to provide translation for your plugin through the creation of .mo (machine object) files (discussed later in this chapter). Many people in different countries create (and have created) .mo files for the translation of WordPress into different languages; by providing localization for your plugin, you're enabling them to translate your plugin text, as well. If you're interested in translating WordPress into a different language, check out this resource page in the WordPress Codex at http://codex.wordpress.org/Translating_WordPress.
Using GetText functions for text strings
WordPress provides you with two main localization functions: __ and _e. These functions use the GetText translation utility installed on your web server. These two functions let you wrap plain text into strings of text to be translated. You need to account for two types of text strings in your plugin file:
HTML: Example: <h1>Plugin Name</h1>
To wrap HTML text strings within the GetText function call, you would wrap it using the _e function like this:
<h1><?php _e('Plugin Name', 'plugin-name'); ?></h1>
This tells PHP to echo (_e) or display the string of text on your Web browser screen, but adds the benefit of using the GetText function, which allows for that string of text to be translated.
PHP: Example: <?php comments_number('No Responses', 'One Response', '% Responses' );?>
To wrap PHP text strings with the GetText function, you would wrap it using the __ function, like this:
<?php comments_number(__('No Responses',plugin-name),('One Response', 'plugin-name'),( '% Responses', 'plugin-name') );?>
Unlike the echo function (_e), the __ function is used when you need to add a string of text to an existing function call (in this case, comments_number()).
Avoid slang when writing your text strings in your plugin file. Slang is significant to only a certain demographic (age, geographic location, and so on) and may not translate well into other languages.
The second argument within the GetText string for the PHP text string example is plugin-name. This defines the domain of the text and tells GetText to return the translations only from the dictionary supplied with that domain name. This is the plugin text domain and most plugin authors use the name of their plugin (separated by hyphens) as the definer. Use the text domain in your GetText functions to ensure that GetText pulls the dictionary you supply instead of attempting to pull the text from the core WordPress language files because some of the text you provide in your plugin is unique and, most likely, won't exist within the WordPress core language files.
In a plugin file, you define the text domain like this:
$my_translator_domain = PLUGIN-NAME;
$my_translator_is_setup = 0;
function fabfunc_setup(){
global $my_translator_domain, $my_translator_is_setup;
if($my_translator_is_setup) {
return;
}
load_plugin_textdomain($my_translator_domain,
PLUGINDIR.'/'.dirname(plugin_basename(__FILE__)),
dirname(plugin_basename(__FILE__)));
}
These lines of code simply tell WordPress where your plugin file is located (the text domain), which in turn informs WordPress about where your .pot, or translation file, is for your specific plugin.
Creating the POT file
After you create your plugin and include all text strings within the GetText functions of __ and _e, you need to create a .pot (portable object template) file, which contains translations for all the strings of text that you wrapped in the GetText functions. Typically, you create the .pot file in your own language, in a special format, thereby allowing other translators to create their own .po (portable object) file or an .mo (machine object) file in their language, using yours as the guide to translate by.
The .pot file is the original translation file, and the .po file is a text file that includes your original text (from the .pot) along with the translation for the text; or you can use an .mo file, which is basically the same as a .po file. However, while .po files are written in plain text meant to be human readable, .mo files are compiled to make it easy for computers to read. Most web servers use .mo files to provide translations for .pot files.
WordPress has an extensive .pot file that you can use as a template for your own. You can download it at
http://svn.automattic.com/wordpress-i18n/pot/trunk/wordpress.pot
Additionally, .pot files can be translated into .mo files using free translation tools available online, such as Poedit (www.poedit.net), which is a free tool that takes the original .pot file and the provided translations in a .po file and merges them into a compiled .mo file for your web server to deliver the translated text.
The .pot file begins with a header section, which contains required information about what your translation is for. The .pot header section looks like this:
# LANGUAGE (LOCALE) translation for WordPress.
# Copyright (C) 20114 WordPress contributors.
# This file is distributed under the same license as the WordPress package.
# FIRST AUTHOR <YOU@YOUREMAIL.COM>, 2011.
#
#, fuzzy
msgid ""
msgstr ""
"Project-Id-Version: WordPress VERSION\n"
"Report-Msgid-Bugs-To: \n"
"POT-Creation-Date: 2011-01-01 12:00-0600\n"
"PO-Revision-Date: 2011-01-01 12:00-0600\n"
"Last-Translator: YOUR FULL NAME <YOU@YOUREMAIL.COM>\n"
"Language-Team: LANGUAGE <EMAIL@EMAIL.COM>\n"
"MIME-Version: 1.0\n"
"Content-Type: text/plain; charset=CHARSET\n"
"Content-Transfer-Encoding: 8bit\n"
All the capitalized, italicized terms in this code example are placeholders. Replace these terms with your own information.
The format of the .pot file is specific and needs to contain the following information:
Filename: The name of the file in which the text string exists. For example, if the plugin file is wordpress-twitter-connect.php, you need to include that filename in this section.
Line of code: The exact line number of the text string in question.
msgid: The source of the message, or the exact string of text that you included within one of the GetText functions, either __ or _e.
msgstr: A blank string where the translation (in the subsequent .pot files) is inserted.
For your default .pot file, to format a text string using the GetText function (<h1><?php _e('WordPress Twitter Connect'); ?></h1>), which exists on the second line in the wordpress-twitter-connect.php plugin file, you include three lines in the .pot file that look like this:
#: wordpress-twitter-connect.php:2
msgid: "WordPress Twitter Connect"
msgstr: ""
You need to go through all the text strings in your plugin file that you wrapped in the GetText functions and define them in the .pot file in the format provided. Now, if anyone wants to create a .po file for your plugin in a different language, he or she simply copies their language translation of your .pot file between the quotation marks for the msgstr: section for each text string included in the original .pot file.
All .pot and .po (or .mo) files need to be included in your plugin folder in order for the translations to be delivered to your website. Have a look at the directory structure of the popular WordPress All In One SEO Pack plugin in Figure 6-2: You can see the original .pot file along with the translated .mo files listed within the /wp-content/plugins/all-in-one-seo-pack/ plugin folder.
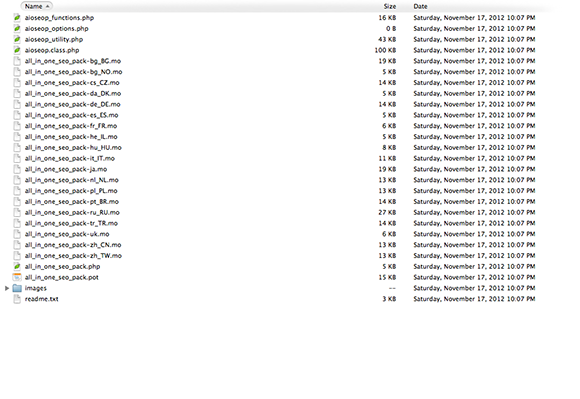
Figure 6-2: The .pot and .mo files for WordPress All In One SEO Pack plugin.
You, or other translators, can create unlimited .mo files for several different languages. Make sure that you name the language file according to the standardized naming conventions for the different languages. The naming convention for the languages is language_COUNTRY.mo. For example, the French .mo file for the wordpress-twitter-connect.php plugin is wordpress-twitter-connect-fr_FR.mo.
A full list of language codes can be found at
http://www.w3schools.com/tags/ref_language_codes.asp
And a full list of country codes can be found at