Chapter 2
Using Boot Diagnostics
IN THIS CHAPTER
 Figuring out what’s going wrong with boot diagnostics
Using a special boot mode to bypass server issues
Performing a memory test on your server
Using the Command Prompt to troubleshoot
Troubleshooting with third-party boot utilities
As a system administrator, you’ll get the inevitable call one day about a server that just won’t start. Maybe the server is in a continuous boot loop. Maybe the server just hangs. Your mission, should you choose to accept it, is to figure out why the system is having issues starting and then fix the issue.
This chapter discusses basic tools and techniques to troubleshoot issues that are causing your system to not be able to boot properly.
Accessing Boot Diagnostics
The first step to figuring out what’s going wrong with your system is to access the boot diagnostic utilities that ship with Windows Server operating systems.
From the DVD
If the server that is having boot issues is a physical server, you can use a DVD or a USB flash drive to access the boot diagnostics menu. It’s very rare to have physical media on hand anymore, so, chances are, you’ll need to download the ISO file for Windows Server 2019 from the Microsoft website and burn the image to the DVD or USB flash drive.
 An ISO file is a duplicate of what’s on a physical disc.
After you have the disc ready to go, you need to insert the disc or the USB flash drive into the server and boot from it. You may need to change the boot order on the server so that the boot order will start with the DVD drive or the USB flash drive before the hard drive. You can make this change by accessing the Basic Input/Output System (BIOS). On server systems, this option is available when the system is booting. The key you need to press to access the BIOS will depend on the firmware manufacturer that created the BIOS/UEFI. Some systems simply offer you a boot menu when you press F12, which will allow you to select the DVD drive or USB flash drive for a one-time boot.
When you’ve figured out how to boot from the DVD or USB flash drive, follow these steps:
- Boot from the DVD or USB flash drive.
-
When you see the message
Press any key to boot from CD or DVD, press any key.The installation wizard for Windows Server 2019 runs.
-
On the first screen, click Next.
This screen is just asking for language, time and currency format, and keyboard or input method. You can safely accept the defaults.
- On the next screen, you see the big Install now button. Don't click that! Instead, look in the lower-left corner for the Repair Your Computer link (see Figure 2-1), and click that.
-
On the next screen, click Troubleshoot.
This gives you your available options (see Figure 2-2):
- System Image Recovery: Allows you to restore your system from an image created by a backup utility. You’ll be asked to choose a target operating system to restore, and then you’ll be shown available backups you can use.
- Command Prompt: Allows you to do advanced troubleshooting and is especially helpful if you need to repair boot files. You can use the diskpart utility to work with the drive, and the bootrec command to either rebuild or repair the boot files.
- UEFI Firmware Settings: In newer systems, Unified Extensible Firmware Interface (UEFI) has replaced the older BIOS firmware due to the latter’s technical limitations and slowness; UEFI is now the preferred firmware to use. In fact, Intel announced that it was planning on dropping support for legacy BIOS firmware in 2020. The UEFI firmware will give you options that vary depending on the system in question, but they include things like enabling or disabling Trusted Platform Module (TPM), using Secure Boot Control, working with Secure Boot Keys, and more.

FIGURE 2-1: Look for the Repair Your Computer link in the lower-left corner.

FIGURE 2-2: The Advanced Options screen.
From the boot menu
In previous versions of the Windows Server operating system, getting to the boot menu meant pressing F8 repeatedly after the system had passed its Power-On Self-Test (POST). As operating systems began to boot more quickly, however, it became more and more difficult to press F8 in time to get to the boot menu. Today, you have a few more options that will get you to the Advanced Boot Options menu:
- If the Windows Server operating system fails several times, it will automatically launch the Advanced Boot Options screen. This is helpful if it never gets to Windows. I don’t recommend forcing the operating system to fail several times, however, because you could corrupt the operating system.
- Assuming the system occasionally gets to Windows Server, you can hold down the Shift key while you restart. This gives you the Windows Boot Manager (shown in Figure 2-3). From the Windows Boot Manager, press F8. This will get you to the Advanced Boot Options menu. If you click Repair Your Computer, you get to the smaller menu shown in Figure 2-2.
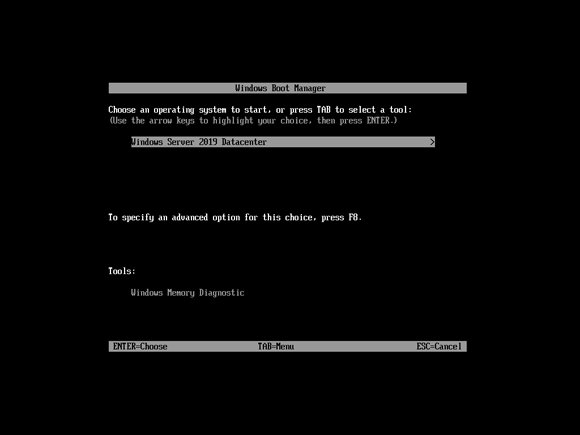
FIGURE 2-3: Windows Boot Manager.
Using a Special Boot Mode
After you’ve entered the Advanced Boot Options menu, you have quite a few tools that you can choose from to help troubleshoot the system. In the following sections, I walk you through each of the options in the Advanced Boot Options menu (shown in Figure 2-4).
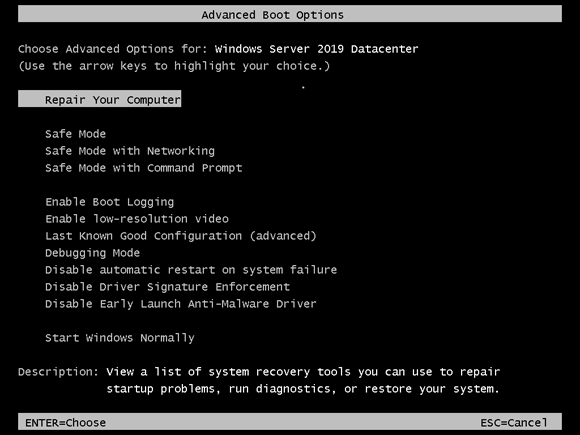
FIGURE 2-4: The Advanced Boot Options menu.
Safe Mode
Safe Mode is almost always my go-to when there are boot issues with a system. Whenever new hardware or software has been installed, or if I suspect that a system may be having issues because of a malware infection, I turn to Safe Mode.
You may be asking, “What is Safe Mode, and why is it such a big deal?” Safe Mode starts Windows with the bare-minimum services and drivers it needs in order to run. Safe Mode is crucial for troubleshooting issues where a bad driver is causing a boot loop. By going into Safe Mode, you can troubleshoot what’s wrong with the driver, and uninstall or replace it. Safe Mode is also extremely useful with potential malware infections because the malware may have dependencies it needs to run that are not loaded, which allows you to run malware removal tools and destroy the last bits and pieces of the malicious code from the operating system.
The type of Safe Mode I use depends on what I’m needing to accomplish. For instance, if I’m just troubleshooting an issue that I suspect may be related to drivers, most of the time I use regular old Safe Mode. In the following sections, I walk you through the different forms of Safe Mode and why you may want to use each of them.
Safe Mode
This is just regular old Safe Mode. It loads only the basic services and drivers needed for Windows to function and for you to interact with it. Nothing more, nothing less.
In most cases, this regular form of Safe Mode is all you need to troubleshoot and resolve the issue at hand. It has a graphical interface like you’re used to seeing in Windows Server, but it has no access to the Internet or other network resources. In essence, it’s a stand-alone machine.
Safe Mode with Networking
Safe Mode with Networking is similar to regular Safe Mode, except the system will also load the drivers needed for the network interface card (NIC) to function properly. This is useful if you need to download software from the Internet (for example, drivers or diagnostic software) or over a network share.
Safe Mode with Networking is most useful when you’re trying to resolve a software or driver issue. It allows you to download replacement software or replacement drivers while still in Safe Mode. Then you can replace the misbehaving driver or incompatible software with a known good version and then boot successfully.
Safe Mode with Command Prompt
In Safe Mode with Command Prompt, you bypass the Explorer desktop environment. This can be especially useful if the desktop is not displaying properly for whatever reason.
If you like Server Core, you’ll like this version of Safe Mode. If you aren’t as comfortable with the command window as you would like to be, having a cheat sheet available may help you.
I recommend Safe Mode with Command Prompt when the issue that needs to be fixed has something to do with graphics. The problem may be due to a driver, graphics rendering, or removing a malware infection that relied on graphical components like wallpapers and screensavers.
Enable Boot Logging
If you need to see which drivers were installed as the system started up, you should choose Enable Boot Logging. This will create a file called ntbtlog.txt, which lists all the drivers that were installed when the operating system started. The file is stored in your Windows system directory; typically, this will be C:\WINDOWS. Incidentally, this is the same list you see flash by on the screen when you boot into Safe Mode.
Enable Low-Resolution Video
This setting is very useful if you're having display issues, most commonly after changing display settings to something your monitor doesn’t support. It uses the currently installed video driver but starts with lower resolution (typically 640 x 480) and refresh settings.
Last Known Good Configuration
Last Known Good Configuration is helpful in fixing issues with booting that occur because the Windows Registry has been damaged. Most commonly, this occurs due to user misconfiguration or from updates or patches. When you choose Last Known Good Configuration, the Registry is reverted so that it matches the settings it had the last time the system booted successfully.
 Any time you use something that modifies the Registry in any way, be extra cautious. There’s no way to undo using Last Known Good Configuration. If it doesn’t fix the issue, or it makes matters worse, you’ll need to restore from a backup.
Directory Services Restore Mode
This option only appears on a server that is a domain controller (and, therefore, it isn’t shown in Figure 2-4). Directory Services Restore Mode (DSRM) is a special form of Safe Mode made for domain controllers that allows you to repair or recover an Active Directory database.
 To use this utility you need to know the DSRM password that was set when the domain controller was initially created. If you don’t know the password, you can use the ntdsutil tool change the password. You need to have access to the Command Prompt on the system in question to run it.
If all of this is Greek to you, don’t worry! I cover Active Directory in depth in Book 2, Chapter 5. For now, think of Active Directory like a special database that stores information on users, computers, sites, and other objects in your network. This database can be crucial to your organization, so knowing how to restore it if it becomes damaged is a very useful skill.
Debugging Mode
If you’re a hard-core system administrator and you want to get your feet wet using a kernel debugger, this option is for you!
The kernel is a program that is one of the first to run when your server boots (the kernel loads right after the bootloader); it has total control over everything on your system.
Debugging Mode turns on kernel debugging, which allows you to work with the kernel debugger to examine states and processes that are running at the kernel level. This can be very useful for troubleshooting issues with device drivers that cause the infamous blue screen of death (BSOD) and issues with the central processing unit (CPU). You can look at the kernel memory dump on the system that is having the issue, or you can view the kernel memory dump remotely on another system via a serial connection. The information from the Debugging Mode is typically made available over the COM1 port (assuming you have a serial port and it’s assigned to COM1).
Disable Automatic Restart on System Failure
Eventually, every system administrator has a system that will continuously try to start, fail, reboot, and then try to start, fail, reboot, and so on. This situation is known as a boot loop. If you’re experiencing a boot loop on one of your systems, you can get the system to stop automatically restarting by choosing Disable Automatic Restart on System Failure from the Advanced Boot Options menu.
Disabling automatic restart can be very helpful if the system is getting the blue screen of death and you need to get the information being displayed. When the system halts on its next blue screen, you’ll have all the time you need to copy down the information.
Disable Driver Signature Enforcement
By choosing the Disable Driver Signature Enforcement option, you’re basically telling the system that it’s okay to load drivers that aren’t digitally signed. Microsoft requires drivers to be digitally signed by default, and will prevent unsigned drivers from running. Microsoft does this because, when a driver is digitally signed, it is seen as being authentic since you can verify from the digital signature that it came from the vendor it claims to be from. Digital signatures also guarantee that the driver has not been altered in any way since it was released from the vendor.
You may be asking, “What is a digital signature?” Digital signatures use a code-signing certificate to encrypt the hash of a file. (Hashes are unique thumbprints — any change to the file will change the hash.). That encrypted hash is then bundled with the certificate and the executable for the driver. When the end user installs the driver, the hash of the file is decrypted with the public key in the certificate. The file gets hashed again on the end user’s system, and the new hash is compared to the decrypted hash. If they match, the driver has not been tampered with.
If you choose to disable driver signature enforcement, you’ll be able to load unsigned drivers. Choose this option at your own risk: You could end up installing malware that presents itself as an unsigned driver.
Disable Early Launch Anti-Malware Driver
Malware that installs after Windows has booted will most likely be seen by the antivirus software that is installed on the system. But the problem is, virus writers began writing malware called rootkits. These rootkits can be very difficult to get rid of because they install and execute before the operating system has booted. Many of the more sophisticated rootkits began installing drivers that start really early in the boot process of the system. This can make them extremely difficult to find and remove.
Microsoft does its best to evolve and respond to threats and prevent them whenever possible. In this case, it came up with the early launch anti-malware (ELAM) driver. Certified antivirus vendors whose products support early launch can get their products’ drivers to launch before the Windows boot drivers, which allows them to scan for malicious processes on boot. Pretty cool, right?
But what happens if a legitimate boot driver for Windows gets flagged as malicious? Your server will not boot. So, Microsoft gives you the ability to turn off this feature, by choosing Disable Early Launch Anti-Malware Driver, to allow the boot driver to launch like normal.
This feature is a great one to have on, so I would only disable it if you absolutely have to, and then only until the issue is resolved.
Performing a Memory Test
What happens if your server is crashing unexpectedly or throwing blue screens when you least expect it? That can be a difficult question to answer. These symptoms could occur because of corrupted software or because of hardware failure. Memory is a great place to start with your troubleshooting efforts, and Windows Server 2019 includes a built-in memory diagnostic utility, called the Windows Memory Diagnostics Tool.
You can run the Windows Memory Diagnostics Tool by pressing the Windows Key + R, typing mdsched.exe, and clicking OK. If you do nothing, the Windows Memory Diagnostics Tool will run in Standard mode. You can interrupt it at any time by pressing F1 to enter the Options screen and change the settings. Your options are as follows (see Figure 2-5):
-
Test Mix: The test mix is the set of tests you want the tool to run:
- Basic: Runs three tests on your memory and is the fastest option.
- Standard: Runs the same tests on your memory as Basic, and adds five additional tests. It takes longer to complete than Basic.
- Extended: Runs the same tests as Standard and adds nine additional tests. This test is the most detailed and takes the longest to complete.
If you don’t know what each of these tests is looking for, I would say that Standard is a good starting point for your tests. Extended will take longer, so if you don’t need the extra tests, you may not get any worthwhile information from running them. That said, it won’t hurt your server to run either of the three tests. - Cache: Cache sets the cache setting (cache is used to improve the speed of memory access for things that are frequently accessed by the CPU) for each test you’re going to run. The cache should be disabled if you’re running tests that require direct access to the memory. Your options are as follows:
- Default: In most cases, Default is the appropriate setting. It selects the correct cache setting for the test that is being run.
- On: Forces the cache on for the tests.
- Off: Forces the cache off for the tests.
- Pass Count (0–15): Pass count controls how many times the whole test mix you selected will run. If it’s set to 5, then the selected test mix will run through its tests five times. The default for this setting is to make two passes.
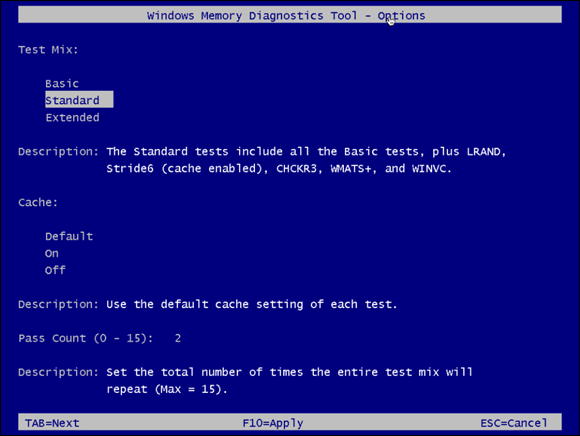
FIGURE 2-5: Windows Memory Diagnostics Tool options.
After you’ve made your selections, press F10 to apply the settings, and the scan will restart.
Using the Command Prompt
When all else fails, the Command Prompt is always there. I’ve had to troubleshoot many issues over the years where I was saved because the Command Prompt was available. Corrupted system files? Open the Command Prompt and run sfc /scannow. Damaged hard drive perhaps? Open the Command Prompt and type chkdsk /f /r.
In Table 2-1, I list some of the most helpful tools that I’ve used over the years. The majority of these commands need the command window to be running with administrator credentials. To run the Command Prompt as administrator, choose Start ⇒ Windows System, right-click Command Prompt, click More, and then select Run as Administrator, or if you can bring up Task Manager, you can choose File ⇒ Run New Task and type cmd.exe.
TABLE 2-1 Troubleshooting with the Command Prompt
|
Name |
Command |
Description |
|
System File Checker |
|
This utility checks system files to see if they match what's expected by comparing the signature of the system file on the server with the signature of a cached copy of the same file. The cached files are stored in a compressed folder located at |
|
Check Disk |
|
This utility repairs file system errors and marks bad sectors so that the operating system doesn't use them anymore. The |
|
Driverquery |
|
This utility queries the system for all the hardware drivers that are installed on Windows. This can be very helpful if you're running into issues with systems that have similar hardware and you want to know if they have a driver in common. |
|
BCDEdit |
|
This utility is covered in depth in Book 1, Chapter 4. For now, just know that it allows you to edit the boot configuration on your Windows server. |
Working with Third-Party Boot Utilities
This chapter wouldn’t be complete without a brief look at third-party utilities that are designed to help diagnose and resolve boot issues, or to at least assist with recovery. Table 2-2 lists a few of my favorites, along with their cost and a brief description.
TABLE 2-2 Third-Party Boot Utilities
|
Name |
Cost |
Description |
|
Ultimate Boot CD |
Free |
This is one of my all-time favorite utilities. It includes multiple diagnostic and recovery tools. To use it, you boot to the disc. It’s that easy! Go to |
|
Trinity Rescue Kit |
Free |
Trinity Rescue Kit is full of great features, this is also a very useful utility. Go to |