Chapter 3
Performing the Basic Installation
IN THIS CHAPTER
 Installing the prerequisites to support a successful installation
 Doing a clean install of Windows Server 2019
 Upgrading from a previous version of Windows Server
 Performing a network install with Windows Deployment Services (WDS)
You’ve made the decision: You want to install Windows Server 2019. Great! You may be wondering what’s next. One of the most important things you can do to ensure a successful installation is make sure that you’re meeting all the prerequisites for Windows Server 2019. By ensuring that you have the appropriate hardware to meet the needs of the operating system, you can definitely save yourself some headaches later.
When you’ve got everything necessary to install Windows Server 2019, you’re ready to go. In this chapter, I walk you through how to perform a clean install as well as an upgrade install. I also explain how to do a network install with Windows Deployment Services.
Making Sure You Have What It Takes
Microsoft publishes the prerequisites for each of its operating systems. Some of the hardware requirements are independent of which edition of Windows Server you’re planning to install; other hardware requirements vary based on whether you’re installing Server with Desktop Experience or Server Core.
Windows Server 2019 is available only as a 64-bit operating system; there is no 32-bit version available. When you run the installer, you’re presented with options for the Standard edition or Datacenter edition. At the same time, you choose whether you want to install Server Core or Server with Desktop Experience.
So, what are the absolute bare minimums that you have to meet in order to install Windows Server 2019? Read on.
Central processing unit
The central processing unit (CPU) is the brains of the outfit. It processes instructions made by the program and/or applications. The CPU requirements for Windows Server 2019 are pretty easily met by most modern processors:
- 1.4 GHz 64-bit processor: Considering that the operating system is an x64 system, it makes sense that the processor must also be an x64 processor. Even a cheap server with a lower-end processor should be able to meet the 1.4 GHz requirement with flying colors.
-
Supports No Execute (NX): When the NX bit is enabled on certain areas of the memory, the processor will not execute anything in that memory space, which can provide protection against malware. Areas protected by the NX bit usually contain things like processor instructions or data storage.
 Intel may refer to this technology as XD (short for Execute Disable), while AMD processors refer to it as Enhanced Virus Protection (EVP).
 - Supports Data Execution Prevention (DEP): DEP provides additional protection against malware that may target memory locations.
- Supports CMPXCHG16b, LAHF/SAHF, and PrefetchW: These settings are specific to the processor, and there are multiple whitepapers published on the specifics. CMPXCHG16b is an instruction set supported by most modern x86_64 processors. Load AH from Flags (LAHF)/Store AH into Flags (SAHF) is needed to support virtualization. PrefetchW provides improvements to performance when using AMD processors. You don’t need to memorize these things — just know that these processor features can speed up execution of tasks and add some additional security features as well.
- Supports Second Level Address Translation (Extended Page Table [EPT] or Nested Page Table [NPT]): This feature is especially important if you’re planning on running Hyper-V. It improves the performance of the VMs on the system and takes some of the pressure off the hypervisor, which can, in turn, improve hypervisor performance.
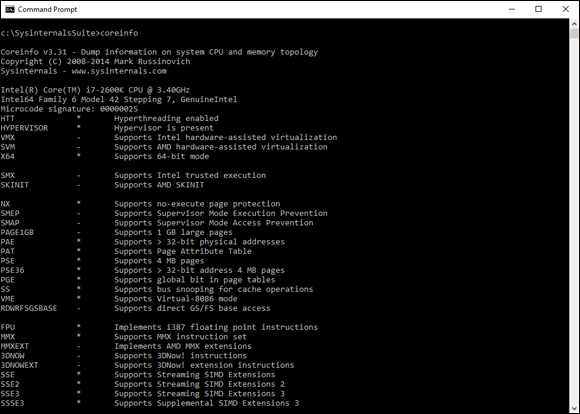
FIGURE 3-1: Running the Coreinfo utility on a Windows system.
Random access memory
Random access memory (RAM) is used by the server to store things that you need to access right now and things that you may need to access in the near future. RAM is much faster than persistent storage, so a server that has lots of RAM will perform far better than a system with very little RAM. As I mention in the “Version and edition requirements” sidebar, earlier in this chapter, Server Core requires a minimum of 512MB of RAM, while Server with Desktop Experience requires a minimum of 2GB of RAM. The RAM must also be Error Correcting Code (ECC)–type memory. ECC-type memory is able to correct single-bit errors (for example, if electrical interference flips a bit in error, using the parity bit can ensure that the data in memory is corrected).
Storage
There’s no fancy formula or calculation here. If you want to install Windows Server 2019, you need a minimum of 32GB of hard drive space. Remember that this is the absolute bare minimum to install the operating system. If all you have is 32GB, you won’t have room to install anything else. If you’re limited on storage space, according to Microsoft, Windows Server Core is approximately 4GB smaller than Windows Server with Desktop Experience.
Network adapter
A server does you no good if you can’t access it. The network adapter, also referred to as the network interface card (NIC), gives your server a way to talk on your network. For Windows Server 2019, your network adapter will have to support at least gigabit ethernet. Your network adapters may be onboard, meaning that they’re a part of the motherboard, or they may be on a NIC, which plugs into a PCI Express slot.
Your network adapter should support the Pre-boot Execution Environment (PXE). This is what the majority of organizations use today to image systems from a central imaging server like Windows Deployment Services or System Center Configuration Manager.
DVD drive
Not all servers come with DVD drives anymore. There are so many more options for installing operating systems like booting from flash drives or booting from the network that many system administrators don’t bother with DVDs. That said, if you want to install from a DVD, you need to ensure that you have a DVD drive. The drive can be internal or external.
UEFI-based firmware
Unified Extensible Firmware Interface (UEFI) has replaced the traditional legacy Basic Input/Output System (BIOS) at this point. I highly recommend that you choose UEFI rather than BIOS. It’ll be required if you want to use some of the advanced features like secure boot.
Trusted Platform Module
The majority of motherboards come with a Trusted Platform Module (TPM) chip nowadays. If you plan on doing disk encryption with BitLocker, this is a must-have item.
Monitor
It goes without saying that you need to be able to see what’s going on with your server when you’re installing your operating system. Windows Server 2019 requires a Super Video Graphics Array (SVGA) connection with a minimum of 1024 x 768 screen resolution. You can accomplish this by attaching a physical monitor to the server or by viewing the video stream through a KVM.
Keyboard and mouse
You can connect a keyboard and mouse directly to the server during imaging or you can present them to the system via a KVM. Either way, you need a keyboard and a mouse of some kind to interact with the system.
Performing a Clean Install
Clean installs are my preferred way to go. By performing a clean install, you’re far less likely to run into issues caused by bad drivers, corrupted system files, or misconfigurations. In this section, I walk you through how to do a clean install of Windows Server 2019.
In this section, I assume that you’ve already booted to whatever media you’re going to use for the installation (DVD, flash drive, and so on), and you’re on the starting installation screen for Windows Server 2019. If you’ve done this, you should see a screen that looks like Figure 3-2. From this screen, follow these steps:
-
Select the appropriate settings for your locality and click Next.
In my example, I’ve chosen the following:
- Language to Install: English (United States)
- Time and Currency Format: English (United States)
- Keyboard or Input Method: US
After you click Next, the screen shown in Figure 3-3 appears.
- Click Install Now.
-
On the next screen, enter the product key and click Next.
If you don’t have a license key, click the I Don’t Have a Product Key link.
-
On the next screen, choose which version of the operating system you want to install and click Next.
The default selection is for Windows Server 2019 Standard (shown in Figure 3-4). If you prefer, you can select Windows Server 2019 Standard (Desktop Experience), Windows Server 2019 Datacenter, or Windows Server 2019 Datacenter (Desktop Experience).
- On the next screen, check the I Accept the License Terms box and click Next.
-
On the next screen, choose Custom.
The other option is for upgrade installations.
-
On the next screen, select the partition on which you want to install Windows and click Next.
In Figure 3-5, you can see that this is Drive 0.
Windows Server 2019 begins installation and restarts after it’s finished. That’s when the real fun begins!
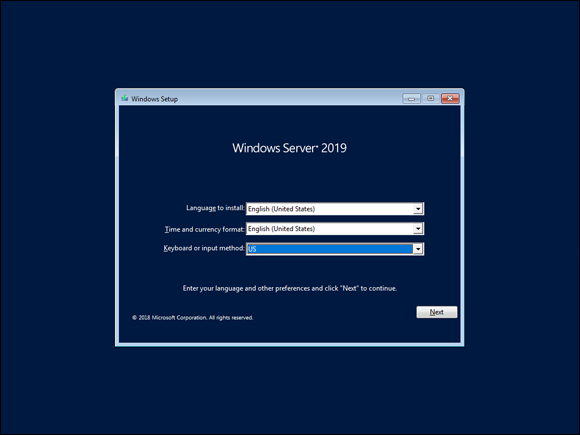
FIGURE 3-2: The first installation screen for Windows Server 2019.
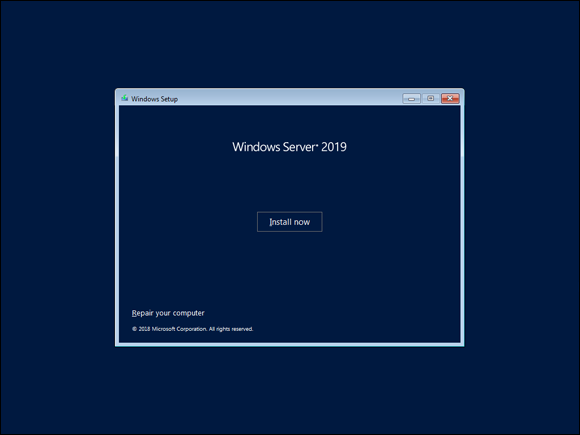
FIGURE 3-3: The Windows Server 2019 Install now button.
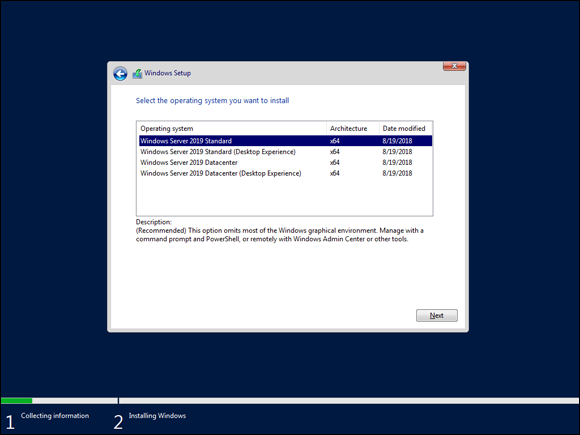
FIGURE 3-4: Choosing your desired edition and experience of Windows Server 2019.
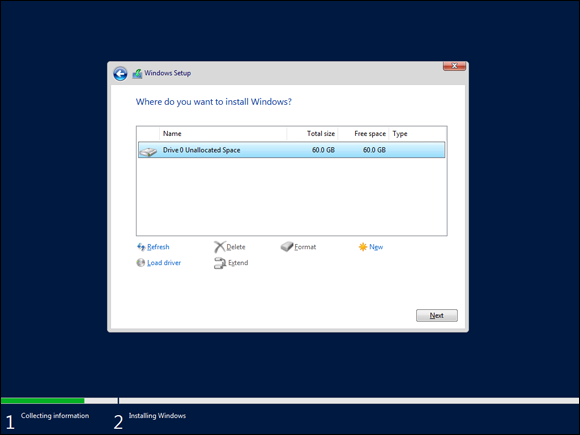
FIGURE 3-5: Choose where to install Windows.
Upgrading Windows
When considering an upgrade install, you need to ensure that the version of the operating system you’re starting with is able to be upgraded to Windows Server 2019. Table 3-1 tells you which operating systems you can upgrade from, and which edition of Windows Server 2019 you can upgrade to. You also need to check with your application vendors to ensure that the applications on the server are compatible with Windows Server 2019. If they aren’t, then you may need to upgrade your applications before you upgrade the server operating system.
TABLE 3-1 Windows Server 2019 Upgrade Compatibility Matrix
|
If you’re running this edition … |
You can upgrade to these editions … |
|
Windows Server 2016 Standard |
Windows Server 2019 Standard or Datacenter |
|
Windows Server 2016 Datacenter |
Windows Server 2019 Datacenter |
|
Windows Server 2012 R2 Standard |
Windows Server 2019 Standard or Datacenter |
|
Windows Server 2012 R2 Datacenter |
Windows Server 2019 Datacenter |
|
Windows Server 2012 R2 Essentials |
Windows Server 2019 Essentials |
After you’ve verified that you’re on a compatible version, you can begin the upgrade install. For this example, I’ll start with a Windows Server 2016 Datacenter installation and upgrade it to Windows Server 2019 Datacenter. Follow these steps:
- Log in as the administrator on the system that you want to upgrade.
-
Insert the disc or other installation media into the system that you’re wanting to upgrade, and run
setup.exe.The next screen asks if you want to download updates and drivers ahead of time (see Figure 3-6).
-
Select the Download Updates, Drivers, and Optional Features radio button and then click Next.
The next screen asks you which image you want to install.
- Select Windows Server 2019 Datacenter with Desktop Experience (or whichever version you want) and click Next.
-
Read through the license terms if you have time on your hands, and then click Accept.
On the next screen, you choose whether to keep your personal files and apps or keep nothing. If you're sticking with the same experience (Core or Desktop), you’ll see both options. If you’re changing the experience, the only option you’ll have will be to keep nothing.
-
If you have the option, select the Keep Personal Files and Apps radio button, as shown in Figure 3-7, and click Next.
The installer fetches any applicable updates and presents you with a summary screen.
-
If everything looks correct, click Install.
The installer begins the upgrade install to Windows Server 2019. It may restart several times during this process.
That’s it — you’re done!
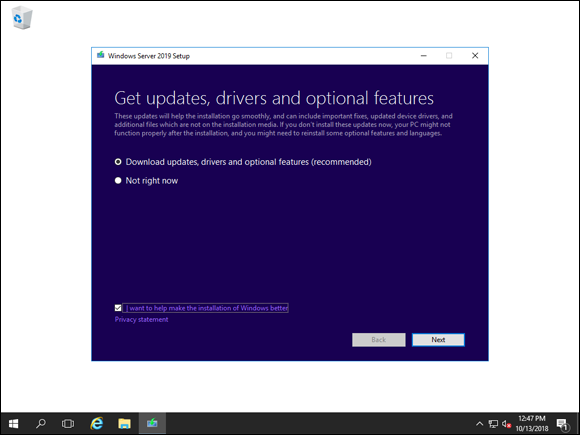
FIGURE 3-6: The Get Updates, Drivers, and Optional Features option can simplify your upgrade.
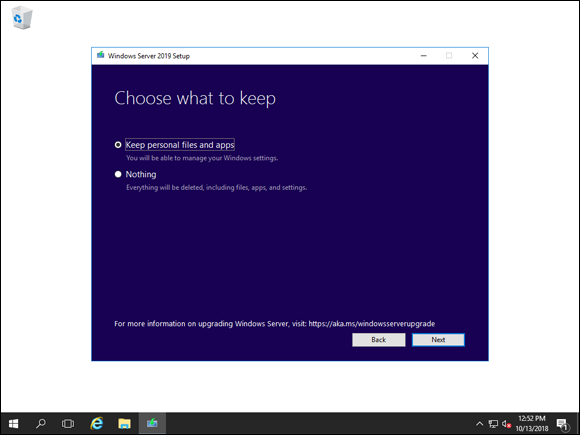
FIGURE 3-7: Upgrade options in Windows Server 2019.
Performing a Network Install with Windows Deployment Services
Windows Deployment Services (WDS) is a role that can be installed on a Windows Server operating system. It serves as a combination of a Preboot Execution Environment (PXE) server and a Trivial File Transfer Protocol (TFTP) server and enables you to install Windows over a network connection by choosing the network interface card as the boot device.
Installing WDS is fairly straightforward. You can choose to install it as a stand-alone server or integrate it with Active Directory. You tell it what the boot file is that you want to use. The easiest one to start with is the boot.wim file on the Windows Server installation media, which contains the Windows Preinstallation Environment (WinPE).
From there, you need to create the installation files. The simplest way to do this is to copy install.wim from the Windows Server 2019 installation media. It gives you the same edition and experience options that you would’ve gotten from the installation wizard on disc. After WDS is fully configured, it serves images over the network. All you need to do is tell your new server to boot from the network.
 You should know that you can’t change between Server Core and Server with Desktop Experience anymore. This capability was removed in Windows Server 2016, in order to support the newer Windows 10 desktop experience on the server, rather than the older legacy desktop experience you had with Windows Server 2012 R2. If you install Server Core, and then change your mind and decide you actually want Server with Desktop Experience, you need to reinstall it.
 Where I discuss minimum requirements in this section, it’s important to understand that these are the bare minimums to successfully install Windows Server 2019. You should not expect your server to perform well if you give it the specs listed here. For any real workload, your server should have faster processors, more processor cores, and more memory.