Chapter 6
Managing DNS and DHCP with IP Address Management
IN THIS CHAPTER
 Getting IP Address Management up and running
Setting up IP Address Management the way you want
Working with IP Address Management
When you work for a smaller organization, managing your Domain Name System (DNS) and Dynamic Host Configuration Protocol (DHCP) servers isn’t all that bad. You may have one server or just a handful of servers. As your organization grows, however, you may start to feel the pain of managing multiple DNS and DHCP servers. It may get more difficult to keep track of all the zone and scopes.
Microsoft chose to solve for the inevitable sprawl of DNS and DHCP servers with a feature known as IP Address Management (IPAM). The name is super catchy, don’t you think? IPAM combines the management of your network services like DNS and DHCP into one application so you can manage both your DNS infrastructure and your DHCP infrastructure all from a central management console.
One of the really great things about IPAM is that it can tell you when a subnet is being very heavily utilized. This can help you keep track of when you may need to add additional subnets so that your users or systems don’t run out of usable IP addresses.
In this chapter, I walk you through how to install, configure, and use IPAM.
Installing IP Address Management
Before you begin trying to install IPAM, keep in mind the following requirements:
- IPAM can’t be installed on domain controllers.
- IPAM shouldn’t be installed on a DHCP or DNS server because it can cause issues with discovery.
- IPAM needs to be installed on a domain-joined system.
- IPAM is Microsoft-centric. You can’t manage third-party products like BIND on Linux.
With those simple requirements addressed, you’re ready to install IPAM. Follow these steps:
- In Server Manager, click Manage and then click Add Roles and Features.
- On the Before you Begin screen, click Next.
- On the Select Installation Type screen, click Next.
- On the Select Destination Server screen, click Next.
- On the Select Server Roles screen, click Next.
- On the Select Features screen, select IP Address Management (IPAM) Server and click Add Features when it pops up.
- Click Next.
- On the Confirm installation selections screen, click Install.
- When installation finishes, click Close.
Configuring IP Address Management
Installing IPAM is pretty straightforward, you just have to make sure that you don’t skip anything. All the tasks that you need to follow to configure IPAM show up as numbered tasks in the Quick Start tile after you’ve clicked IPAM. Do yourself a favor: For this installation, log in with an account that has domain administration privileges. Then follow these steps:
-
In Server Manager, click IPAM on the left-hand menu (see Figure 6-1).
Notice the tasks in the Quick Start tile. Task 1: Connect to IPAM Server is already complete.
- Click Task 2: Provision the IPAM Server.
- On the Before you Begin screen, click Next.
- On the Configure Database screen, accept the default Windows Internal Database, and click Next.
-
On the Select Provisioning Method screen, select the Group Policy Based radio button, and enter a Group Policy Object (GPO) name prefix in the GPO Name Prefix field (see Figure 6-2).
 A Group Policy Object (GPO) is a collection of settings that describe how a system will act or how it will look to users. It can be targeted at users and/or computers.
I like the obvious IPAM prefix. It tells me exactly what these group policy objects are for.
- Click Next.
-
On the Summary screen, click Apply.
If all goes well, you should be greeted with the IPAM Provisioning Completed Successfully screen.
-
Click Close.
Now you need to push the new group policies out to the domain. You have to do this in every domain that you want IPAM to manage. In this case, I have only one domain.
- Right-click the Start menu on the IPAM server and choose Windows PowerShell.
- Run the following command (you must be logged in as a domain admin for this step):
Invoke-IpamGpoProvisioning -Domain <domain name>-GpoPrefixName "IPAM" -force -
Confirm that you want to do this three times, once for each policy being created.
The policies are: IPAM_DC_NPS, IPAM_DHCP, and IPAM_DNS.
-
Return to the IPAM Quick Start tile in Server Manager.
The next task is Task 3, where you configure server discovery.
- Click Configure Server Discovery.
-
Click the Get Forests button.
A query will be run.
- Click OK to close the Server Discovery screen.
-
After the job completes, click Configure Server Discovery again.
This time, the forest and domain will be filled in.
- Next to the domain, click Add.
-
Select the server roles you want IPAM to discover.
Your screen should look similar to Figure 6-3.
- Click OK.
-
Click Task 4: Start Server Discovery.
This schedules a discovery job. Wait for it to complete. It will let you know when the job finishes.
- After the job finishes, click Task 5: Select or Add Servers to Manage and Verify IPAM Access.
- Right-click the server, and choose Edit Server.
- Change the Manageability Status drop-down list from Unspecified to Managed, as shown in Figure 6-4.
-
Click OK.
This adds the managed server to those GPOs you created earlier.
You may see IPAM Access Status blocked at this stage. Typically, this means that the group policies haven’t applied on the other system yet (assuming you used group policy for your provisioning method). To resolve this, log in to the other system, open a PowerShell window, and type Invoke-GPUpdate -Force. Then go back to your IPAM server, right-click the system in question and choose Refresh Server Access Status. If this still doesn’t work, you may need to reboot the server that you’re wanting to manage. - Right-click the managed server and choose Retrieve All Server Data.
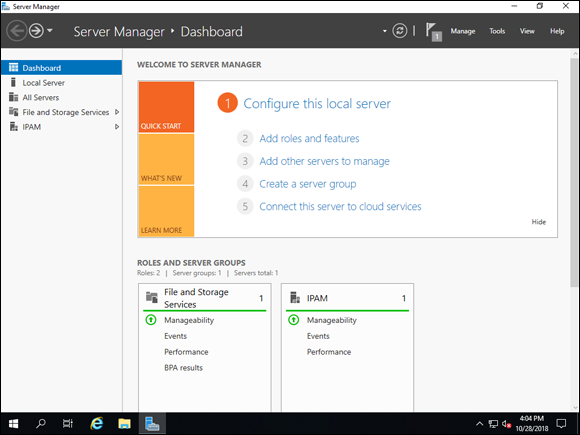
FIGURE 6-1: IPAM shows up in Server Manager after it’s installed.

FIGURE 6-2: Provisioning methods for IPAM include manual or group policy based.
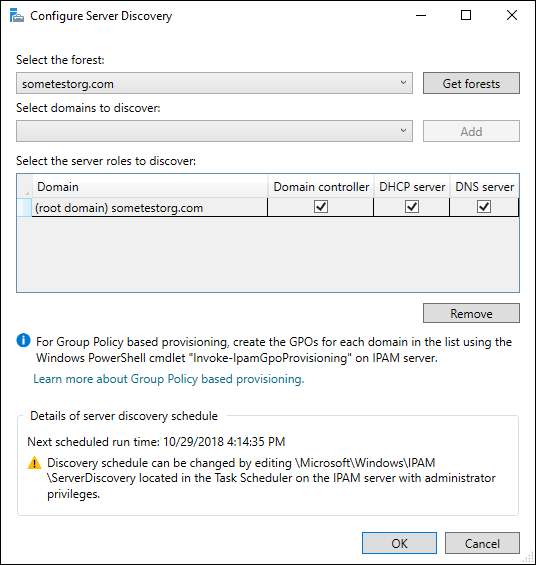
FIGURE 6-3: Configuring server discovery in IPAM.
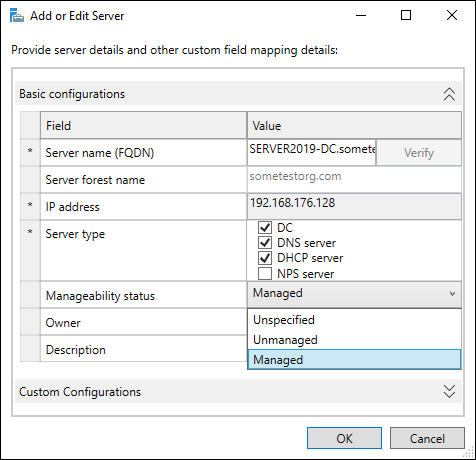
FIGURE 6-4: Setting the manageability status of the server to Managed.
After the retrieval job is complete, you can start managing the server you added through IPAM. Congratulations! That was the hard part!
Using IP Address Management
You may wonder what you can actually do in IPAM. In the following sections, I walk you through the different areas in IPAM that you can use to configure and manage your DNS and DHCP infrastructure.
Overview
Now that IPAM is configured, go to the Overview section. Remember that Quick Start tile you were using? Instead, click the second orange tile, the one that says Actions. You should see a list of the things you can do similar to Figure 6-5.
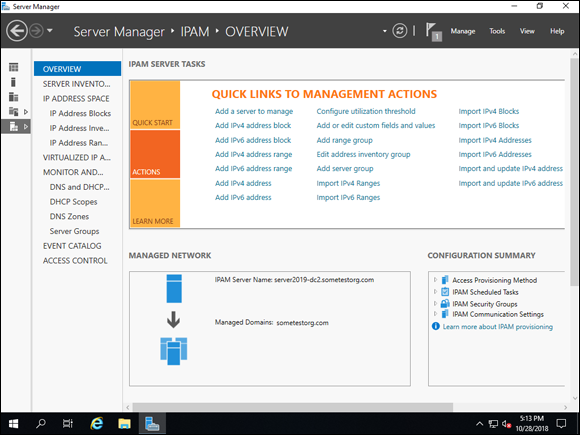
FIGURE 6-5: Some of the actions you can take against servers that are being managed in IPAM.
Server Inventory
The Server Inventory section should look familiar to you — it may have been the source of much frustration when you were configuring IPAM. The main things that this screen gives you are an overview of the servers you’re managing, their IPAM Access Status, and the ability to pull fresh data from the servers outside of the scheduled retrieval task. You can filter by IPv4 and IPv6, and you can also filter by Managed (GPO Provisioned) servers and Unmanaged (Manual) servers. Check out Figure 6-6 for a view of the Server Inventory screen.

FIGURE 6-6: The Server Inventory screen gives you a list of your servers and what their status is.
IP Address Space
If you click the first selection in IP Address Space, called IP Address Blocks, you see the DHCP scope that was set up earlier. Right now, for Utilization, it says Under, as shown in Figure 6-7. This means that it has plenty of IP addresses available. Before IPAM, you had to track this utilization on a spreadsheet, which could be difficult because the spreadsheet might not be up to date, and the spreadsheet had no way to give you a friendly warning that you were overutilizing your space.
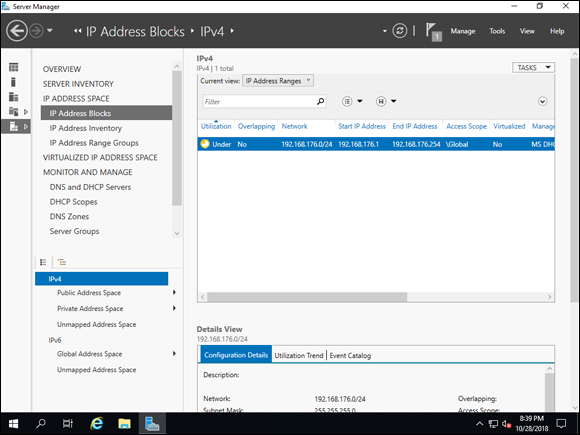
FIGURE 6-7: IP address utilization is easy to see at a glance in IPAM.
The other screens under the IP Address Space category — IP Address Inventory and IP Address Range Groups — give you similar data just with different views. Take the time to click through these and get familiar with what’s in each.
Monitor and Manage
Monitor and Manage is where you’ll spend a significant amount of your time in IPAM.
DNS and DHCP Servers
When you click DNS and DHCP Servers, you can see the status of the services on every server you’re managing through IPAM. If all is well, Server Availability should say Running for both DNS and DHCP. See Figure 6-8 for an example of the status page.
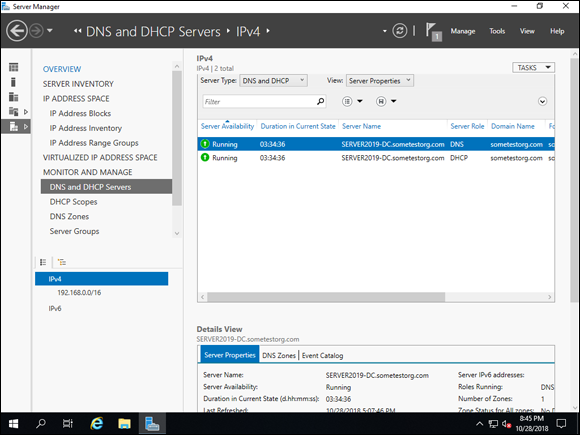
FIGURE 6-8: The status of the DNS and DHCP servers that are being monitored and managed through IPAM.
DHCP Scopes
DHCP Scopes contains all the DHCP scopes that are configured on all the DHCP servers IPAM is aware of. This interface gives you the same utilization metric that you had before in the IP Address Blocks section. It tells you what some of the basic subnet settings are, like the subnet mask and the lease duration. If you right-click over on the existing scope, you see that you’re presented with a ton of options to manage the DHCP Scope. See Figure 6-9 for the configuration options available to you.
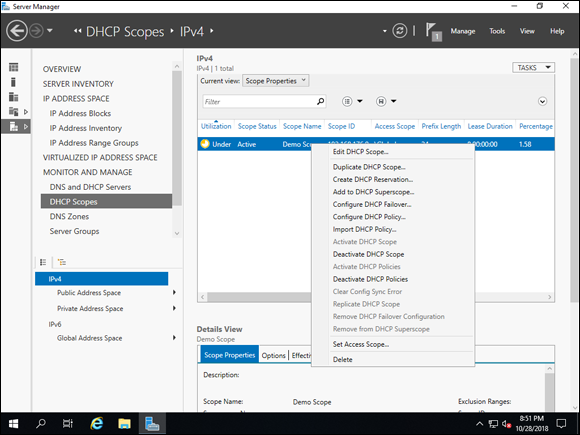
FIGURE 6-9: DHCP Scope configuration can be done across multiple DHCP servers all from IPAM’s DHCP Scopes screen.
DNS Zones
In the DNS Zones section, you can see with a quick glance whether the Zone status is good or bad. You can also get some really helpful information at a glance regarding the DNS server that the zone is hosted on. You can select whether you want to look at the forward lookup zones (names to IPs) or if you want to look at the reverse lookup zones (IPs to names). And of course, just like the DHCP Scopes screen, you can right-click the zone and configure it right from IPAM. No need to go to multiple DNS servers anymore! See Figure 6-10 for an example of what the DNS Zones screen looks like.
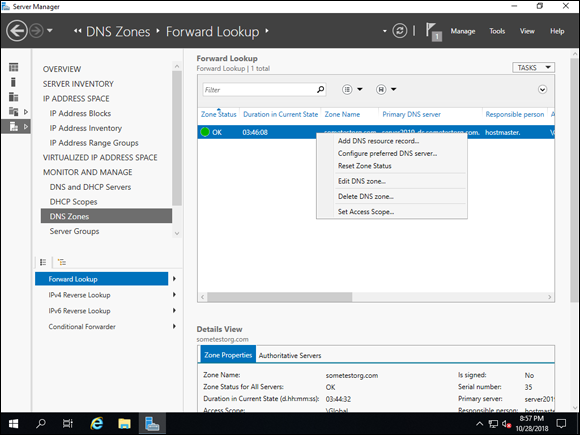
FIGURE 6-10: Configuring DNS zones can be done from inside of IPAM.
Server Groups
Server Groups lets you separate out the systems by the type of service running on them. You simply click the Server Type drop-down list and select whichever service you’re interested in.
Event Catalog
Event Catalog gathers all the events in Event Viewer that are directly related to IPAM. This can be very helpful if you’re troubleshooting why something isn’t working properly.
Access Control
The last section, Access Control, allows you to view the roles within IPAM that allow you to manage various activities. There are several built-in roles and you can also create your own role by clicking Tasks and then clicking Add User Role. For the most part, I think you’ll find that the built-in roles will meet your needs. If you need to create one though, follow these steps:
- In the Access Control section, click Tasks and then click Add User Role.
-
Name the role and then select the desired permission.
In my case, I’m creating a role for a DNS Zone Administrator. See Figure 6-11 for an example of what that looks like.
-
Click OK.
After the role is created, it shows up in the list, and you can tell it isn’t a built-in role because it says No under the Built-in Role column. See Figure 6-12 for the final view.
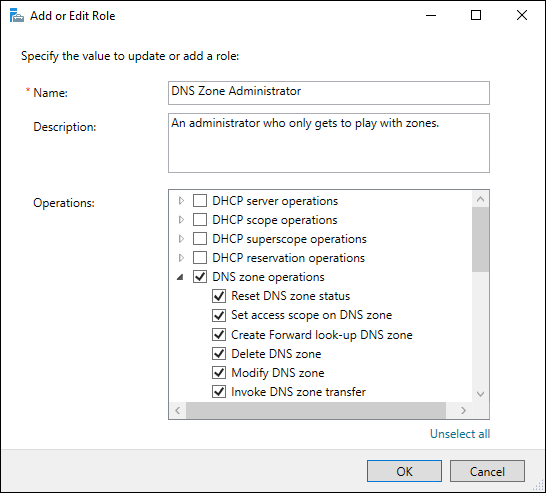
FIGURE 6-11: Creating a DNS Zone Administrator is easy given the granular permissions available.
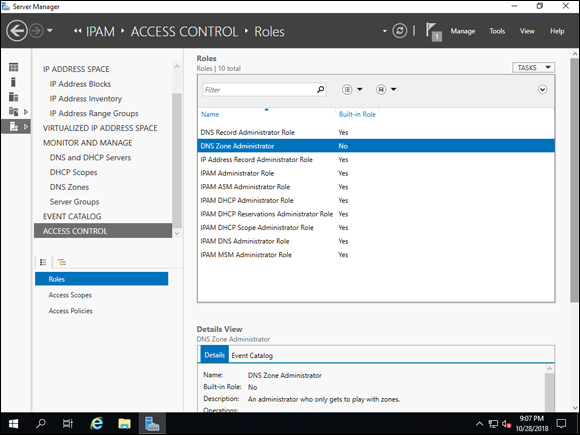
FIGURE 6-12: The new role is created and shows up with the built-in roles.