Chapter 6
Working at the Command Line
IN THIS CHAPTER
 Opening an administrative Command Prompt to manage your server
 Configuring the command line for use
 Setting up user and session environmental variables
 Getting additional help at the command line
 Understanding command line symbols and what they do
Just about every system administrator has worked with the Command Prompt at some point in his or her career. The Command Prompt is a launching point for a number of diagnostic utilities and a great resource for gathering information, in addition to being a method to automate repetitive tasks.
This chapter discusses working with the command line — from the basics on how to use the command line to how to customize it to your liking.
Opening an Administrative Command Prompt
The simplest way to get to the Command Prompt in Windows Server 2019 is to click the Start menu, scroll down to Windows System, and click Command Prompt. This will run the Command Prompt in an unprivileged state.
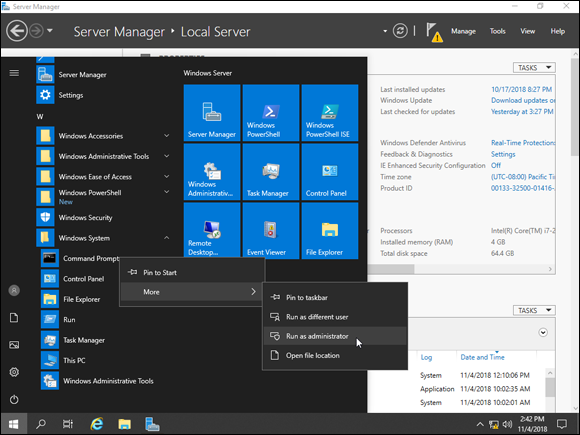
FIGURE 6-1: Running the Command Prompt as administrator allows you to run more privileged commands.
Configuring the Command Line
You can customize the Command Prompt quite a bit. If you right-click the menu bar and choose Properties, you can set the customizations that you want. These customizations will last for as long as you have the session open. If you want the settings to be saved, right-click the menu bar and choose Defaults. The Properties and Defaults menus are nearly identical.
In this section, I give you a look at the different customizations you can make.
Customizing how you interact with the Command Prompt
The Options tab (shown in Figure 6-2) is where you can set things like the size of the cursor, how many commands to keep saved in the buffer, editing options, and text selection. Refer to this screenshot as I walk you through each section of the Option tab.
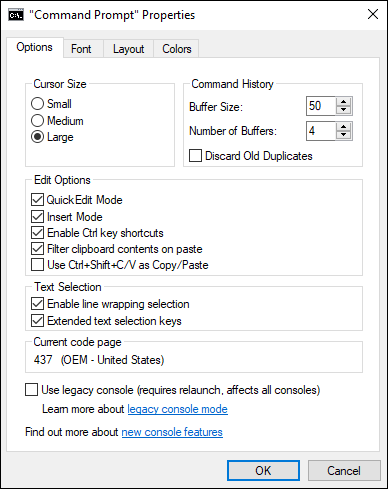
FIGURE 6-2: The Options tab allows you to customize how you interact with the Command Prompt.
Cursor Size
Changing the cursor size makes the cursor wider and easier to spot. This setting can be very helpful for someone who is visually impaired.
Command History
The command history allows you to simply press the Up key to back through old commands, which can save you from having to retype commands if you’re doing something repetitive. The default buffer size is 50, but you can increase or decrease that as you like.
Edit Options
In this section, you a few choices in controlling how you can edit things within the Command Prompt:
- Quick Edit Mode: Allows the use of the mouse to copy and paste text into and from the Command Prompt window.
- Insert Mode: Allows you to type wherever the cursor is at. If Insert Mode gets disabled for some reason, you’ll overwrite existing text starting at the location of the cursor.
- Enable Ctrl Key Shortcuts: Lets you use Ctrl key shortcuts like Ctrl+C to copy or Ctrl+V to paste.
- Filter Clipboard Contents on Paste: Remove tabs and smart quotes from pasted material coming from the Command Prompt window.
- Use Ctrl+Shift+C/V as Copy/Paste: If you use Ctrl+C to copy text, you can’t use it to stop a running command. This could be problematic because your only other option is close the Command Prompt window and start again. If you check this box, it preserves the original use of Ctrl+C but also allows you to copy and paste by adding the Shift key into the command.
Text Selection
In this section, you two additional options to work with:
- Enable Line Wrapping Selection: Helps correct formatting issues when copying and pasting from the Command Prompt.
- Extended Text Selection Keys: Allows you to use common keyboard shortcuts inside the Command Prompt.
Current Code Page
Current Code Page is not an adjustable field. It’s simply passing on information regarding which character code you’re using. I’m in the United States, so I’m assigned 437 (which is a holdover from the old IBM PC days) and the additional identifier of United States.
Use Legacy Console
Legacy console removes a lot of the newer features that were added to the Command Prompt. If you select the Use Legacy Console check box, some of the customization options that I’ve mentioned will no longer show up on the Options tab for you. You may want to do this for compatibility issues, or for someone who is used to the way that the Command Prompt used to work and finds it disruptive to work with it with the newer options.
Changing the font
The Font tab (shown in Figure 6-3) is pretty straightforward. It allows you to select the size of the font and which font you want to use. It even gives you a preview of what your selection will look like in the Window Preview. In Figure 6-3, for instance, I’ve chosen a font size of 18 in the Lucida Console font. You can see in the bottom box the preview of what my font will look like if I keep this setting.
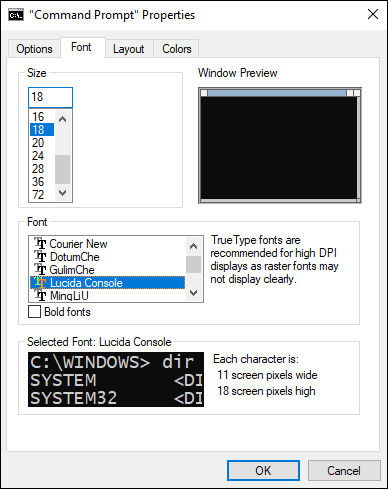
FIGURE 6-3: The Font tab allows you to change the font and how it displays in the Command Prompt.
Choosing your window layout
On the Layout tab (shown in Figure 6-4), there are three configurable options:
- Screen Buffer Size: The number of characters you can see on a single line is controlled by the Width adjustment. The Height adjustment determines how many lines will be stored in memory. Select the Wrap Text Output on Resize if you would like for the text to adjust whenever you resize the Command Prompt window. This is useful if the output of a command is difficult to read because the window size was small. You can adjust the Command Prompt window and the text will resize automatically, instead of your having to resize the window and then rerun the command.
- Window Size: The Width and Height adjustments change the size of the actual Command Prompt window.
- Window Position: If you uncheck the Let System Position Window check box, you can adjust how far away you want the Command Prompt to open from the top and left edges of the screen. If you don’t select the check box, you can’t change the Left and Top settings.
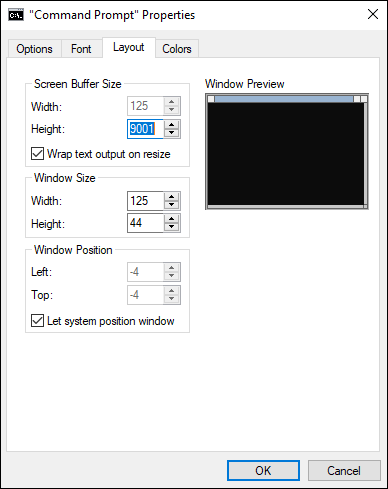
FIGURE 6-4: The Layout tab configures what the window looks like.
Defining text colors
The Colors tab (shown in Figure 6-5) lets you set the background and text colors that are used in the Command Prompt. You can adjust the text and background colors for the Command Prompt screen, as well as for popup boxes. By default, the Command Prompt has a black background and off-white text. You can change that to whatever you like.
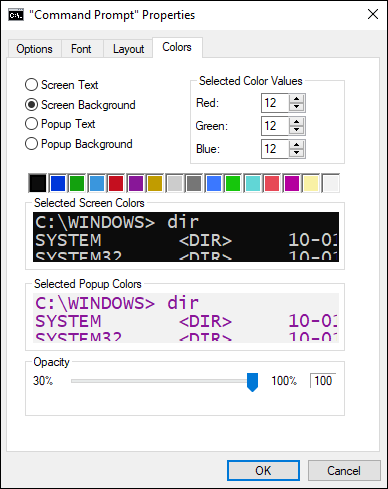
FIGURE 6-5: The Colors tab lets you customize colors in the Command Prompt.
You can also adjust the opacity of the Command Prompt using the Opacity slider. The slider is normally set to 100%. However, if you adjust the slider downward, you can see what’s behind the Command Prompt.
Setting Environmental Variables
There are two types of environment variables. User environment variables apply to an individual user, and system environment variables apply to all users.
There are quite a few environmental variables, far too many to cover in a single book. If you want to know which environmental variables are available to you and what their current settings are, you can do this on the Command Prompt window. Just type Set | More and you get the output for all the environmental variables on the system, as shown in Figure 6-6.
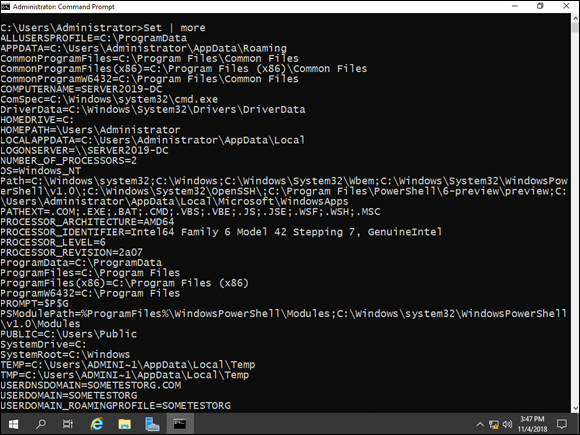
FIGURE 6-6: Displaying environmental variables and their current settings is possible with the Set command.
One of the most common environmental variables to edit is the PATH variable. You can edit the PATH variable when you want to include a directory in your path so that you can simply run programs in that directory without having to actually navigate to that directory. The syntax is simple. For instance, to add a folder named Tools to my path, I type SET PATH=%PATH%;C:\Tools. This appends my Tools folder to the existing path variables, as you can see in Figure 6-7. I can verify that my new entry is in my path by typing echo %PATH%.

FIGURE 6-7: Before and after appending a folder to my PATH environment variable.
Getting Help at the Command Line
Getting help at the command line is pretty easy. To get help with a specific command, you can type the command followed by /?. For example, in Figure 6-8, you can see that I wanted to get help with the nslookup utility, so I typed nslookup /? and I was presented with the options for that command.

FIGURE 6-8: Using the Command Prompt help to get more information on a command.
If you want general help at the Command Prompt, such as guidance as far as what you can do, simply type help and press Enter. You get a list of all the commands you can run at that point in time, shown in Figure 6-9.

FIGURE 6-9: Using the help command in the Command Prompt.
Understanding Command Line Symbols
Symbols can extend the usefulness of the Command Prompt. They can allow you to send output to a file or combine commands. Table 6-1 provides a list of symbols that you can use on the Command Prompt window.
TABLE 6-1 Command Line Symbols
|
Symbol |
Example |
Description |
|
> |
command > file.txt |
Writes the output of the command to the filename you specify. If the file does not exist, it will be created. If the file does exist, the file will be overwritten. |
|
< |
command < file.txt |
Runs a command and inserts the contents of the file after the command. |
|
>> |
command >>file.txt |
Similar to the single > symbol except this command appends if the file exists, rather than overwrites the file. |
|
| |
command A | command B |
Sends the output of command A to the input of command B. |
|
& |
command A & command B |
Runs command A and then command B. |
|
&& |
command A && command B |
Executes command B only if command A finishes successfully. |
|
|| |
command A || command B |
Executes command B only if command A does not finish successfully. |
|
@ |
@echo off |
Typing the at symbol (@) will suppress whatever comes after it. It’s not truly a command; it’s actually an optional flag that can be used to suppress whatever comes after it. This can prevent a line of code from showing up in your server’s logs. You commonly see it used with @echo off to turn off the output of commands that are running in a script, or on the console. |
 For some commands to work, you must run the Command Prompt as an administrator. To do this, right-click Command Prompt in the Start menu, click More, and click on Run as Administrator, as shown in