Chapter 2
Performing Basic Network Tasks
IN THIS CHAPTER
 Viewing network properties on Windows Server 2019
Connecting to other networks and using virtual private networks
Managing and configuring network connections in Windows Server
System administrators are expected to know the basic ins and outs of how to configure networking on a Windows server. You may need to change the IP address on a server for instance. Certain servers should have their addresses set statically. These are generally going to be critical infrastructure systems like Active Directory Domain Services (AD DS), Domain Name Server (DNS), and Dynamic Host Configuration Protocol (DHCP) servers.
In this chapter, I cover how to do the basic configuration on a network interface card and delve into some other neat things that you can do with networking in Windows Server 2019.
Viewing Network Properties
Looking at the properties of your network adapter gives you a quick and simple way to see how your system is configured to communicate on your network. To look at your network properties in Windows Server 2019, follow these steps:
- Click the Start Menu, and then click the gear icon to open the Settings menu.
- Click Network & Internet.
- Choose Ethernet from the left-hand menu.
- Click Change Adapter Options.
When you select the network adapter, you have several options that appear in a bar across the top of the screen, as shown in Figure 2-1:
- Disable This Network Device: Disables the selected network adapter.
- Diagnose This Connection: Used to troubleshoot connection issues related to network connectivity.
- Rename This Connection: Allows you to rename the connection. This is helpful if there are multiple network adapters and you need to keep track of what each one is doing.
- View Status of This Connection: Shows you the status of the network connection.
- Change Settings of This Connection: Bring up the Properties dialog box for the network adapter that was selected.
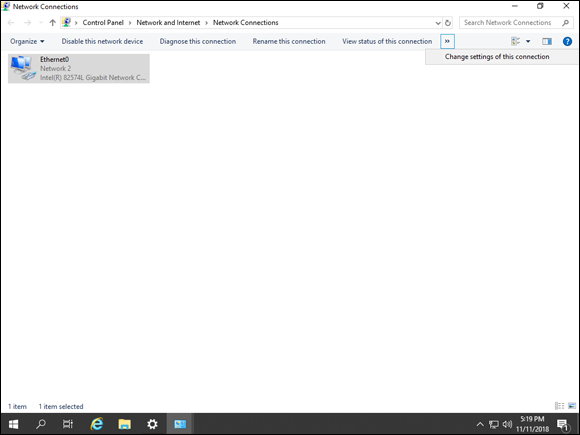
FIGURE 2-1: Working with the properties of a network adapter.
There are also options if you right-click the network adapter. The majority of the options match what appeared on the top bar when you selected the network adapter, with the exception of Bridge Connections, which allows you to bridge two network adapters so that the operating system sees them as a single network adapter.
Assuming that you want to configure the network adapter, you can either right-click on the adapter and choose Properties or select Change Settings of This Connection from the top bar when the network adapter is selected. After you’ve opened up the Properties dialog box for the network adapter, you should see something that looks like Figure 2-2.
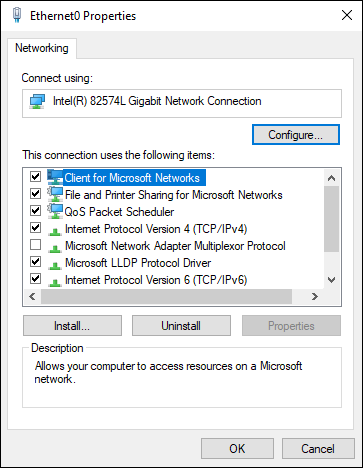
FIGURE 2-2: The Properties dialog box for the network adapter allows you to change the network adapter’s configuration.
Some of the items in the network adapter Properties dialog box can only be uninstalled, while others can be configured via the Properties button. Plus, you can install new network features by clicking the Install button.
Connecting to Another Network
Connecting to your local network is a great first step, but in most cases you really want to be able to connect to another network. The best and most common example of this is connecting to the Internet. The Internet is an entirely different network from the one that your computer is on, and you need to be set up properly to access it.
Connecting to the Internet
In some networks (like a home network, for example), you connect your computer to a router or a switch attached to a cable modem, and setup is automatic. You’re able to access the Internet within minutes. If you were to check your IP address, you would have one of the non-routable internal IP addresses, from one of the ranges shown in Table 2-1.
TABLE 2-1 IPv4 Private Address Ranges
|
Subnet |
Range |
|
10.0.0.0/8 |
10.0.0.0–10.255.255.255 |
|
172.16.0.0/12 |
172.16.0.0–172.31.255.255 |
|
192.168.0.0/16 |
192.168.0.0–192.168.255.255 |
To get to the Internet however, you need a public IP address. The cable modem you lease from your ISP is receiving the public IP address, and it’s usually doing the “translation” between your internal IP address (which is not routable on the Internet) to the routable public IP address that it’s assigned.
In an organization, you may have a proxy of some kind in between you and the Internet. Proxies can act as a combination of a firewall and a web filter; they can protect your system from dangerous traffic, as well as block known malicious sites. To set up a proxy, follow these steps:
- Click the Start menu and then click the gear icon to access the Settings menu.
- Click Network & Internet.
-
Click Proxy.
In an organization, if you’re using a proxy, you’ll most likely have a setup script.
- Click the Use Setup Script toggle, and enter the Script address, including the name of the
.pacfile. - Click Save.
After you hit save, your server’s settings should look similar to Figure 2-3. The location of the proxy script will be different, of course.
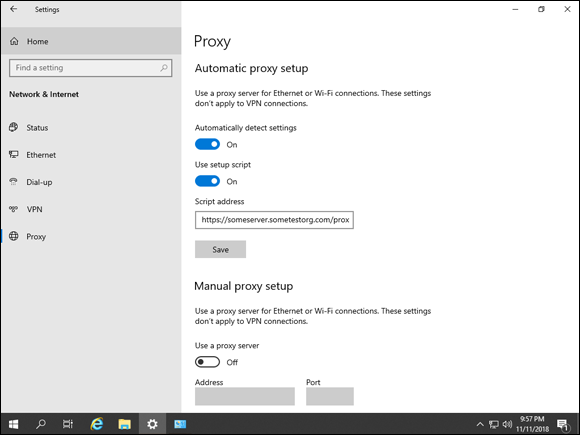
FIGURE 2-3: Setting up a proxy script for Internet access on a Windows server.
Setting up a dial-up connection
Okay, I know you probably giggled when you saw this header. Who uses dial-up anymore, right? Believe it or not, dial-up is still around, though it’s certainly becoming less common. Why might you use dial-up? Well, there are a few reasons why it might be a good solution depending on your use case:
- Maybe you have a traditional phone line but DSL is not offered in your area.
- Maybe you need a reliable, consistent connection, and you’re really just checking emails or doing simple Google searches.
- Maybe you need Internet access, but you need it to be as inexpensive as possible (dial-up is approximately $20 a month).
Whatever the reason, if you need to use a dial-up connection, here’s how to set it up:
-
Sign up with a dial-up service and get the service number from them.
This is the number you will call to connect.
- Click the Start menu, and click the gear to access the Settings menu.
- Click Network & Internet.
- Choose Dial-up.
- Click Set Up a New Connection.
- Choose Connect to the Internet and click Next.
- On the How Do You Want to Connect screen, select Dial-up.
-
On the Type the Information from Your Internet Service Provider (ISP) screen, enter the information that you obtained back in Step 1.
Your screen should look similar to Figure 2-4, though for obvious reasons the entries won’t match.
- Click Create.
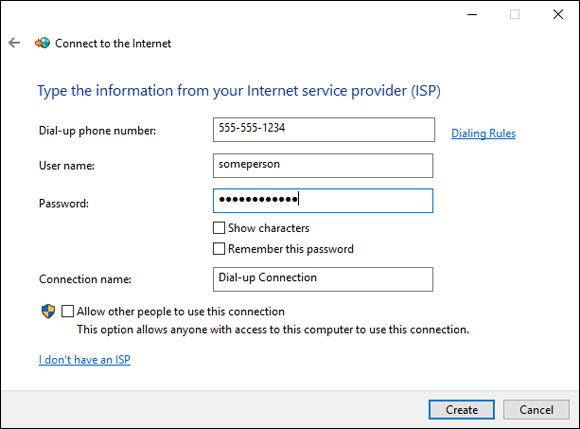
FIGURE 2-4: Configuring a dial-up connection in Windows Server 2019 is simple if you have the information from your ISP.
Connecting to a virtual private network
You can use a virtual private network (VPN) to gain remote access to a network. The great thing about VPNs is that they allow you to work as if you were actually on your work network.
If your workplace uses a VPN to connect, you can use the built-in Windows VPN client. Here’s how to configure that:
- Click the Start menu and then click the gear icon to access the Settings menu.
- Click Network & Internet.
- Select VPN.
- Click Add a VPN Connection.
- For VPN Provider, select Windows (Built-in).
- Enter a connection name, and the address of the VPN server that you want to connect to.
- Enter your username and password, and click Save.
Your screen should look similar to Figure 2-5, though your fields will have different data in them.
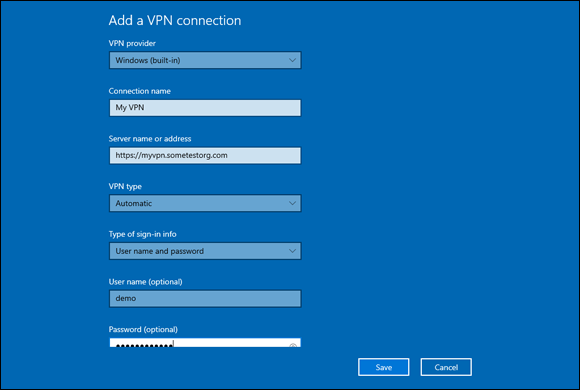
FIGURE 2-5: Setting up a VPN for remote access with the built-in Windows VPN client.
Managing Network Connections
Changing the IP address is pretty standard activity, but some of the other options in the network adapter’s Properties dialog box aren’t so straight forward. In this section, I walk you through each of these options, because these are the ones that you’ll most likely work with.
Understanding the Client for Microsoft Networks feature
Client for Microsoft Networks has no configuration that you can do on it. You can uninstall it, but that’s it. The Client for Microsoft Networks feature is required to allow a client to remotely access files, printers, and other shared resources on a Windows server. It’s installed by default, and it should not be uninstalled.
Configuring the Internet Protocol
Configuring the IP settings on a server is one of the most common tasks that system administrators will do on a server. Before we move on to configuring, let’s look at a little terminology first.
The IP address is the address given to a system. It’s how other systems on the network will address your system.
The subnet mask identifies which part of the address is a network address and which part of the address is a host address. For instance, 172.22.0.0/16 has a subnet mask of 255.255.0.0. The /16 is referred to as Classless Inter-Domain Routing (CIDR) notation and tells me how many bits the network portion of the address takes up. Other systems on this same network will all have IP addresses that start with 172.22.x.x, and the x refers to the host part of the address that will differ from system to system.
The default gateway is the IP address used by a system to reach systems in other networks.
Let’s get a little background on IPv4 and IPv6 and then look at how you can configure each.
To start with, you need to open the network adapter Properties dialog box for whichever network adapter you want to work with. Here are the steps to get to the Properties dialog box:
- Click the Start menu, and then click on the gear icon to open the Settings menu.
- Click Network & Internet.
- Choose Ethernet from the left-hand menu.
- Click Change Adapter Options.
- Right-click the desired network adapter and choose Properties.
IP Version 4
IP Version 4 (IPv4) addresses are 32-bit addresses. Each number represents 8 bits in binary — for instance 255 is represented as 1111 1111.
To configure a static IPv4 address, select Internet Protocol Version 4 (TCP/IPv4) and click Properties. By default, this is set to Obtain an IP Address Automatically and Obtain DNS Server Address Automatically. You can select Use the Following IP Address and fill in the IP address, the subnet mask, and the default gateway in the top half of the dialog box. Then select Use the Following DNS Server Addresses and fill in the preferred DNS servers at the bottom, and click OK. See Figure 2-6 for an example.
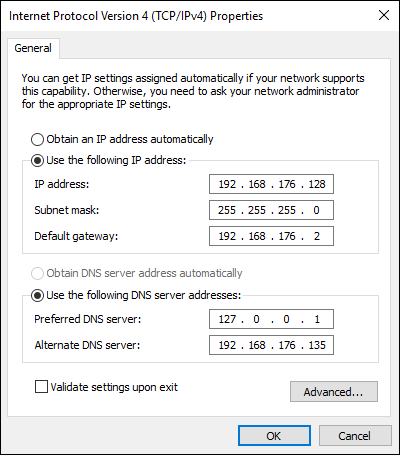
FIGURE 2-6: IPv4 properties are set through the network adapter Properties dialog box.
IP Version 6
IPv4 addresses have been in use for quite some time and it was recognized that eventually there would be no more public IPv4 addresses available. The last available public IPv4 address available from the American Registry for Internet Numbers (ARIN) was issued in September 2015. IP Version 6 (IPv6) was created to address the issue of running out of IPv4 addresses. Instead of a short 32-bit address, IPv6 addresses have a much longer 128-bit address. The address comprises 8 groups of 16 bits, separated by colons.
To configure a static IPv6 address, select Internet Protocol Version 6 (TCP/IPv6) and click Properties. By default, this is set to Obtain an IP Address Automatically and Obtain DNS Server Address Automatically. You can select Use the Following IPv6 Address and fill in the IP address, the subnet mask, and the default gateway in the top half of the dialog box. Then select Use the Following DNS Server Addresses and fill in the preferred DNS servers in the bottom of the dialog box, and click OK. See Figure 2-7 for an example.
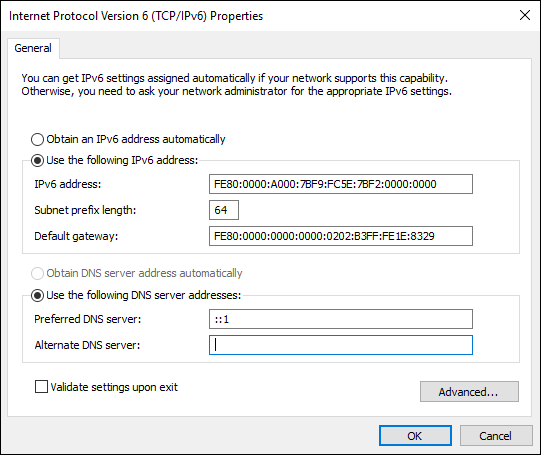
FIGURE 2-7: IPv6 properties are set through the network adapter Properties dialog box.
Installing network features
Installing new network features isn’t done as often as it used to be. The option is still available from within the network adapter Properties dialog box. Follow these steps:
-
From the network adapter’s Properties dialog box, click Install.
You have a choice of Client, Service, or Protocol.
- Select Protocol and click Add.
- Select Reliable Multicast Protocol and click OK.
The new protocol now shows up in the list of installed protocols, as shown in Figure 2-8.
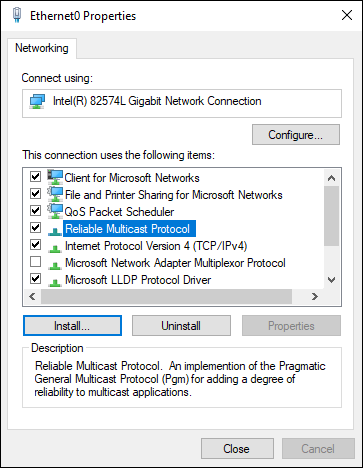
FIGURE 2-8: It’s simple to install clients, services, and protocols like the Reliable Multicast Protocol.
Uninstalling network features
Uninstalling network features is similar to adding them. You simply select what you want to uninstall, and then you click the Uninstall button.
 Be careful uninstalling network features. Uninstalling the wrong thing, like Client for Microsoft Networks, could have very bad outcomes.
You remember how we installed Reliable Multicast Protocol in the preceding section? Let’s uninstall that now:
- Select Reliable Multicast Protocol.
-
Click Uninstall.
You get a dialog box asking you to confirm that you want to uninstall it.
- Click Yes.
It really is that simple to uninstall a network feature. Always keep in mind that there is risk when removing features like these on production servers, so you should always use a test environment first to ensure that the change you’re making is a safe one.