Chapter 1
Understanding Windows Server 2019 Security
IN THIS CHAPTER
 Working with basic Windows Server security
 Securing files and folders
 Working with the local security policy in Windows Server
 Understanding Windows Security
Given the number of security breaches in the news today, it isn’t surprising that Microsoft has invested heavily in improving the security of Windows Server. But before you can get into the really cool, new security features of Windows Server 2019, you need a firm grasp on basic security concepts in general and a working knowledge of Windows security in particular.
In this chapter, I cover security basics. Think of this chapter like a security primer, with general security topics first, followed by Windows Server–specific topics (like .NET security, file and folder security, and the Windows Security App).
Understanding Basic Windows Server Security
Securing your server is arguably one of the most important things you need to do in your daily work. After all, you don’t want to go through all the effort to build and configure a server just to have it attacked.
This section covers security basics so that you understand the terminology I use throughout this book.
The CIA triad: Confidentiality, integrity, and availability
The CIA triad (shown in Figure 1-1), consisting of confidentiality, integrity, and availability, is one of the most basic concepts in information security. The closer you get to any one point of the triangle, the farther away you are from the others. For example, if you have a system that keeps records completely confidential, that system won’t be available to your end users.

FIGURE 1-1: The CIA triad is one of the most basic concepts in information security.
Here’s what each of these terms means for you as a system administrator:
- Confidentiality: Confidentiality refers to keeping access to data out of the hands of those who shouldn’t have access to it. For instance, when you’re using an online banking site or an e-commerce site, the connection should use HTTPS, which means that it’s encrypted. Encryption protects sensitive information from being captured by someone eavesdropping on the network.
- Integrity: Integrity means that the data has not been changed or tampered with in any way. Data integrity can apply to data at rest or data in transit. Version control can be useful to roll back accidental changes. Potentially malicious changes can be detected by file integrity monitoring software, which creates a hash of a file. If the hash changes, then the file has changed as well.
- Availability: Availability is the part of the triad that most people are familiar with. As a system administrator, your goal is to ensure that your systems are up and available to your end users. You may build in redundancy and fault tolerance to make the likelihood of the system going down lower, or you may be responsible for the backups that will allow you to restore data if something does happen.
Authentication, authorization, and accounting
The next set of terms that you need to know are authentication, authorization, and accounting, collectively referred to as triple A:
- Authentication: Authentication is how you prove to a system who you are. This may be a username and password, or username and biometrics or a personal identification number (PIN). Think of authentication like showing a security guard your badge and being allowed inside the gate that the guard is responsible for protecting.
- Authorization: After you’re authenticated, any time you access a resource, the system will check to see if you’re authorized to access that resource. Authorization is similar to swiping your badge at the doors inside of a secure building. If you’re authorized to enter an area, you’ll be allowed through. If you aren’t authorized, you won’t be allowed through.
- Accounting: Accounting, sometimes referred to as auditing, is having a log of when authentication and authorization events occurred. In a Windows system, this can be accomplished with something as simple as Event Viewer.
Access tokens
Access tokens are used by the Windows Server operating system to identify a user who is interacting with an object. The token usually contains the user’s security identifier (SID), SIDs for groups that the user is a member of, and the source of the access token. A SID is a unique value that is assigned to an object to identify it. With users, the SID is what allows you to change the name of the user without impacting the user’s access. The user’s name may change, but the SID will not.
Security descriptors
Security descriptors contain useful information related to the security of an object that is secured or able to be secured. It can include the SID for the owner of the object, access control lists that specify who is allowed to access the object, and which access events should generate audit records.
Access control lists
Access control lists (ACLs) contain access control entries (ACEs) that grant or deny specific access to users or groups. The Windows Server operating system has two types of ACLs that you need to be aware of:
- Discretionary access control lists (DACLs): DACLs are what most system administrators think of when asked about ACLs in Windows Server. DACLs are used to grant or deny access based on a user account or group membership. Deny entries always take precedence over allow entries. See Figure 1-2 for an example of a DACL on a folder.
- System access control lists (SACLs): SACLs are not as widely known about as DACLs. They can be used to determine what type of event should be audited. They can audit successful access, failed access, or both. In the example in Figure 1-3, I’m auditing both success and failures for any Domain Admin account, but I’m only logging failures for my Demo account.
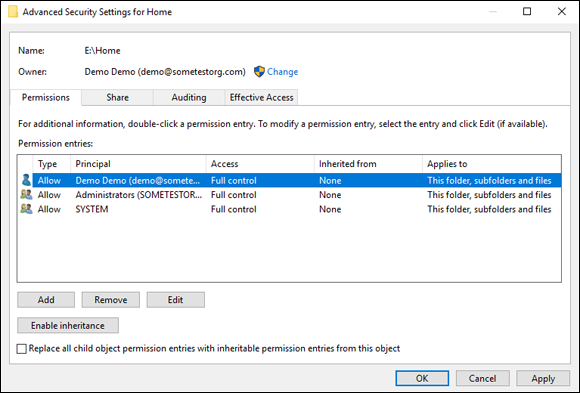
FIGURE 1-2: Discretionary access control lists can be used to determine who should have access to a folder or file.
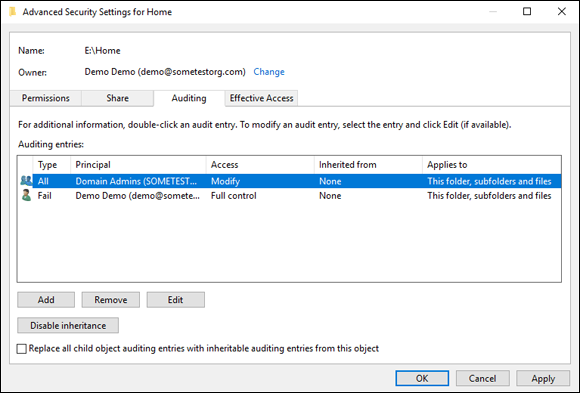
FIGURE 1-3: Using an SACL to audit privileged access to a folder is simple.
SACLs are empty by default, you have to configure what you want them to audit. If you only have one or two servers, configuring this setting manually isn’t so bad. If you have numerous servers, though, configuring SACLs quickly becomes unmanageable. Group Policy to the rescue!
Group Policy allows you to make configuration settings in one place and then apply those changes to multiple systems. Here’s how to turn on feature through Group Policy.
- From Server Manager, choose Tools⇒ Group Policy Management.
- Expand a domain by double-clicking the domain.
-
Choose the policy you want to set this through.
In my case, I’m going to create a new group policy object (GPO) called File Servers.
-
Right-click the domain name, and select Create a GPO in This Domain, and Link It Here.
 Creating your GPO this way means that it will apply to all domain systems. Although this is fine in a demo environment, you’ll most likely want to link the GPO to an organizational unit (OU) that contains the file servers.
 - Name the policy, and click OK.
- Right-click your new policy and choose Edit.
- Under Computer Configuration, double-click on Policies, then Windows Settings, then Security Settings, and then Advanced Audit Policy Configuration.
- Double-click Audit Policies to expand it, and then double-click Object Access.
- Double-click Audit File System.
- Check the Configure the Following Audit Events check box, and select Success, Failure, or both (see Figure 1-4).
- Click OK.
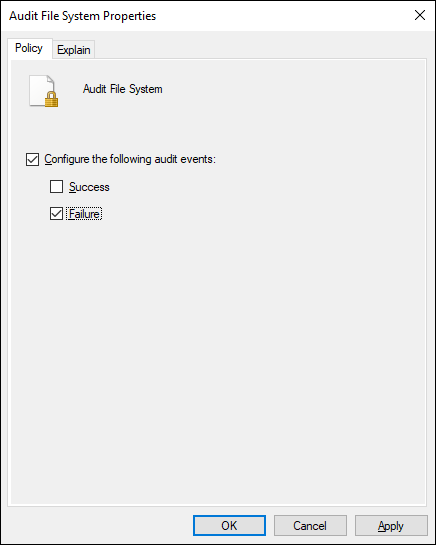
FIGURE 1-4: You can use Group Policy to set your SACLs so that you can apply them across the organization.
That’s all there is to setting up file auditing in Group Policy. You also need to enable auditing on the folder that you want to monitor. On the file server where the folder is located, follow these steps:
- Right-click the folder that you want to enable auditing on and choose Properties.
- Click the Security tab, and then click the Advanced button.
- Click the Auditing tab, and then click the Add button.
- Click the Select a Principal hyperlink, enter a username or group in the dialog box, and click OK.
- Change the Type drop-down list to All, and click OK.
- Click OK again to exit the Advanced Security Settings for <folder_name> dialog box.
- Click OK one more time to close out of the Properties dialog box.
Working with Files and Folders
Working with files and folders is pretty much the bread and butter of a system administrator’s work. Although some folders can be left open to the world, you’ll most likely be asked to lock certain folders or shares down so that only certain people can access them. On Windows Server, you can have conflicting NT File System (NTFS) and share permissions, which can make troubleshooting access issues much more difficult. Let’s examine the different types of permissions and how we can check effective permissions.
Setting file and folder security
With NTFS, we gained the ability to be able to set ACLs, a huge improvement over the FAT32 days. Although file servers do take advantage of NTFS permissions, they can also use shares. The idea behind shares is to make it so that users can access a directory on the server without direct access to the server. That’s a great win for security, but the effective permissions (the combined permissions of the NTFS permissions and the share permissions) can sometimes cause unexpected access issues.
NTFS permissions
Editing the NTFS permissions on a file or folder is simple: Simply right-click the folder or file that you want to change permissions on and click Properties. Then click the Security tab (see Figure 1-5). There are several different levels of permissions in NTFS file systems:
- Full Control: Full Control gives you the ability to read, write, and execute files within a folder, as well as the ability to set permissions. It also allows for the ability to delete files and folders. Full Control is a highly privileged level of permission and should only be granted to those who have administrative access.
- Modify: Allows you to change the contents and/or titles of folders and files, and allows for the deletion of files and folders.
- Read & Execute: Allows you to open files and folders, and launch programs including scripts.
- List Folder Contents: Allows you to view the titles of files and folders, but does not allow you to open the files.
- Read: Allows you to open the files to read them, but does not allow you to modify them.
- Write: Allows you to add a file or subfolder and make changes to a file.
- Special Permissions: These are special sets of permissions that are set through the Advanced dialog box.
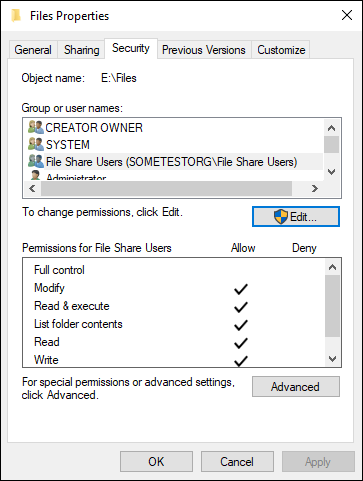
FIGURE 1-5: You can set permissions very granularly with the Security tab in the File Properties dialog box.
Share permissions
Share permissions are set using the Sharing tab is the File Properties dialog box (refer to Figure 1-5) — just click the Advanced button and then click Permissions. Share permissions are much simpler than NTFS permissions. You see something similar to Figure 1-6.
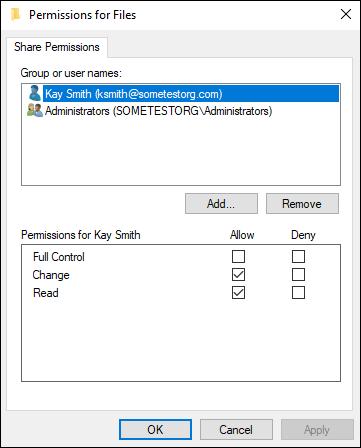
FIGURE 1-6: Share permissions allow you to grant Full Control, Change, or Read access to users or groups.
You have three simple levels of permissions that you can set on a share:
- Full Control: Allows you to read, modify, and delete items within the share. You can also change permissions and take over ownership of the files.
- Change: Allows you to do everything that Full Control can with the exception of setting permissions.
- Read: Allows you to view files and folders, but not edit in anyway.
Effective permissions
Effective permissions are the ones that can cause problems. You may get your permissions set up right, but then a user calls in and says he can’t access his files. In Windows Server 2016, Microsoft introduced an Effective Permissions tab that allows you to check what permissions a user will actually have based on the combination of NTFS permissions and share permissions.
To get to the Effective Permissions tab, follow these steps:
- Right-click the folder that you want to check and select Properties.
- Click the Security tab.
- Click Advanced.
- Click the Effective Access tab.
- Click Select a User, and enter the username of the person whose permissions you want to check.
-
Click View Effective Access.
You see a screen similar to Figure 1-7. It shows you that my user Kay Smith doesn’t have permissions to the folder. In reality, she has no NTFS permissions, although she does have share permissions. Because she has no NTFS permissions, she is denied.
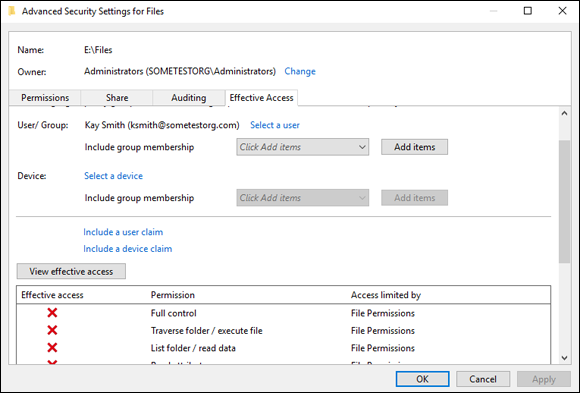
FIGURE 1-7: Checking the effective permissions of a user account is a great way to validate if she has the permissions you expect her to have.
Creating a Local Security Policy
Local security policies allow you to define quite a few settings related to the computer that you’re on. They can be very useful if you need a setting to be applied on a specific server that is not currently being applied by Group Policy. Local policy applies to the server first, followed by AD Group Policy. If there is a conflict between the settings of the Local Security Policy and the AD Group Policy, the settings in the AD Group Policy will apply because it’s applied to the system after the Local Security Policy. To access the Local Security Policy, follow these steps:
- Click the Start menu.
-
Type secpol.msc and press Enter.
The Local Security Policy window opens.
From this screen, you can change quite a few settings related to the security of your system. If file server auditing is not enabled, for instance, you can turn it on for this individual server. See an example of the Local Security Policy in Figure 1-8.
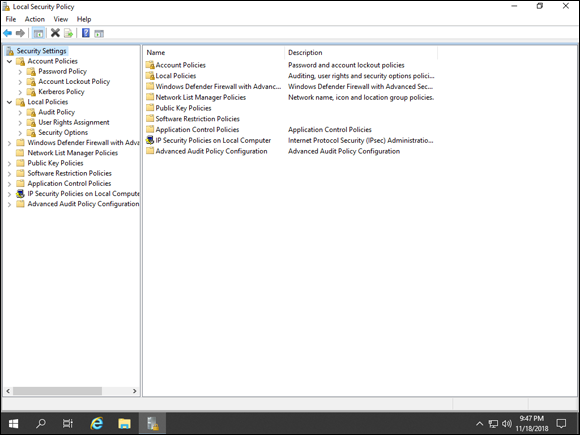
FIGURE 1-8: The Local Security Policy screen allows you to set local security settings on your system.
- Account Policies: Account Policies contains the Password Policy, Account Lockout Policy and Kerberos Policy. The Password Policy allows you to set password requirements. The Account Lockout Policy defines when an account will be locked out and for how long it will be locked. The Kerberos Policy allows you to define the lifetime for the different ticket types.
- Audit Policy: The Audit Policy is located under Local Policies. It allows you to specify which types of events you want to audit. These can be set to Success, Failure, or both.
- User Rights Assignment: User Rights Assignment is the second section under Local Policies. This allows you to assign accounts to various things on the system. For instance, if you have a service account that is used to launch non-interactive scripts, you need to add the user account to the logon as a batch job section.
- Security Options: Security Options is also located under Local Policies. This is a long list of security settings that can be defined for your system. They’re organized into like groups of configuration options like Accounts, Audit, DCOM, Devices, Domain Controller, Interactive Logon, Microsoft Network Client, Microsoft Network Server, Network Access, Network Security, Recovery Console, Shutdown, System Cryptography, System Objects, System Settings, and User Account Control.
- Advanced Audit Policy Configuration Settings: This area is all about auditing and the types of things that you can audit. It allows you to set up auditing for all different categories of events including: Account Logon, Account Management, Detailed Tracking, DS Access, Logon/Logoff, Object Access, Policy Change, Privilege Use, System, and Global Object Access Auditing.
Paying Attention to Windows Security
The Windows Security app provides a central location to view the security health of your system. You can view the status of your antivirus software under Virus & Threat Protection, check your firewall settings in Firewall & Network Protection, look at whether an app is trusted with App & Browser Control, and gain additional protections with Device Security.
Virus & Threat Protection
Virus & Threat Protection is a full-featured anti-malware solution. It’s able to check for regular updates and does scheduled and real-time scanning. It even provides ransomware protection capabilities. Check out Figure 1-9 for an idea of what the Virus & Threat Protection dashboard looks like.
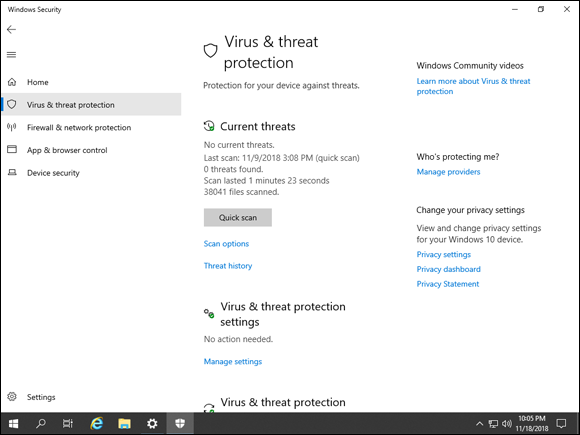
FIGURE 1-9: The Virus & Threat Protection dashboard offers a full featured anti-malware solution.
You can choose the settings for the Virus & Threat Protection screen across the organization using Group Policy. Simply make the changes that you want to push out to the organization by opening the Group Policy Management Editor. Open the Group Policy Object that you want to edit, and then double-click on Computer Configuration, followed by Policies, then Administrative Templates, then Windows Components, and then Windows Defender Antivirus.
Firewall & Network Protection
The Firewall & Network Protection area allows you to work with the various profiles in your Windows Firewall. You have a private profile and a public profile, and if your system is domain-joined, you have a domain profile as well. From here, you can add exceptions for applications so that they’re allowed through the firewall and you can adjust the notification settings of the Windows Firewall. See Figure 1-10 for an idea of what the Firewall & Network Protection area looks like.
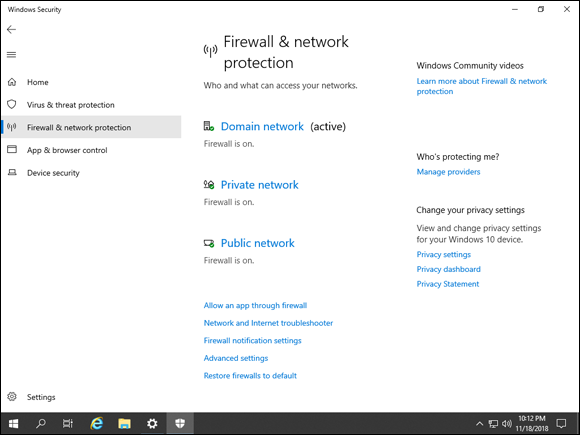
FIGURE 1-10: Changing the firewall settings from Firewall & Network Protection is simple with the links provided.
App & Browser Control
The App & Browser Control section is able to protect your system by checking applications and files that are downloaded from the web for threats. You can set it to block or warn when it comes across these files, or you can turn it off. The default is set to warn. In addition you can tweak the exploit protection settings built into Windows Server 2019 by clicking Exploit Protection Settings. App & Browser Control is shown in Figure 1-11.
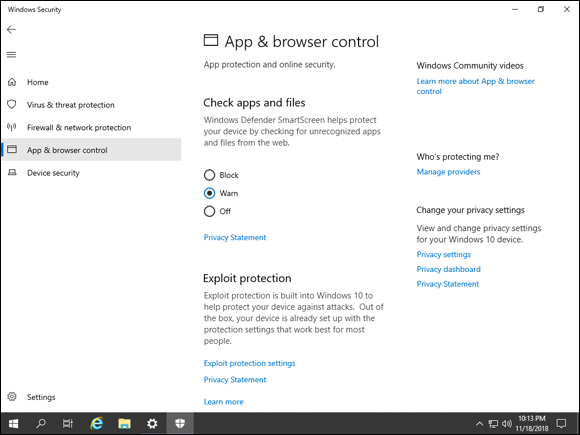
FIGURE 1-11: App & Browser Control gives you the ability to protect yourself against downloaded executables and files, as well as configure Exploit Protection.
The Exploit Protection screen is worth a little more scrutiny (see Figure 1-12). It can protect you against multiple types of exploits and is on by default. It features Control Flow Guard, which helps to ensure the integrity of indirect calls made to the system, and Data Execution Prevention, which prevents code from being run in memory pages that are reserved for data. Plus, it offers Address Space Layout Randomization (ASLR), which provides randomization for the locations where executables are stored in your server’s memory. This provides protection against buffer overflow attacks.
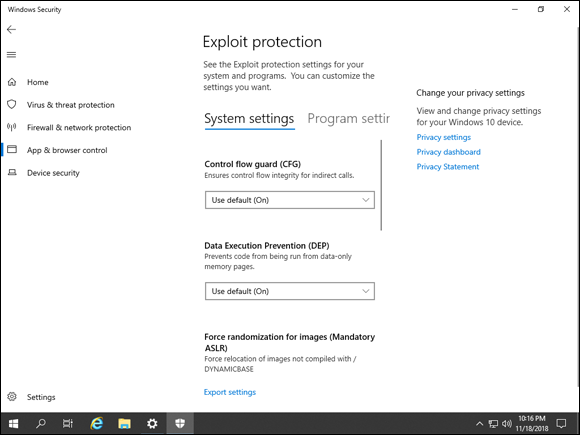
FIGURE 1-12: Exploit Protection provides several more advanced mechanisms to protect your system, already enabled by default.
Device Security
Last but not least is the Device Security section, which provides utilities that allow you to interact with your Trusted Platform Module (TPM) chip (if you have one) and virtualization controls. The TPM is a chip on your motherboard that generates cryptographic keys and keeps half of the key; the other half of the key is stored on disk. This prevents a thief from stealing a hard drive and decrypting it on another system. There is a button to clear the TPM, and users can receive recommendations to update their TPM firmware when there is an update available. There is also a Hypervisor Control Integrity setting that you can use to enable or disable this functionality. It’s used to determine if software running in kernel mode like drivers is safe software. You can see in Figure 1-13 that the Hypervisor Control Integrity piece is running on my virtual machine, but it has no TPM exposed to it, so the TPM options do not exist.
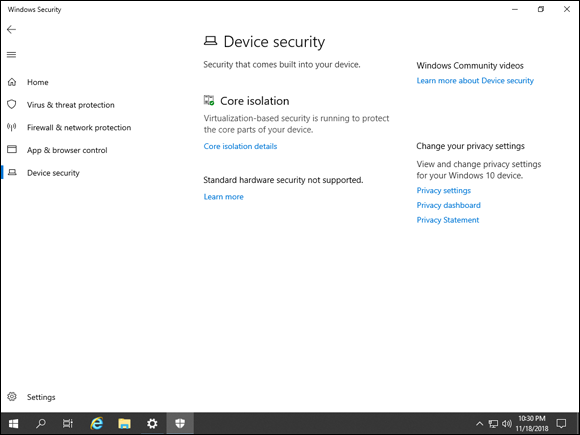
FIGURE 1-13: The Hypervisor Control Integrity feature is shown under Core Isolation on this virtual machine.
If you click Core Isolation Details, you can adjust the settings for Hypervisor Control Integrity. You’re presented with a simple slider switch that allows you to enable or disable memory integrity.
 A hash is a mathematical function that is run against a file. It creates a unique “thumbprint” that will change if any modifications are made to the file that it was generated from. By comparing the thumbprints of two files (the original and a copy, for instance), you can tell if the file has been modified.
  Share permissions govern what a user can access across the network. NTFS permissions control what a user can do both on the server and across the network.