Chapter 3
Configuring Operating System Security
IN THIS CHAPTER
 Examining User Account Control and what it can do for you
Administering user passwords in Windows Server 2019
Understanding and configuring Credential Guard
Configuring the startup and recovery options in Windows Server
Windows Server 2019 provides multiple built-in security mechanisms that allow you to better secure your system for no extra cost past that of the server OS license.
In this chapter, you learn about some of these built-in mechanisms — how they work and how to take advantage of them.
Understanding and Using User Account Control
You can’t have a discussion about Windows internal security without a discussion of User Account Control (UAC). Love it or hate it, it serves a purpose.
Using User Account Control to protect the server
If you’ve worked with Windows operating systems at all, you’ve no doubt been prompted that something is trying to install. You’ve most likely received a screen similar to Figure 3-1, rolled your eyes, and allowed it. This interruption is annoying when you’re trying to install something, but imagine if it prompted you to install something when you weren’t attempting an install. This is what UAC is designed to protect against.
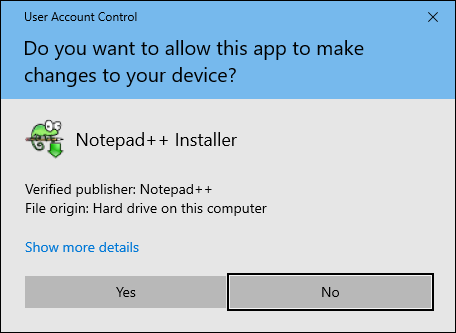
FIGURE 3-1: The familiar User Account Control window protects your system from unauthorized software or unauthorized users.
In the past, if you accidentally went to a website or opened an email that had malware, that malware could potentially run with administrator permissions without interference, and you wouldn’t even know that it had run. UAC shored up this weakness. Now, if you download malicious code and it attempts to elevate its privileges, you’re prompted with the familiar box asking if you want to allow it to run as administrator. This gives you the ability to stop it from even getting the chance to run in the first place.
 It’s not a good idea to access the Internet on a server. It may even be against your organization’s policies. If you must download software for your server from the Internet, download it to your workstation first, and then copy it to the server.
Running tasks as administrator
You may be wondering how you can tell if an application will give you a UAC prompt when you run it. If the application’s icon has a small shield in its lower-right corner, you’ll get a UAC response from it.
 UAC is great for interactive sessions, but what if you’ve scheduled tasks that you need to run. These tasks are run in a non-interactive session, so how do you get them to run as administrator without UAC interfering? When you’re creating the task in Task Scheduler, make sure that you select the Run Whether a User Is Logged On or Not radio button, and select the Run with Highest Privileges check box. With those items selected, your scheduled tasks will be able to run as administrator with no interference from UAC.
Watching out for automatic privilege elevation
This feature allows administrative accounts to go about their business without receiving any of the UAC prompts. Sounds great, right? The downside is that this is very similar to what you would get if you turned off UAC completely.
Maybe you understand the risks inherent with doing this, and you still want to have automatic privilege elevation. If so, see the “Using the Local Security Policy to Control User Account Control,” later in this chapter. There, I go over the necessary steps to allow automatic privilege elevation.
Overriding User Account Control settings
There are several ways to override or permanently disable UAC. Some methods provide more granularity than others. I never recommend permanently disabling UAC. I do, however, recommend tuning it so that it works more seamlessly with your users and administrators. UAC is protecting your system, after all, so it’s best to allow it to do exactly that.
Working with User Accounts in Control Panel
One of the common methods for dealing with UAC is to just turn it off when it annoys you. I don’t recommend this course of action, but it can be accomplished quite easily with the User Accounts applet:
- Open the Control Panel, and click User Accounts.
- Click User Accounts again.
- Click Change User Account Control settings, as shown in Figure 3-2.
-
In the User Account Control Settings box, choose Never Notify (see Figure 3-3).
Your four options are as follows:
- Never Notify
- Notify When Apps Try to Make Changes (Don’t Dim the Desktop)
- Notify When Apps Try to Make Changes (Default)
- Always Notify When Apps Try to Make Changes or You Try to Make Changes
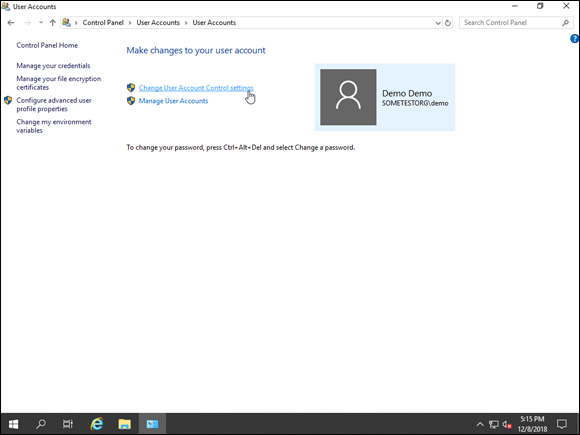
FIGURE 3-2: Turning off User Account Control in User Accounts is simple, but it should be done with caution.

FIGURE 3-3: Choosing Never Notify disables UAC for the logged-in user.
Using the Local Security Policy to control User Account Control
In most cases, you’re going to want more granularity than you have through User Accounts in the Control Panel. This is where the Local Security Policy is really handy.
To bring up the Local Security Policy box, click the Start Menu and then type secpol.msc and press Enter. Select Local Policies and then Security Options and scroll all the way down. You see multiple options for UAC configuration toward the bottom, all sorted by User Account Control, as shown in Figure 3-4. If you want to change these settings across your organization, make the changes discussed here in Group Policy instead of the Local Security Policy.

FIGURE 3-4: The Local Security Policy allows for more granular configuration of User Account Control.
I promised you earlier in this chapter that I would show you how to automatically elevate administrative permissions without the UAC prompts. Here’s how:
- Double-click User Account Control: Behavior of the Elevation Prompt for Administrators in Admin Approval Mode.
- Select Elevate without Prompting and click OK.
This automatically elevates your permissions as needed.
Several other settings are also behaviors you can choose from for Admin Approval Mode:
- Elevate without prompting: Allows a privileged account to run executables and make changes to the system with no prompts.
- Prompt for credentials on the secure desktop: The user’s screen will be dimmed, and the user will be asked for credentials. The user will not be able to interact with the desktop until he either enters credentials or cancels the operation that he was attempting.
- Prompt for consent on the secure desktop: The user’s screen will be dimmed, and the user will be asked to permit or deny the action. The user will not be able to interact with the desktop until he makes a choice.
- Prompt for credentials: When something requires administrative privileges, the user is prompted for administrative credentials.
- Prompt for consent: When something requires administrative privileges, the user is asked to permit or deny the action. If the user permits it, it will run with the user’s highest level of permissions. If the user doesn’t have high enough permissions, then the action will not occur.
- Prompt for consent for non-Windows binaries (default): When something that is not a Windows program requires administrative privileges, the user is asked to permit or deny the action. If the user permits it, it will run with his highest level of permissions. If the user doesn’t have high enough permissions, then the action will not occur.
Managing User Passwords
With most systems today, passwords are managed by Active Directory — the exception to that being in a workgroup environment, where password management is done locally on each system. Understandably a lot of people don’t have the best understanding of how to manage local passwords. Luckily, Windows Server 2019 happens to have a tool that simplifies working with passwords locally and on the network.
Regardless of whether you’re using a local sign-on or a domain account to sign on, Windows Server 2019 (and Windows 10!) uses a product called Credential Manager to save your web and Windows credentials. You can access Credential Manager in the Control Panel by clicking User Accounts and then clicking Credential Manager.
The great thing about Credential Manager is that it gives you the ability to save credentials so that you can have an almost single sign-on type of experience. You can back up and restore credentials, as well as add Windows credentials, certificate-based credentials, and generic credentials all from the same pane of glass, shown in Figure 3-5.
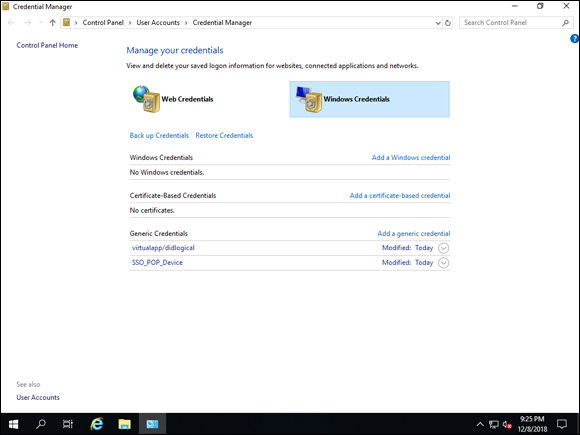
FIGURE 3-5: Credential Manager allows you to manage your network passwords from one single location.
Understanding Credential Guard
Credential Guard was introduced in Windows Server 2016 as a way to mitigate some of the password attacks that were becoming more common. It protects just about anything that could be considered a credential on a Windows server including NT LAN Manager (NTLM) password hashes, Kerberos Ticket Granting Tickets (TGT), and credentials that are stored by applications as domain credentials. NTLM was a protocol that was developed by Microsoft to facilitate authentication. It stores hashed password values on the server or on the domain controller. Kerberos provides stronger encryption capabilities and uses ticket-based authentication. The ticket granting ticket (TGT) is used to request access to resources. Credential Guard is available on Windows Server 2016/Windows 10 and newer.
Do not enable Credential Guard on Domain Controllers. It can cause crashes.
How Credential Guard works
Traditionally, Windows stored secrets in the Local Security Authority (LSA). These secrets were stored in memory, which made them vulnerable to credential theft. With Credential Guard enabled, LSA talks to the newer isolated LSA process that protects secrets with virtualization-based security. Secrets are no longer stored in memory and are much better protected against credential theft. Hacking tools like Mimikatz can’t extract credentials from memory anymore, which provides a layer of protection for credentials that didn’t exist before Credential Guard.
 Credential Guard is not designed to protect credentials that are stored in Active Directory or the Security Accounts Manager (SAM). It’s designed to protect secrets while in use so that they aren’t being stored in memory where they can be stolen.
Credential Guard Hardware Requirements
To support Credential Guard, there are a few requirements that need to be met. Most modern systems should be able to meet these requirements without any difficulty:
- Hardware must support virtualization-based security.
- You need a 64-bit CPU.
- Your CPU must support virtualization extensions (Intel VT-x or AMD-V) and extended page tables (SLAT).
- Your system needs to be able to run the Windows hypervisor, Hyper-V.
- Hardware must support secure boot.
- You must have TPM version 1.2 or 2.0.
- UEFI lock is preferred, though not a requirement. It prevents an attacker from disabling Credential Guard with a registry change.
- The UEFI firmware on your server must support secure boot and be on firmware version 2.3.1.c or higher.
How to enable Credential Guard
You have a few options for enabling Credential Guard. In this section, I cover the most common methods you would use in an Enterprise setting. Group Policy is one of the more common methods because it will apply to any domain-joined system. The registry can also be a very useful method, especially if you have systems that aren’t domain-joined.
Group Policy
Enabling Credential Guard by Group Policy is by far the simplest method because it has the least amount of steps and room for error. Follow these steps:
- From Server Manager, click Tools and then click Group Policy Management.
- Expand Forest and Domains, and then expand the domain you want to apply Credential Guard to.
- Right-click Group Policy Objects and select New.
-
Name your policy and click OK.
I named mine Credential Guard.
- Expand Group Policy Objects if you haven’t already and click your new policy to select it.
- Right-click your policy and choose Edit.
-
Navigate through Computer Configuration, then Policies, then Administrative Templates, then System, and then Device Guard.
 Device Guard is used to prevent malicious code from running, while Credential Guard is focused on protecting credentials from compromise. They’re different features but complement each other very well.
 - Double-click Turn On Virtualization Based Security and select Enabled.
-
Under Select Platform Security Level, choose Secure Boot.
Secure boot prevents unauthorized software and/or drivers from loading as the system starts. -
In the Credential Guard Configuration box, select Enabled with UEFI Lock.
Your settings should look like Figure 3-6.
- If your settings match Figure 3-6, click OK.
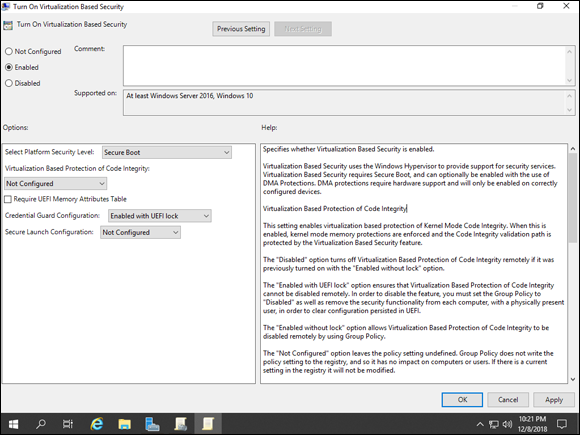
FIGURE 3-6: Enabling Credential Guard with Group Policy is the simplest and fastest method of deployment.
Registry
On some systems, you can’t apply Group Policy and you need another means of enabling Credential Guard. There are a few steps that you will need to perform to enable it through the registry. This section walks you through each of these steps.
ENABLE VIRTUALIZATION-BASED SECURITY
This first step only needs to be performed if the system on which you want to turn Credential Guard on is a Windows 10 build prior to build number 1607. Windows Server 2016 and newer does not require this step.
- Open the Registry Editor by clicking the Start Menu and typing regedit.exe and then pressing Enter.
- Navigate to HKEY_LOCAL_MACHINE\System\CurrentControlSet\Control\DeviceGuard.
- Add the following DWORDS to the DeviceGuard key by right-clicking DeviceGuard and choosing New, and then choosing DWORD (32-bit) Value.
- EnableVirtualizationBasedSecurity: Set the value to 1 to enable.
- RequirePlatformSecurityFeatures: Set the value to 1 for Secure Boot.
You can see the newly created DWORDs in Figure 3-7. When these DWORDs are created, you can turn on Credential Guard.
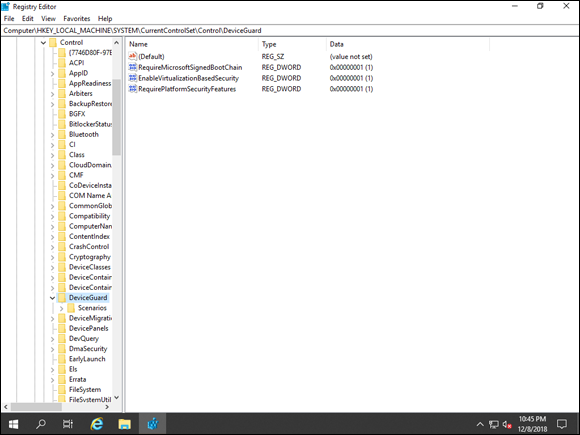
FIGURE 3-7: With the two keys set that enable virtualization-based security, you can enable Credential Guard.
ENABLE CREDENTIAL GUARD
The second step in this adventure is to actually enable Credential Guard. If you’re on Windows Server 2016 or newer, or Windows 10 1607 or newer, you may have skipped right to this step. If you aren’t sure how to access the Registry Editor, check Step 1 in the preceding section.
- With Registry Editor open, navigate to HKEY_LOCAL_MACHINE\System\CurrentControlSet\Control\Lsa.
- Add a new DWORD named LsaCfgFlags and set the value to 1 to enable Credential Guard with UEFI lock.
- Close the Registry Editor.
These settings will take effect after a reboot, because they were made in the HKEY_LOCAL_MACHINE (HKLM) hive.
Configuring Startup and Recovery Options
If you need to configure the Startup and Recovery settings for your server, you can do this through the Advanced System Properties dialog box in Windows Server 2019.
The Startup and Recovery dialog box allows you to choose things like which OS you want the system to start with (if you have multiple operating systems installed), the time to show the list of the operating systems, and the amount of time to show recovery options. You can also configure System failure to automatically restart the systems and whether you want it to create a memory dump or not. You can see these options in Figure 3-8.
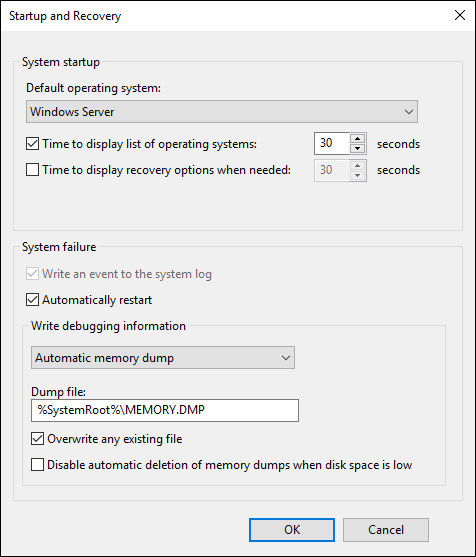
FIGURE 3-8: The Startup and Recovery dialog box allows you to set the startup and recovery functionality that you want your server to use.
You may be thinking, “Well, that’s cool, but how do I get to the Startup and Recovery dialog box?” I’m glad you asked. Follow these steps:
- Click Start and then click the Control Panel tile.
- Click System and Security.
- Click System.
- Click Advanced System Settings, shown in Figure 3-9.
- Click the Advanced tab, and then click the Settings button in the Startup and Recovery section.
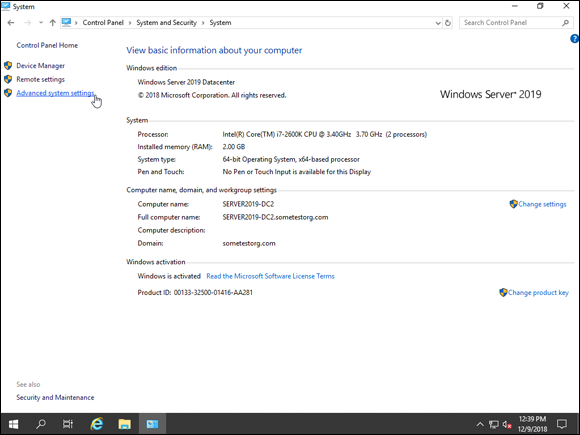
FIGURE 3-9: To access Startup and Recovery, you need to select Advanced System Settings.
In the Startup and Recovery dialog box, you can set the default operating system that you want to boot to, as well as how long you want the list of available operating systems to show up. This setting is helpful if you have multiple operating systems installed on the same server, and you want to specify which operating system should be considered the default. You can also configure what you want the system to do in the event of a failure, and whether you want a memory dump to occur, as well as where you want it stored, as shown in Figure 3-10. By default, if it encounters a failure, Windows Server 2019 automatically restarts and creates a memory dump. The memory dump is helpful later in diagnosing the issue that caused the system to fail.

FIGURE 3-10: The Startup and Recovery dialog box allows you to configure the startup and recovery behavior of Windows Server 2019.
And there you have it. That’s how you change the startup and recovery options in Windows Server 2019.