Chapter 4
Working with the Internet
IN THIS CHAPTER
 Understanding the Basics of the Windows Defender Firewall
 Configuring and Managing the Windows Defender Firewall in Windows Server 2019
There are few things more basic to security than the principle of keeping bad things out and letting good things in. You may choose to block or restrict inbound traffic from risky protocols or port numbers. You might even lock down outbound traffic to only approved protocols and port numbers. Defining the acceptable forms of inbound and outbound traffic is typically accomplished with the Windows Defender Firewall.
In this chapter, I introduce you to the Windows Defender Firewall, including the configuration and usage tasks that every System Administrator should know.
Firewall Basics
The Windows Defender Firewall is a stateful firewall. This means that you can create a rule to allow inbound traffic, and established traffic will automatically be let back out. If you create an outbound rule, traffic going out will automatically be allowed back in. It can inspect all traffic passing through it and track the state of the connection. This is a great improvement over the older, traditional firewalls, referred to as stateless firewalls, for which you had to create a rule to allow traffic in both directions in an access control list. Stateless firewalls do not inspect traffic; they only allow or block based on source and destination IP addresses or ports.
The Windows Defender Firewall, like most of the firewalls out there, operates on a default deny for inbound connections. Essentially, if there is not a rule allowing traffic in, then it will be blocked. Outbound connections are typically allowed by default.
Getting acquainted with the Windows Defender Firewall profiles
The Windows Defender Firewall uses profiles to define trust levels of network traffic. The profiles can be assigned to specific network adapters, though by default all the profiles are enabled for each network adapter. As an example, the domain profile is used when a system is connected to a domain and will typically be more permissive than the public profile, which is designed to be used when a network adapter is connected to an untrusted network like the Internet.
The Windows Defender Firewall has three profiles:
- Domain: This profile is available only if the system is joined to a domain. It’s the least restrictive of the profiles.
- Private: This profile is used if the system is sitting on a network that it has no association with; for instance, a system on a network that doesn’t have a domain would use the Private profile. The Private profile should be more restrictive than the Domain profile because there is less trust on a Private network than on a Domain network.
- Public: This profile is used when a connection is made to a public network like a hotel, restaurant, or coffee shop. It should be the most restrictive profile because it’s connecting with the least amount of trust to the network.
Enabling and disabling the Windows Defender Firewall
When you’re troubleshooting connectivity issues, the typical request is, “Can we disable the firewall?” I can’t tell you how often I was asked to do this by a vendor when troubleshooting connectivity issues with their applications. Technically, it is possible to disable the Windows Defender Firewall, but you should check your organization’s policy as to whether you’re allowed to do so.
With that disclaimer out of the way, let’s look at how to disable and enable the Windows Defender Firewall. There are three ways to enable and disable the firewall. You can do it through the graphical user interface (GUI), through PowerShell, or through the command line.
Disabling/enabling through the graphical user interface
Disabling the firewall through the GUI is definitely the longest process of the three. You can’t simply disable all at once; instead, you have to turn it off for each individual profile.
Here are the steps involved with turning off the firewall for the Domain profile (the steps are the same for the Public and Private profiles, just substitute the desired profile in Step 4):
- Right-click the Start menu and click the gear icon to go into the Settings menu.
- Click Update & Security and select Windows Security.
- Under Protection areas, click Firewall & Network Protection (shown in Figure 4-1).
-
Click Domain Network (Active).
 If you don’t see a domain profile, it’s because the system is not connected to a domain. This profile does not show up unless the system is domain joined.
 - To disable the Windows Defender Firewall, click the Windows Defender Firewall toggle switch, currently in the on position in Figure 4-2, to slide it to off.
- To re-enable the firewall, simply click the toggle switch again to slide it back to the on position.
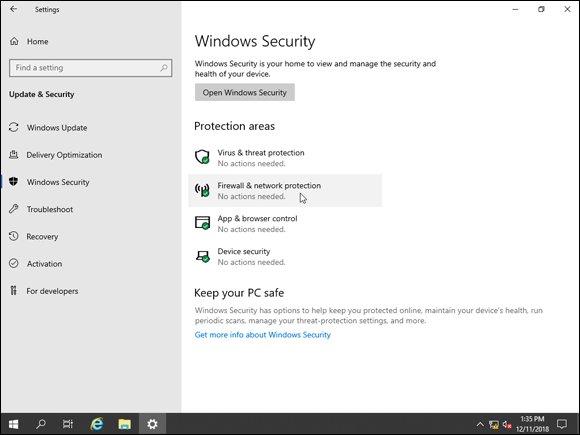
FIGURE 4-1: Windows Defender Firewall settings are available through the Windows Security app in Update & Security.
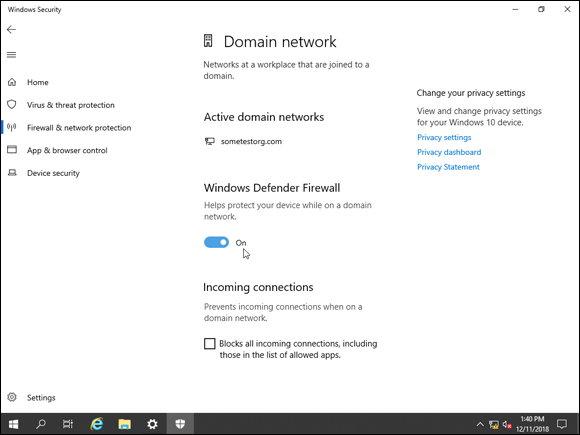
FIGURE 4-2: Each Windows Defender Firewall profile can be disabled individually with the toggle switch.
Disabling/enabling through PowerShell
One of the methods to disable or enable the firewall is with PowerShell. It’s a simple one-line command to turn it off for all the Windows Defender Firewall profiles or to turn it off for a specific profile. Here’s the command to disable the firewall for all profiles:
Set-NetFirewallProfile -Profile Domain,Public,Private -Enabled False
To re-enable the firewall for all profiles, use the following:
Set-NetFirewallProfile -Profile Domain,Public,Private -Enabled True
If you only want to disable/enable one of the profiles, you would use just that profile name instead of Domain,Public,Private.
Disabling/enabling through the Command Prompt
Disabling and enabling via the Command Prompt is a one-line command that can be used to disable or enable all or specific profiles. Here's how to disable the firewall for all profiles:
netsh advfirewall set allprofiles state off
To re-enable the firewall for all profiles, use the following:
netsh advfirewall set allprofiles state on
If you only want to disable/enable one of the profiles, you would use just that profile name (domain, public, or private) instead of allprofiles.
Configuring Windows Defender Firewall with Advanced Security
To configure Windows Defender Firewall, you need to get into the Advanced Settings. Follow these steps:
- Right-click the Start menu and click the gear icon to go into the Settings menu.
- Click Update & Security and select Windows Security.
- Under Protection Areas, click Firewall & Network Protection.
- Scroll down and click Advanced Settings.
The Advanced Settings screen looks familiar if you’ve worked with Windows Defender Firewall in the past. It shows you, at a glance, which profiles are enabled, as well as a basic overview of what kind of blocking state the firewall is in (see Figure 4-3).
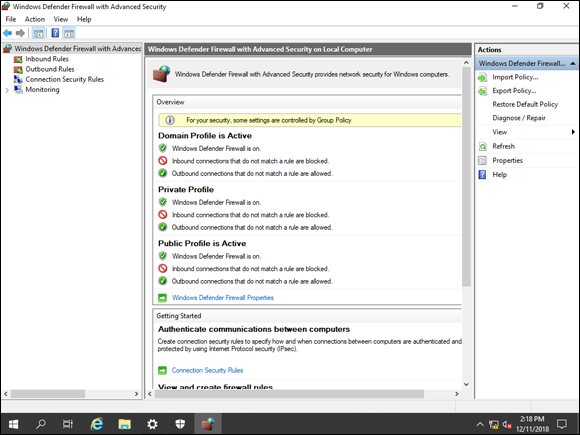
FIGURE 4-3: The Advanced Settings screen of the Windows Defender Firewall allows you to make granular changes to the way the firewall behaves.
The left side of the screen give you several options:
- Inbound Rules: If an inbound connection doesn’t match a rule in the Inbound Rules area, then by default it will be blocked. Clicking this area gives you the ability to enable built-in rules or create custom rules.
- Outbound Rules: If an outbound connection doesn’t match a rule in the Outbound Rules area, then by default it will be allowed. Clicking this area gives you the ability to enabled built-in rules or create custom rules.
- Connection Security Rules: This area allows you to configure your system to use IPSec to protect communications between endpoints.
- Monitoring: This area lets you see at a quick glance which profile rules are enabled and if there are any connection security rules configured. It also lets you see if there are any Security Associations set up currently. See the “Understanding IPSec” section, later in this chapter, if you aren’t sure what an SA is.
Working with profile settings
For most people, the default profile settings work well. But what if you work for an employer who wants to be very strict about outbound connections not allowing traffic out unless it’s explicitly allowed? You can change the behavior of the profile.
From inside the Advanced Settings screen, right-click Windows Defender Firewall with Advanced Security and select Properties. You see tabs for each of the profiles and a tab for IPSec. Start with the tab for the Public Profile, shown in Figure 4-4.
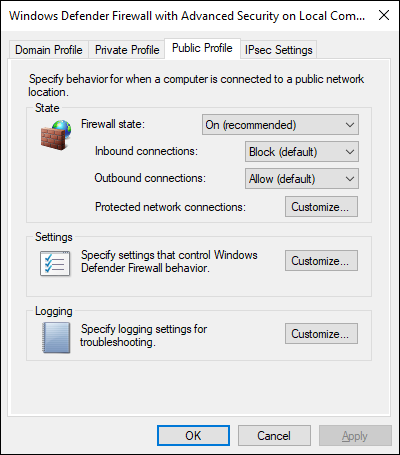
FIGURE 4-4: Profiles can be changed from the default behavior in the Properties screen for Windows Defender Firewall.
There are a few settings that I want to call your attention to:
- Firewall State: Here you have the choice of on or off. This can be set to disable or enable the firewall for the specific profile you’re on.
-
Inbound Connections: You have three options here:
- Block: Blocks anything that is not allowed by a rule.
- Block All: Blocks everything regardless of whether there is a rule allowing it or not.
- Allow: Allows traffic regardless of whether the traffic is allowed by a rule.
The default setting for this is Block.
-
Outbound Connections: You have two options:
- Block: Blocks anything that is not allowed by a rule.
- Allow: Allows traffic regardless of whether the traffic is allowed by a rule.
The default setting for this is Allow.
- Protected Network Connections: Clicking this button will allow you to select which network adapters you want the profile to be applied to.
- Settings: Clicking the Settings button lets you customize the settings of the profile that you’re on. This includes the settings regarding notifications, allowing unicast (one-to-one transmission), and whether you want to merge rules that are pushed out through Group Policy.
- Logging: The Logging button allows you to change the location of the firewall logs, set the size limit of the logs, and choose whether you want to log dropped packets and/or successful connections.
As you can probably tell, you can get very specific in terms of how you want a profile to behave and where you want that profile to apply to.
Working with inbound/outbound rules
Windows Server 2019 has quite a few firewall rules already created for you. The ones that are essential to the server to allow it to function properly are already enabled. Rules that support core networking functions and file and print sharing are great examples of that. When you install new roles and features, the firewall rules for these roles and features are automatically enabled as well.
Enabling prebuilt rules
Enabling the prebuilt rules is very simple: Simply right-click the rule that you want to enable and choose Enable Rule, as shown in Figure 4-5.
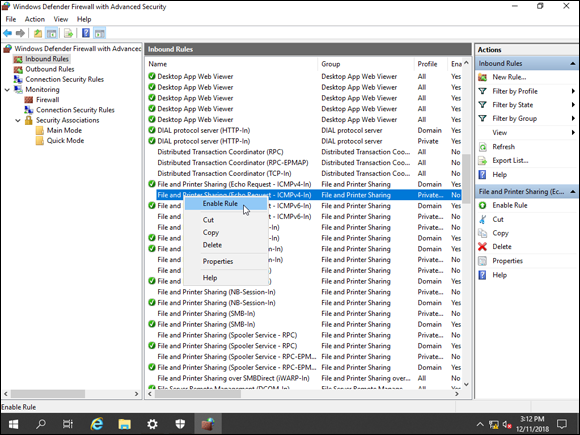
FIGURE 4-5: Enabling prebuilt rules can be done from the main screen. No need to open the rule in question.
To disable the rule, simply right-click it and choose Disable Rule.
Creating a custom rule
The prebuilt rules are convenient, but they tend to be very specific to Microsoft services. What if you need to install a vendor product with specific port needs?
Let’s create a rule from a use case: You’re a system administrator, and you’ve been asked to allow inbound connections to a domain-connected system hosting a MySQL database. You know that MySQL needs TCP port 3306, so let’s create a rule to allow this traffic:
- Select Inbound Rules and then click New Rule (located in the menu on the right side of the screen).
- On the Rule Type screen, select Port and click Next.
- On the Protocols and Ports screen, leave the TCP selected and with Specific Local Ports selected, type 3306 into the text box, and then click Next.
- On the Action screen, select Allow the Connection, and then click Next.
- On the Profile screen, leave Domain checked, but uncheck Private and Public, and then click Next.
- On the Name screen, give it a meaningful name, and then click Finish.
In Figure 4-6, you can see the rule that I created at the top. You can tell that it’s already enabled because it has the green check mark beside it.
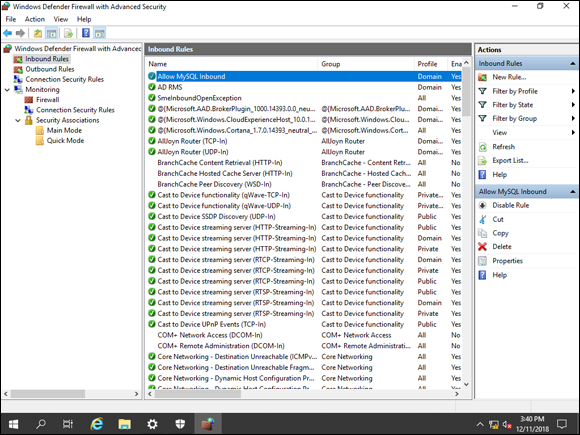
FIGURE 4-6: The custom rule created for MySQL will allow inbound TCP/3306 traffic coming from the domain.
I can hear the voice inside your head saying, “That was easy, but where is the granularity?” You can get exceptionally granular on the rule. Let’s take a peek at the settings. Double-click a rule. I’ll use the MySQL rule that I just created.
There are eight tabs in all. Each tab allows for you to make a change to the rule. Some of the settings are the basic stuff that you set when you initially created the rule; others allow for more granularity than what was inside the rule wizard:
- General: This tab allows you to adjust the name of the rule, whether it’s enabled, and whether you want to allow or block the traffic.
- Programs and Services: This tab allows you to specify an application or service that should be allowed through the firewall.
- Remote Computers: On the Remote Computers tab, you can choose to allow connections from only specific computers or to skip the rule for specific computers.
-
Protocols and Ports: The Protocols and Ports tab allows more depth than the wizard does when Port is selected. When I created the rule, I had the choice between TCP and UDP because I chose a Port rule. On this screen, however, I have many more options, shown in Figure 4-7. I could get these through the wizard if I chose Custom instead of Port.
I can change the local and remote ports on this tab as well. Currently, in my rule, I have TCP 3306 allowed.
- Scope: The Scope tab allows you to determine who should be allowed to connect. Local IP, for example, may be set if your system has multiple IP addresses but you only want to allow the connection from the rule through one of the IP addresses. By using the Remote IP, you’re setting which IPs the application on the server can reach out to. This can increase security posture greatly; for instance, with my MySQL server, maybe I only want to allow it to talk to the application server, but not the web server. I can set that with Scope.
- Advanced: Advanced allows me to set which profiles to apply this rule to, which network adapter to apply it to, and whether you want to allow edge traversal. Normally, you want this to be set to Block Edge Traversal, which is the default setting.
- Local Principals: The Local Principals tab allows you to set specific local users who are allowed to connect through the rule, or specify which users should be able to skip the rule.
- Remote Users: The Remote Users tab allows you to set specific remote users who are allowed to connect through the rule, or which users should be able to skip the rule.
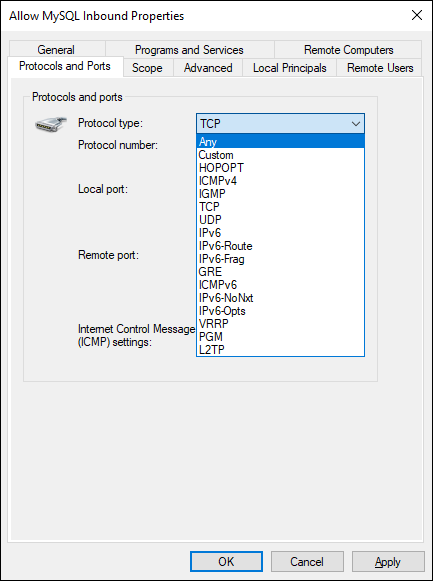
FIGURE 4-7: There are many more protocols available through this tab than there were through the wizard because I created it as a Port rule.
You could have made all these settings through the wizard if you had selected Custom instead of Port. I like to take you through the exercise of looking at the individual tabs, though, because I’ve met quite a few system administrators who don’t understand what the tabs mean or how to edit the rule properly after it’s created.
Understanding IPSec
IP Security (IPSec) is used to secure communications over an IP-based network. It’s typically set up to support and secure network-to-network, host-to-host, or host-to-network communication. For businesses that deal with sensitive information, IPSec provides a method to encrypt data while it’s in transit. There are a few terms you should understand when talking about IPSec:
- Security Association (SA): The SA is the most basic part of the IPSec connection. It’s an agreement between endpoints on how they’ll establish secure communication — everything from which cryptographical algorithm to use, which key to encrypt with, and other relevant network information. The key exchange used for IPSec follows two phases:
- Main Mode or Aggressive Mode: Also referred to as IKE Phase 1. This phase securely creates the communication channel and handles the key exchange. This negotiation sets up the SA.
- Quick Mode: Also referred to as IKE Phase 2. All subsequent key exchanges are done through Quick Mode because it’s less resource intensive on the system.
- Internet Key Exchange (IKE): IKE is used to handle negotiations and authentication for the creation of IPSec SAs.
Configuring the IPSec settings
The IPSec tunnel can be configured through the Connection Security Rules section in Windows Defender Firewall. For this section, I’m going to create a server-to-server tunnel.
- With the Advanced Settings screen open, right-click Connection Security Rules and select New Rule.
- On the Rule Type screen, select Server-to-Server and click Next.
-
On the Endpoints screen, define which endpoints will meet the criteria for the tunnel, and click Next.
I’m going to leave both of these on Any IP Address. In a production environment, you would want this to be more specific.
-
On the Requirements screen, you can select whether you want to request or require authentication, and click Next.
I’ll leave it on Request Authentication for Inbound and Outbound Connections.
-
On the Authentication Method screen, you can select Computer Certificate if you have an internal public key infrastructure (PKI) that can support this use.
I’ll click Advanced, and then click Customize.
- For this demo, I’ve elected to use NTLMv2 as my primary authentication method, with Kerberosv5 as a secondary authentication option, shown in Figure 4-8.
- Click OK.
- Click Next.
- On the Profile tab, keep Domain selected but uncheck Private and Public, and then click Next.
- On the Name page, give your IPSec tunnel a meaningful name, and then click Finish.
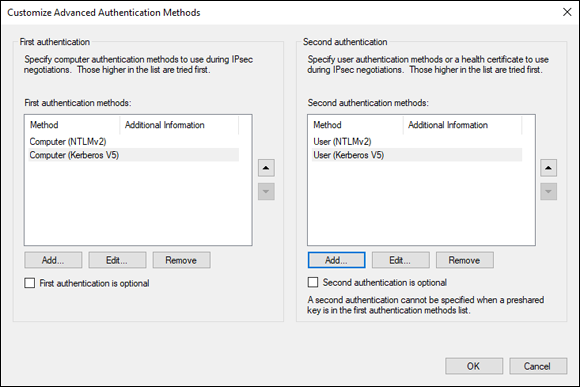
FIGURE 4-8: You can set primary and secondary authentication options for both computers and users.
Now you have the connection security rule finished. This needs to be set up on any system on which you want to use IPSec. As an example, I set it up on one of my other systems and the SA came up for it right away, as shown in Figure 4-9.
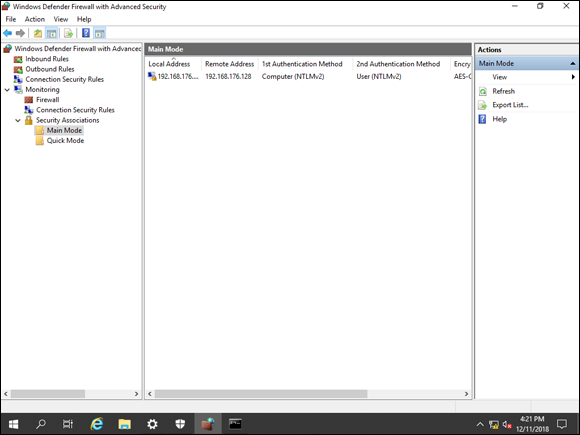
FIGURE 4-9: The SA between my two systems connected automatically after the connection security rules were set up on both systems.
 Disabling the Windows Firewall isn’t a good idea. It’s a layer of protection for your server.
 I set up the connections using NTLM and Kerberos mainly because it was the simplest way to do it for the demonstration in the book. Although this does work, certificate authentication is preferred because it proves the identity of the sender given that the sending system/user should be the only entity with the private key. With the Customize button, you have the ability to add a pre-shared key if you would like, but this is not recommended because it’s stored in plaintext.