Chapter 2
Understanding the .NET Framework
IN THIS CHAPTER
 Getting acquainted with the .NET Framework versions
Paying attention to what’s new in .NET 4.7
Viewing the contents of the Global Assembly Cache
Examining .NET Standard and .NET Core
Many people wonder why they need to understand the .NET Framework and, more important, why it’s bundled with PowerShell. Using .NET, not only can you do things in PowerShell that you wouldn’t be able to do natively, but you also can create functions and modules with the .NET code that you can reuse.
In this chapter, I explain the basics of .NET and how to interact with it. I don’t cover .NET programming — that’s a whole other book’s worth of material.
Introducing the Various Versions of .NET Framework
Before I jump into .NET versions, I want to make sure that you understand what the .NET framework actually is. A framework allows a programmer to call code instead of having to write the code each time the programmer wants the functionality. The .NET framework gives developers the code they need to write .NET applications without having to custom develop every single little piece of code themselves. .NET is integrated with PowerShell, so you can call the same snippets of .NET code that developers can from within PowerShell, either in the console or in a script. For instance, Figure 2-1 shows a piece of .NET code called from PowerShell that displays the value of pi.
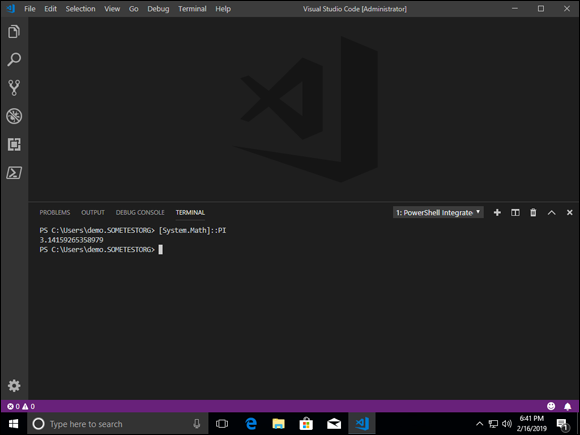
FIGURE 2-1: The .NET Framework expands the functionality of PowerShell greatly with code that can be called on the console or via script.
Each new version of the .NET Framework adds new functionality and fixes old problems. The .NET Framework follows a similar cadence to most products in that it has major and minor versions. The major releases tend to focus heavily on new features, while the minor versions add features and fix issues found in the previous releases.
As of the time of this writing, version 4.7 is the current major version, and 4.7.2 is the current minor version. The 4.7 versions shipped with Windows Server 2019; version 4.6.2 shipped with Windows Server 2016; and version 4.5.1 shipped with Windows Server 2012 R2. It’s very common to have multiple versions of the .NET Framework installed on the same system; there is usually no issue with them co-existing.
 The version of .NET you’re currently on is stored in the Windows Registry. To locate the release number, you can use the following command:
(Get-ItemProperty 'HKLM:\SOFTWARE\Microsoft\NET Framework Setup\NDP\v4\Full' -Name Release).Release
This command returns a number. Table 2-1 lists the minimum number for each major version. When I run this command on my system, for example, I get 461814. According to Table 2-1, that means that I have version 4.7.2, which is correct because the minimum value for 4.7.2 is 461808.
TABLE 2-1 .NET Versions with Release Values
|
Version |
Minimum Value |
|
.NET Framework 4.5 |
378389 |
|
.NET Framework 4.5.1 |
378675 |
|
.NET Framework 4.5.2 |
379893 |
|
.NET Framework 4.6 |
393295 |
|
.NET Framework 4.6.1 |
394254 |
|
.NET Framework 4.6.2 |
394802 |
|
.NET Framework 4.7 |
460798 |
|
.NET Framework 4.7.1 |
461308 |
|
.NET Framework 4.7.2 |
461808 |
Most of the time, you have one version of .NET installed, and that’s it. Sometimes, though, you may have a legacy application that needs an older version of .NET, and a newer application that requires a newer version of .NET. The great thing about .NET is that you can run more than one version side by side. For instance, your legacy application may need .NET 3.5, but your newer application needs .NET 4.5. You can install both versions of .NET on your system, and each application will be able to run with the version of .NET that it needs.
.NET is available in the server operating system as a feature. To install .NET, follow these steps:
- In Server Manager, choose Manage ⇒ Add Roles and Features.
- On the Before You Begin screen, click Next.
- On the Select Installation Type screen, choose Role-Based or Feature-Based Installation, and then click Next.
- On the Select Destination Server screen, click Next.
- On the Select Server Roles screen, click Next.
- On the Select Features screen, select either .NET Framework 3.5 Features (which installs .NET Framework 2.0 and 3.5) or .NET Framework 4.7, and then click Next.
- On the Confirm Installation screen, click Install.
Focusing on New Features in .NET 4.7
.NET version 4.7 introduced new features in a few key areas:
-
Core: Among the core functionality that was added in version 4.7 is increased functionality for elliptic curve cryptography (ECC) and some other improvements for cryptography in general.
Core also includes better support for control characters and is enabled by default for any application that targets .NET 4.7. It can be opted in to with applications that are using an older version of .NET.
- Networking: Developers no longer need to hard-code a Transport Layer Security (TLS) version into their applications. Instead, they can target the TLS protocols that are supported by default on the installed operating system.
- ASP.NET: ASP.NET is used to build web applications and offers three different frameworks to support that objective — Web Forms, MVC (model, views, and controllers), and Web Pages. ASP.NET got a newer feature with .NET 4.7 called Object Cache Extensibility, which allows developers to make changes to the in-memory object caching and monitoring if the default implementation does not meet their needs.
- Windows Communication Foundation (WCF): WCF allows you to send messages between your services and your clients. With .NET 4.7, WCF got the ability to configure message security settings to use the stronger TLS 1.1 and 1.2 rather than SSL 3.0 and TLS 1.0. It’s an opt-in setting so you have to go in and enable it inside of your application’s configuration file. Plus, in .NET 4.7, several changes were made to improve the reliability and stability in relation to serialization options.
- Windows Forms: Windows Forms allows you to build graphical ways for your application to interact with your users. It allows you to add controls to your forms, and to tell the application what to do when a user clicks a button. As of .NET 4.7, Windows Forms can now support high-DPI monitors. This is an opt-in feature that must be enabled within your application.
- Windows Presentation Foundation (WPF): WPF is a UI-based framework that aids in the creation of desktop applications. WPF now supports the touch/stylus stack when using WM_POINTER messages, instead of Windows Ink Services Platform. This is an opt-in feature, which you have to enable inside of your application. Printing APIs were also updated.
Viewing the Global Assembly Cache
Before I dive into the Global Assembly Cache (GAC), you may be wondering what it is. The GAC is responsible for storing assemblies that are shared by multiple applications on a computer. The assembly, at its most basic definition, is an executable of some kind. It contains all the code that will be run and serves as the boundary for the application. Many assemblies are installed when .NET is installed on your system.
.NET Framework versions 4 and up store their assemblies in %windir%\Microsoft.NET\assembly. The %windir% is a placeholder for the Windows directory, which is typically located at C:\Windows.
Viewing the assemblies in the GAC is done using a tool called gacutil.exe. This tool is a part of the Developer Command Prompt for Visual Studio so you need to install Visual Studio on your system if you want to play with the GAC on your system. Visual Studio IDE Community is the free version and does include the Developer Command Prompt. Figure 2-2 gives you an idea of what the GAC looks like when you view the assemblies. I've typed the following command:
gacutil.exe -l
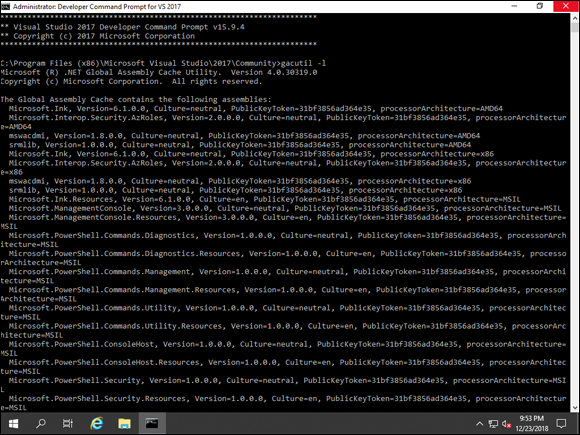
FIGURE 2-2: You can view the contents of the GAC with the Developer Command Prompt.
This command lists all the assemblies within the GAC.
Understanding assembly security
Because the GAC lives in the Windows folder, it inherits the permissions of the Windows folder. In many cases, you may want to tighten the permissions on the GAC directories so that only administrators can delete assemblies. If someone deletes an assembly that the system or an application relies on to function properly, that application will no longer work.
Identifying the two types of assembly privacy
Two types of assemblies make up the .NET presence on your system:
- Private: Private assemblies are deployed with an application and can only be used by that application. Think of them like the children on the playground who won't share.
- Shared: Shared assemblies are available to be used by multiple applications on your system. They’re stored in the
WinSXSfolder and are installed via Windows Update and Windows Installer packages.
Viewing assembly properties
In older versions of the Windows Server operating system, you could simply right-click an assembly to get all the properties of the file. That function was removed several operating system versions ago. Now if you need to get information on the assembly file, your best bet will be to go through PowerShell. Say that I want to view the version information on the accessibility.dll that is in use. This is the command that I would need to run:
[Reflection.AssemblyName]::GetAssemblyName('C:\Windows\Microsoft.NET\Framework\v4.0.30319\accessibility.dll').Version
After I've run this command I’m presented with the major, minor, build, and revision numbers, as shown in Figure 2-3.
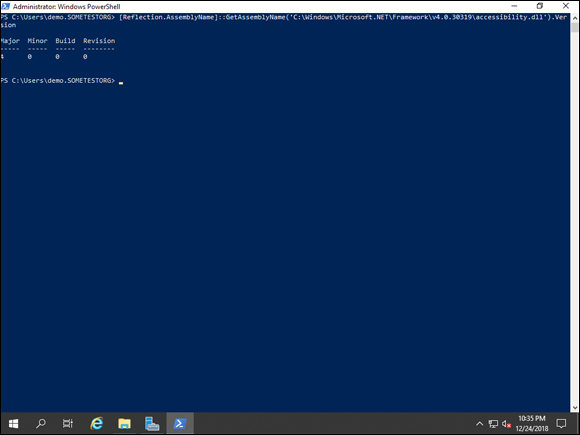
FIGURE 2-3: You need to use PowerShell to view the assembly properties in Windows Server 2019.
Understanding .NET Standard and .NET Core
The .NET Framework has been a staple for many years, but newer frameworks are gaining in popularity.
.NET Core
.NET Core is one of the newest members of the .NET Framework family. It’s open source and it can be run on Windows, Linux, and macOS. With .NET Core, you can build applications that are cross-platform. If your application is developed with .NET Core, then only .NET Core applications will be compatible — you won’t be able to support Xamarin or the classic .NET Framework. .NET Core is an implementation of the specifications that are set in the .NET Standard.
You may wonder why you would use .NET Core if it isn’t compatible with the other runtimes. There are a couple good reasons:
- You can develop .NET Core on Windows, Linux, or macOS.
- If you’re coding for a mobile application, .NET Core is optimized for mobile work.
.NET Standard
.NET Standard is a set of APIs that all the .NET frameworks must support. This includes .NET Core, Xamarin, and the classic .NET Framework. It’s important to note that .NET Standard is a specification, not a framework. It’s used to build libraries that can be used across all your .NET implementations, including the traditional .NET Framework, the newer .NET Core, and Xamarin.
Tying it all together: .NET and PowerShell
PowerShell Core 6.0 uses the newer .NET Core as its runtime. This means that you can now run PowerShell on Windows, Linux, and macOS. PowerShell Core also enables you to take advantage of all the awesome .NET Core APIs in your commands and scripts, which really extends the utility and capabilities of your scripts. You can start working with PowerShell Core without impacting your current installation of PowerShell because both PowerShell and PowerShell Core can be run side-by-side. PowerShell Core is available for download from the PowerShell repo on GitHub at https://github.com/PowerShell/PowerShell/releases.