Chapter 4
Virtual Storage
IN THIS CHAPTER
 Looking at disk formats
 Identifying types of disks
 Adding storage to the host
 Adding storage to the virtual machine
After you build your virtual machine (VM) and your networking is set up, the next thing most system administrators will look at is storage for the application that’s going to be installed on the VM. There are multiple reasons for this:
- You don’t want to install applications on the operating system (OS) drive.
- The application may have very strict size and/or performance requirements for its storage.
This chapter discusses how to add storage to both the Hyper-V host and the VMs that reside on the Hyper-V host. Here, you learn about the different types of disks and the disk formats as well.
Understanding Virtual Disk Formats
There are two disk formats to be aware of when you start talking about virtual disks: VHD and VHDX. Each format has pros and cons that you should consider before you decide which one you want to use:
- VHD: VHD was the original disk format. It’s supported by Generation 1 VMs, and by Azure Infrastructure as a Service (IaaS) offerings. A VHD can be a maximum of 2TB in size. To change the size of the disk, you have to power down the VM it’s attached to. In most cases, you’ll want to use a VHDX format unless you need to do the following:
- Use the drive with a Generation 1 VM (legacy hardware support). Generation 2 VMs don’t support VHD.
- Move the VM to Azure.
- VHDX: VHDX is the newer disk format available. It’s supported by both Generation 1 and Generation 2 VMs and can reach a maximum of 64TB in size. You can change the storage size of a VHDX file while a VM is powered on, which is a huge win for a mission-critical system running on a VM.
Considering Types of Disks
There are four different types of disks used in Hyper-V: fixed, dynamic, differencing, and pass-through. Each has a use case that makes the most sense. When you try to create a disk, you may not see all these options in the menu to choose from.
VHDs in Hyper-V are created as a file that lives in a location that you determine. They may be located locally on your Hyper-V host, or they may be located on a shared volume on network storage.
Fixed
A fixed disk is similar to your standard traditional hard drive. If you provision a 60GB hard drive, then the file for your VM will be a full 60GB. This disk choice offers the best performance, but it can lead to a lot of wasted space because it can’t be shrunk down after it’s created. Fixed disks are also referred to as thick provisioning.
Dynamic
A dynamic disk can save on space. You may have an application that says it requires 200GB for storage. If you provision a dynamic disk, the OS and the application will see a 200GB disk. The actual disk file will be much smaller — the size of the actual data. For instance, if you’re only using 30GB of a 200GB dynamic disk, then the size of the disk file will be 30GB. The performance is not as good as a fixed disk, and you have to be careful to not overprovision the storage available to the VMs on the Hyper-V host. Dynamic disks are also referred to as thin provisioning.
Differencing
Differencing disks are different from your traditional VHD/VHDX disks. A differencing disk is a dynamic disk that is tied to a parent disk. The disk that is tied to the parent disk is known as a child disk. Child disks store changes that are made to the parent disks. This makes them excellent for troubleshooting but can make it easy to overprovision storage because they’re using dynamic disks.
Pass-through
Pass-through disks are not VHDs. These are physical drives that are attached to the Hyper-V host and then passed through to the VM. Using pass-through disks also allows you to take advantage of physical network storage that is connected to a Hyper-V host. This enables you to maximize the benefit you receive from an expensive physical storage array in your virtual environment. Plus, it can simplify backups and restores, because the data is stored in its native NTFS format.
Adding Storage to the Host
Adding storage to a Hyper-V host is a common administrative task. The Hyper-V host is typically storing the VM configuration files and the VM’s disk files on local storage, unless you have it configured to save them on network storage of some kind.
Adding the storage to the Hyper-V host is similar to adding storage to any Windows 2019 Server. Let’s create two 50GB drives and add them to the host. Then I’ll show you how to change the default save location for the virtual hard disks and the VMs.
Adding the drives
Before you can add the drives to the server for use, they must be installed. After they’ve been installed, you can go into Server Manager and initialize them.
Follow these steps:
- From Server Manager, click File and Storage Services.
- Click Disks.
-
Right-click the first disk that says Offline, and click Bring Online, as shown in Figure 4-1.
You get a dialog box warning about data loss if the disk is in use elsewhere.
- Click Yes.
- Right-click the disk again and choose Initialize.
- On the Initialize Disk warning box that appears, click Yes.
- Right-click the disk again and choose New Volume.
- On the Before You Begin screen, click Next.
- Select the disk you brought online and initialized and click Next.
- On the Specify the Size of the Volume screen, click Next.
- On the Assign to a Drive Letter or Folder screen, click Next.
- On the Select File System Settings screen, click Next.
- On the Confirm Selections screen, click Create.
- After the disk has been created, click Close.
- Repeat steps 3 through 14 for the second offline disk.
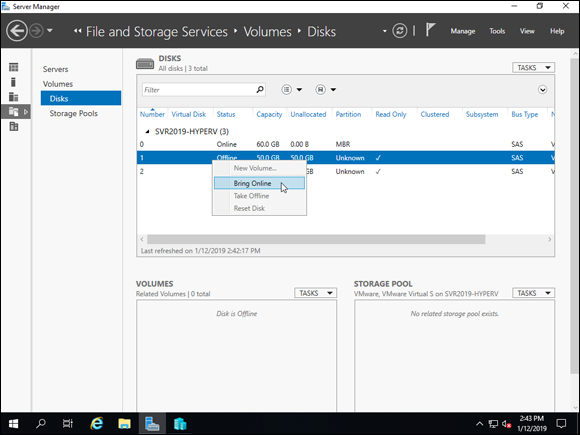
FIGURE 4-1: After the disks are installed, they must be brought online and initialized.
At this point, your screen should look similar to Figure 4-2, with all three disks showing online and partitioned.
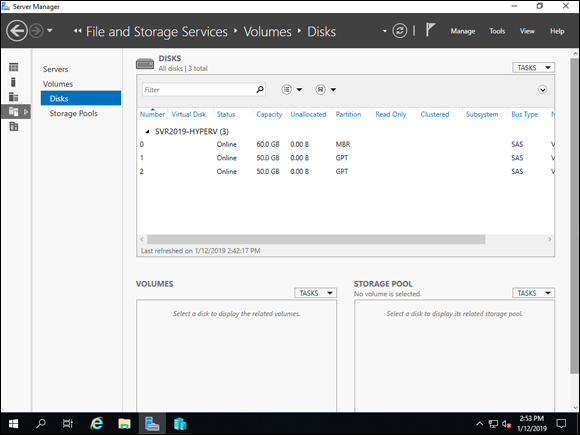
FIGURE 4-2: With the storage added to the server, initialized, and formatted, it’s ready for use.
Changing the default save locations of virtual disk files
After you have the new storage added to the Hyper-V host, you can use it for all kinds of things. One of the most common reasons to add storage is to create save locations for the VMs and for the virtual disk files.
Follow these steps to change the default save locations for both VMs and virtual disks:
-
From Hyper-V Manager, right-click the Hyper-V host and choose Hyper-V Settings.
Virtual Hard Disks is selected by default, so let’s change that one first.
- Click Browse and select one of the new drives you added earlier.
-
Click Select Folder.
The new location will appear in the box, as shown in Figure 4-3.
- Click Apply.
- Click Virtual Machines, underneath Virtual Hard Disks.
- Select Browse and choose the other drive that was added earlier.
- Click Select Folder.
- Click Apply, and then click OK.
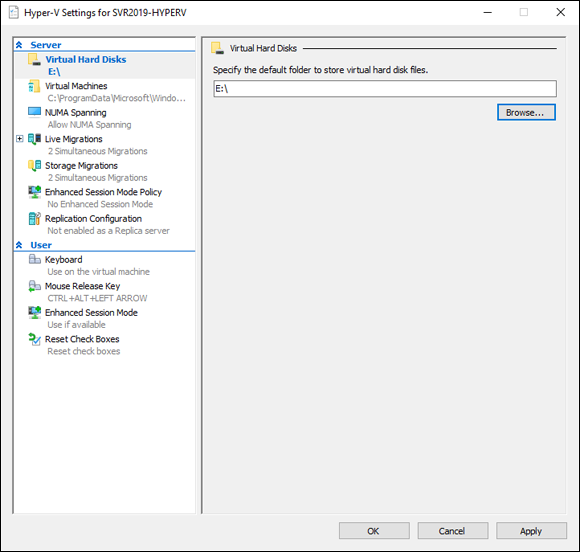
FIGURE 4-3: The default save location for my virtual hard disks is now the E:\ drive.
This does not change VMs that were previously created. They would need to be moved to the new locations via storage migration (see Chapter 5 of this minibook).
Adding Storage to the Virtual Machine
Adding storage to a VM is an everyday event for a system administrator. Sometimes you need to expand a virtual drive; other times, you need to add additional virtual drives.
Adding a new virtual drive
With a Generation 1 VM, you're given a choice between a VHD- or VHDX-formatted drive. If you have a Generation 2 VM, you don’t have a choice — it can only be a VHDX-formatted drive — so you’re asked what type of drive you want to create rather than what format you want to use.
Because the wizards are a little different for the two generations of VMs, I’ve included the instructions for each.
Adding a disk to a Generation 1 virtual machine
With the Generation 1 VM, you need to make a decision as to what kind of disk you want to create. If you’re going to move the VM to Azure, you need to select the VHD format; otherwise, you can typically choose the VHDX format. Follow these steps:
-
Right-click the VM and click Settings.
You have an IDE controller and a SCSI controller. You can use either one. I’m going to use the IDE controller because my other hard drive is using it (this is for tidiness — you can mix and match controllers).
-
Select the IDE controller and choose Hard Drive and then click Add (see Figure 4-4).
The virtual hard disk button will be selected.
- Click New.
- On the Before You Begin screen, click Next.
-
On the Choose Disk Format screen, choose the format you want and click Next.
I’ll select VHDX.
- On the Choose Disk Type screen, select Dynamically Expanding, and then click Next.
- On the Specify Name and Location screen, you can name the disk whatever you would like.
- If you changed the default location in the earlier section of the chapter, that will show here. Change it if needed, and then click Next.
-
On the Configure Disk screen, select Create a New Blank Virtual Hard Disk and change the size to whatever you want; then click Next.
On the last page of the wizard, you’re given a summary of your selections.
- If everything looks correct, click Finish.
- On the VM Settings page, click OK.
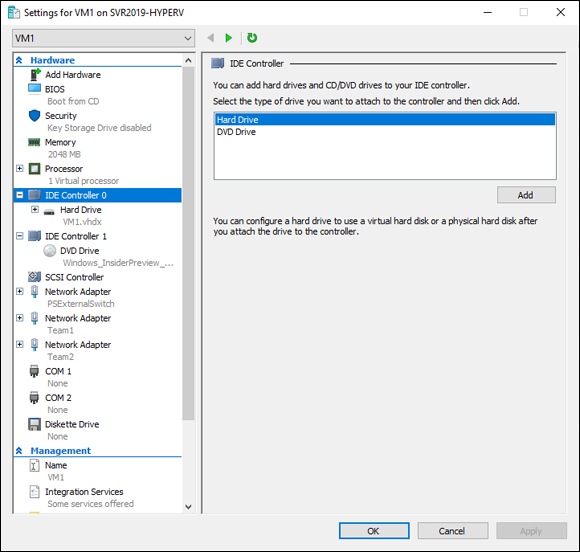
FIGURE 4-4: Creating a disk in a Generation 1 VM gives you the option of an IDE controller or a SCSI controller.
Adding a disk to a Generation 2 virtual machine
The Generation 2 VM does not have the IDE controller as an option, so you’ll select the SCSI controller when you create this hard drive (unless you have a Fibre Channel Adapter). Follow these steps:
- Right-click the VM and click Settings.
-
Select the SCSI controller, select Hard Drive, and click Add.
Virtual Hard Disk will be selected.
- Click New.
- On the Before You Begin screen, click Next.
- On the Choose Disk Type screen, select Dynamically Expanding, and click Next.
- On the Specify Name and Location screen, name your disk and either accept the default location for the disk or choose another location; then click Next.
- On the Configure Disk screen, select Create a New Blank Virtual Hard Disk, set the desired size, and click Next.
- On the final summary page, verify that the settings are correct, and then click Finish.
- Back on the VM Settings screen, click OK.
Expanding a disk drive
If you want to expand a VHDX file, you can do it while the VM is running. This is one of the great things about VHDX-formatted disks. If you’re using a VHD-formatted disk, you need to power down the VM to expand it. Follow these steps:
- Right-click the VM and click Settings.
- Select the hard drive you want to expand and click Edit, as shown in Figure 4-5.
- On the Locate Virtual Hard Disk screen, click Next.
- On the Choose Action screen, select Expand, and then click Next.
- On the Expand Virtual Hard Disk screen, set the desired size, and then click Next.
- On the summary page, verify that the settings look correct, and then click Finish.
- Back on the VM Settings screen, click OK.
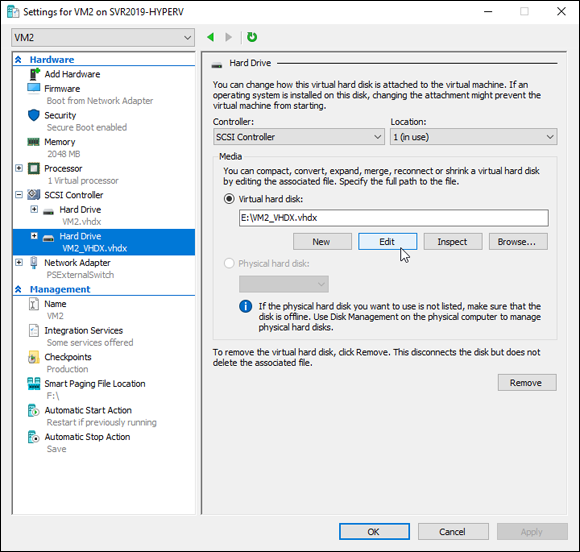
FIGURE 4-5: Expanding a disk is done by selecting Edit when the hard drive is selected.
Adding a pass-through disk
For the VM to see the pass-through disk, it must be offline on the host. If it isn’t offline, it won’t show up as an available disk. You can verify that there is an offline disk available for you by checking the Disks area of File and Storage Services in Server Manager, as shown in Figure 4-6.
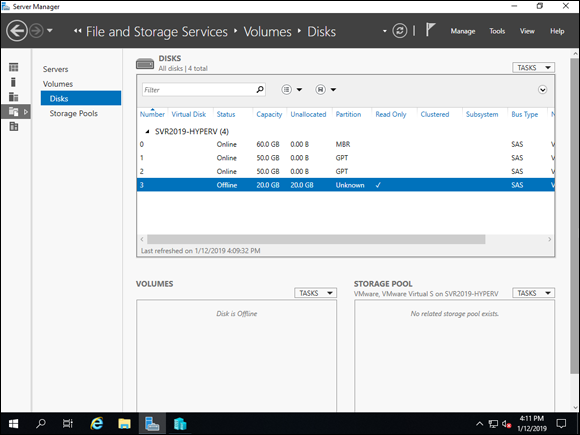
FIGURE 4-6: You need to verify that you have an available disk that is showing as offline. You can do this from Server Manager.
After you’ve verified that you do have an available offline disk, open Hyper-V Manager and follow these steps:
- Right-click the VM you want to add the disk to and click Settings.
-
Select SCSI controller and then Hard Drive, and then click Add.
Virtual Hard Disk is selected by default.
-
Select Physical Hard Disk, as shown in Figure 4-7.
If there is no hard drive listed, ensure that the disk shows offline on the Hyper-V host.
- Click Apply, and then click OK.
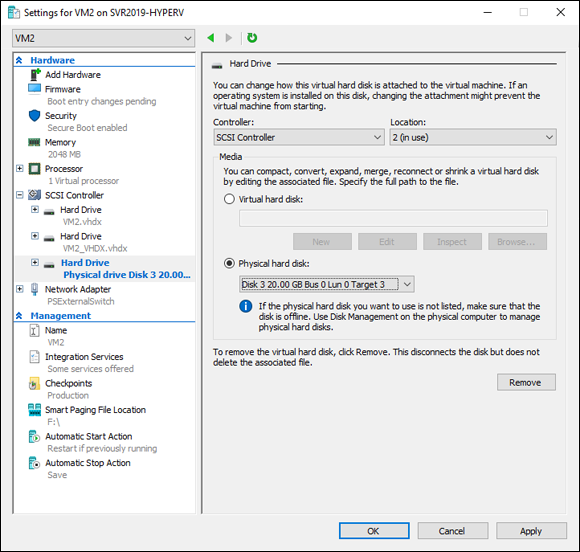
FIGURE 4-7: When you select physical hard disk, the offline disk that was added to the Hyper-V host will show as available.
Converting a VHD disk file to a VHDX disk file
The day may come when you need to convert your VHD disk file to a VHDX disk file. You may have reached the 2TB limit, or maybe you want the improved resiliency against power outages. Or you may want to upgrade to a Generation 2 VM. Whatever the case, you can convert the file through the graphical user interface (GUI) or through PowerShell. In this section, I walk you through both methods.
Converting through the graphical user interface
When you do the conversion through the GUI, you start out in the VM Settings screen and you select the hard drive in question. Follow these steps:
- With the hard drive selected that you want to convert, click Edit.
- On the Locate Virtual Hard Disk screen, click Next.
- On the Choose Action screen, click Convert, and then click Next.
- On the Convert Virtual Hard Disk screen, select VHDX, and then click Next.
- Keep Dynamic selected (unless it’s a fixed disk, in which case keep Fixed selected), and then click Next.
- On the next screen, you don’t need to choose a new storage location unless you want to do so.
-
Specify the name of the converted disk and click Next.
You can leave it the same — you just need to specify
.vhdxas the file extension. - On the summary screen, click Finish.
Converting with PowerShell
The disk conversion through PowerShell is a simple command. The command is similar to the following:
Convert-VHD -Path E:\ConvertPS.vhd -DestinationPath E:\ConvertPS.vhdx
In Figure 4-8, you can see that I have the VHD file in my E: drive. I run the preceding command, and then I have the VHDX file. That’s all there is to it.
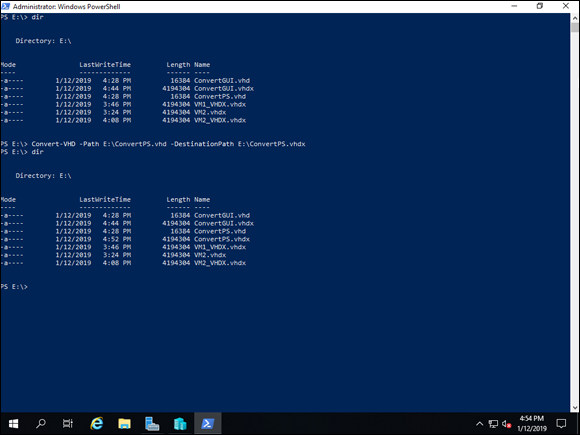
FIGURE 4-8: Converting a VHD file to a VHDX file in PowerShell involves far fewer steps than it does through the GUI.
Attaching the converted drive to the virtual machine
The converted disk drive does not get attached automatically to the VM. You have to specify that you want the VM to use the VHDX file after the conversion is complete. This process is similar to creating a new hard drive, except instead of clicking New or Edit, you click Browse and select the VHDX file. After you select it and click OK, the converted VHDX file will then be attached to the VM.